
After you've installed the JumpCloud Agent on your devices and they are reporting to JumpCloud, they will appear on the devices list in the Admin Portal. From the devices list, you can take bulk actions to require MFA, or drill into a specific device's details and add and apply policies, run commands, or change a device's group associations.
Viewing the Devices Overview
Activity
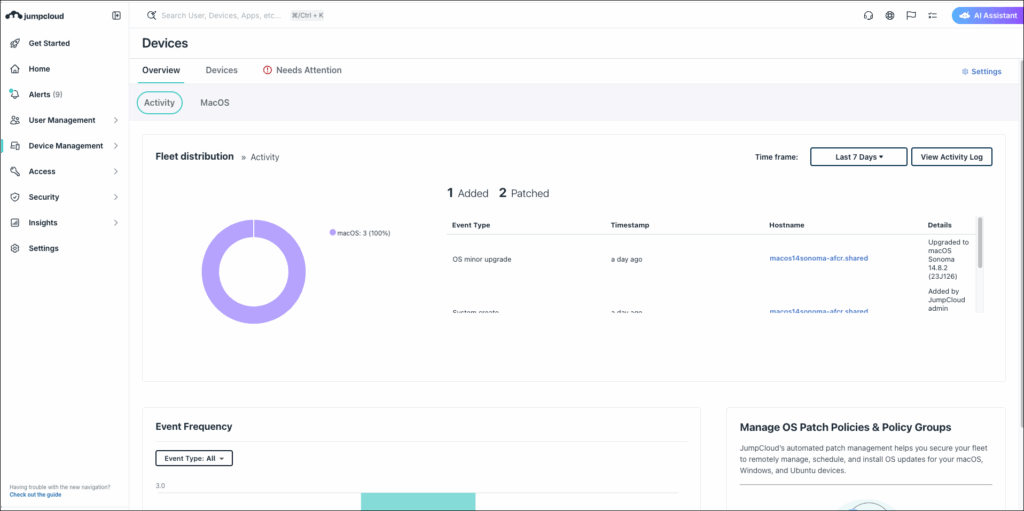
- Quickly view fleet distribution across your entire org, or view the release train details for macOS and Windows.
- See View Your OS Distribution to learn more.
Changing Device Settings

You can access Device Settings by clicking Settings in the top right corner of either the Overview or Devices tab.
Set Devices List as Default Page
Under Default Devices Page, select Devices List to set the Devices tab as the default page when landing on the Device Management > Devices page. Select Overview to set the Device Overview tab as the default page.
Password Sync
By default, any new users associated to devices have their JumpCloud password synced to their device password. Toggle this Off to disable password sync and instead have users enter a local password to log into their device. See Device Password Sync to learn more.
Self-Service Account Provisioning
Enable users to provision their JumpCloud account to devices from the login window. You can toggle this for macOS and Windows devices independently. You can also select the permission level of users added to devices (standard or administrator/sudo). See Provision New Users on Device Login to learn more.
Viewing the Devices List
Find your Devices list by navigating to Device Management > Devices in the Admin Portal and clicking the Devices tab.
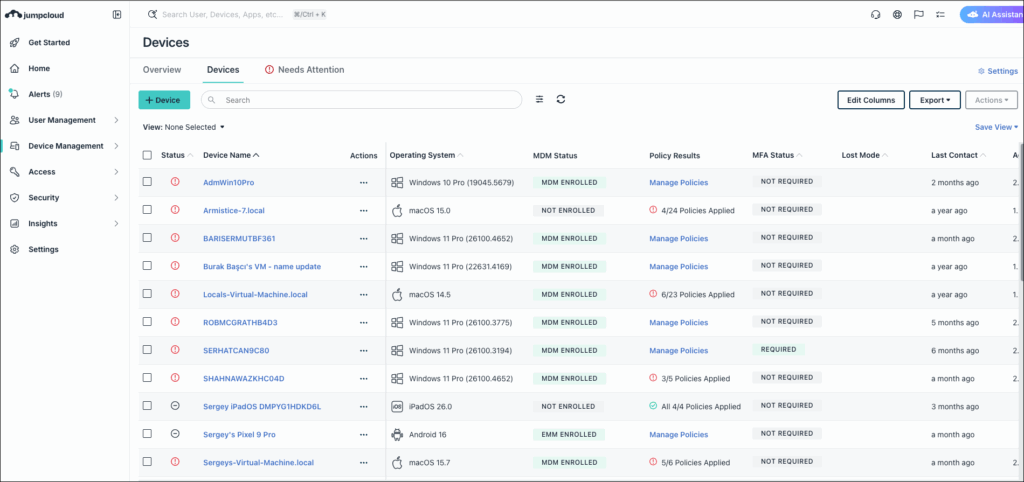
Device Alerts
The Device Alerts section notifies you if there are any issues present for any of your devices. Click on the issue to open more details about it. From here you can either click on the device name to be taken to the Device's Details page, or take Action directly from the Alerts page.
Adding a Device
To add a new device from the devices list, click ( + Device). See Add a Device to learn more.
Searching for a Device
Using the Search bar:
- If there’s a specific device you’re interested in viewing, enter one of the device's attributes in the search bar.
- You can search for the following terms:
- Amazon Instance ID
- Architecture
- Description
- Device Name
- Host Name
- JumpCloud System ID (exact value)
- MDM Device ID (exact value)
- OS
- OS Family
- OS Version
- Remote IP
- Serial Number
- You can search for the following terms:
- When you’re done with your search, click ( x ) in the search bar to clear it.
Using the Filters:

- Click the three line filter icon to narrow search results by Operating System, Device Status, Disk Encryption Status, MDM status, and/or MFA Requirement.
- Click Add Advanced Filter for even more filtering options including Agent Version, Created Date, Last Contact, Service Account Status, and System Insights Status.
- To remove a filter, click Clear All > Apply, or Cancel.
- To remove an Advanced Filter, click the trash icon next to the filter, and Apply.
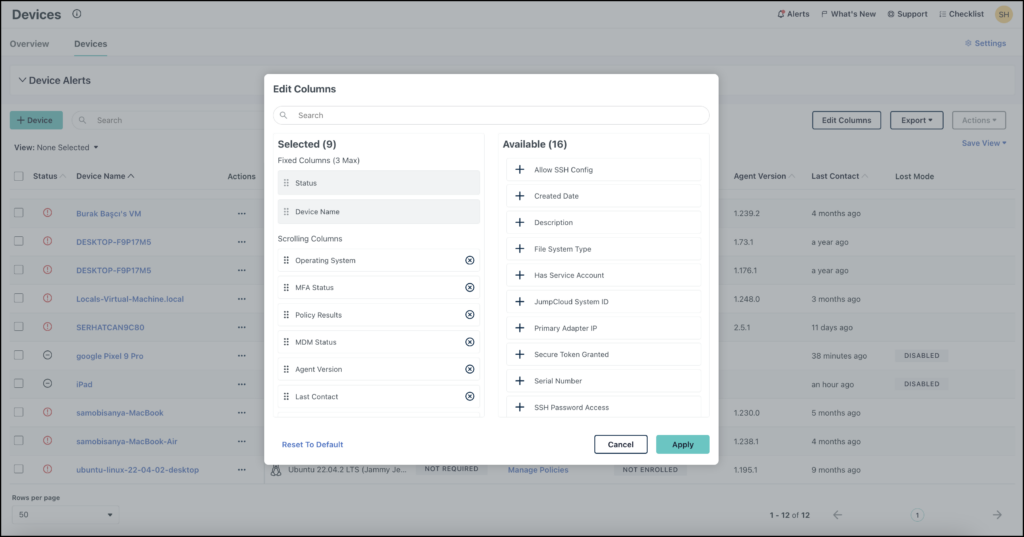
Column Management
You can customize what columns are displayed in your Device List. The list has two (up to three) fixed columns on the left side. Status and Device Name will always be fixed, but you can add one more from the Available list into this column. You can also add additional scrollable columns, and drag and drop these to appear in whichever order you’d like to see first from left to right. The default scrolling columns are Operating System, MDM Status, MFA Status, Lost Mode, Policy Results, Last Contact, and Agent Version.
To customize the devices list view:
- Click Edit Columns.
- The Selected column shows you all of the current columns in order.
- To add a new column, under Available, click the ( + ) next to the column. This moves the column to the Selected list.
- To reorder any of the columns, under Selected, drag and drop the column to where you want it to appear in the Devices list from left to right.
- To make one more column fixed to the left of the list, add it to the Selected list, then drag it up to the Fixed Columns section at the top.
- To remove a column, click the ( x ) next to the name of it.
- Once you're done customizing, click Apply.
- If you want to revert back to the default columns, click Reset To Default.
Exporting the Devices List
To receive all of your device information for audits, compliance, or troubleshooting reports, you can export current Device list views, which can be customized by adjusting which columns are displayed. You can also individually select specific devices to export, or simply export all columns available for all devices.
To export data:
- Click Export, then select which option you want from the dropdown.
- For customized column data, click Current View (JSON) or Current View (CSV) depending on which format you need.
- For a full report of all data available, click All Data (JSON) or All Data (CSV) depending on which format you need.
- If you want to export data for specific devices, select the devices from the list before clicking any of the Export options.
- Files are saved as jcDevicelist_yyyymmdd.<filetype>.
Running the Users to Devices Report
You can generate a report of all user attributes and device associations for each user.
To run the users to devices report:
- Click Export, then Run Users To Devices Report.
- Stored reports are available for download 7 days after their creation timestamp.
- See JumpCloud Reports to learn more.
Actions Menu
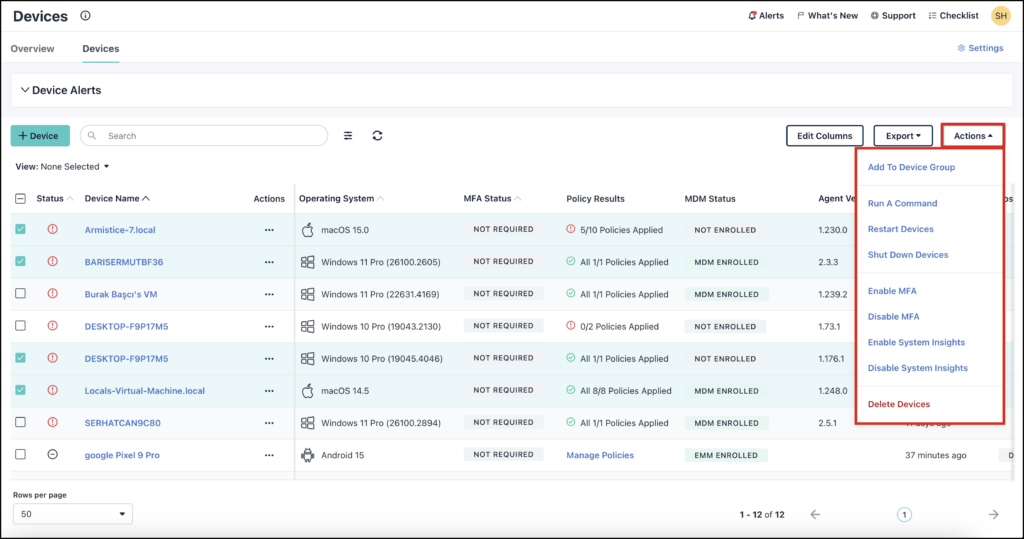
The Actions dropdown menu lets you apply actions on a single, or multiple devices from the devices list at once:
- Add to Device Group: You can add devices to an existing device group, or create a new one from here. See Get Started: Groups to learn more.
- Run A Command: Run a command through a streamlined commands modal, or create a new command from here. See Get Started: Commands to learn more.
- Restart Device: Security command; you're prompted to confirm you want to restart the device.
- Shut Down: Security command; you're prompted to confirm you want to shut down the device.
- Enable/Disable MFA: When MFA is enabled, users who have TOTP or Push set up will be prompted to authenticate upon login.
- Enable/Disable System Insights: View device activity within System Insights.
- Delete Devices: You're asked to confirm the number of devices you want to delete.
- Enable/Disable Lost Mode - Place a company-owned, supervised device in lost mode if it is lost or stolen. See Enable Lost Mode on Mobile Devices to learn more.
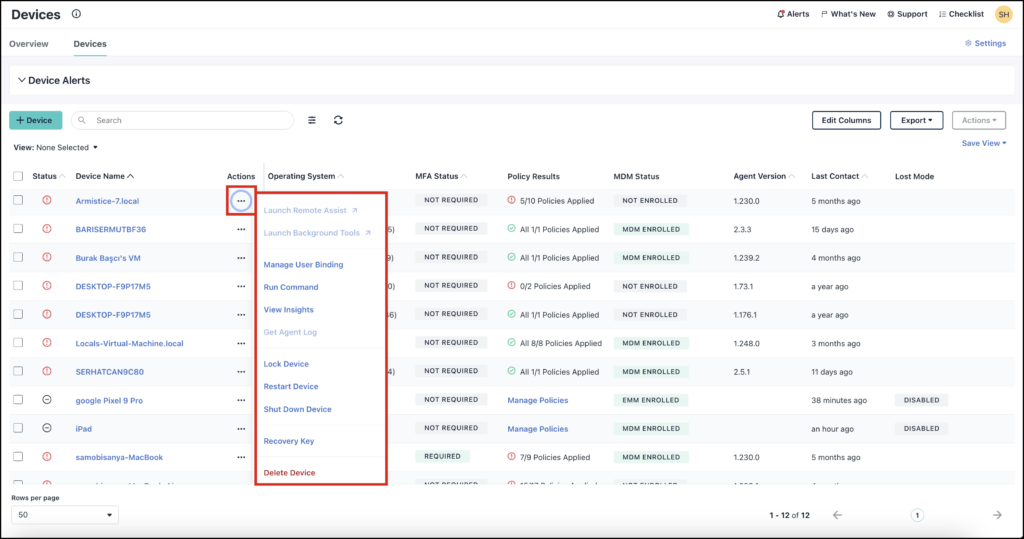
You can also click on the three dot menu next to the name of the device to apply actions to a single device.
- Launch Remote Assist: see Get Started: Remote Assist to learn more
- Launch Background Tools: see Get Started: Background Tools and Remote File Manager to learn more
- Manage User Binding: see Bind Users to Devices to learn more
- Run Command: see Get Started: Commands to learn more
- View Insights: see Get Started: Directory Insights to learn more
- Get Agent Log: See information about the agent.
- Lock Device: Remotely lock the device.
- Restart Device: Remotely restart the device.
- Shut Down Device: Remotely shut down the device.
- Recovery Key: Access your recovery key.
- Delete Device: Delete the device.
Views
You can customize your device list view to show you exactly what you need, and how you prefer it to be displayed. Then, you can save these views for quick access any time you need, without having to reconfigure it again.
To create a saved view:
- Customize the view you want using columns and filters, then click Save View.
- Enter a name for the view, and then select if you want to make the view private, otherwise all Admins in this org will have access to this view.
- You can also select to make the new saved view your default view every time you log in and go to the Device list page.
- Click Save.
- To edit the view, make your changes to the columns or filters, then click Save View > Apply Changes To This View.
- You'll be shown the Unchanged Filters, Added Filters, and Removed Filters before you click Save.
- To see all your different views, click the View dropdown on the left. Your Saved Views will appear here, along with five Quick View options that are provided by JumpCloud.
- You can also quickly edit or delete any Saved Views by clicking the pencil icon to edit the Name or viewing permissions, or the trash icon to delete the view.
Deleting Devices
Select the devices you want to delete, then click Actions > Delete Devices. You're asked to confirm the number of devices you want to delete before proceeding.
![]()
Deleting an active device will uninstall the JumpCloud Agent and permanently remove all device data and associations. This action cannot be reversed.
Individual Device Details
From the Devices list page, click on a specific device to view that individual device's details. The device name (display name), Primary User information, OS, and Serial Number are displayed at the top of the page. A summary of each tab is presented below; the tabs vary depending on device type.
Highlights Tab
![]()
The names in the Device Name column of the devices list correspond with the Device Name field in the device's Highlights tab. The Device Name is captured when the JumpCloud Agent is installed on a device. The Device Name is not dynamically updated after that initial capture, but this field is editable, so you can change the Device Name of a device at any time.
On the device's Insights > System and Hardware tab, you will find Hostname listed under System Info. The hostname is updated dynamically at regular intervals, and you will see a Hostname updated within two hours after a change locally on a device, presuming the device remains online. There is not a mechanism for forcing an immediate Hostname update in the JumpCloud Admin Portal at this time.
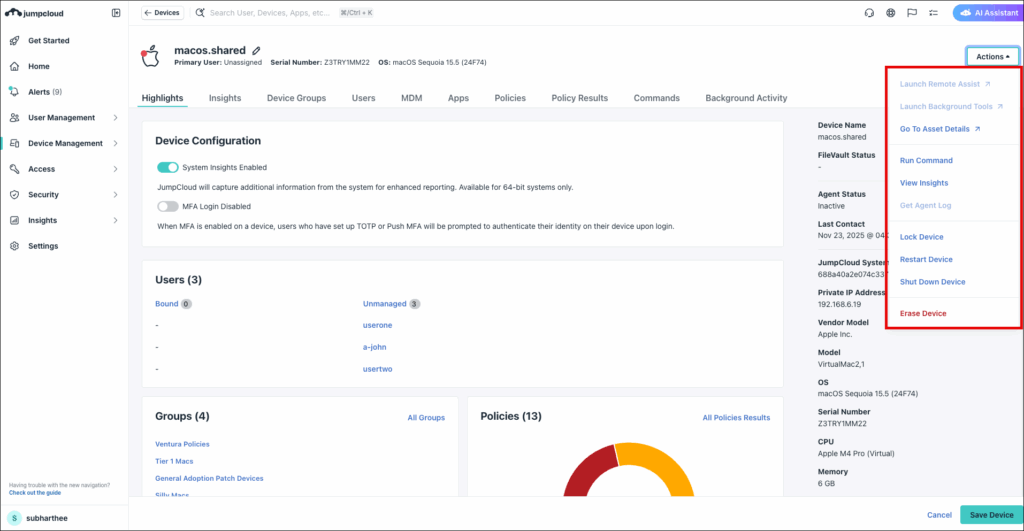
The Highlights tab provides a Device Overview with information about the individual device like its OS version, serial number, IP address, agent status, last contact and more. In the top right corner, the quick Actions menu allows you to apply any of the following actions to the device; Start Remote Assist, Launch Background Access, Run Command, View Insights, Lock Device, Restart Device, Shut Down, Erase Device and Get Agent Log.
![]()
Click Get Agent Log to download up to 1MB in agent logs to help troubleshoot agent issues. Agent logs can only be retrieved if the device is online, and it may take a few minutes to retrieve results.
For macOS devices with Full Disk Encryption, access the Recovery Key by clicking view key.
Under Device Configuration, you can enable or disable System Insights, and MFA Login. See Get Started: System Insights, and Get Started: MFA to learn more.
The Users, Device Groups, and Policies sections show those respective bindings for the device.
The Device Activity section shows a table of Events, Resource/Status, and Timestamp for events that have occurred on the device. Click activity log to see more details; Directory Insights customers are directed to the Directory Insights activity log with the Device filter applied for the device they are viewing. Customers without Directory Insights can add this feature by contacting their Account Manager. See Add a Device to learn more.
Insights Tab

From the Insights tab, you can click on the following tabs to get more information about the system; Summary, System And Hardware, Operating System, Software, Network, and Local Users And Groups. Each tab has their own subsections that you can easily navigate to using the table of contents on the right hand side. See Get Started: System Insights to learn more about the data that's collected and reported.
Device Attributes
You can create and store custom attributes for your devices to use as criteria when building dynamic device groups. Attribute field names must be unique.
To add a custom attribute to a device:
- From the Insights tab, click the Summary subtab.
- Under Custom Attributes, enter an Attribute Name and Attribute Value.
- Click Add Attribute.
- Click Save.
You can now use this custom attribute when configuring a dynamic device group. See Configure Dynamic Device Groups to learn more.
SSH Settings
Configure SSH Settings for Linux devices. See Configure SSH Settings to learn more.
Device Groups Tab

From the Device Groups tab, you can add the device to or remove the device from device groups. The default device groups list view shows all device groups configured in JumpCloud. The selected device groups are ones where the device is currently bound.
Select the device groups you want to add the device to or clear the device groups you want to remove the device from and click save device.
Select show bound device groups (n) to only display a list of the device groups to which the device is bound.
See Create a Device Group to learn more.
Users Tab

From the Users tab, you can bind users to or unbind users from the device. The default users list view shows only users who are currently bound to the device. Clear the Show bound users (n) selection to view all users in your org. Select the users you want to bind to the device and click Save Device. See Bind Users to Devices to learn more.
Primary and Standard Users
To designate a device's owner in JumpCloud, you can assign a directly bound user as the primary user. Other users who are bound to the device are automatically marked as standard users. Both primary and standard users have the same account access on the device, but the primary user is explicitly marked as the device's owner.
- Primary User: The workstation owner or main user of the device. This user must be directly bound to the device and not via a User Group.
- Standard User: Another user who has local account access on the device. These additional users have the same device level access as primary users, but are not the primary owner of a device.
To assign a primary user: In the User Type column, click Standard, then select Primary.
![]()
- Setting primary or standard users does not affect sudo/admin permissions on the device; it solely indicates device ownership. See Set Sudo/Admin Permissions to learn more.
- Devices enrolled by users through Self-Service Account Provisioning or Automated Device Enrollment will automatically have that user assigned as the primary user.
- To automate assigning directly bound users as primary users on their devices, reference Automate Device Primary User Assignment with PowerShell.
MDM Tab
Applies to Apple MDM-enrolled devices only.
- MDM Enrollment Info: See MDM enrollment status, MDM provider, and by whom the device was enrolled.
- Activation Lock: View information related to the Activation Lock feature. See Create a Mac or iOS Activation Lock Policy for information on using this feature.
- Device Activity: Shows a table listing the Timestamp, Event Type, and Status of commands run on the device via MDM.
- OS Updates: See current OS version, versions available, and when the device last scanned for updates. You can also schedule device updates from here.
EMM Tab
Applies to Android Enterprise Mobility Management (EMM)-enrolled devices only.
- EMM Enrollment Info: View Management Mode, Enrollment Type, Ownership, and other information.
- Device State: View device settings and security posture information.
See Add and Manage Android Devices to learn more.
Apps Tab

The Apps tab shows a list of the JumpCloud-managed applications that are on the device. If you want to add an app, see Get Started: Software Management to learn more. Click on an app to edit it.
Policies Tab

From the Policies tab, you can apply policies to or remove policies from the device. The default policies list view shows the policies that are currently bound to the device.
Clear the show bound policies (n) selection to view all policies. Select the policies you want to apply to the device and click save device.
See Get Started: Policies to learn more.
Policy Results Tab
If policies have been applied to the device, you can click view to see individual status reports for each policy from the policy results list.
Commands Tab

The Commands tab displays all commands that are bound to the device. You can also click Run Command to run any of the commands on the device from this page instead of having to navigate to the Commands page to run them. You can also click the Recent Commands dropdown at the top of the page to see a list of the last five commands that were run on the device.