
Admins can use JumpCloud to remotely enroll, track, and manage Android mobile devices. These devices can be company owned or personal devices. After you enroll a device in JumpCloud’s Android Enterprise Mobility Management (EMM), you can keep company resources, data, and apps secure.
Prerequisites:
- These types of Android devices are supported:
- Android 5.1 (Lollipop) and later for employee-owned, personal devices.
- Android 8.0 (Oreo) and later for company-owned, personally enabled devices used for work and personal use.
- Your enterprise is registered with JumpCloud Android EMM. See Set Up Android EMM to learn more.
- End-user network connectivity must be available to add devices.
- Connectivity to Google services is also required. See Google’s support documentation Android Enterprise Network Requirements to learn more.
Considerations:
- Android devices should be encrypted before proceeding with the enrollment process. If devices aren't encrypted, there may be additional steps to complete the enrollment process.
Determining Enrollment Type
After you register your enterprise, choose the appropriate EMM enrollment method for each type of device. JumpCloud currently supports these ownership and enrollment types:
- Company-owned devices - The Admin or the end user can set up company-owned devices according to how they will be used. Organizations can also enforce device-wide policies (for example, configure WiFi settings, block USB file transfers) and restrictions that apply only to a device's personal data like disallowing certain apps.
- Admin Enrolled - You can enable and enroll these types of company-owned devices in the JumpCloud Admin Portal:
- Work Profile - The end user can access company data, apps, and policies that are stored in the work profile, which is a separate encrypted container on the device. The work profile keeps personal data separate and safe from corporate data on these mixed use devices.
- Fully Managed - The device is used exclusively for work.
- Dedicated - This subset of fully managed devices is used only for simple workflows. The devices are often used for a kiosk and can perform tasks like printing a ticket or managing inventory.
- User Enrolled - The Admin enables user enrollment of a corporate device. The end user then enrolls the device via the JumpCloud User Portal.
- Admin Enrolled - You can enable and enroll these types of company-owned devices in the JumpCloud Admin Portal:
- Personal devices - Personal devices are owned by the employee. The Admin enables user enrollment of a device owned by an employee, and the user enrolls the device via the User Portal. An employee's org has full management control of the apps, data, and settings in the device's work profile, but has no visibility or access to the device's personal profile. This distinct separation gives enterprises control over corporate data and security without compromising employee privacy.
| Enrollment Method | Company-owned Android device | Personal Android device |
|---|---|---|
| Admin Enrolled, Admin Managed | ✔️ | ❌ |
| Admin Enrolled, User Managed | ✔️ | ❌ |
| User Enrolled, User Managed | ❌ | ✔️ |
Managing Enrollment Tokens
Before adding Android devices to your EMM instance, create enrollment tokens that will be used to enroll those devices.
Adding Enrollment Tokens
To create a new enrollment token:
- Log in to the JumpCloud Admin Portal.
![]()
If your data is stored outside of the US, check which login URL you should be using depending on your region. If your organization uses LDAP, RADIUS, or requires firewall allow list configuration, the Fully Qualified Domain Names (FQDNs) will also be region specific. See JumpCloud Data Centers for the URLs, FQDNs, and IP addresses.
- Go to Device Management > MDM, then select the Google tab.
- Under Android Install, click Create Enrollment Token.

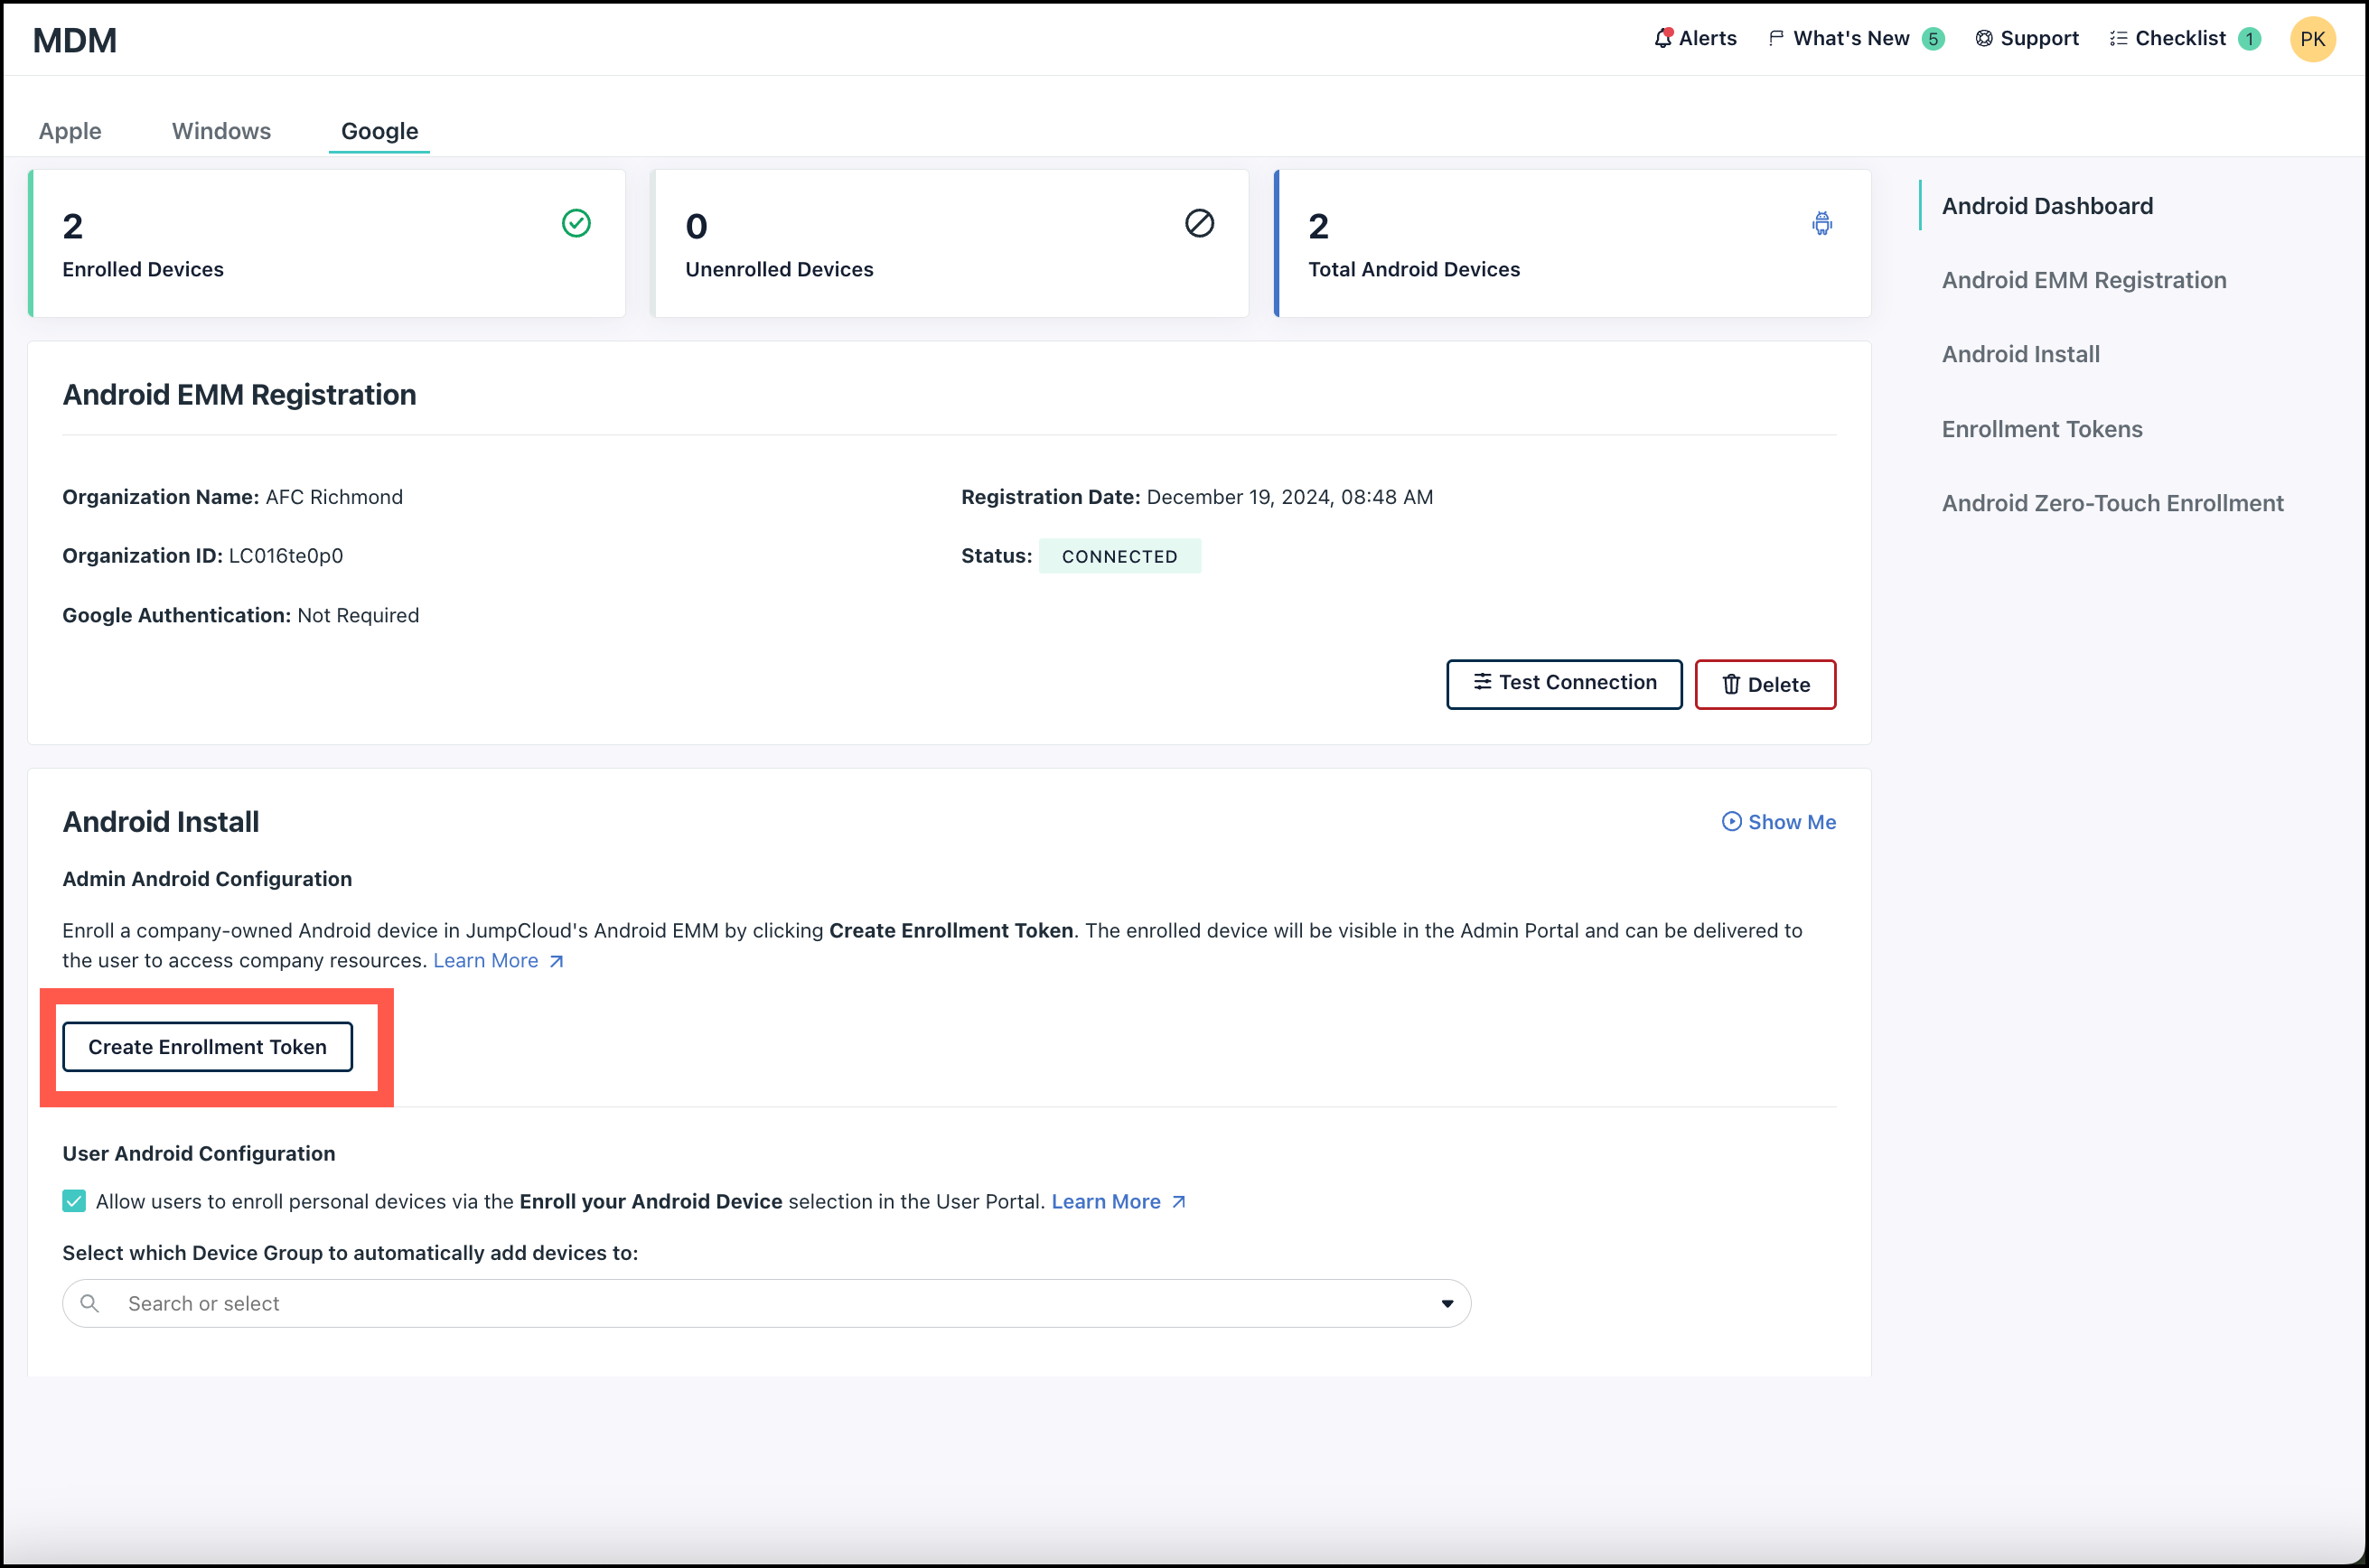
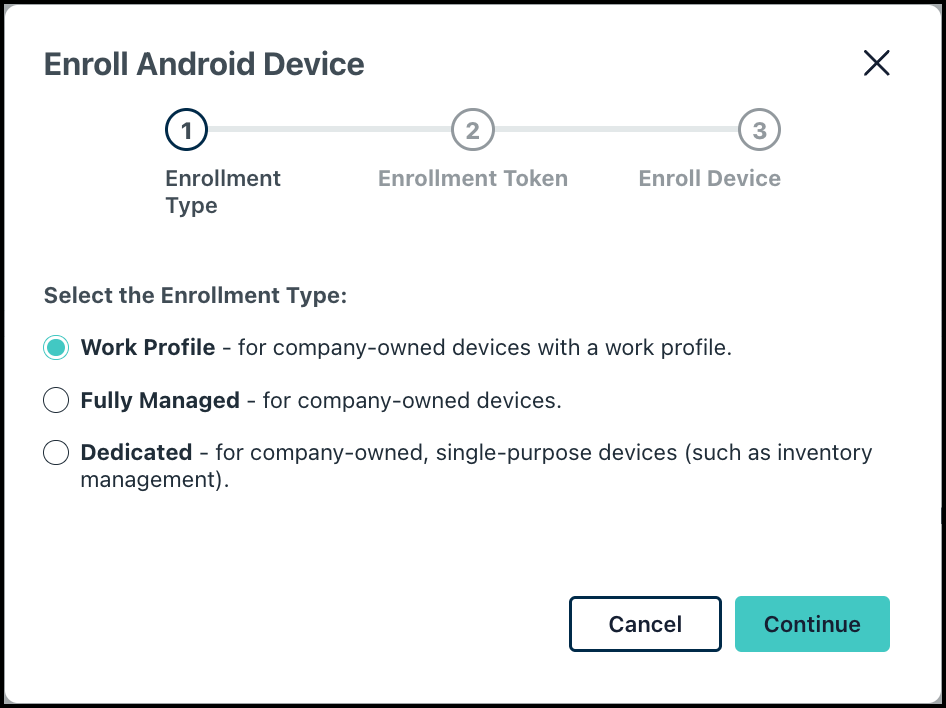
- Select an enrollment type, then click Continue.

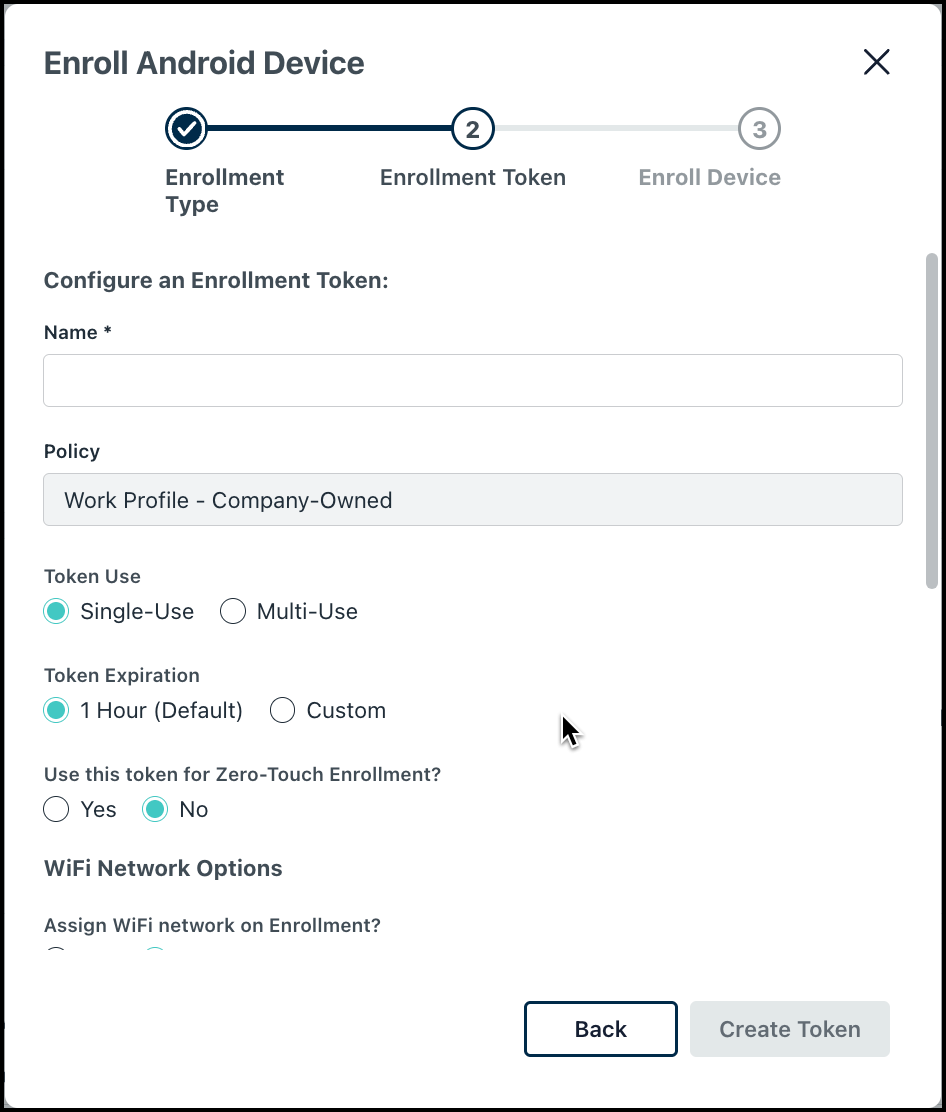
- In the Enroll Android Device editor, configure the enrollment token:

- Name (required): Assign a name to the token so that it is identifiable to you.
- Policy: Pre-filled based on the enrollment type selected previously.
- Token Use: Choose whether the token will be Single-Use (individual) or Multi-Use (batch).
- Token Expiration: Choose the duration for which the token will be valid. The default is 1 Hour. If Custom, configure the following:
- Expires in: Enter a value that represents the length of time the enrollment token will be valid, from 1 to 10,000.
- Duration: Select from Minutes, Hours, Days, or Years.
- Use this token for Zero-Touch Enrollment?: Select whether the enrollment token will be used to enroll zero-touch devices. To follow the steps for zero-touch enrollment, see Configure Zero-Touch Enrollment for Android.
- Assign WiFi network on Enrollment?: If this is not a zero-touch enrollment token, you can configure WiFi settings for the device.
- Network Name (SSID): Enter a name or Service Set Identifier (SSID) for the WiFi network.
- Hidden Network: Select this option to connect to a WiFi network that is not broadcasting its SSID.
- Security Type: Determine the access protocol for the WiFi network. Some options will require a password. Choose one of these options:
- None – If selected, the Password field does not appear.
- WEP-PSK – The Wired Equivalent Privacy Pre-Shared Key (WEP-PSK) protocol authenticates users on a WiFi connection. These passphrases support only 40-bit (10-digit) or 104-bit (26-digit). Selecting this field makes the Password field appear.
- WPA-PSK – The WiFi Protected Access Pre-Shared Key (WPA-PSK) protocol authenticates users on a WiFi connection. The keys used by WPA are 256-bit, making it more secure than WEP. This selection applies to versions that are WPA, WPA2, and WPA3. Selecting this field makes the Password field appear.
- Password: If you selected WEP-PSK or WPA-PSK as the Security Type, enter the WiFi password.
- Select Enable system apps to leave all system apps enabled on the device.
- Select Use mobile network for provisioning to allow provisioning using mobile data.
- Select Allow offline provisioning to allow enrollment of devices in completely closed networks.
- Select Keep screen on (Android 13+) to prevent devices running Android 13 or later from automatically dimming or turning off during provisioning.
- Select Skip education screens to skip introductory screens during the provisioning process.
- Under Language, select a language to specify the provisioning locale from the drop-down.
- Under Time Zone, select the device time zone from the drop-down.
- Click Create Token.
Viewing or Removing Enrollment Tokens
The Enrollment Tokens table lists your enrollment tokens in a single location. View at-a-glance information about your existing enrollment tokens, such as Name, Enrollment Type, Expiration, and Token Use.
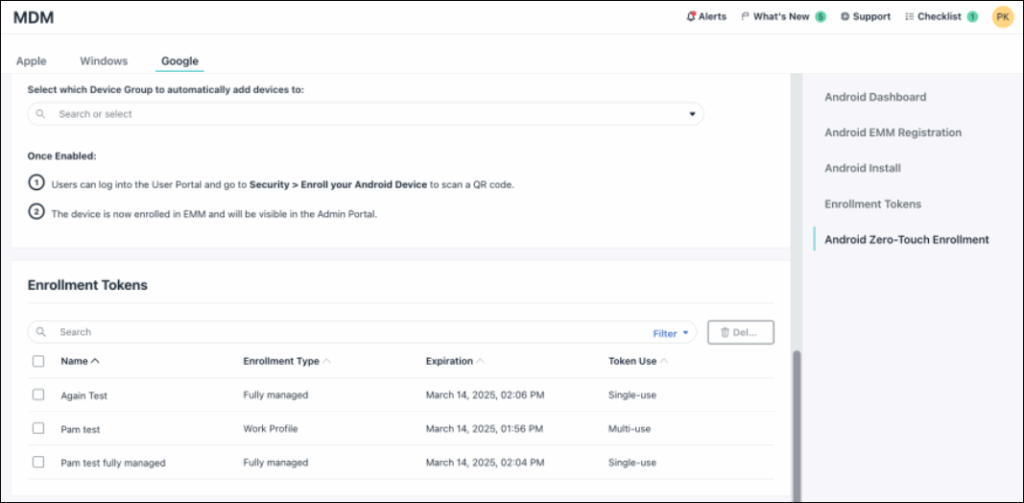
To delete an enrollment token, select the checkbox next to the token you want to delete, and click Delete.
Enrolling Devices
Enrolling a Company-Owned Android Device
If you are handing the device over to the employee, have the device handy because you’ll scan a QR code and set the device up first. If you do not have access to the company-owned Android device, you can also email the direct link to the user to scan and enroll.
To enroll a company-owned Android device:
- Log in to the JumpCloud Admin Portal.
![]()
If your data is stored outside of the US, check which login URL you should be using depending on your region. If your organization uses LDAP, RADIUS, or requires firewall allow list configuration, the Fully Qualified Domain Names (FQDNs) will also be region specific. See JumpCloud Data Centers for the URLs, FQDNs, and IP addresses.
- Go to Device Management > Devices, then click the Devices tab.
- Click (+ Device), then select the Android tab.
- Under Admin Android Configuration, click Create Enrollment Token and select the enrollment type for the company-owned device, then click Continue.
- Configure the enrollment token. Jump to Adding Enrollment Tokens for information on the configuration settings.
- Click Create Token. An Enroll Your Company-Owned Android Device screen appears.

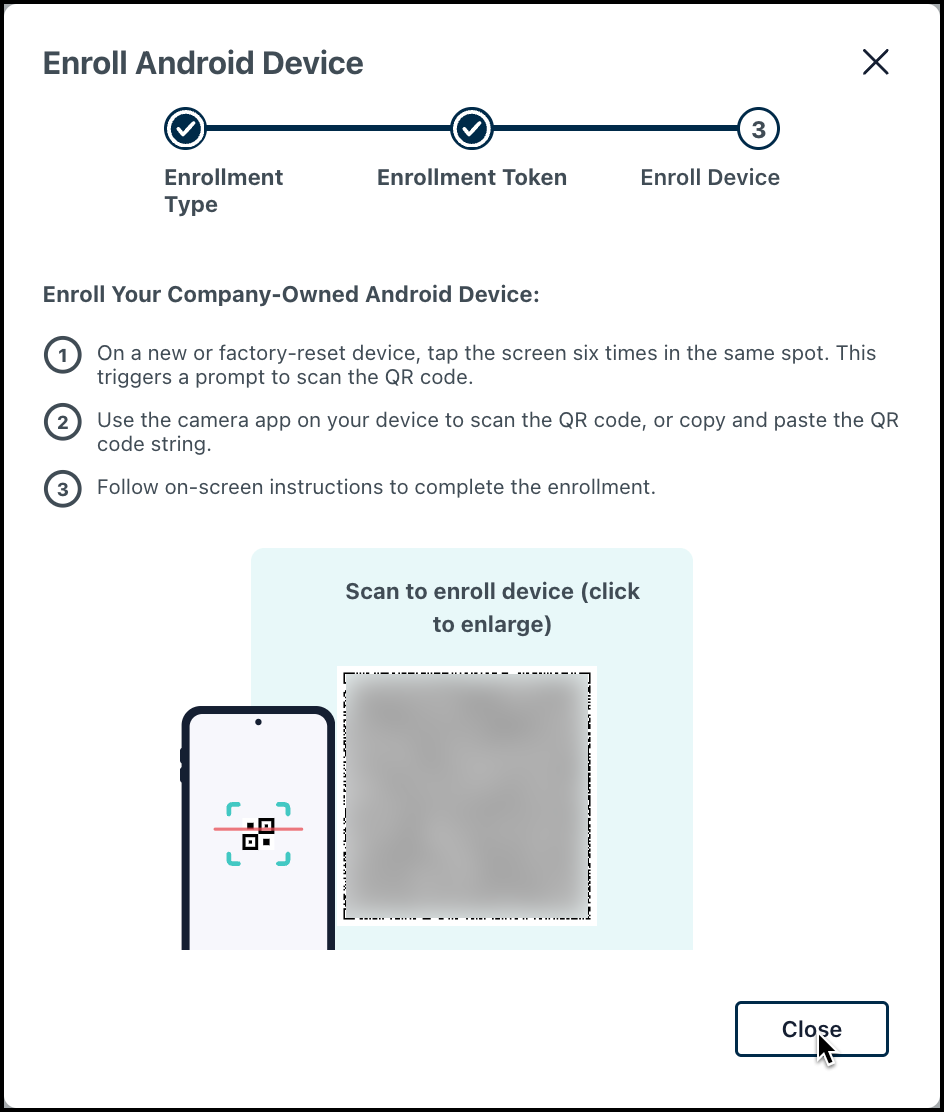
- On the new or factory-reset (if using existing) device, tap the screen six times in the same spot to trigger a prompt to scan the QR code.
- Scan the QR code in the Admin Portal with the company-owned device. If QR scanning is not possible, manually enter the enrollment token to proceed.
- Authentication screens may appear if Authenticate Using Google is enabled. See Configuring Device Authentication to learn more about this setting.
- If the company-owned device fails to enroll, use the DPC identifier method:
- Connect the device to WiFi.
- When prompted to sign in, enter afw#setup which manually downloads Android Device Policy.
- Scan the QR code or manually enter the enrollment token to continue provisioning the device.
- On the mobile device, tap ACCEPT & CONTINUE and follow the on-screen instructions to create a work profile.


![]()
Your screens might look slightly different, depending on the Android OEM (for example, Google, Samsung, LG, or Huawei).
- After the device updates and registers the profile, the work profile appears. This action might take a few minutes.

- Verify that the device appears in the Admin Portal by going to Device Management > Devices, clicking the Devices tab, and checking the device’s status:
 Active - The device is enrolled and is under JumpCloud management.
 Inactive - The device is not currently reporting or was manually disabled.

![]()
If the device doesn't appear, ensure that you have network connectivity and repeat the enrollment steps.
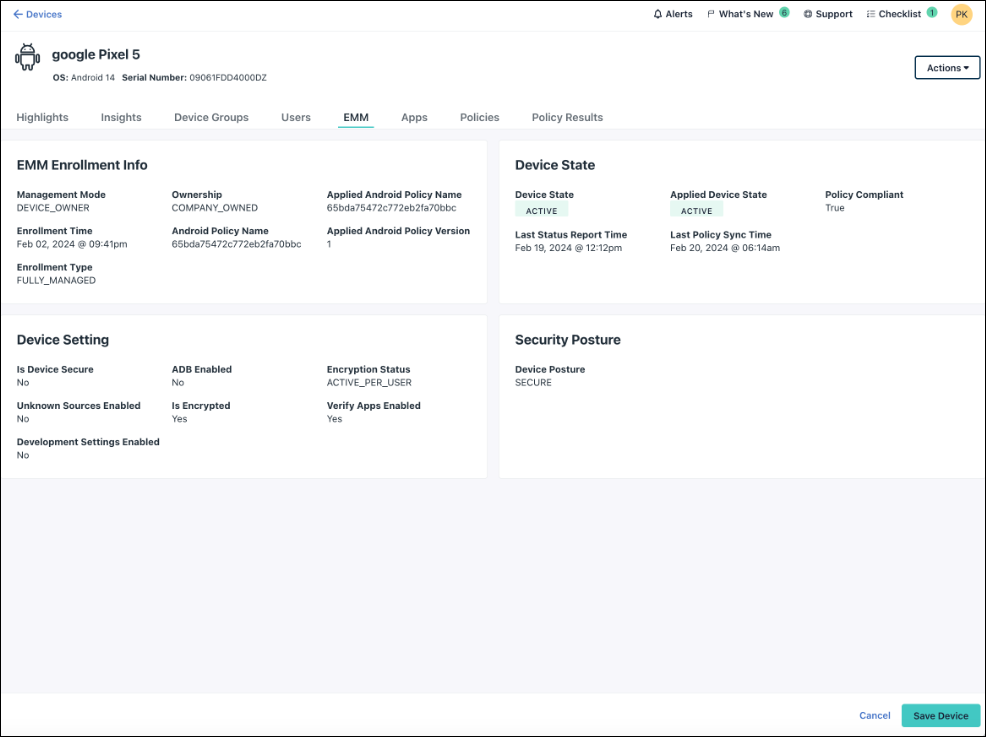
- Verify that the device was enrolled in EMM:
- In the Devices tab, select the device that you just enrolled.
- Select the EMM tab to view enrollment details.

- (Optional) Bind the device to a device group by selecting the Device Groups tab, selecting the checkbox next to an existing group, and clicking save device. Device groups help you pool together devices for policy enforcement and user account provisioning. See Get Started: Device Groups to learn more.
- (Optional) To enforce additional device security, create a policy in the Policies tab and apply it to your devices. See Configure an Android Passcode Policy and Create an Android Runtime Permissions Policy to learn more. Additional Android policies can control Location Services, VPN Restrictions, Application-based Restrictions, Bluetooth Restrictions, Device Restrictions, Account Restrictions, and more. See Configure Settings for Android Policies to learn more.
- Click Save Device if any configuration changes were made.
- Deliver the enrolled device to the user.
Enrolling a Personal Android Device
As the Admin, you have to enable personal device enrollment before an employee can enroll a personal Android device. Users should be in a private, secure environment before they scan the QR code.
To enable a personal Android device:
- Log in to the JumpCloud Admin Portal.
![]()
If your data is stored outside of the US, check which login URL you should be using depending on your region. If your organization uses LDAP, RADIUS, or requires firewall allow list configuration, the Fully Qualified Domain Names (FQDNs) will also be region specific. See JumpCloud Data Centers for the URLs, FQDNs, and IP addresses.
- Go to Device Management > Devices, then click the Devices tab.
- Click (+ Device), then select the Android tab.
![]()
You can also add devices by going to Device Management > MDM, then selecting the Google tab.
- In the New Device panel, enable enrollment for personal devices by going to User Android Configuration and selecting Allow users to enroll personal mobile devices and access Enroll Your Android Device in the User Portal.
- Click Select the Device Group to choose a device group where this device will automatically be enrolled.
![]()
You can't delete the default Android device group that you choose here. To change the default group, assign the enrolled devices to another device group, and then delete it.
![]()
If the default device group you select is configured to update group membership dynamically, ensure that the group’s membership rules are compatible with the devices you’re expecting to auto-enroll. See Configure Dynamic Device Groups for more information.
- Click save.
- After you enable a personal Android device to be able to access company data, instruct the user to follow the instructions in Users: Enroll a Personal Android Device to scan the QR code and enroll the device.
- After the user finishes Step 7, verify that the device was enrolled:
- Go to Device Management > Devices.
- Click the Devices tab, then select the Android device.
- Select the EMM tab and check that the device is enrolled.
- (Optional) Apply a policy to provide additional device security:
- Passcode - Enforce a device passcode for the device itself, and a passcode to access corporate applications and data within the work profile. See Create an Android Passcode Policy to learn more.
- Runtime Permissions - Set a default response to runtime permission requests that are made by Android work apps. See Create an Android Runtime Permissions Policy to learn more.
- Custom Payload - Control the behavior of a managed device and the apps installed on it by providing JSON content to create a custom policy. See Create an Android Custom Payload Policy to learn more.
- Additional Android policies can control Location Services, VPN Restrictions, Application-based Restrictions, Bluetooth Restrictions, Device Restrictions, Account Restrictions, WiFi Restrictions, Battery Mode, and more. See Configure Settings for Android Policies to learn more.
 Managing Devices
You can view details about each Android device, and view which device groups, users, apps, and policies are applied to the device.
To manage Android devices:
- Log in to the JumpCloud Admin Portal.
![]()
If your data is stored outside of the US, check which login URL you should be using depending on your region. If your organization uses LDAP, RADIUS, or requires firewall allow list configuration, the Fully Qualified Domain Names (FQDNs) will also be region specific. See JumpCloud Data Centers for the URLs, FQDNs, and IP addresses.
- Go to Device Management > Devices.
- Click the Devices tab and review the list of Android devices. You can filter how device info is displayed and perform additional actions:
- Click the Operating System column to reorder the devices by OS type or click the horizontal three line filter icon next to the search bar and click Android > Apply to only view Android devices.
- After you select at least one device, click Actions to enable MFA or System Insights on multiple devices.
- You can’t remove a device’s status and name from the Devices list, but you can customize the other columns to show only the information you want to see. For example, instead of showing Last Contact, click the columns down arrow and choose Serial Number or another column name. You can select up to eight columns.
- Select a device and click Insights to view more info, such as OS version, serial number, model, and storage usage.
- (Optional) Bind a device to a device group:
- Select a device, then select the Device Groups tab.
- Bind the device to a device group by selecting the checkbox next to an existing group. If you have not yet created a device group, see Getting Started: Device Groups to learn more.
- Click Save Device.
- (Optional) Add a security policy to a device to make it more secure by selecting the Policies tab and assigning a policy to the device. If you have not created Android policies yet, see Configure Settings for Android Policies to learn more.
- (Optional) If needed, you can remotely execute these management commands from the Actions menu of a device by selecting the device in the Devices tab:


- Reset Passcode - Click Reset Passcode to create a new passcode, which must have a minimum of 8 alphanumeric characters and include at least one special character. You must enter the new passcode, then click Save. For devices enrolled with a work profile, the passcode that is reset is the work profile passcode.
- Lock Device - Click Lock Device to remotely lock a lost Android device, then click Yes, Lock. For devices enrolled with a work profile, the work profile passcode is locked and the container will remain locked until the end user enters the Work Profile passcode.
- Enable Lost Mode - Click Enable Lost Mode to place the device in lost mode if it is lost or stolen. Configure external messaging to be displayed on the lock screen. See Enable Lost Mode on Mobile Devices.
- Restart Device - Click Restart Device to immediately restart this Android device. Any unsaved work on the device will be lost.
- Note: This action is supported on fully managed or dedicated devices running Android 7.0 (API level 24) or later.
- Erase Device or Remove Work Profile - Depending on the type of device, one of these buttons is visible:
- Erase Device - Click Erase to permanently remove all data from this corporate-owned device. The device will be reset to factory settings and you’ll no longer manage the device. If you’re troubleshooting an issue, erase the device only after trying other solutions. To manage this device in the future, the end user must re-enroll the device and enter pre-defined security information.
- Remove Work Profile - Click Remove to permanently delete the work profile on a personal Android device. This deletes all company data, apps, and policies in the work profile. To use this personal device to access company information in the future, you’ll need to re-enroll the device.
![]()
The Erase Device command might be delayed if the device is turned off, does not have network connectivity, or the end user has not attempted to enter the work profile. As soon as the end user attempts to access a work profile that has been flagged to be erased, the device’s work profile will be erased.