
JumpCloud's reporting feature allows Admins to collect essential data about their organization's users and devices, and utilize it for compliance, governance, and security.
Key Features
- Improved Reporting UI: Updated UI with a list of reports instead of a dropdown, enabling you to add new columns to existing reports, export report data, and filter report results before export.
- Enhanced Search Capabilities: Search improvements provide faster data retrieval, automated query refinement, and improved overall performance.
- Expanded Search Operators: Search capabilities are more flexible, with support for advanced operators tailored to attributes types (for example not_equals, contains, starts_with, is_null). These search operators improve the precision of data queries, and can be saved as part of custom reports.
- Saved Reports: Save customized reports for reuse. When generating a report, you can save any filters, column selections, or search operators applied as a custom report, allowing you to quickly re-run the report later with the same settings.
- Scheduled Reports: Automate reports generation and delivery as required. When scheduling a report, you can select the cadence, start and end date, notification channels, output format, etc. allowing you to automate the process as required. See Scheduling a Report to learn more.
- Report History: Scheduled reports will appear in this tab after every run.
Types of Available Reports
Available reports include:
- Users to Devices: Returns all user attributes and device associations for each user.
- Users to Directories: Returns all user attributes and associations to directories for each user.
- Users to LDAP: Returns all user attributes and associations to LDAP resources for each user.
- Users to RADIUS Server: Returns all user attributes and associations to RADIUS Servers for each user.
- User to SSO Applications: Returns all user attributes and SSO application associations for each user.
- Users to User Groups: Tracks membership of user groups data, which can be used for troubleshooting and compliance purposes.
![]()
This feature is in Private Preview. Features in preview are continuing to evolve. If you don’t see it, contact your Account Manager to enable it.
User Group Rules: Tracks all rules set up for user groups showing what criteria define automatic group membership.
- Browser Patch Management Policy: Troubleshoots any related browser issues with users' devices and provides evidence during compliance audits regarding users' devices and their current browser versions.
- OS Patch Management Policy: Provides a clear view of each user's device status relative to the OS policies that they have deployed.
- OS Version: Returns information related to the OS version installed on devices, including the current version of the installed OS, the OS build (Windows only), device status, and installation date.
- Software Inventory: Returns information related to the software installed on your device, including software name, the device name where it is deployed, when the software was last opened, and dates when software was installed or updated.
![]()
If the same software is installed on multiple devices, one row of information will display for each software and device combination.
- Command Results: Track executed commands and command results on user devices.
- Device Security: Return information related to the security status of user devices to ensure minimum security requirements are met.
- Device Inventory: Track and maintain a complete record of all device specifications and utilization patterns to enhance resource allocation and device efficiency.
- User Application Access: Understand how individual users within an organization are actually using each cloud application that they have access to through Single Sign-On (SSO) to better manage underutilized resources.
- User Account Health: Returns information to evaluate the health and security of user accounts, including account status, password status, and secure enrollment information.
Running a Report
To run a JumpCloud Report:
- Log in to the JumpCloud Admin Portal.
![]()
If your data is stored outside of the US, check which login URL you should be using depending on your region. If your organization uses LDAP, RADIUS, or requires firewall allow list configuration, the Fully Qualified Domain Names (FQDNs) will also be region specific. See JumpCloud Data Centers for the URLs, FQDNs, and IP addresses.
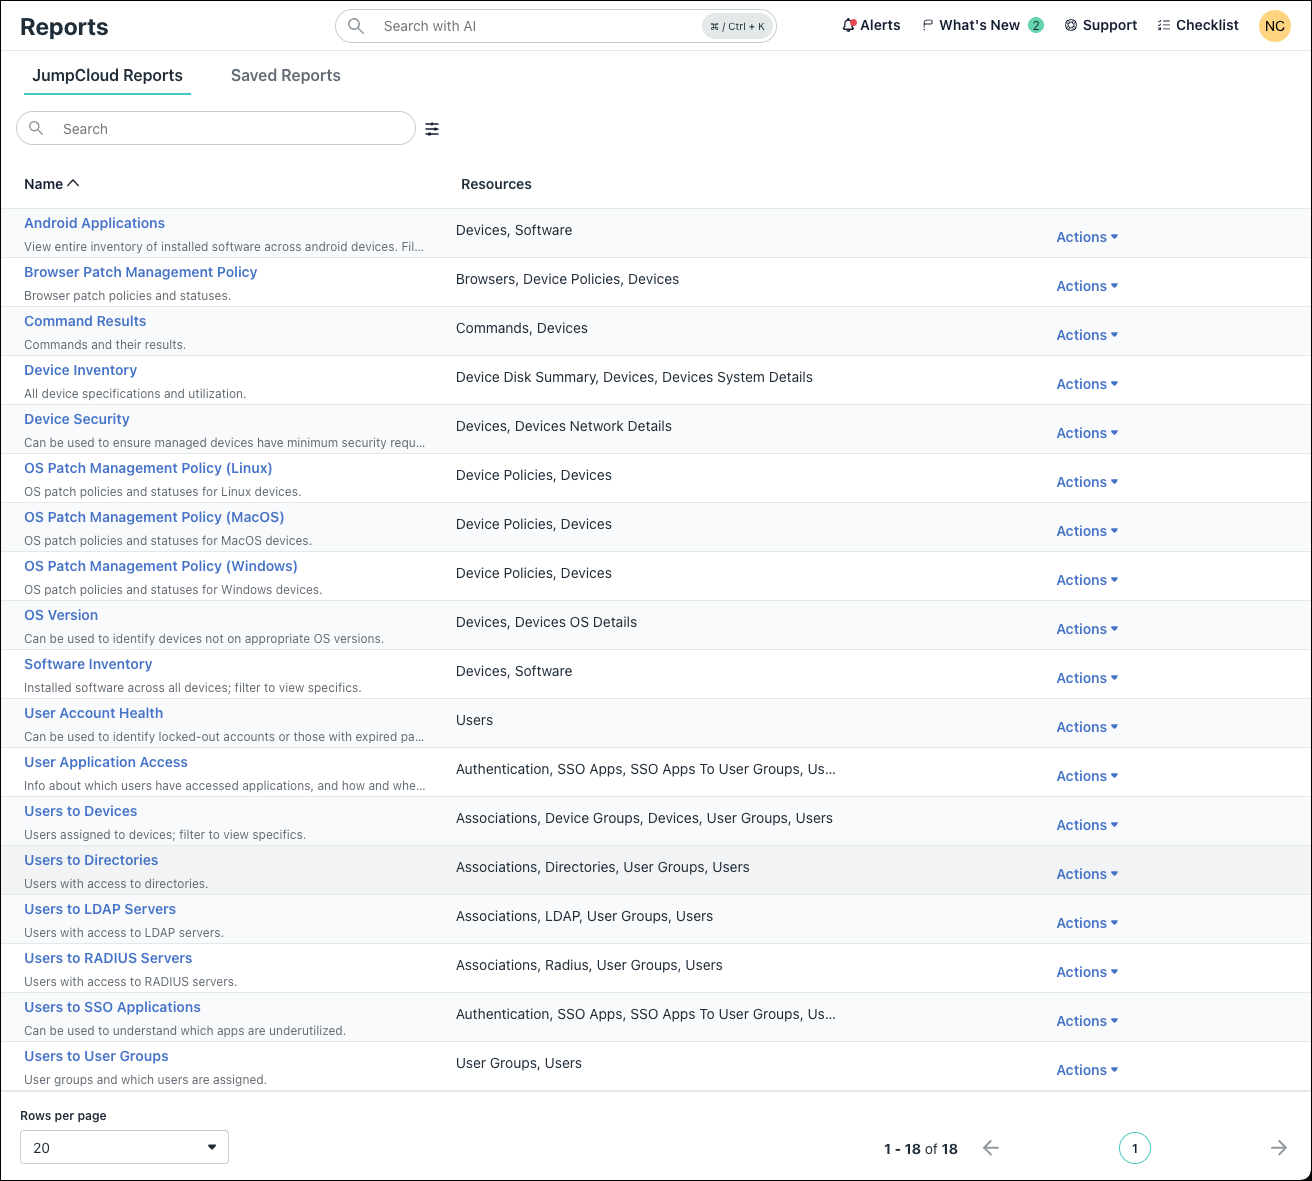
- In the lefthand navigation, go to Insights > Reports. The JumpCloud Reports tab displays.
![]()
- Use the filter icon next to the Search bar to filter the list of available reports by their resources.
- To run and download a report in CSV or JSON format, click the Actions dropdown menu.
- Click to select and run a report.
- To run and customize reports directly from the browser, select the report from the Name column. The results will display directly in the Admin Portal.
- (Optional) Customize the report results.
- After running the report in the Admin Portal, customize results using Filter and Edit Columns.
- Use the Actions dropdown menu to download the report in CSV or JSON format.
- (Optional) Save a report for reuse.
- After customizing a report, click Actions > Save As New to save the report.
- Enter a Name and an optional Description to save the report.
- To view your saved reports, click the Saved Reports tab.

Scheduling a Report
To schedule a report:
- Log in to the JumpCloud Admin Portal.
![]()
If your data is stored outside of the US, check which login URL you should be using depending on your region. If your organization uses LDAP, RADIUS, or requires firewall allow list configuration, the Fully Qualified Domain Names (FQDNs) will also be region specific. See JumpCloud Data Centers for the URLs, FQDNs, and IP addresses.
- In the left navigation, go to Insights > Reports.
- You can schedule a report using one of the following methods:
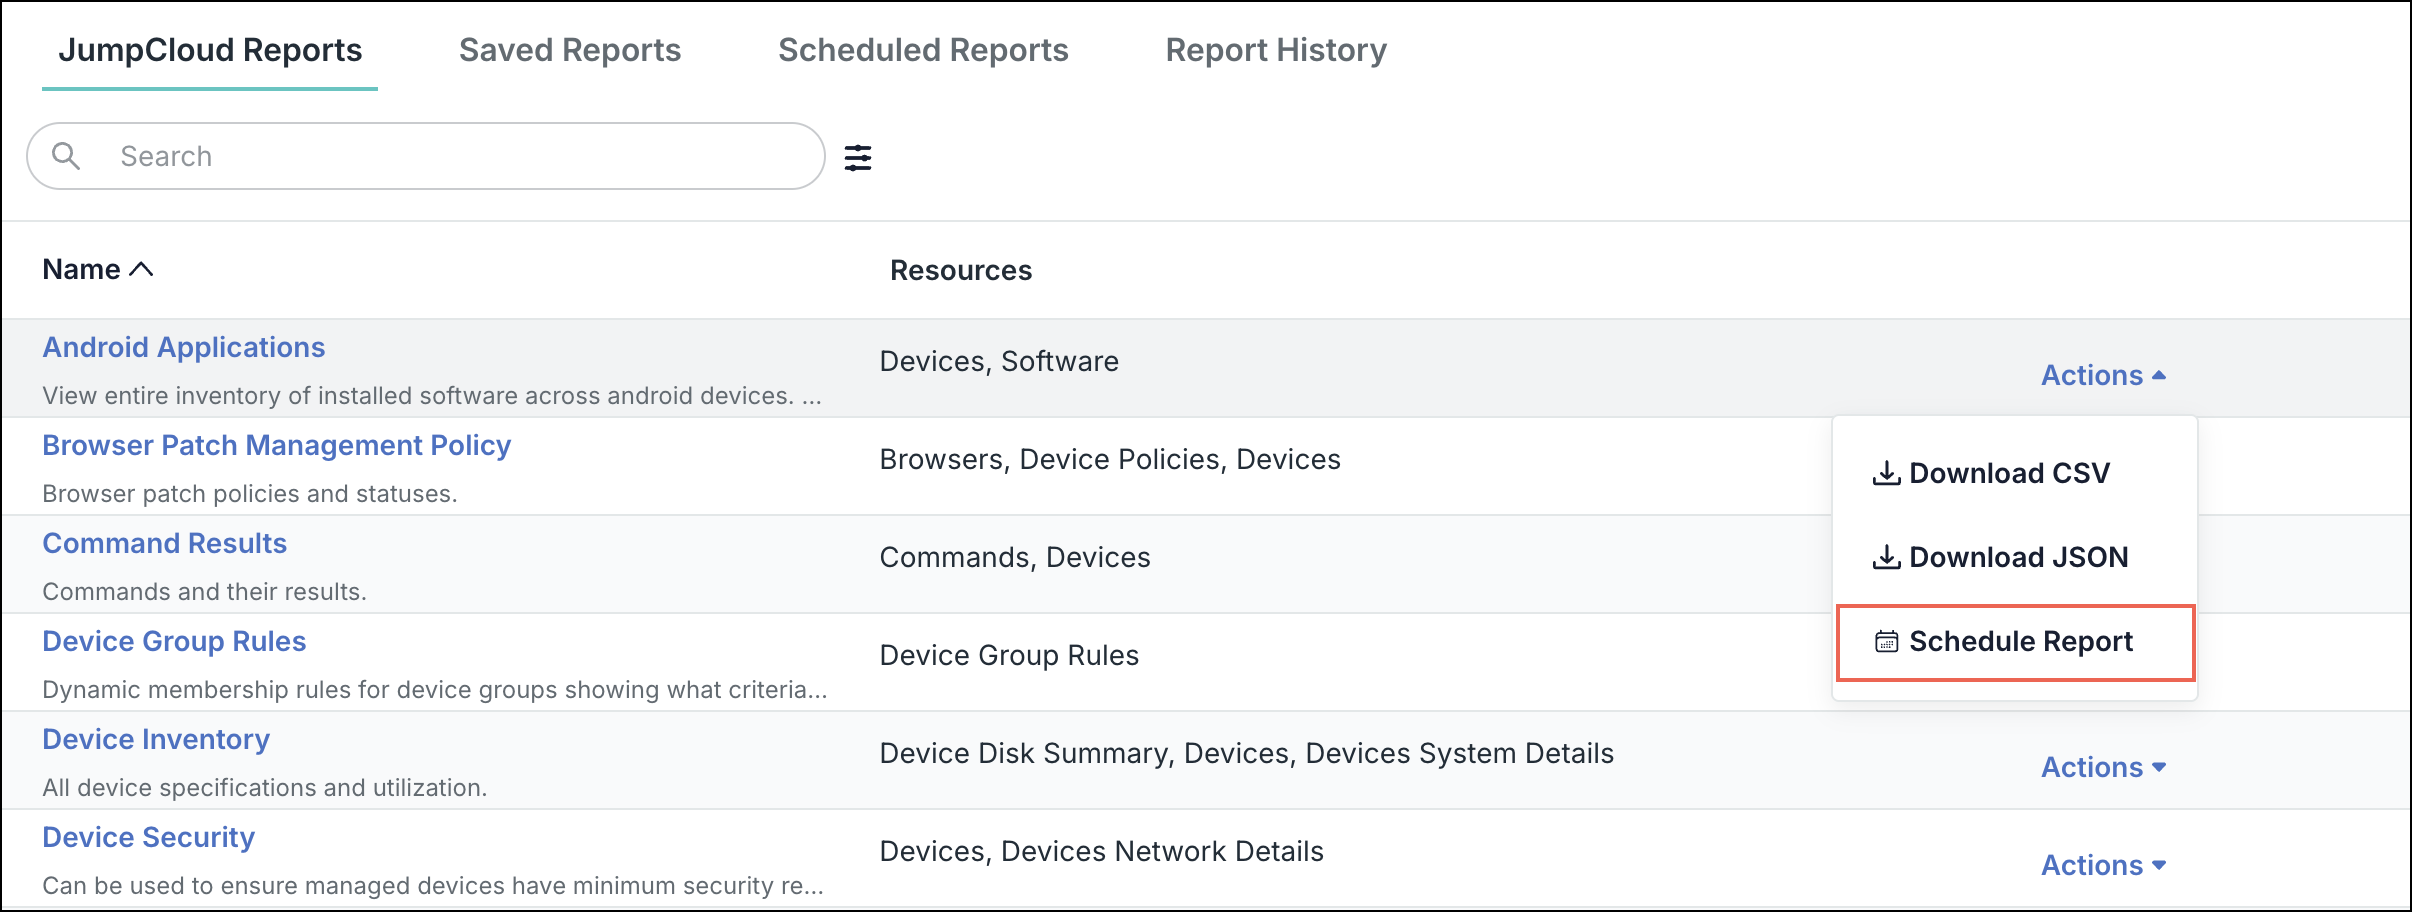
- In the JumpCloud Reports tab, click the Actions drop-down next to any report, then click Schedule Report.

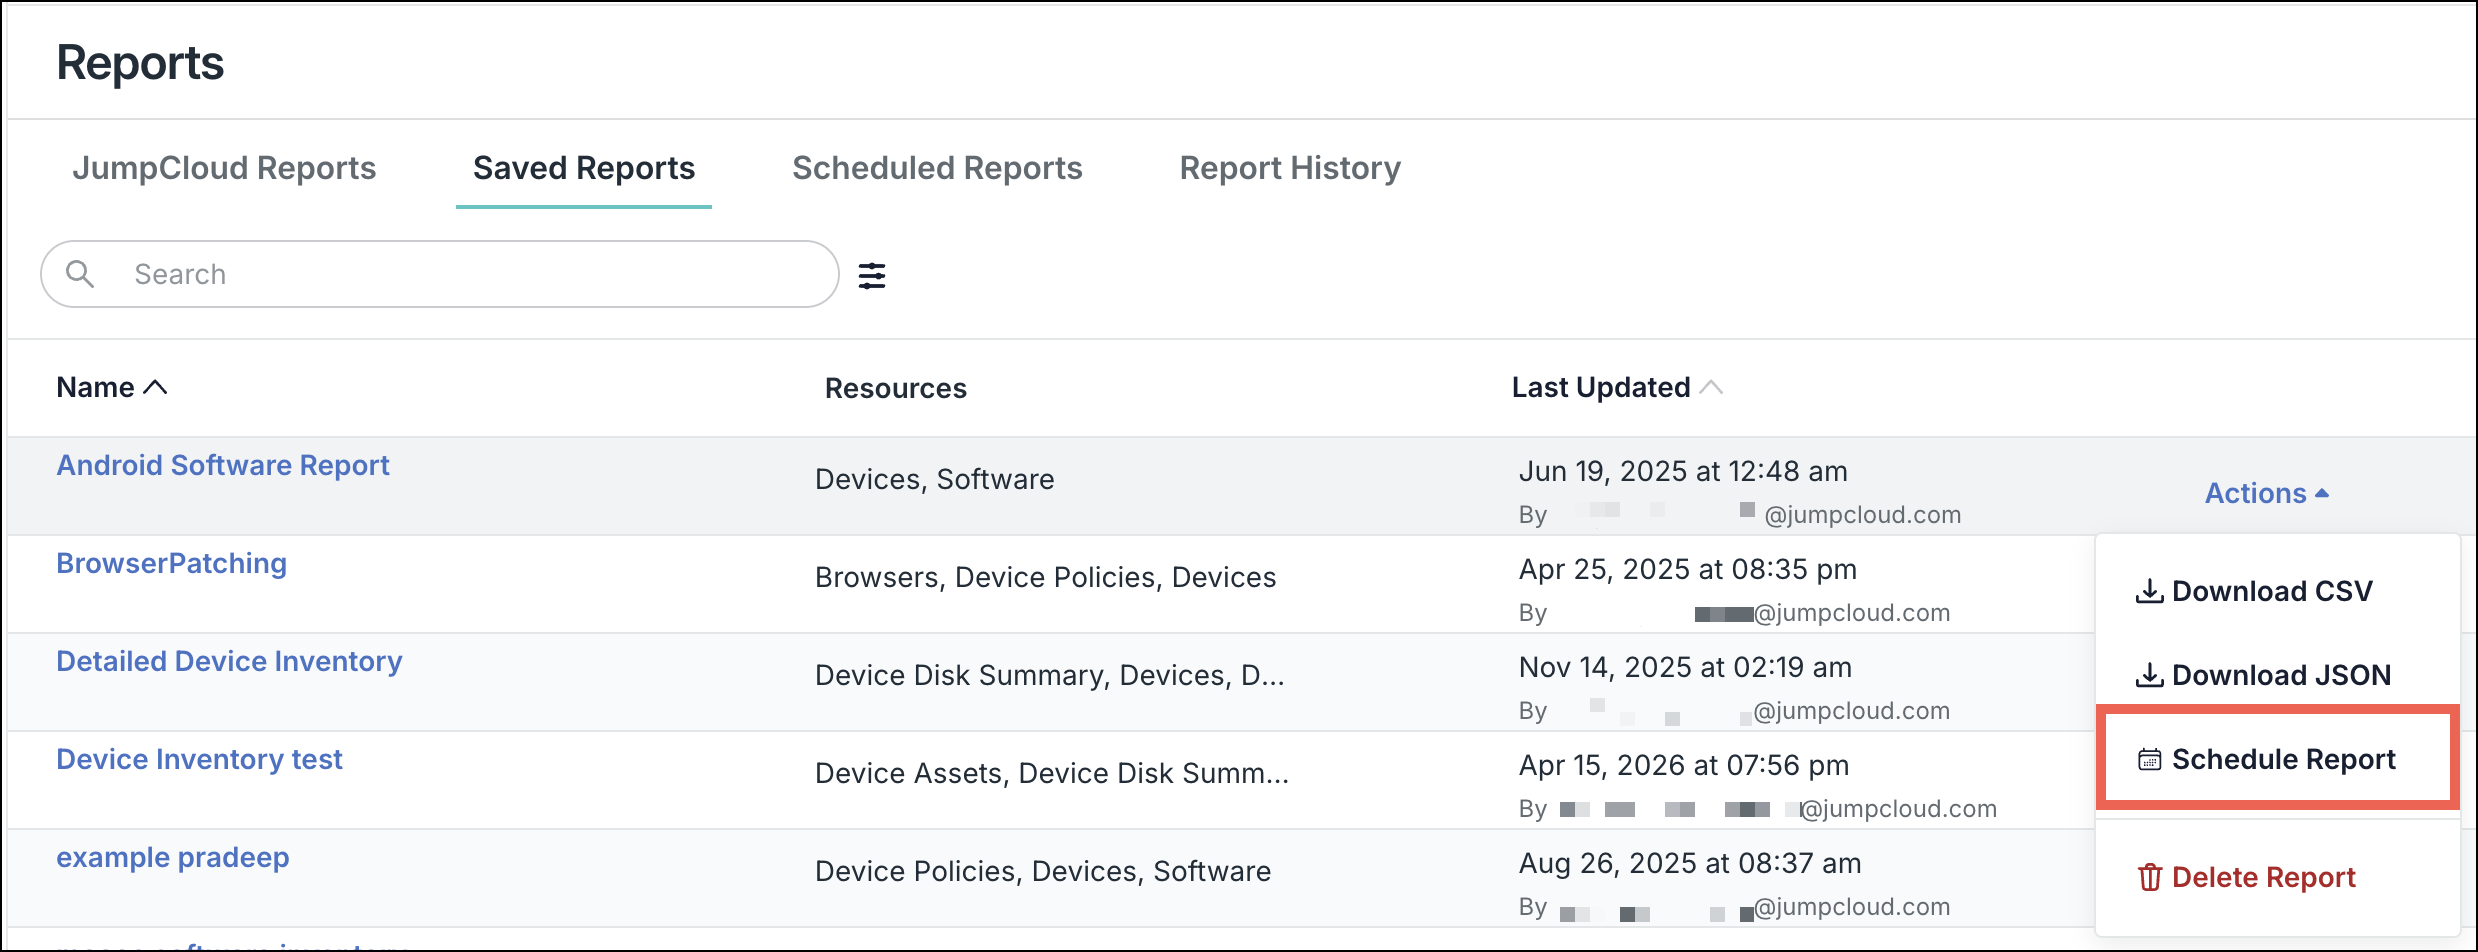
- Navigate to the Saved Reports tab. Click the Actions drop-down next to any report, then click Schedule Report.

- In the JumpCloud Reports tab, click the Actions drop-down next to any report, then click Schedule Report.
- Enter details such as sending frequency, time, timezone, start date, end date, etc. Set preferences for notification channels and output format.


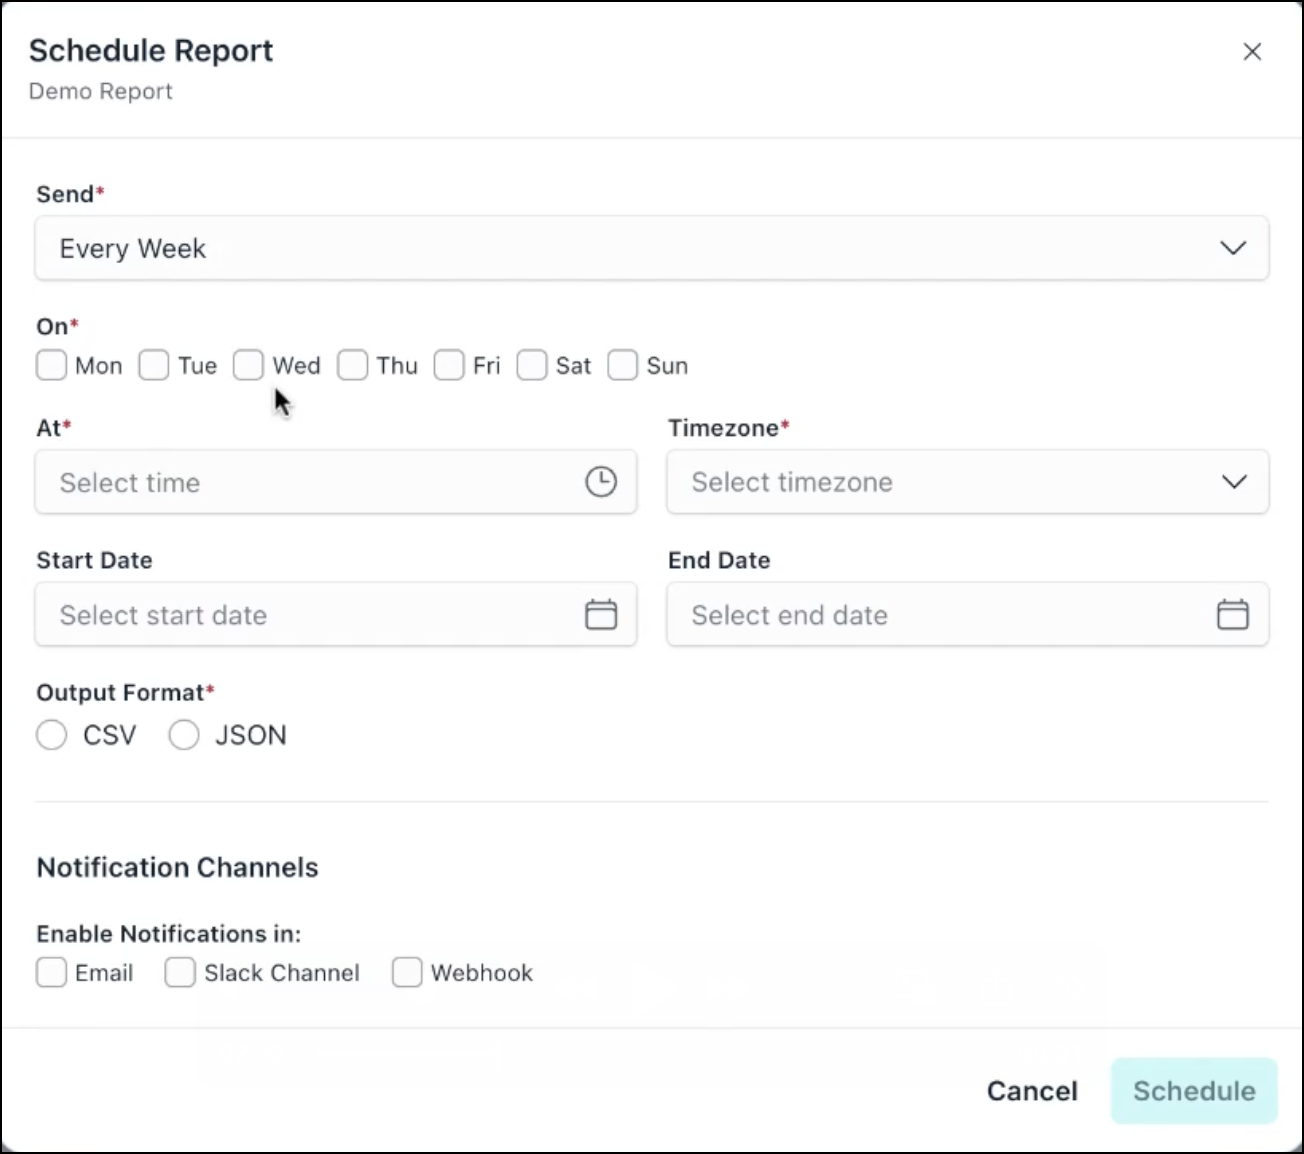
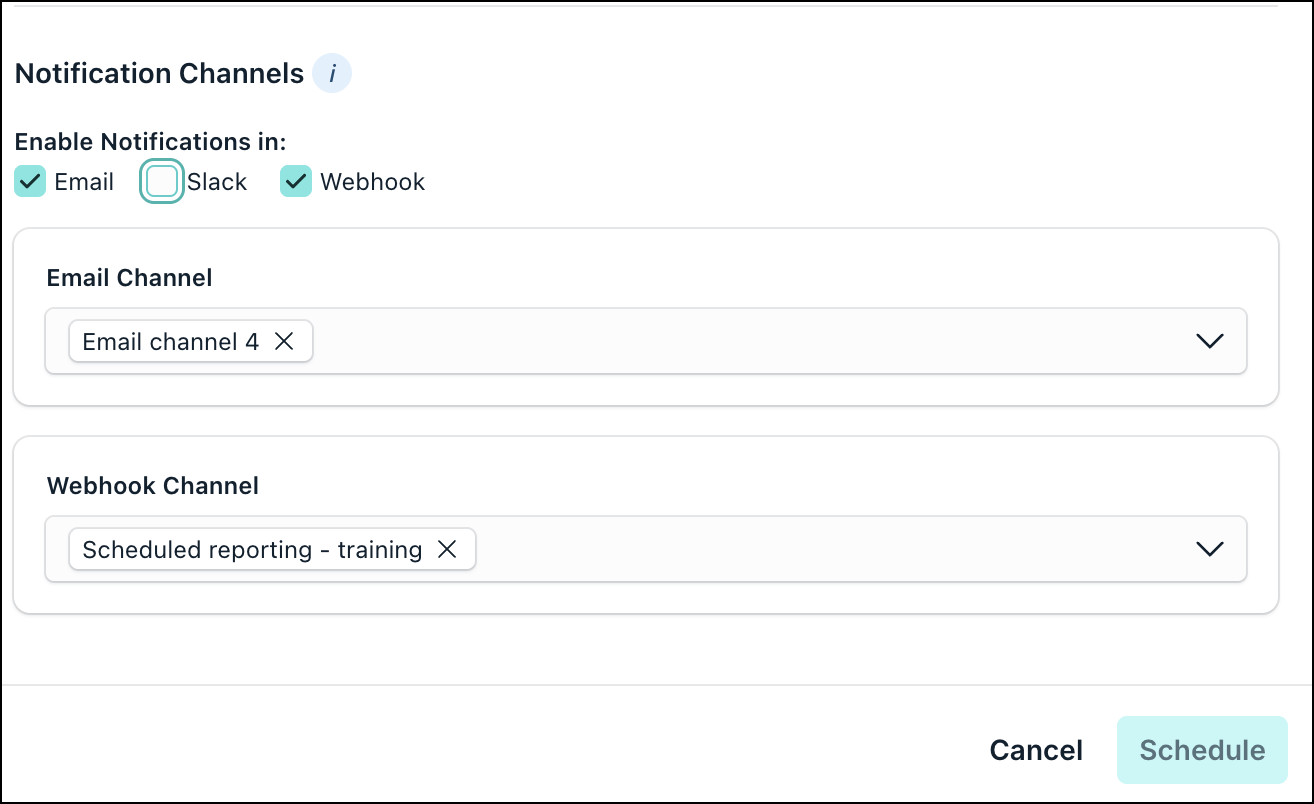
![]()
Under Notification Channels, only the pre-configured channels are visible for selection. See Get Started: Notifications to learn more.
- After entering the details, click Schedule.
The following options are available for all scheduled reports in the Scheduled Reports tab.
- Edit Schedule: Edit the report. You can edit the time, date, and other information using this option.
- Run Schedule: Execute the report right away at the current time.
- Remove Schedule: Delete the schedule. This only deletes the schedule and not the report.
- Report History: See the report run history for each scheduled report.
In the Report History tab, you can see a log of all the scheduled reports. All the report generation instances are chronologically listed along with status and a link to the report (valid for 7 days). You can use filters as required to filter the listed instances.