
JumpCloud’s Active Directory Integration (ADI) is JumpCloud’s user identity and access management directory integration that enables the syncing of users, groups, and passwords between JumpCloud and on or off-premise AD. ADI can be used to extend AD to the Cloud, minimize the number of resources managed by AD, and migrate away from AD.
As covered in Get Started: Active Directory Integration, ADI uses two agents: an Import Agent and a Sync Agent that can be installed in three (3) configurations, referred to as deployment configurations. These deployment configurations are determined by where you want to manage users, groups, and passwords and are flexible enough to support your specific use case, goals, and AD environment.
- Manage users, groups, and passwords in AD
- Manage users and passwords in AD, JumpCloud, or both
- Manage users, groups, and passwords in JumpCloud
This article provides an overview of the benefits, example use cases, workflows, and implementation steps as well as a link to the step-by-step configuration article for each deployment configuration. It also outlines the prerequisites and considerations across all deployment configurations.
ADI Prerequisites
Before getting started with ADI, JumpCloud recommends going through this list and ensuring all items have been completed before continuing.
You will need:
- AD Domain Admin credentials
- Access to all Domain Controllers (DCs) or member servers in your AD domain
- Network access to the internet from DCs or member servers and ability to communicate outbound (only) to console.jumpcloud.com over HTTPS port 443
- The JumpCloud AD Import and Sync Agent services use SSL/TLS for all communication. If no network connectivity exists to JumpCloud, ADI will fail to connect and won't work properly
- JumpCloud Organization for your company
![]()
- We STRONGLY recommend installing and using LDAPS for ADI.
- Configuring and using LDAPS on the Domain Controller to which the JumpCloud ADI agents will connect secures any sensitive information that is exchanged between the JumpCloud agents and the Domain Controller and protects against malicious users
- Create a separate JumpCloud admin account for this integration
- API tokens are specific to each JumpCloud Admin account. An integration admin account prevents the possibility of breaking the ADI connectivity to your JumpCloud organization when an Admin account is deleted
System Requirements
- 64-bit Windows Server (versions 2012, 2016, 2019, 2022, 2025)
- Server Core installation is also supported for Windows Server versions 2016, 2019, and 2022. You will need to include the /msiexec parameter when running the agent installer
- 15MB disk space
- 10MB RAM
Network Requirements
The JumpCloud Active Directory Integration (ADI) Agent requires network connectivity to specific JumpCloud-hosted services to function properly. If these endpoints are blocked by firewalls, security tools, or network filters, the ADI Agent may fail to install, register, or sync with JumpCloud. Additionally, verifying gRPC connectivity helps confirm that outbound communication required by the ADI Agent is not being blocked.
The following URLs must be accessible from the server running the JumpCloud Active Directory Integration Agent. These URLs must be accessible over HTTPS (TCP 443):
- United States Tenants:
- adbridge.jumpcloud.com
- adbridge-kickstart.jumpcloud.com
- European Union Tenants:
- adbridge.eu.jumpcloud.com
- adbridge-kickstart.eu.jumpcloud.com
- India Tenants:
- adbridge.in.jumpcloud.com
- adbridge-kickstart.in.jumpcloud.com
Confirm gRPC traffic is permitted by running the following test:
- Download grpcurl from GitHub: grpcurl v1.9.3 (Windows x86_64)
- Extract the archive, open a PowerShell or Command Prompt window in the extracted folder and run the following command:
.\grpcurl.exe -plaintext grpcb.in:9000 list
- Expected output:
addsvc.Add
grpc.gateway.examples.examplepb.ABitOfEverythingService
grpc.reflection.v1alpha.ServerReflection
grpcbin.GRPCBin
hello.HelloService
If this output is returned, gRPC connectivity is working correctly. If errors are returned (e.g., connection refused or timed out), verify firewall or proxy settings that may be blocking outbound gRPC traffic.
General Considerations
These considerations apply to all or most of the use case scenarios and configurations.
- When specifying a DN, you must use a semicolon (;), commas (,) are not supported.
- The user attributes that sync by default are:
- First Name
- Last Name
- Username
- The import agent can be configured to sync additional attributes.
- Non-standard ASCII characters are not supported in the Root User DN
- When updating an existing agent installation, only minimal installation screens are shown
- Demoting a DC installation to a member server or promoting a member server installation to a DC installation aren’t supported. The agent(s) must be uninstalled first and then installed on the other type of server
- The passwords for the service accounts used by the integration (e.g., jcimport and jcsync)should be rotated periodically for security reasons
- As of ADI sync agent version 4.x and import agent 2.x, the following changes were made:
- The default location for all agent related installation, configuration, and log files is C:\Program Files\JumpCloud\AD Integration\
- All references to AD Bridge changed to AD Import
- The ADI sync agent can be installed independently of the ADI import agent
- The jcimport username & password and the API key are stored in the registry instead of the ADI Import Agent configuration file. Both the password and API key are encrypted and the values in the registry are replaced with the encrypted value when the import agent starts
- The ADI sync agent connect key is encrypted and the value in the registry is replaced with the encrypted value when the agent starts
- The JumpCloud ADI import and sync agent services use TLS for all communication. If no network connectivity exists to JumpCloud, ADI won’t work properly
ADI Configurations
The table below provides an overview of the three (3) deployment configurations and main use cases. The sections that follow describe the capabilities, example use cases, benefits, workflow, and considerations for each configuration, as well as a link to the step-by-step guide.
| ADI Configuration | Use case | User and Group Authority | Password authority | Data sync direction | Server type(s) on which agent(s) can be installed | Install Import Agent | Install Sync Agent |
|---|---|---|---|---|---|---|---|
| Manage users, groups and passwords in AD | Extend AD |
 |
|
 |
Domain Controllers |
 |
 |
| Manage users and passwords in either system, or both | Extend AD |
|
 |
 |
Domain Controllers, Member Servers |
|
|
| Minimize AD footprint |
|
|
|
Domain Controllers |
|
|
|
| Migrate away from AD |
 |
|
|
Domain Controllers, Member Servers (Sync agent only) |
|
|
|
| Manage users, groups, and passwords in JumpCloud | Minimize AD footprint |
|
|
 |
Domain Controllers, Member Servers |
|
|
| Migrate away from AD |
|
|
|
Domain Controllers, Member Servers |
|
|
Manage users, groups, and passwords in AD
|
This deployment configuration supports organizations looking to extend AD to the cloud for additional functionality with minimal changes to their existing AD environment. Use Cases
Benefits
|
Workflow Details
Data syncs one-way from AD to JumpCloud Passwords managed solely in AD Users created, updated, and deactivated solely in AD Security groups created and managed solely in AD Group membership managed solely in AD |
|
Configuration
Read Configure ADI: Manage users, groups, and passwords in AD for step-by-step instructions
Use ADI import agent only Install import agent on two or more member serviers or all domain controllers (DCs) Add users and security groups under the ADI security group in AD |
|
|
Important Considerations:
|
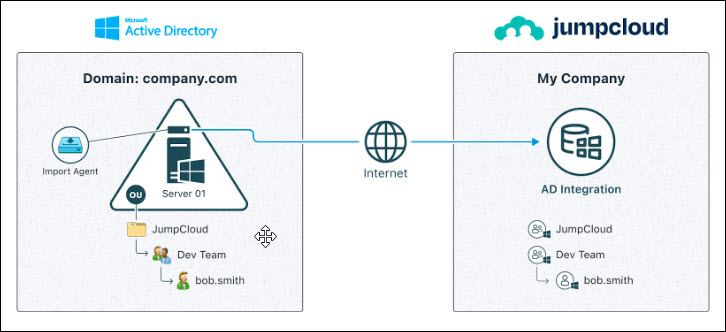
AD Import only – single domain workflow
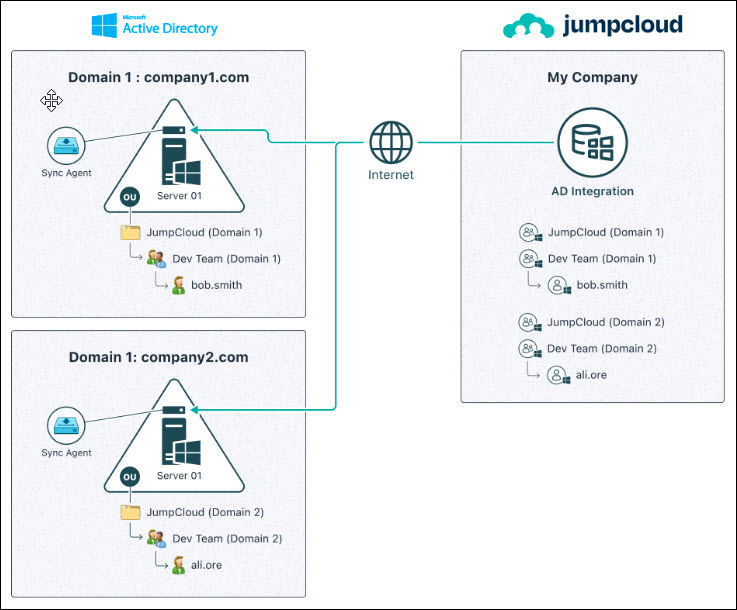
AD Import only – multiple domain workflow

Manage users and passwords in AD, JumpCloud, or both
|
This deployment configuration supports organizations looking to minimize the number of resources managed by AD and organizations that want to eventually migrate away from AD. This configuration provides the greatest flexibility. Users, passwords, and groups can be managed in AD, JumpCloud, or both.
Use cases
Benefits
|
Workflow Details
|
|
Configuration Read Configure ADI: Manage users, groups and passwords in AD, JumpCloud, or both for step-by-step instructions
Use both the ADI import agent and ADI sync agent.
Install agents on either domain controllers (DCs) or member servers. Important: To sync passwords from AD to JumpCloud the import agent must be installed on all DCs.
|
|
|
Important Considerations:
|
Two-way Sync – Single Domain Workflow

Two-way Sync – Multiple Domain Workflow

Manage user, groups, passwords in JumpCloud
|
This configuration supports organizations looking to migrate away from AD completely and organizations that have already significantly reduced the resources being manged by AD.
Use Cases
Benefits
|
Workflow Details
Data syncs one-way from JumpCloud to AD
Passwords managed solely in JumpCloud
Users created, updated, and deactivated solely in JumpCloud
User (security) groups created and managed solely in JumpCloud
Group membership managed solely in JumpCloud
|
|
Configuration
Read Configure ADI:Manage users, groups, and passwords in JumpCloud for step-by-step instructions.
Use ADI sync agent only
Install agents on either domain controllers (DCs) or member servers.
Assign users and user groups to the ADI instance in JumpCloud
|
|
|
Important Considerations:
|
JumpCloud Sync Only – Single Domain Workflow

JumpCloud Sync Only – Multiple Domain Workflow
Migrate Windows Devices from AD-member to JumpCloud-managed
If your company is looking to migrate off of your AD domain to JumpCloud or move device management to JumpCloud, we recommend leveraging our Active Directory Migration Utility (ADMU) to migrate Windows devices from AD-bound to JumpCloud-managed.
Important Considerations
- Utilizing the ADMU does not require the ADI:
- If you’re looking to migrate user identities off of AD and into JumpCloud, and your company is going to migrate off of AD in phases, we recommend to implementing both JumpCloud’s ADI and ADMU
- You can run ADMU locally on the device or remotely using JumpCloud Commands
Configuration
See GitHub Wiki Page: JumpCloud ADMU for step-by-step instructions.
Use Cases
- You want to convert AD-member Windows devices to JumpCloud-managed
- You are ultimately looking to migrate entirely off of AD
- You want JumpCloud to become the Primary IdP for all user identities
Workflow Details
- User Identities can be imported in any of the following methods: Microsoft365, Google Workspace, JumpCloud ADI, CSV Import, or Manually created.
- ADMU tool is run on the AD-member Windows Device, which will convert it from an AD-member device to a local WORKGROUP device, as well as convert an AD User Account to a Local User Account.
- The ADMU tool can automatically bind a JumpCloud user to the converted user mentioned in the previous step.
Benefits
- Automation of device migration
Ready to Configure?
Check out the step-by-step configuration guide that aligns with chosen deployment configuration:
- Configure ADI: Manage users, security groups, and passwords in AD
- Configure ADI: Manage users, groups and passwords in either, or both, AD and JumpCloud
- Configure ADI: Manage users, groups, and passwords in JumpCloud
Want additional assistance from JumpCloud?
JumpCloud now offers myriad professional services offerings to assist customers with implementing and configuring JumpCloud. If you’re looking for assistance with Migrating from AD, or to integrate AD with JumpCloud, we recommend you reach out to JumpCloud’s Professional Services team on the following page: Professional Services - JumpCloud.
Need to troubleshoot?
If you’re having issues with getting JumpCloud’s ADI working, try Troubleshoot: ADI.
Want more information?
- [web page] Modernize Active Directory
- [eBook] Breaking Up with Active Directory
- [eBook] Modernize Active Directory: Break Free from the Limitations of AD
- [eBook] How to Modernize Your AD Instance: The IT Professional’s Roadmap to Augmenting or Replacing AD
- [blog] Modernizing AD is Possible
- Modernize Active Directory: Everything you need to know in less than 3 minutes
- [webinar] How To Modernize AD: An Admin’s Journey to IT Flexibility