
This article provides a step-by-step guide for configuring ADI to manage users, security groups, and passwords in AD (AD to JumpCloud one-way sync). This configuration is typically used when you want to extend AD to the cloud for additional functionality, plan to keep AD as your primary user, group, and password authority, and want minimal changes to your existing AD environment. This configuration supports:
- Syncing data one-way from AD to JumpCloud
- Managing passwords from AD
- Creating, updating, and deactivating users from AD
- Creating and managing JumpCloud ADI user groups from AD
- Managing AD and ADI group membership from AD
Deployment Configuration Overview
- Use ADI import agent only
- Install import agent on all domain controllers (DCs) or on at least 2 member servers
- Add users and security groups under the ADI security group in AD
![]()
To sync passwords from AD to JumpCloud, the import agent must be installed on all DCs.
To explore the use cases and benefits of this configuration, see Manage users, groups, and passwords in AD in the Configure Active Directory Integration (ADI) help center article.
Data Flow
Single Domain Data Flow

Multiple Domain Data Flow

To learn more about the general user identity workflow and expected behavior for any user, group, and password change in AD and in JumpCloud read Use and Manage the Active Directory Integration (ADI) .
System Requirements
- 64-bit Windows Server (versions 2012, 2016, 2019, 2022, 2025)
- Server Core installation is also supported for Windows Server versions 2016, 2019, and 2022. You will need to include the /msiexec parameter when running the agent installer
- 15MB disk space
- 10MB RAM
New Installation Overview
The main steps you will take to install and configure ADI for a one-way sync from AD to JumpCloud are:
- Determine on which servers the AD import agents will be installed: member servers or domain controllers (DCs).
- Complete the prerequisite checklist.
- Determine the Root User Container in AD.
- Create the JumpCloud ADI Integration Security Group in AD.
- Create the AD Import Service Account.
- Delegate read-only control for the JumpCloud import account.
- Create an ADI domain instance in JumpCloud.
- Select your configuration and follow the installation steps and download the import agent
- Run the the AD Import Agent installation wizard
- Reboot the servers on which the agent was installed.
- Verify the Import Agent Service started on each AD server.
- Complete post-installation AD import agent configuration on each AD server.
- Verify the AD import.
Considerations
Agent Upgrade Considerations
![]()
You must use the same AD admin account used to initially install the import agent, or the import agent service won't start due to a credential error. If you don't know which account was used, you must re-enter the credentials in the registry.
- The import agent service account password is machine + user encrypted when stored in the registry.
Member Server Installation Considerations
The following are considerations only if you choose to install the import agents on member servers:
- The AD password does NOT sync from AD to JumpCloud. Users imported and synced from AD will not have a password in JumpCloud
Domain Controller (DC) Installation Considerations
The following are considerations only if you choose to install the import agents on DCs:
- An import agent must be installed on all Domain Controllers
- Downtime should be scheduled. The installation requires a server reboot
- AD passwords will sync from AD to JumpCloud. This means that the password will be managed in AD and stored in both AD and JumpCloud
Security Considerations
- We STRONGLY recommend installing and using LDAPS for the ADI. Configuring and using LDAPS on the Domain Controller that the Jumpcloud ADI agents will connect to secures any sensitive information that is exchanged between the Jumpcloud agents and the Domain Controller and protects against malicious users
- We recommend periodically rotating the password for the server account used by the integration (e.g., jcimport)for security reasons
Delegated Authentication Considerations
Review ADI: Use AD Delegated Authentication for specific considerations and more information about delegated authentication to AD.
User Sync Considerations
- Due to the way the primary group information is stored by AD, the groups linked to JumpCloud shouldn't be a primary group for any user or group. Otherwise, users who are members won’t sync
General Considerations
![]()
All installed import agents should be the same version to avoid unexpected behavior or the potential for users not being able to log in if the primary agent is switched.
- Non-standard ASCII characters are not supported in the Root User DN
- Demoting a DC installation to a member server and promoting a member server installation to a DC aren’t supported. The agent(s) must be uninstalled first and then installed on the other type of server
- A reinstall of the same ADI import agent is treated as a repair
- Users who are imported from AD to JumpCloud will automatically have their Password Authority set to Active Directory by default and the attributes that sync will be read-only in both the Admin Portal and in User Portal. These fields become restrictedFields
- The JumpCloud ADI import agent services use TLS for all communication. If no network connectivity exists to JumpCloud, the ADI will fail to sync and will not work properly
- ADI Import Agent settings in the jcadimportagent.config.json file control the behaviors that occur in JumpCloud when certain actions are taken on the user in AD
- Importing privileged user accounts, such as Domain Admins and accounts with “adminCount=1”, into JumpCloud from AD or managing them in AD from JumpCloud, isn’t supported
Attributes
The information that syncs from AD to JumpCloud is controlled by the SyncAttributesAction setting, which is configured during the import agent installation or upgrade.
If it is set to Password Information (PasswordAttributes), the attributes that sync from AD to JumpCloud are:
- Password
- Lock status
- Password expired
- Password expiration date
If it is set to Core User Information (BaseUserAttributes), the attributes that sync from AD to JumpCloud are:
- First Name
- Last Name
- Username
- Password (if import agent is installed on DCs)
If it is set to Full User Record (AllSupportedAttributes), the attributes that sync from AD to JumpCloud are:
- First Name
- Last Name
- Username
- Password (if import agent is installed on DCs)
- displayname
- description
- JobTitle
- department
- company
- location
- employeeType
- phoneNumbers
- addresses
- manager
![]()
These attributes become read-only (restrictedFields) in JumpCloud when a user's Password Authority is set to Active Directory. The Password Authority setting can be changed for a specific user directly from their User Details page or for multiple users from Users >More Actions>Set External Password Authority.JumpCloud to AD Attribute Support
Prerequisite Checklist for New Installations
Before installing the ADI import agents for the first time, complete the following checklist
- Know your AD Domain Admin credentials.
- Decide whether you want to install the sync agents on your AD domain’s non-DC Domain Member Servers (member servers) or Domain Controllers (DCs).
- When installing the import agent on DCs, schedule downtime. Installation requires server reboot!
- Verify you have access to all Domain Controllers (DCs) in the AD domain or to the member servers on which you plan to install the import agents.
- Ensure the servers on which you are installing the import agent are running on a JumpCloud supported 64-bit Windows Server version (2012, 2016, 2019, 2022).
- Confirm the servers on which you are installing the import agent have networking access to the internet and are able to communicate outbound to console.jumpcloud.com over HTTPS port 443.
- Verify all users to be synced from AD to JumpCloud have a value for first name and last name in AD.
- If you install the import agents on DCs, align password complexity requirements between AD and JumpCloud as closely as possible. Otherwise, passwords may not replicate if they’re rejected by the destination directory’s complexity requirements.
- [Recommended] Verify all users you plan to import into JumpCloud live in a single OU or are nested underneath a chosen OU (Root user container) in AD. This can be the default CN=Users container in AD or an alternate custom OU in the directory.
- Review Advanced Configurations for the Active Directory Import Agent to understand the configuration settings available for the import agent and note any default values that need to be changed as part of the installation.
- [STRONGLY recommended] Install LDAPS.
![]()
We STRONGLY recommend installing and using LDAPS for the ADI. Configuring and using LDAPS on the Domain Controller that the Jumpcloud ADI agents will connect to secures any sensitive information that is exchanged between the Jumpcloud agents and the Domain Controller and protects against malicious users.
Prepare AD for New Import Agent Installations
This section can be skipped if you are upgrading the import agent.
To import and update user identities, attributes, and user groups from AD into JumpCloud, you'll need to install a JumpCloud AD import agent on your non-DC Domain Member Servers (member servers) or all Domain Controllers (DCs) within your domain. Complete the steps below to prepare for installing the agents on your servers.
![]()
Passwords can only be synced from AD to JumpCloud if the import agent is installed on a DC. When installing on DCs, an import agent must be installed on all DCs.
![]()
The steps outlined below must be done on a DC, even if you plan to install the import agents on member servers. A server reboot is NOT required after completing these changes.
Determine the Root User Container in AD
![]()
Non-standard ASCII characters are not supported in the Root User DN.
To use a Root User Container other than Active Directory's default (CN=Users), you'll need its distinguishedName value. You'll enter this value during the AD import agent installation.
To obtain the User Container distinguishedName:
- Verify the full LDAP path for the chosen Root user container you have selected in ADUC:
- From the ADUC panel’s View menu, enable Advanced Features.
- Right-click the container and select Properties.
- Select the Attribute Editor tab.
- Select the “distinguishedName” attribute, then click View.
- Note the value. It will need to be entered during both the AD import and AD sync agents installation.


![]()
You will need to replace the commas (,) with semicolons (;) when entering the DN during the agent installation
Create the JumpCloud ADI Integration Security Group in AD
A Security Group for the integration must be created within the Root User Container you’ve defined in the previous step. This Security Group is required. Any member of this group will be exported to your JumpCloud tenant.
![]()
If you do not create this group or give it a unique name across domains, the ADI sync from AD to JumpCloud will fail to function properly.
- Open the ADUC Menu by clicking Start, typing dsa and clicking the Active Directory Users and Computers icon.

- Find your Root User Container.

- Right-click the Root User Container’s folder and click New > Group.
- Ensure the Security Group is a Global Security Group.
- Give the Security Group a name that helps identify it as the group used by the ADI (e.g., “JumpCloud” for single domain environments, “JumpCloud-Domain” for multi-domain environments).

- Click OK.

![]()
In multi-domain environments, the security group must have a unique name within each domain (e.g., “JumpCloud-mydomain1” and “JumpCloud-mydomain2”).
Create the AD Import Service Account in AD
After you identify the ‘Root user DN’ that you want to use with your JumpCloud integration, you proceed by creating a new AD-based service account (standard user account) that allows the JumpCloud AD import agent to manage users and groups.
- Open the ADUC Menu, click the Start button, type “dsa” and click the Active Directory Users and Computers icon.
- Find your Root User Container.
- Right-click the container and click New > User.
![]()
This user cannot:
- Be a Domain Administrator
- Be a member of the JumpCloud integration security group
- Have a username of “JumpCloud”
- Enter the following values for the JumpCloud Import Service Account user:
- First Name: JumpCloud
- Last Name: Import
- User logon name: jcimport


![]()
Use jcimport to distinguish what this user is for and to which agent it is attached.
- Enter a password for the jcimport user and ensure that it is set to Never Expire since this will be a service account for the Import Agent.
![]()
This password should still be rotated periodically for security reasons.
- Click Save.
- If your service account operates under a least-privilege model, you must explicitly add these permissions.
- From the View menu, enable Advanced Features.
- Right-click your domain object (e.g.,
yourdomain.com) and select Properties. - Go to the Security tab and click the Advanced button.
- Click Add and select the service account the agent uses.
- In the "Permissions Entry" window, ensure the "Type" is set to Allow.
- In the "Permissions" list, scroll down and check the boxes for the following permissions:
- Replicating Directory Changes
- Replicating Directory Changes All
Delegate Control for the ADI Import Service Accounts in AD
![]()
If you will be using a Root user container DN other than the ‘Users’ default, you need to do these steps on that chosen container in your AD.
- Navigate to the Root User Container in ADUC that you have selected, right-click the container and select Delegate Control. This launches the Delegation of Control Wizard.
- Click Next.
- Add the JumpCloud Import Agent account to the Delegation of Control Wizard.

- Click Next, then select Read all user information.

- Click Next, then click Finish at the final screen.
Install the AD Import Agent
Create an ADI domain instance in JumpCloud
This section can be skipped if you are upgrading the import agent.
Create a new ADI domain instance in JumpCloud if one does not already exist
- Log in to the JumpCloud Admin Portal.
![]()
If your data is stored outside of the US, check which login URL you should be using depending on your region. If your organization uses LDAP, RADIUS, or requires firewall allow list configuration, the Fully Qualified Domain Names (FQDNs) will also be region specific. See JumpCloud Data Centers for the URLs, FQDNs, and IP addresses.
- Go to Identity Management > Active Directories.

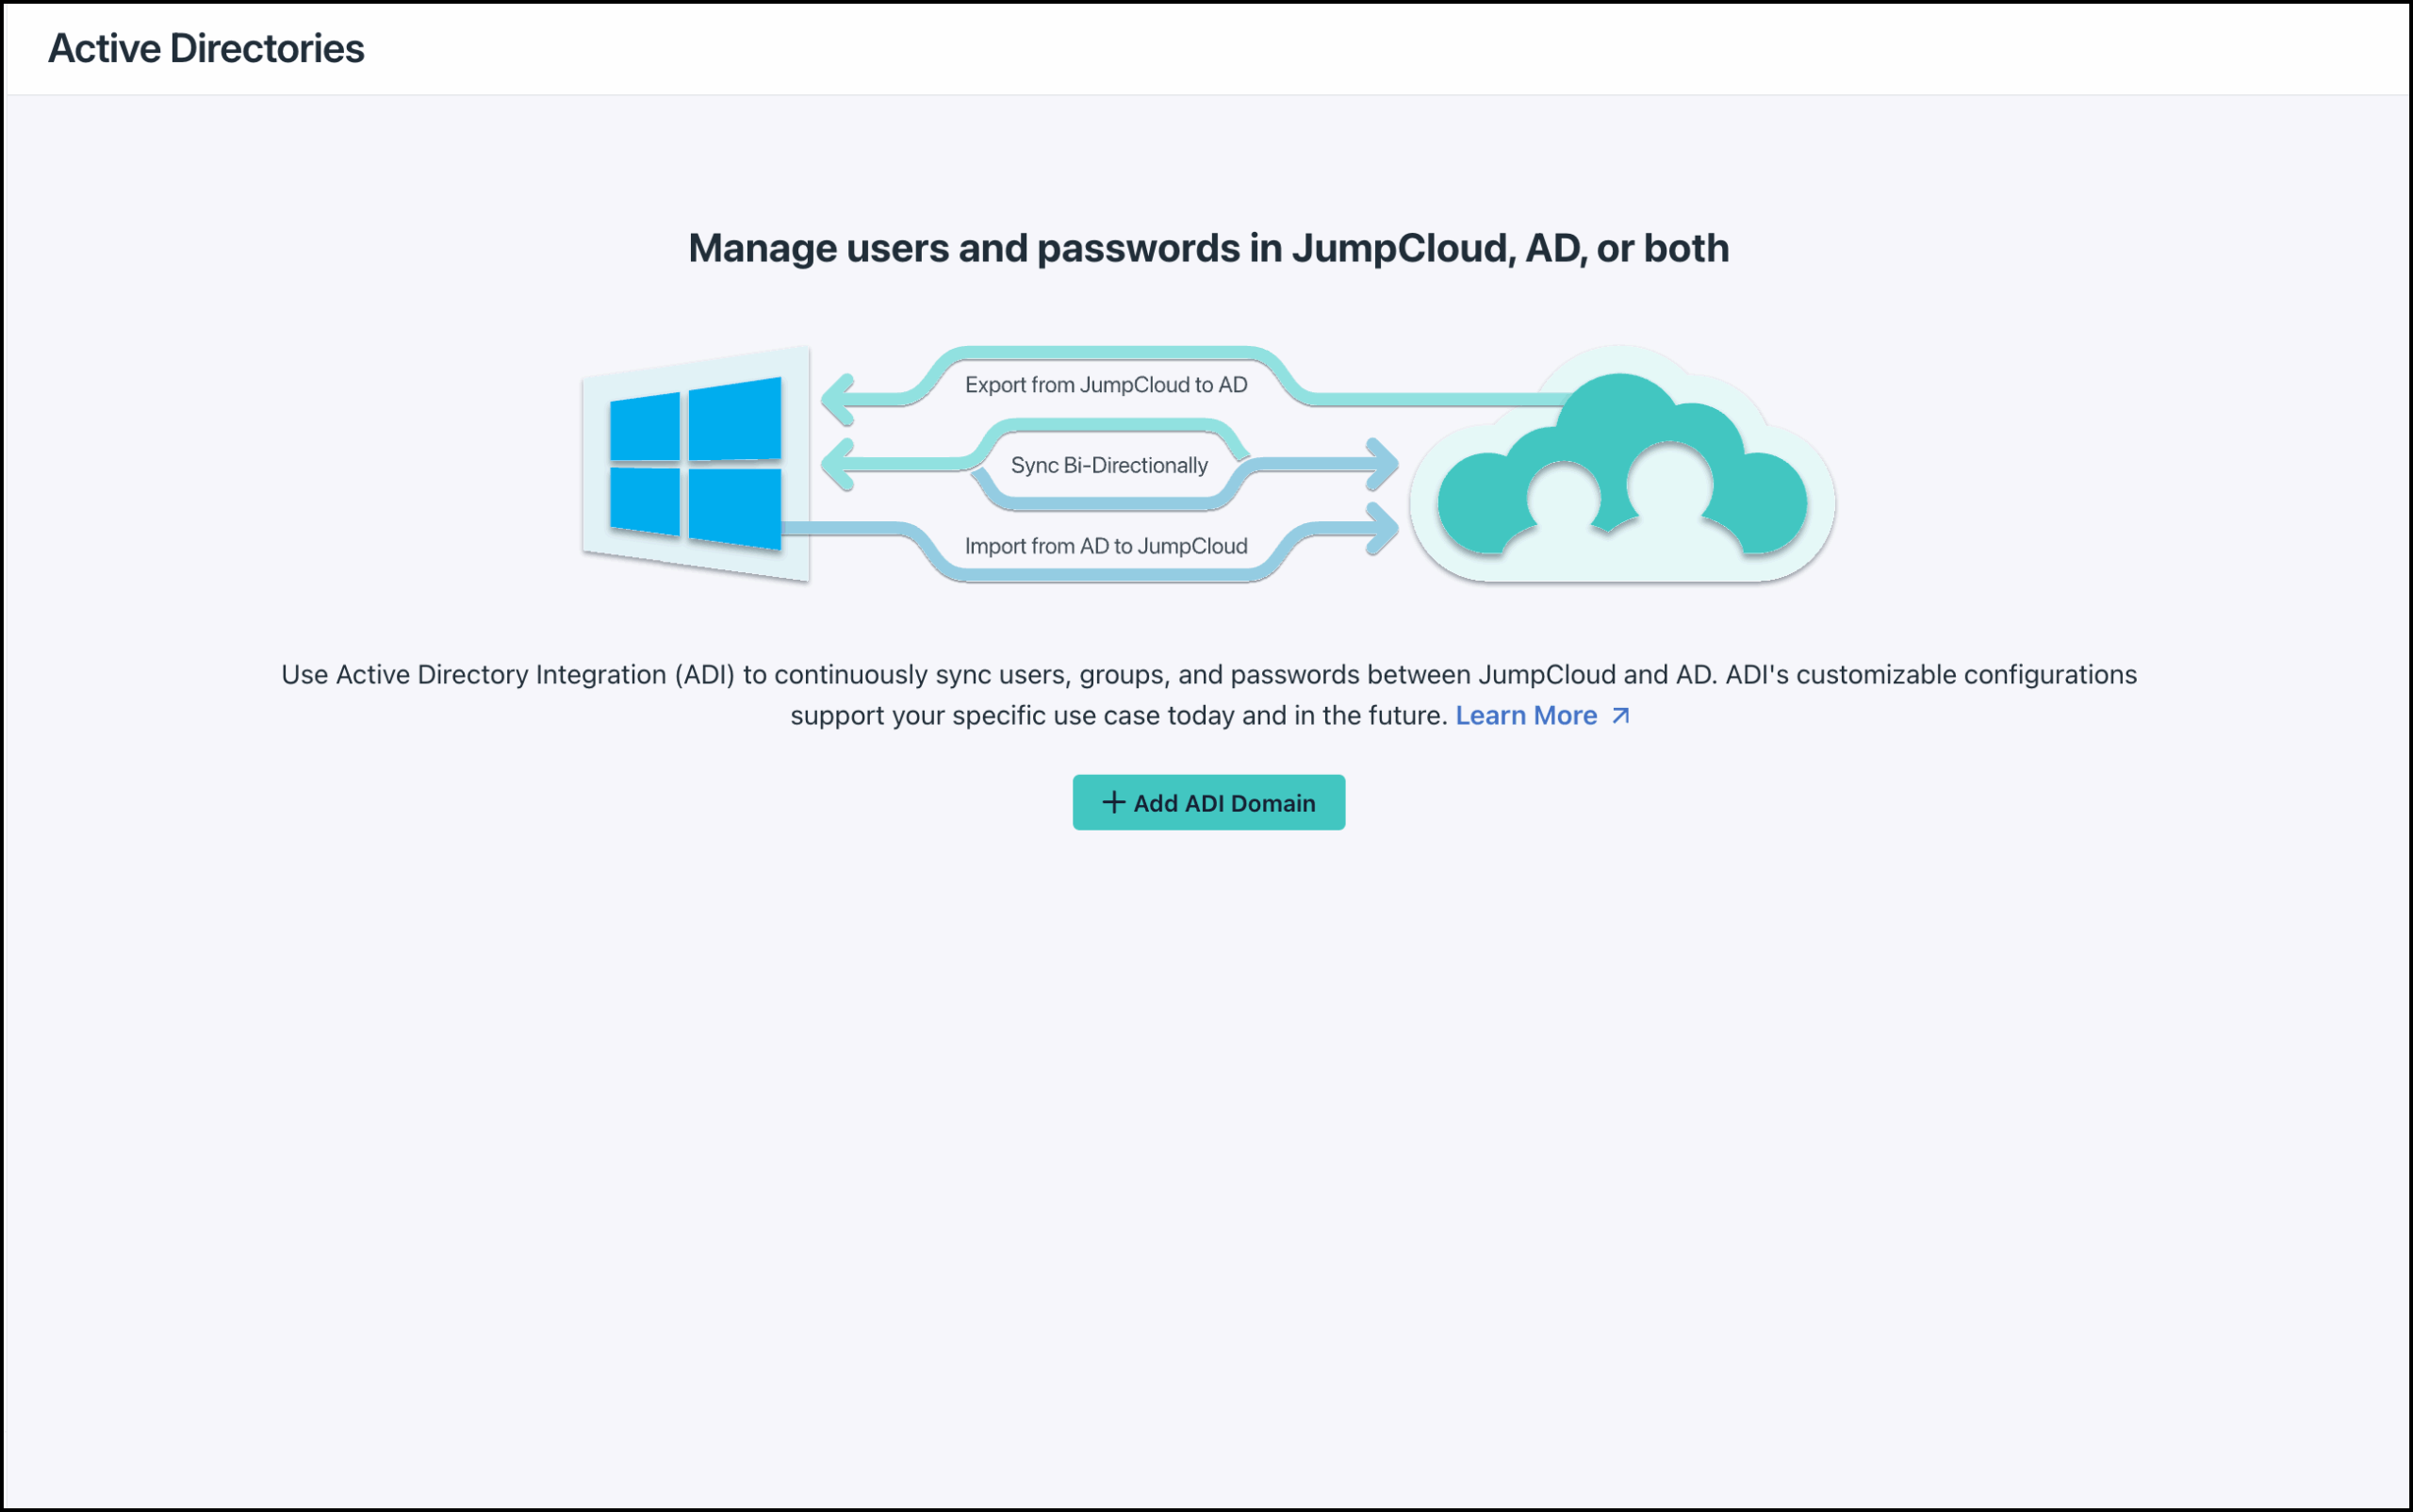
- Click ( + Add ADI Domain )
- Select Manage users and passwords in Active Directory.

- Enter the name of an Active Directory domain that you want to integrate with your JumpCloud tenant. For example, “DC=example;DC=com”.
![]()
The “DC” must be in capital letters. Each value must be separated with a semicolon (;) not a comma. There should be no spaces. The domain case must be the same as it is in the AD import configuration file.

- Click Save.
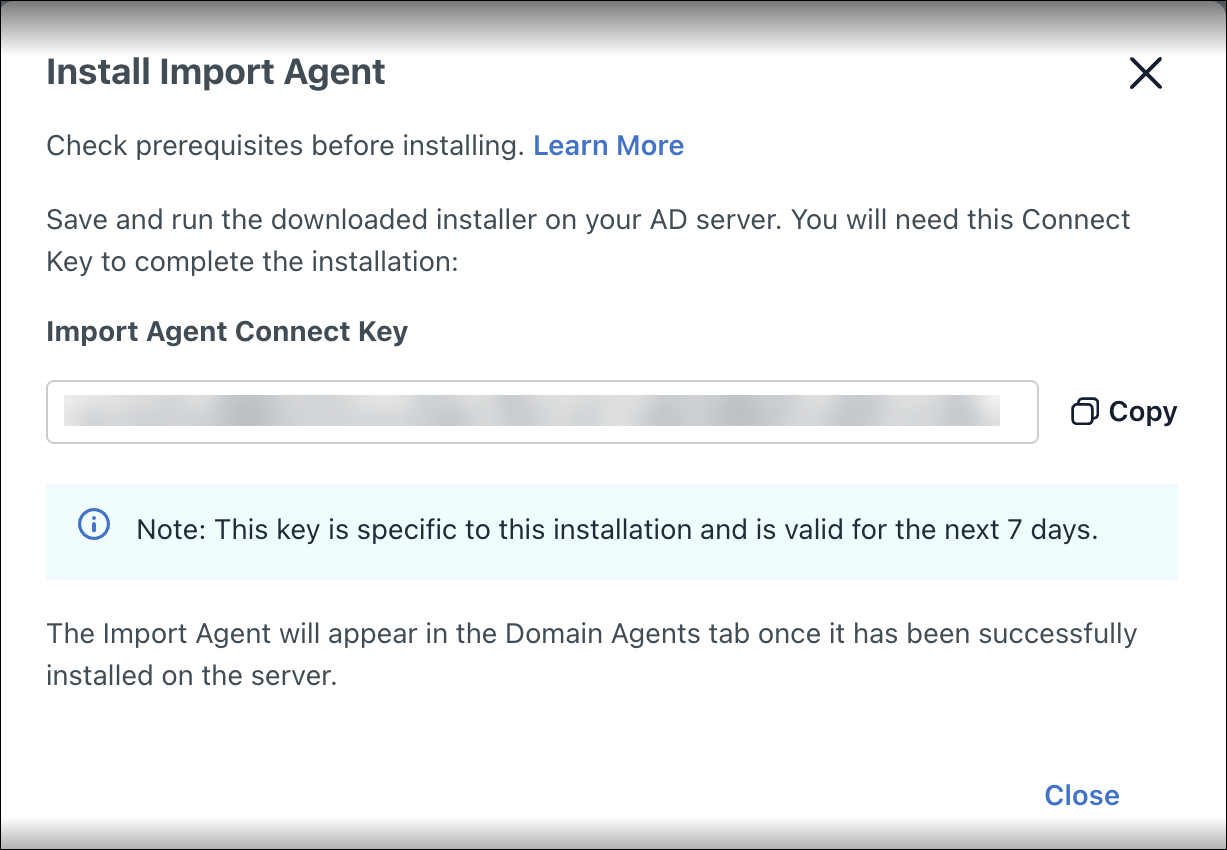
- Click Download Import Agent.
- The Import Agent installer will automatically save to your local Downloads folder.
- Click Copy and save the import agent connect key to a password manager for later use.
- This is the unique one-time use key that is required to connect the Import Agent to your JumpCloud Org and this specific AD domain within JumpCloud. You will input this key during the AD Import Agent install in the steps below.
![]()
The Connect Key will expire in 7 days if it is not used.
- Click Close.
- Save the downloaded installer to the AD servers.
Configure Default External Password Authority
- Go to Identity Management > Users.
- Click Settings.
- Set Default External Password Authority.
- Choose None (JumpCloud) to manage passwords and password policies in JumpCloud.
- Choose Active Directory to manage passwords and password policies in AD.
- Click Save.
Install the AD Import Agent on your AD Servers
![]()
When upgrading the import agent, you must use the same AD admin account used to initially install the import agent, or the import agent service won't start due to a credential error. If you don't know which account was used, you must re-enter the credentials in the registry after the upgrade and before the reboot.
- Navigate to Computer\HKEY_LOCAL_MACHINE\SOFTWARE\JumpCloud\AD Integration Import Agent\ldap in the Registry Editor.
- Select bind_password
- Enter the JumpCloud ADI import account password
- Click OK
![]()
If you are installing the import agent on your DCs, an agent must be installed on all of the write capable DCs within the domain. This does not apply to Read-Only DCs (RODCs).
If you are installing the AD import agent on non-DC domain member servers, we recommend installing on at least 2 servers.
Now you are ready to install the JumpCloud AD import agent.
- Browse to where you saved the AD Import installer file on the server.
- Right-click the file, then select Run as administrator.
- If you are upgrading, skip to step 12.
- The Install Wizard will start and prompt you to agree to the C++ license terms and conditions.

- Select the type of server on which you are installing the AD import agent:

- If you selected Domain Controller, skip to step 9.
- If you selected Member Server for the server type, provide the FQDN or IP address for that server. We recommend using FQDN.


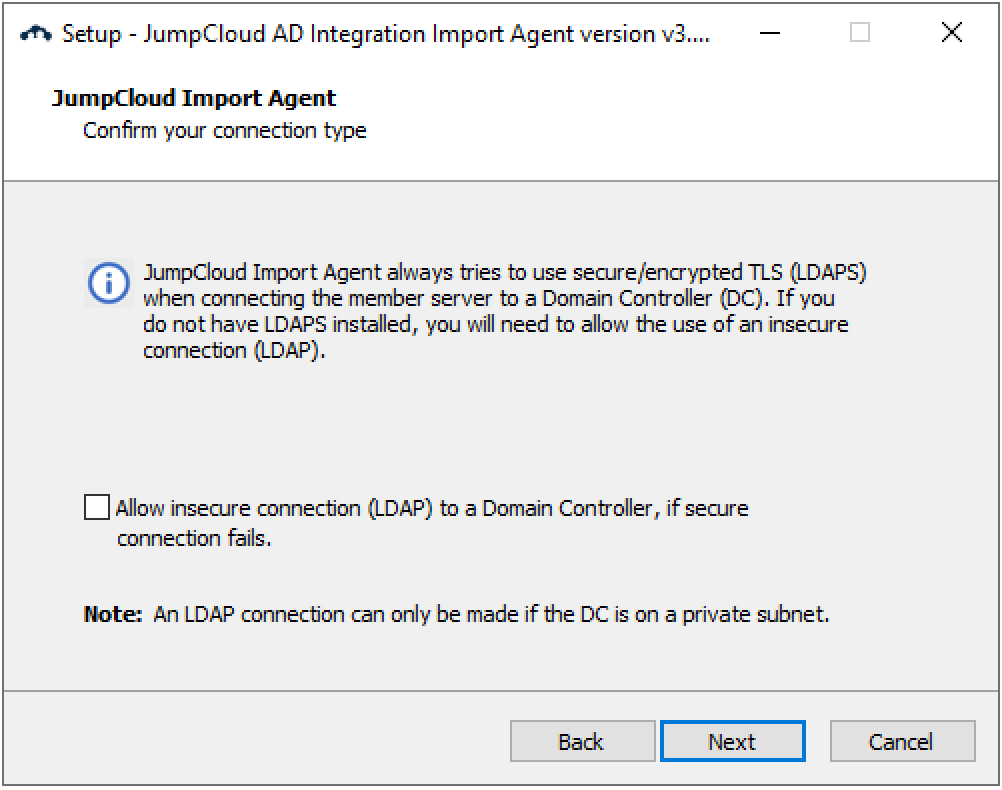
- Confirm your LDAP connection type and decide if you want to allow the use of LDAP if the connection using secure LDAP fails.
![]()
We STRONGLY recommend against allowing the use of LDAP if the connection using secure LDAP fails. LDAP is not secure and increases your potential risk of cyberattacks as it sends unencrypted data. Attackers can spy on the connection and intercept packets sent over the network. We STRONGLY recommend the use of LDAPS only when installing the agents on a member server.
![]()
If are installing the AD import agent on a member server and have not or cannot install LDAPS or TLS, you must select the "Allow insecure connection (LDAP) to a Domain Controller if secure connection fails"option. Otherwise, the integration will fail.
- If you checked Allow insecure connection (LDAP) to a Domain Controller, if secure connection fails, you must confirm that you understand the risk before you can proceed.

- Enter the jcimport account and password, then click Next. Be sure to use the NetBIOS domain format and not the full DNS name. (For example, example\jcimport and the user password).
![]()
If you’re unsure of the NetBIOS name, right-click the domain name in ADUC and select Properties. Use the value labeled Domain name (pre-Windows 2000).

- Enter the import agent connect key, then click Next.

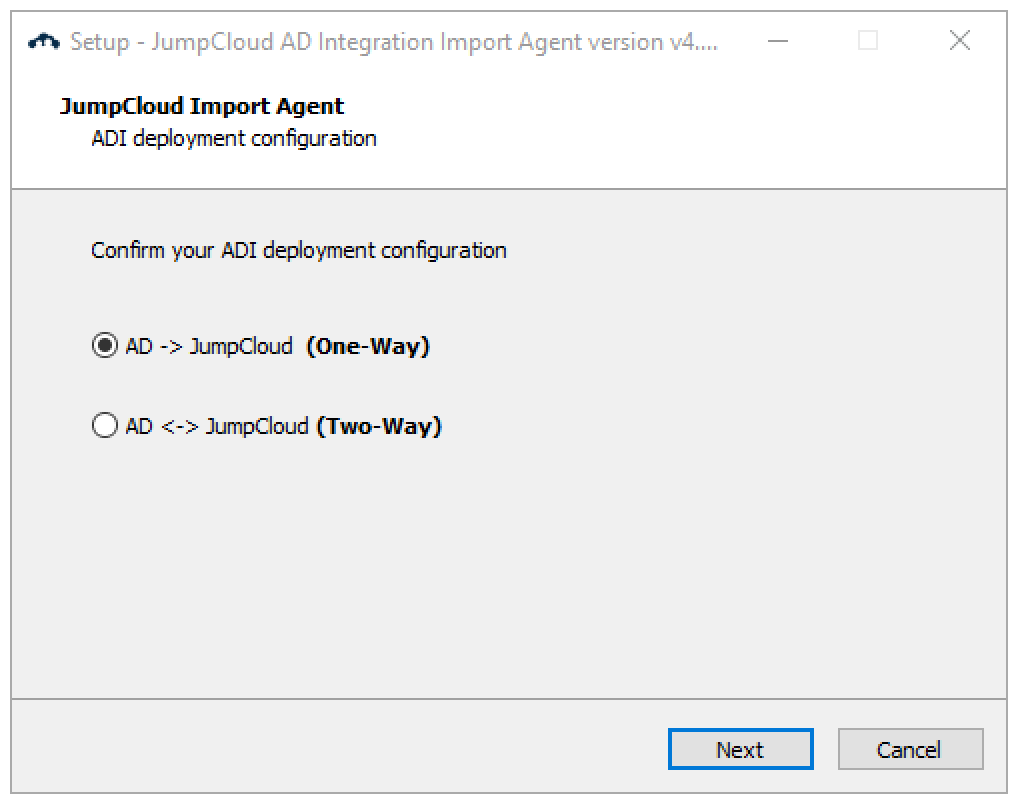
- Select your ADI deployment configuration
- Enter the security group DN
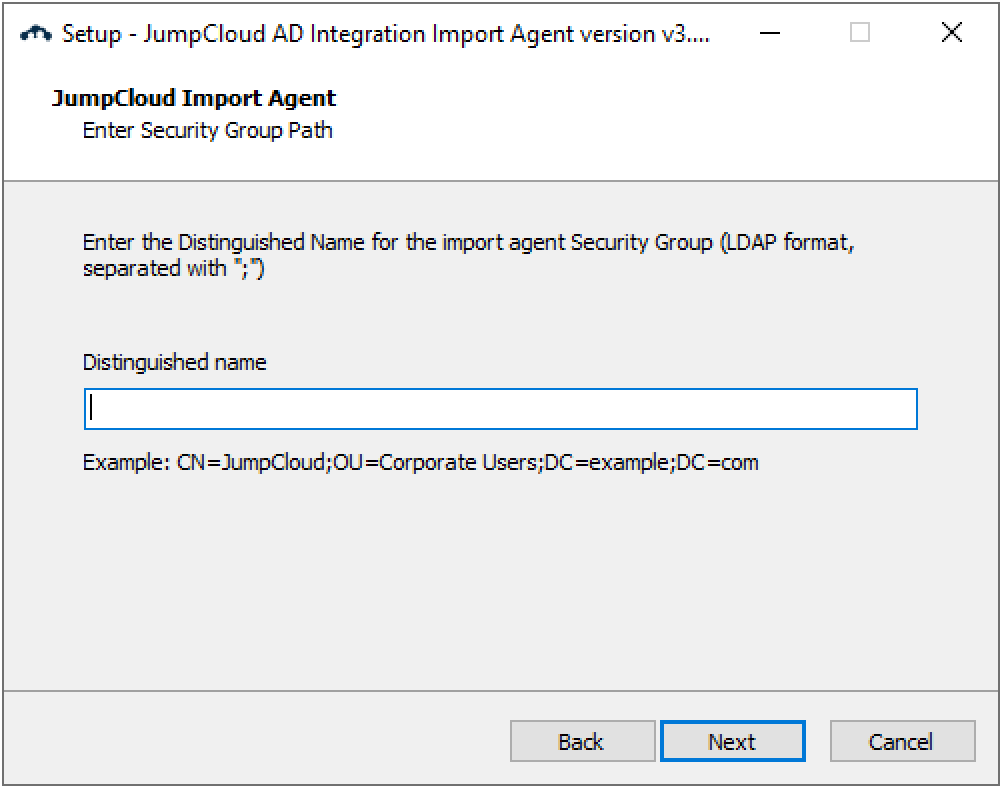
![]()
- Be sure to place semicolons ( ; ) between the values, e.g., “CN=JumpCloud;OU=Corporate Users;DC=example;DC=com”.
- The DN must be the same for both the AD import agent and AD sync agent.
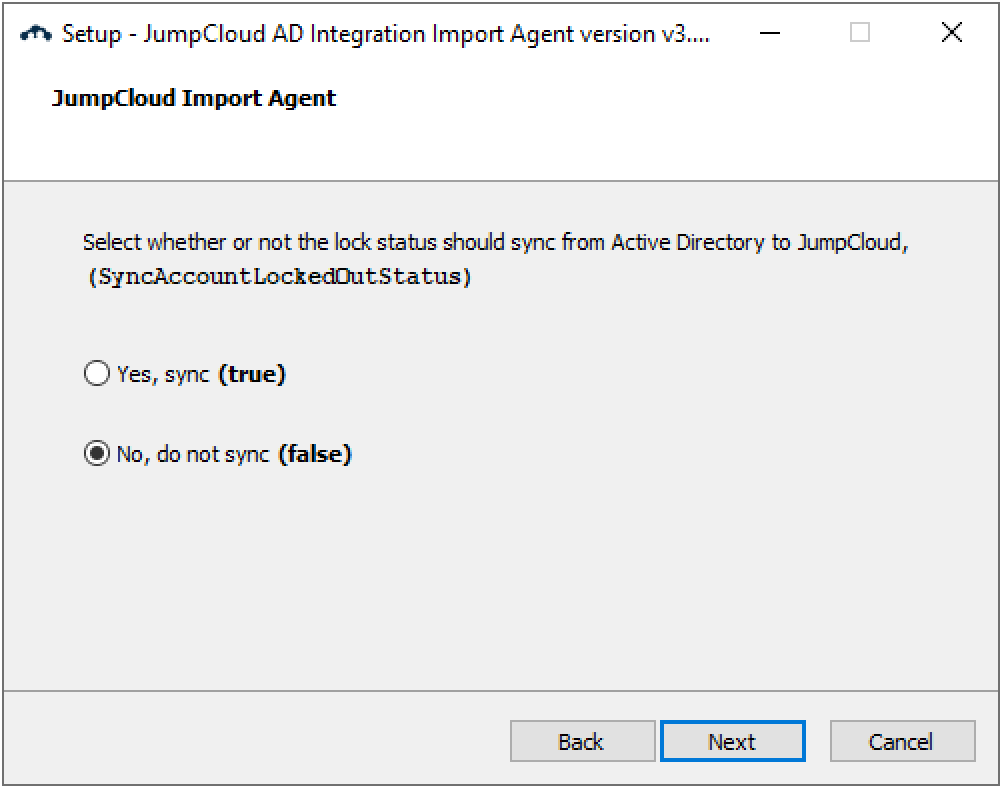
- Select whether to sync the lock status from AD to JumpCloud. Choose "Yes, sync (true)" if you want to sync the lock status.
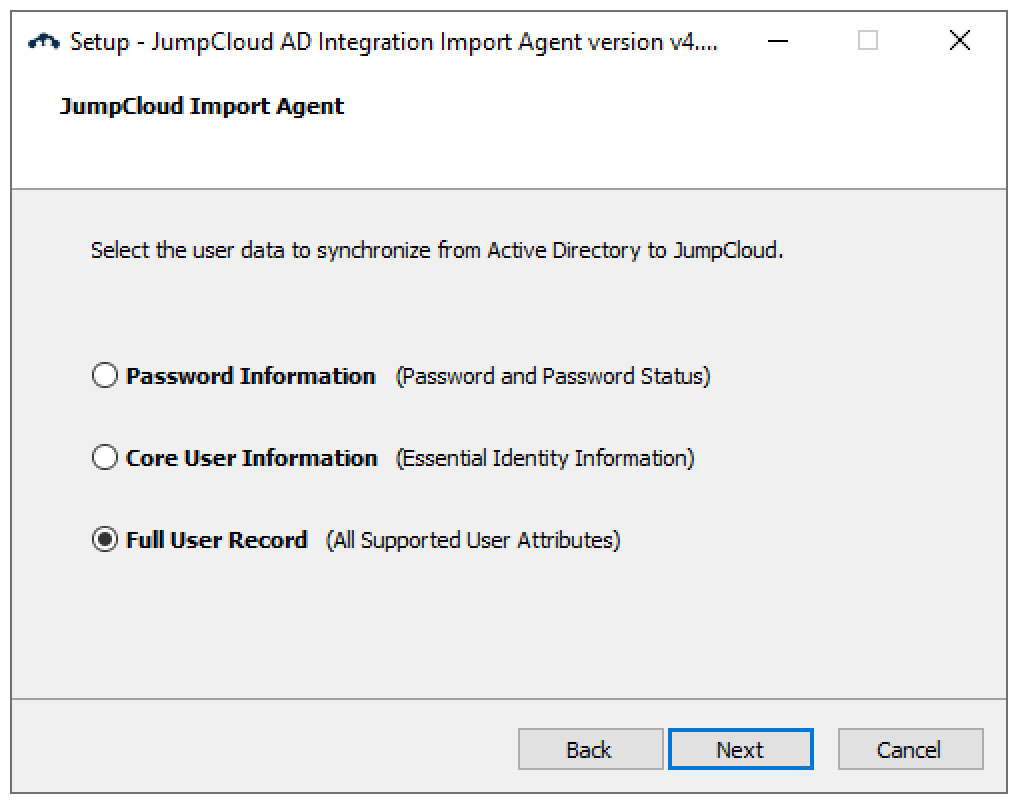
- Select the specific data you want to sync (SyncAttributesAction)
- Password Information (PasswordAttributes): Syncs password, password expired, password expiration date, and password lockout status (if applicable)
- Core User Information (BaseUserAttributes): Syncs firstName, lastName, username, email, password (if import agent is installed on DCs)
- Full User Record (AllSupportedAttributes): Syncs all currently supported users attributes, firstName, lastName, username, email, password (if import agent is installed on DCs), displayname, description, JobTitle, department, company, location, employeeType, phoneNumbers, addresses manager
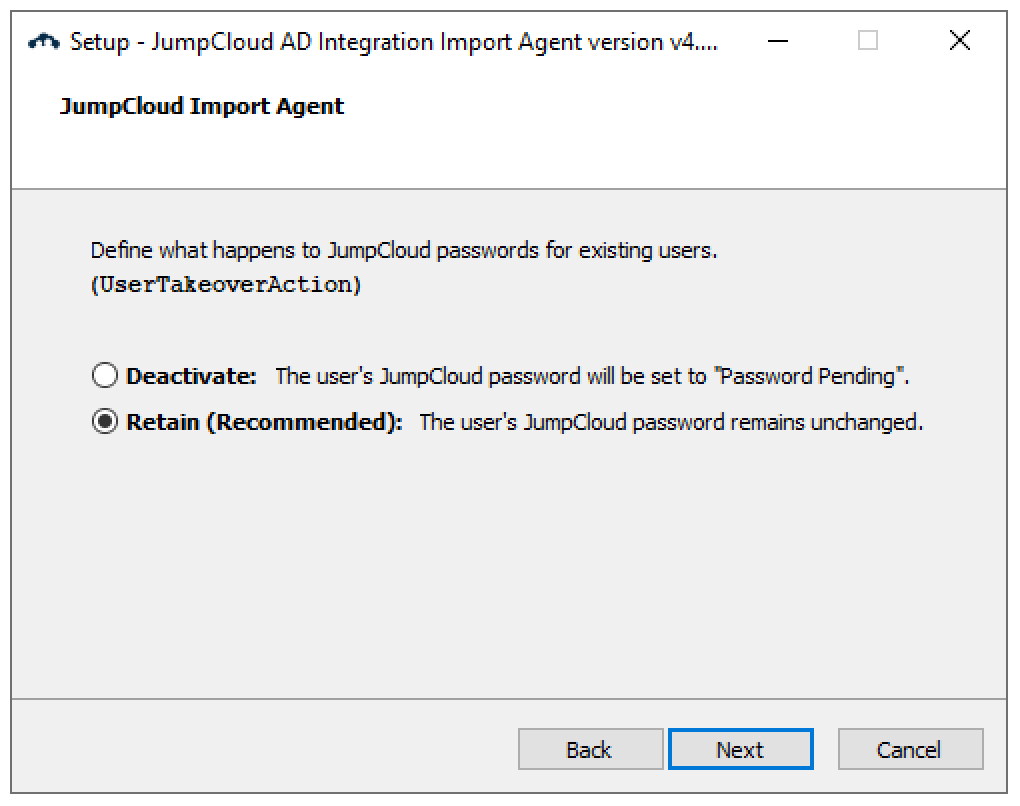
- Select what you want to happen to an existing JumpCloud user's password status when initially syncing fom AD to JumpCloud
- Select the installation directory

- Click Install. The import agent will take about 1 to 2 minutes to install.

- Select Yes, restart the computer now. If Google Workspace Password Sync (GSPS) is installed or further changes are needed, select No, I will restart the computer later.
- Click Finish.

![]()
You must reboot your AD servers to complete the AD Import Agent installation!
Adjust LSA Notification Packages for GSPS Compatibility
If Google Workspace Password Sync (GSPS) is installed on your AD server, you must adjust a registry setting to ensure its continued operation after the JumpCloud ADI import agent installation.
![]()
Incorrect registry modifications can lead to system instability. Proceed with care.
- Open Registry Editor:
- Press Win + R, type regedit, and press Enter.
- Navigate to LSA Key:
- Go to the following path: HKEY_LOCAL_MACHINE\SYSTEM\CurrentControlSet\Control\Lsa
- Modify Notification Packages:
- In the right pane, double-click the Notification Packages value.
- Locate passwordsync_dll within the "Value data" box.
- Carefully cut passwordsync_dll from its current position and paste it at the very end of the list. Each item should remain on its own line.
- Click OK.
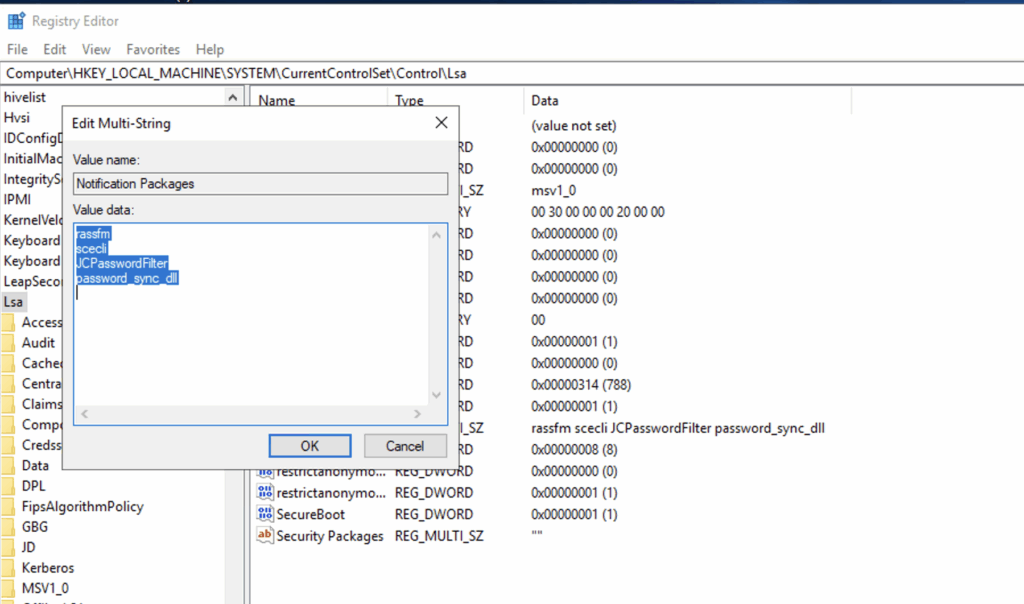
- Restart your AD server for the changes to take effect.
Verify the JumpCloud AD Import Agent Service Started
Once your DC restarted, verify that the service started by confirming display name: “JumpCloud AD Import Agent” ; service name: “JCADImportAgent”; is running in services.msc. If the service fails to start, you can review the agent logs at C:\Program Files\JumpCloud\AD Integration\JumpCloud_AD_Import.log.

Configure AD Import Agent
There are several configuration options that you should implement post-installation of the AD import agent. The recommended configuration updates are:
- Modify the UserDisableAction setting to unbind
- Modify the UserDissociateAction setting to unbind
You can further customize the import process and define behaviors in JumpCloud based on actions in AD by adjusting other advanced configuration settings. See Advanced Configurations for AD Import for more information.
Modify the settings
- Search for a text file editor (e.g., Notepad)
- Right-click and select “Run as administrator”
- Select File>Open
- Navigate to the location of the jcadimportagent.config.json file (The default location is C:\Program Files\JumpCloud\AD Integration\JumpCloud AD Import)
- Select Open
- Change UserDisableAction value to unbind
- Change UserDissociateAction value to unbind
- Change any other settings to customize the import behaviors
Save the configuration changes and restart the AD import agent service
![]()
You do not need to restart the DC only restart the service to apply configuration changes.
Once all configuration changes have been made save them and restart the service.
- Restart the JumpCloud AD Import Agent service using the Windows Service Manager.
- Save the jcadimportagent.config.json file.
Verify AD Import
Once you’ve installed and configured AD Import within your environment, you can easily verify that the JumpCloud AD Import Agent is working. Please ensure the following are present and visible: The JumpCloud AD Import Agent should be shown as green and active within the Admin Portal under Identity Management > Active Directories > Your ADI Instance > Domain Agents section.

![]()
If the AD Import Agent(s) are showing red or are in a non-connected state, please check services.msc to see if the service is running.
- JumpCloud User Group is now within your JumpCloud organization. The JumpCloud User Group should have a User Group icon with an AD badge in the User Group Details pane. See the example below:
- Navigate to Identity Management > User Groups. You should see the JumpCloud User Group with a Microsoft badge next to it. Click on the User Group to open up its details.

- When opened, you can see that the User Group has a Microsoft Badge and is also assigned to AD on the Directories tab.

Next Steps
Please read the Using and Managing the ADI article next.
Want additional assistance from JumpCloud?
If you’re having issues with getting JumpCloud’s ADI working, try the Troubleshooting Guide.
JumpCloud offers myriad professional services offerings to assist customers with implementing and configuring JumpCloud. If you’re looking for assistance with Migrating from AD, or to integrate AD with JumpCloud, we recommend you reach out to JumpCloud’s Professional Services team on the following page: Professional Services - JumpCloud.