
JumpCloud can integrate with Active Directory Domain Services (AD) using the JumpCloud Active Directory Integration (ADI). ADI enables the syncing of users, groups, and passwords between JumpCloud and on-premise or off-premise AD in flexible configurations to support your specific use case, goals, and AD environment.
This article will cover testing the LDAPS configuration in AD to ensure it is functional, and how to configure the Import and Sync Agents to communicate over LDAPS.
Testing for Secure LDAP (LDAPS) in a your AD Environment
Secure LDAP (LDPAS) allows for the encryption of LDAP data (which includes user credentials) in transit during any communication with the LDAP server (like a directory bind), thereby protecting against credential theft. It is not sufficient to only check if the Domain Controller is listening on the LDAPS port (TCP 636), you also need to confirm if LDAPS is working.
To verify if LDAPS has been configured on your Domain Controller and is functioning correctly, perform the following steps on each Domain Controller to which JumpCloud ADI will need to communicate.
- RDP onto the Domain Controller.
- Open the Run dialogue box and run the ldp.exe application.
- Within the Ldp window, select Connection > Connect...
- In the Connect window, enter the following:
- Server: Your server's FQDN
- Port: 636
- SSL: Enabled
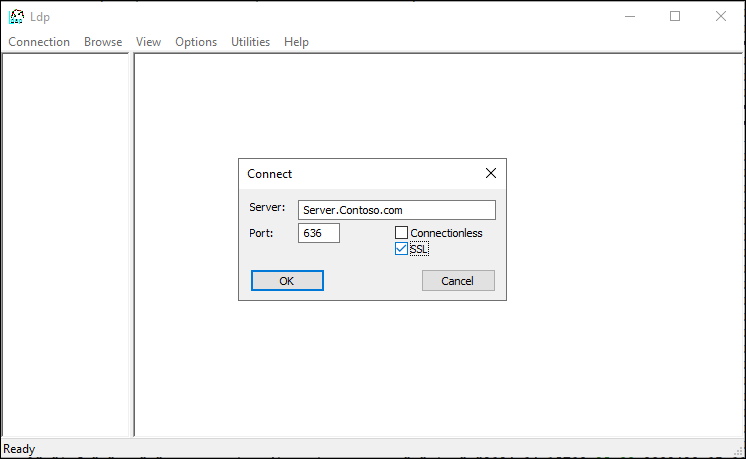
- Click OK.
- If the server is correctly configured for LDAPS, line 5 of the output (you might need to scroll up) will show that the host supports SSL.

If the host is NOT configured for LDAPS, then the following message will be shown and no changes will need to be made to your AD Import and Sync Agents.

Configuring the JumpCloud Active Directory Import Agent for LDAPS
![]()
Ensure you are on the latest version of the Active Directory Import Agent before proceeding.
To enable LDAPS for the JumpCloud Active Directory Import Agent, you need Administrative access to the Domain controller or Member server on which the Agent is installed.
- Using Windows Explorer, browse to C:\Program Files\JumpCloud\AD Integration\JumpCloud AD Import\.
- Open jcadimportagent.config.json using your preferred text editor. Your config file will look similar to this one:

- Modify the following fields:
- ServerIP - change from 127.0.0.1 to your server's FQDN (server.contoso.com)
- AllowInsecureConnection - change to false
- Address - change from 127.0.0.1 to your server’s FQDN (server.contoso.com)
- When you’re done, your configuration file will look similar to the following image:

- Save your changes and restart the JumpCloud AD Integration Import Agent service.
- If the service fails to restart, double check that the information entered into the Config file is correct. If everything looks correct, please review the Import Agent log for additional details
- Browse to C:\Windows\Temp\JumpCloud_AD_Integration.log to find the Import agent log
When LDAPS is not enabled in your AD Import Agent, you will see a message in your Import log similar to the one below:
JCADImportAgent:2024/04/15 08:12:53 validator.go:74: WARNING: eid='1', msg='LDAP is not secure and transmits unencrypted data using TCP. JumpCloud strongly recommends to use LDAPS for this integration.'
JCADImportAgent:2024/04/15 08:14:23 jcadimportagent.go:143:
Once LDAPS is enabled you will no longer see that message in your Import Agent log file.
Configuring the JumpCloud Active Directory Sync Agent for LDAPS
![]()
Ensure you are on the latest version of the Active Directory Import Agent before proceeding.
To enable LDAPS for the JumpCloud Active Directory Sync Agent you will need Administrative access to the Domain controller or Member server on which the Agent is installed.
- Using Windows Explorer, browse to C:\Program Files\JumpCloud\AD Integration\JumpCloud AD Sync.
- Open the config.json file using your preferred text editor. Your config file will look similar to this one:

- Modify the following fields:
- Address - change from 127.0.0.1 to your server's FQDN (Server.contoso.com)
- AllowInsecureConnection - change to false
- When you’re done your configuration file will look similar to the following image:

- Save your changes and restart the JumpCloud AD Integration Sync Agent service.
- If the service fails to restart, double check that the information entered into the Config file is correct. If everything looks correct, please review the Import Agent log for additional details.
- Browse to C:\Windows\Temp\JumpCloud_AD_Integration.log to find the Import agent log