
This article provides a step-by-step guide for configuring ADI to manage users, security groups, and passwords in JumpCloud (JumpCloud to AD one-way sync). This configuration supports organizations looking to have JumpCloud be their Identity Provider to minimize their AD footprint or migrate away from AD completely.
- Syncing data one-way from JumpCloud to AD
- Managing passwords from JumpCloud
- Creating, updating, and deactivating users from JumpCloud
- Creating and managing JumpCloud AD security groups from JumpCloud
- Managing AD and ADI group membership from JumpCloud
Deployment Configuration Overview
- Use ADI sync agent only
- Install agents on either domain controllers (DCs) or member servers
- Assign users and user groups to the AD instance in JumpCloud
To explore the use cases and benefits of this configuration see Manage user, groups, passwords in JumpCloud in the Configure Active Directory Integration (ADI) help center article.
Workflows
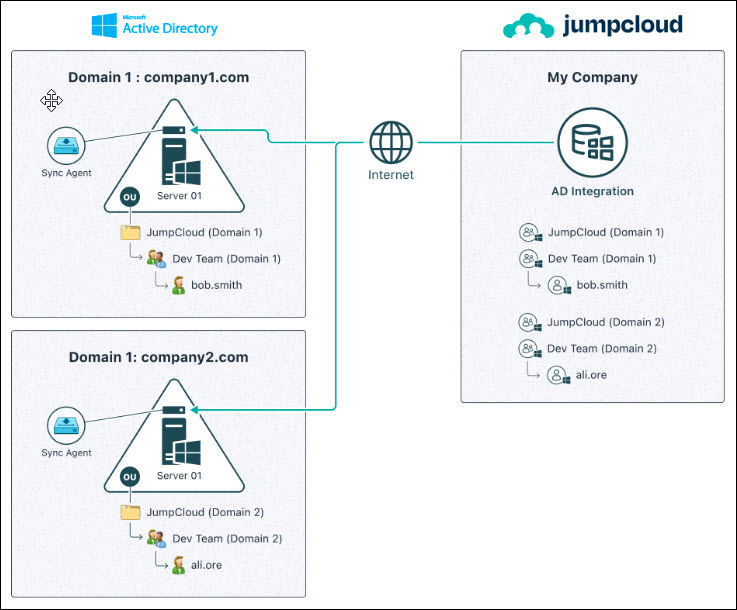
JumpCloud Sync Only – Single Domain Workflow

JumpCloud Sync Only – Multiple Domain Workflow
To learn more about the general user identity workflow and expected behavior for any user, group, and password change after the AD Sync agents have been configured, read Use and Manage the Active Directory Integration (ADI) .
System Requirements
- 64-bit Windows Server (versions 2012, 2016, 2019, 2022)
- Server Core installation is also supported for Windows Server versions 2016, 2019, and 2022. You will need to include the /msiexec parameter when running the agent installer
- 15MB disk space
- 10MB RAM
Considerations
Agent Upgrade Considerations
![]()
You must use the same AD admin account used to initially install the sync agent. Otherwise, the sync agent service won't start due to a credential error. If you don't know which account was used, choose to view all the installation screens and re-enter the agent service account credentials.
- The agent service account password is machine + user encrypted when stored in the registry.
- The installation wizard gives you an option to see all installation screens or only the ones for configuring the new settings.
General Considerations
- We strongly recommend installing and using LDAPS for the ADI. Configuring and using LDAPS on the Domain Controller that the JumpCloud ADI agents will connect to secures any sensitive information that is exchanged between the JumpCloud agents and the Domain Controller and protects against malicious users.
- Connect Keys are one-time use keys required for installing the sync agent on a new AD server. They are not required when upgrading an existing installation.
![]()
The Connect Key will expire in 7 days if it is not used.
- Demoting a DC installation to a member server and promoting a member server installation to a DC aren’t supported. The agent(s) must be uninstalled first and then installed on the other type of server
- Non-standard ASCII characters are not supported in the Root User DN
- The AD Domain and Root User container DN needs to match the Domain and Root User container configured for AD Sync
- The JumpCloud AD sync agent services use TLS for all communication. If no network connectivity exists to JumpCloud, the ADI won’t work properly
- When multiple AD sync agents are installed, one is designated as the primary agent by the ADI service. All create and change requests are sent to that agent. If that agent becomes unavailable, another active sync agent is automatically designated as the primary
- Password complexity requirements in AD and JumpCloud should be as closely aligned as possible to avoid passwords being rejected and failing to sync due to not meeting the complexity requirements
- The user attributes that sync are:
- First Name
- Last Name
- Username
- User state
- Password
- Groups sync automatically from JumpCloud to AD when one or more sync agents are installed. This sync cannot be disabled
- The passwords for the server accounts used by the integration (e.g., jcimport and jcsync) should be rotated periodically for security reasons
- As of ADI sync agent version 4.x, the following changes were made:
- The default location for all agent related installation, configuration, and log files is C:\Program Files\JumpCloud\AD Integration\
- The ADI sync agent can be installed independently of the ADI import agent
- The ADI sync agent connect key is encrypted and the value in the registry is replaced with the encrypted value when the agent starts
- Managing privileged user accounts, such as Domain Admins, in AD from JumpCloud isn’t supported.
- AD flags privileged accounts with “adminCount=1” in the directory, which results in any inherited permissions granted to the JumpCloud AD agent services to be removed. This prevents JumpCloud from being able to effectively manage those privileged accounts
Installation Steps Overview
The main steps you will take to install and configure AD for this use case are:
- Complete the Prerequisite Checklist.
- Determine the Root User container in AD.
- Create the AD Sync Service Account.
- Delegate control for the AD Sync Service Account.
- Create an AD domain instance in JumpCloud.
- Select your configuration and download the agent.
- Run the AD Sync Agent Installation Wizard on AD servers.
- Verify AD sync.
- [Optional] Perform a one-time import of users from AD to JumpCloud.
Prerequisite Checklist
Before installing the ADI sync agent, we recommend completing each item in the following checklist before continuing:
- Know your AD Domain Admin credentials.
- Decide whether you want to install the sync agents on your AD domain’s non-DC Domain Member Servers or Domain Controllers (DCs).
- If installing on DCs, we recommend that you install the AD Sync agent on your Primary DC and any DC impacted by extended replication delays
- Verify you have access to all DCs or non-DC Domain Member Servers in the AD domain.
- Ensure your DCs or non-DC Domain Member Servers are running on a JumpCloud supported 64-bit Windows Server version (2012, 2016, 2019, 2022).
- Verify DCs or non-DC Domain Member Servers have networking access to the internet and are able to communicate outbound to console.jumpcoud.com over HTTPS port 443.
- Verify all users to be synced from JumpCloud to AD have a value for first name and last name in JumpCloud.
- Align password complexity requirements between AD and JumpCloud as closely as possible. Otherwise, passwords may not replicate if they’re rejected by the destination directory’s complexity requirements.
- [Strongly recommended] Install LDAPS.
Prepare for Installing the Agent
To export and update user attributes, passwords and security groups from JumpCloud to AD, you’ll need to install a JumpCloud AD sync agent on your AD domain’s non-DC Domain Member Servers (member servers) or Domain Controllers (DCs). Complete the steps below to prepare for installing the agents on your server(s).
Determine the Root User Container in AD
Prepare for the agent installation in AD by determining the Root User Container.
The agent uses the AD’s ‘Users’ container (CN=Users) by default. The 'Users' container is pre-populated in the AD Users and Computers (ADUC) interface and labeled as “Users” as shown in the following image.

To use AD’s default Root User container, the value you will need to enter during the AD sync agent installation is:
- CN=Users;DC=example;DC=com
![]()
Commas (,) are not supported. You must use semicolons (;).
To use a Root User Container other than Active Directory's default (CN=Users), you'll need its distinguishedName value.
To obtain the User Container distinguishedName:
- Verify the full LDAP path for the chosen Root user container you have selected in ADUC:
- From the ADUC panel’s View menu, enable Advanced Features.
- Right-click the container and select Properties.
- Select the Attribute Editor tab.
- Select the “distinguishedName” attribute, then click View.
- Note the value. It will need to be entered during both the AD import and AD sync agents installation.

![]()
You will need to replace the commas (,) with semicolons (;) when entering the DN during the agent installation.
Create the AD Sync Service Account in AD
Create a new AD-based service account (standard user account) that allows the JumpCloud AD sync agent to manage users and groups.
- Open the ADUC Menu.
- Click start button and type “dsa” and click the Active Directory Users and Computers icon.
- Right click on the container and click New > User.

![]()
This user cannot:
- Be a Domain Administrator
- Have the username of “JumpCloud”
- Be a member of the JumpCloud security group
- Enter the following values for the JumpCloud Import Service Account user:
- First Name - JumpCloud
- Last Name - Sync
- User logon name - jcsync
![]()
Use jcsync to distinguish what this user is for and to which agent it is attached.
![]()
The user logon name cannot be “JumpCloud”.

- Click Next
- Enter a password for the jcsync user and ensure that it is set to Never Expire since this will be a service account for the Sync Agent.
![]()
This password should still be rotated periodically for security reasons.
- Click Save.
Delegate control for the AD Sync Service Account in AD
- Navigate to the Root User Container in ADUC that you have selected, right-click the container and select Delegate Control. This launches the Delegation of Control Wizard.
- Click Next.
- Add the newly created service account user to the Delegation of Control Wizard.

- Click Next, then select the following tasks:
- Create, delete, and manage user accounts
- Reset user passwords and force password change at next logon
- Read all user information
- Create, delete, and manage groups
- Modify the membership of a group

- Click Next, and then Finish.
Install the AD Sync Agent
Create an ADI instance in JumpCloud
Create a new ADI domain instance in JumpCloud if one does not already exist:
- Log in to the JumpCloud Admin Portal.
- Navigate to Directory Integrations > Active Directory.
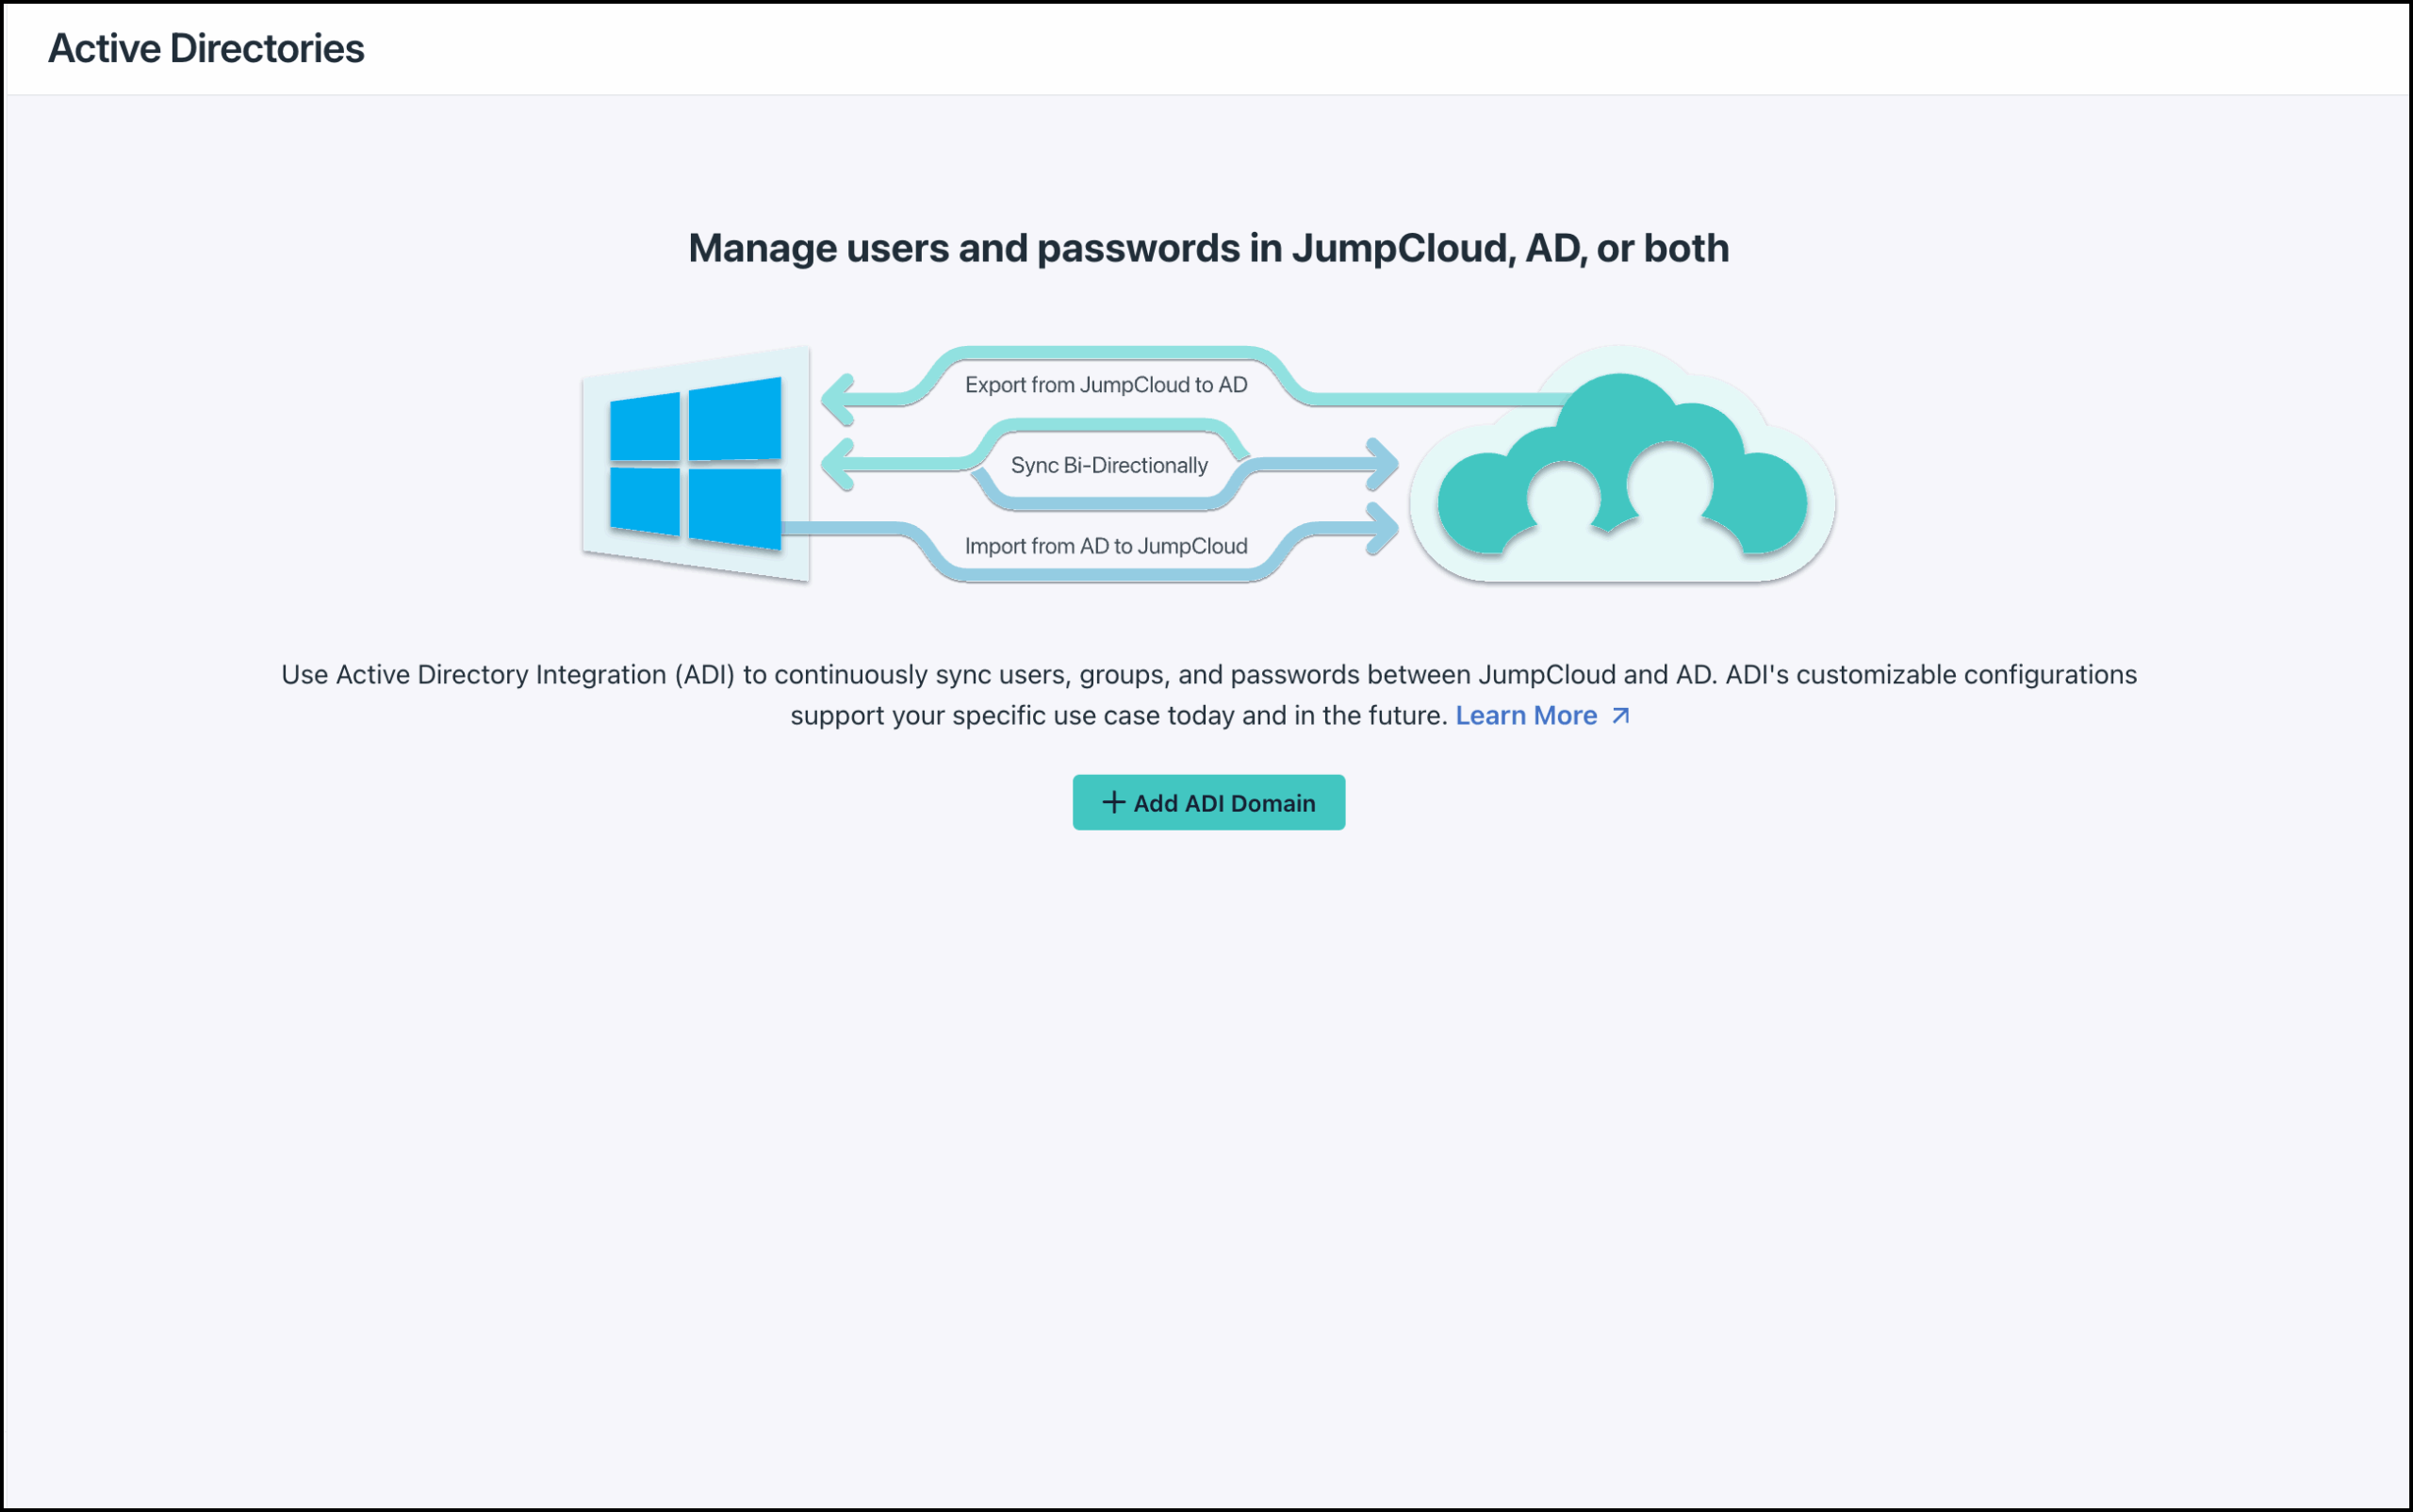
- Click + Add ADI Domain.
- Select Manage users and passwords in JumpCloud.

- Enter the name of an Active Directory domain that you want to integrate with your JumpCloud tenant. For example, “DC=example;DC=com”.
![]()
The “DC” must be in capital letters. Each value must be separated with a semicolon (;) not a comma (,). There should be no spaces. The domain case must be the same as it is in the AD import configuration file.

- Click Save.
Download the Sync agent
- Click Download Sync Agent.

- The Sync Agent installer will automatically save to your local Downloads folder.
- When the Install Sync Agent modal appears, you will be presented with the Sync Agent Connect Key. This is the unique one-time use key that is required to connect the Sync Agent to your JumpCloud Org and this AD domain Integration within JumpCloud. You will input this key during the AD Sync Agent install in the steps below. Click Copy and save it to a password manager for later use.
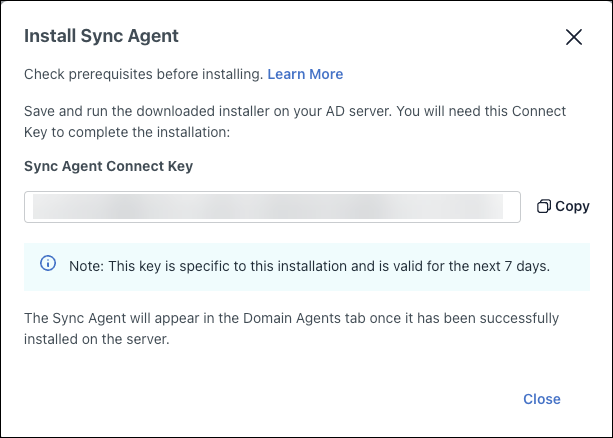
- Click Close.
- Click Configure ADI. A Details page will appear.
- Click Save.
Install the AD Sync Agent on Your AD Servers
![]()
When upgrading the sync agent, you must use the same AD admin account used to initially install the agent, or the sync agent service won't start due to a credential error. If you don't know which account was used, do the following:
- Select Yes to the "Would you like to review your existing configuration settings" prompt
- Select Next until you get to the LDAP Credentials screen
- Enter the agent account credentials
- Click Next
- You do not need to re-enter a Connect Key in this flow
![]()
If you are installing the AD sync agent on DCs, do not install the AD Sync Agent on Read-Only DCs (RODCs).
Now you are ready to install the JumpCloud Sync Agent on one or more member servers or your Primary DC and any DC within the domain impacted by extended replication delays.
- Browse to where you saved the AD Integration Sync installer file on your DC.
- Right-click the file, then select Run as administrator.
- Once the Installer Wizard appears, click Next.
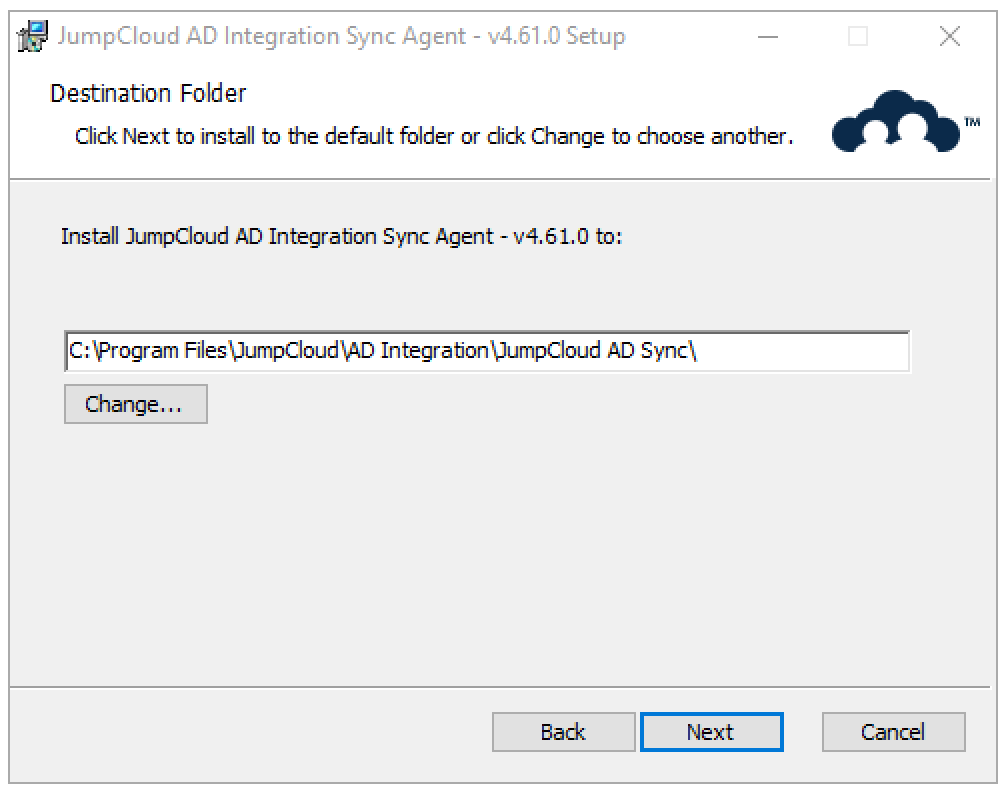
- On the Destination Folder screen, click Next.
- Select the type of server on which you are installing the agent, DC or non-DC member server, then click Next.
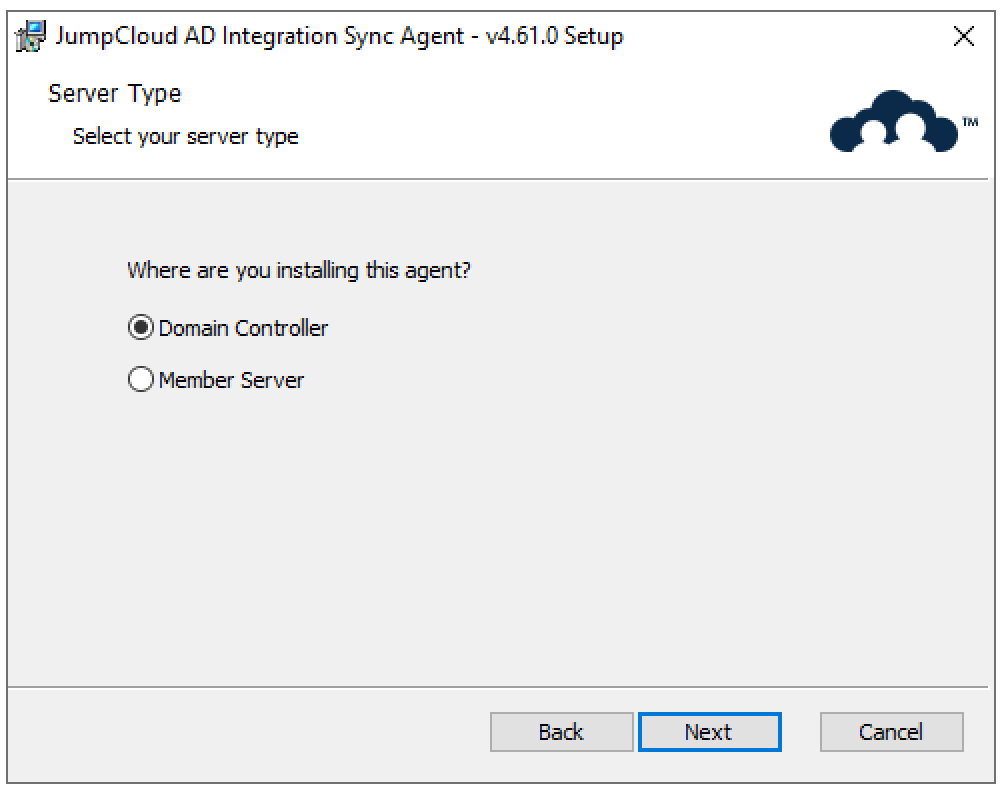
- If you chose Domain Controller, skip to step 10.
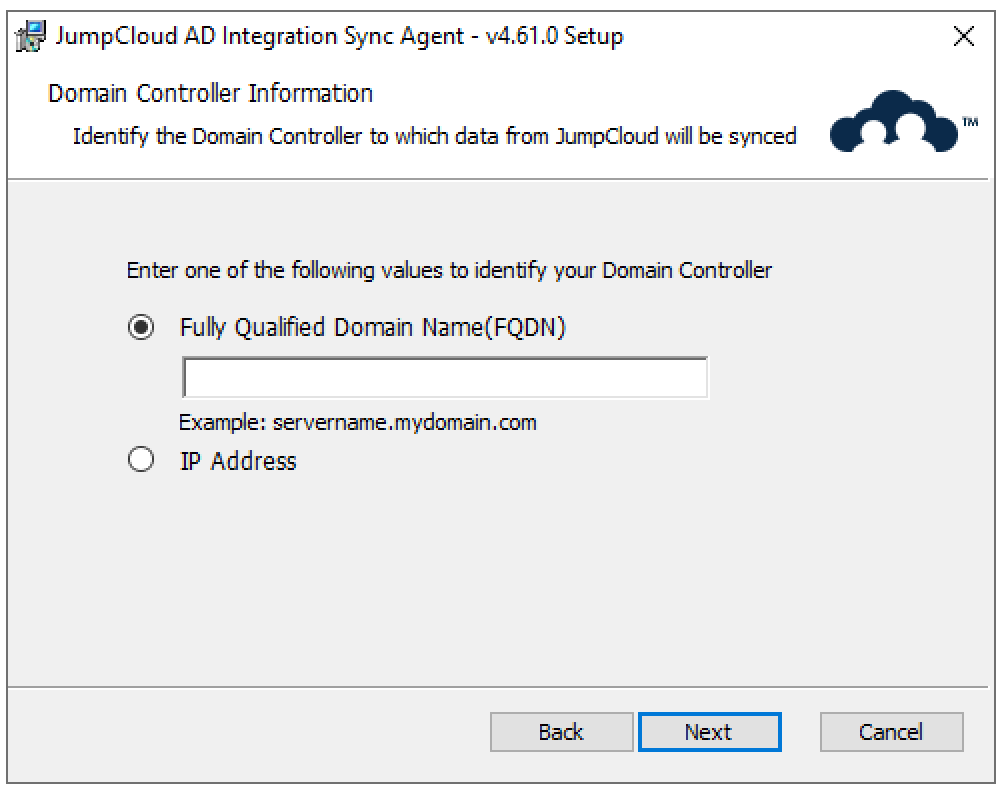
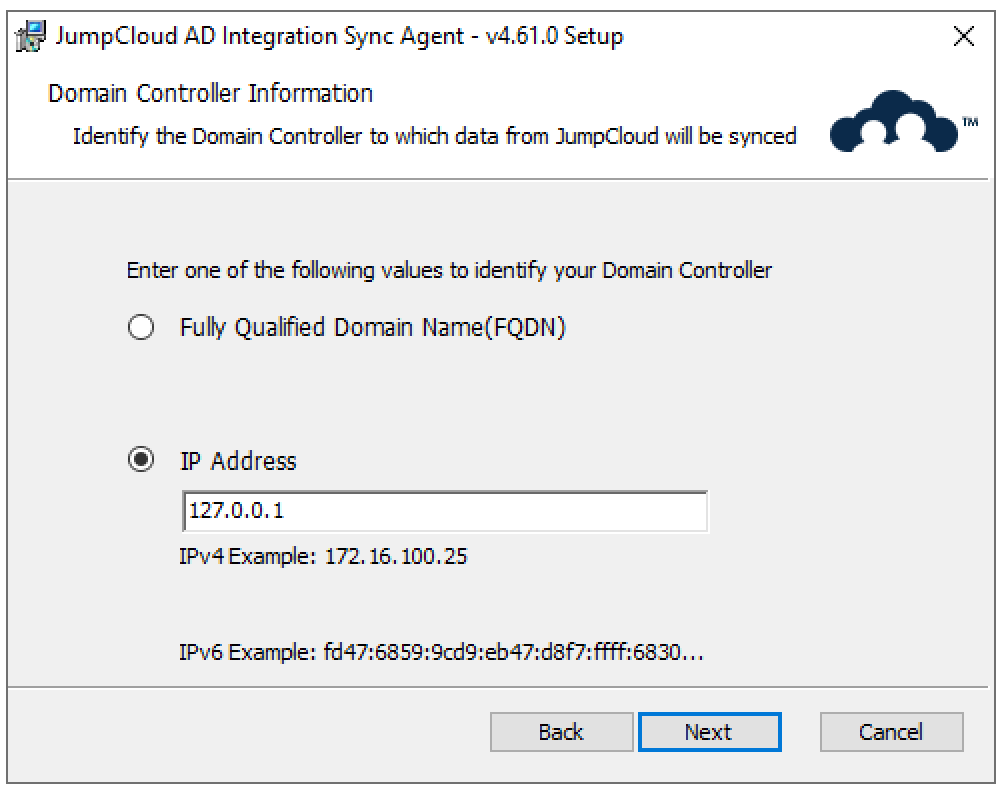
- If you chose Member Server as your server type, enter the information for the DC to which the member server should connect to sync data from JumpCloud to AD. We recommend using the FQDN for your DC.
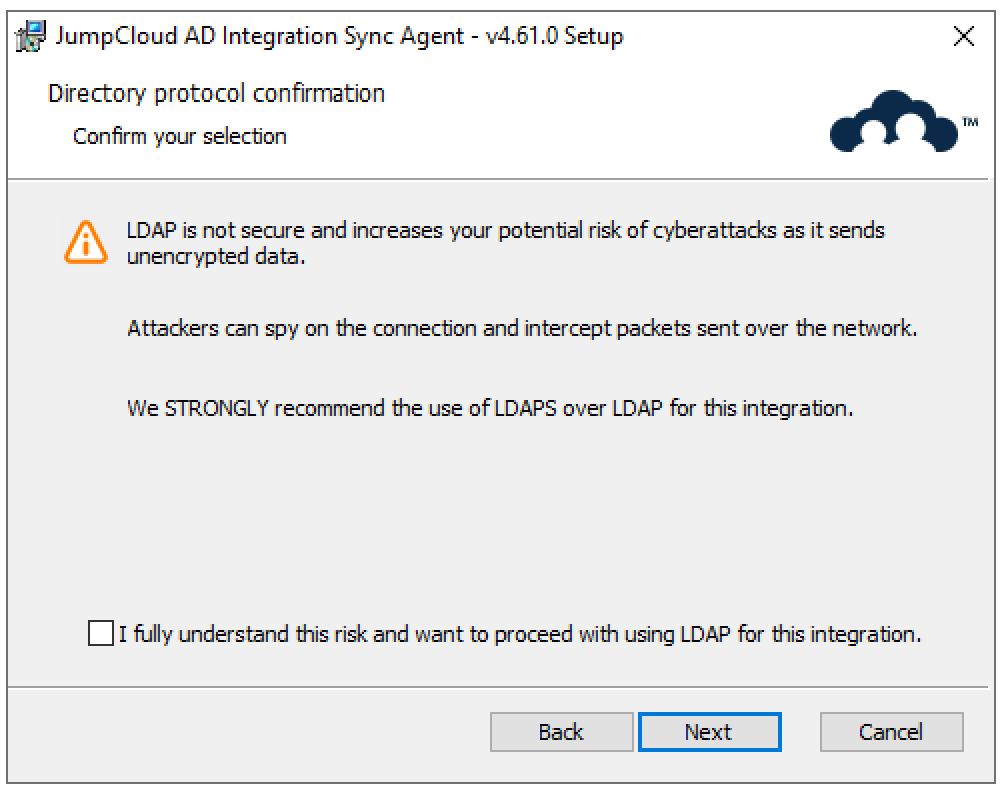
- Confirm your LDAP connection type and decide if you want to allow the use of LDAP if the connection using secure LDAP fails.
![]()
We STRONGLY recommend against allowing the use of LDAP if the connection using secure LDAP fails. LDAP is not secure and increases your potential risk of cyberattacks as it sends unencrypted data. Attackers can spy on the connection and intercept packets sent over the network.
We STRONGLY recommend the use of LDAPS only when installing the agents on a member server.
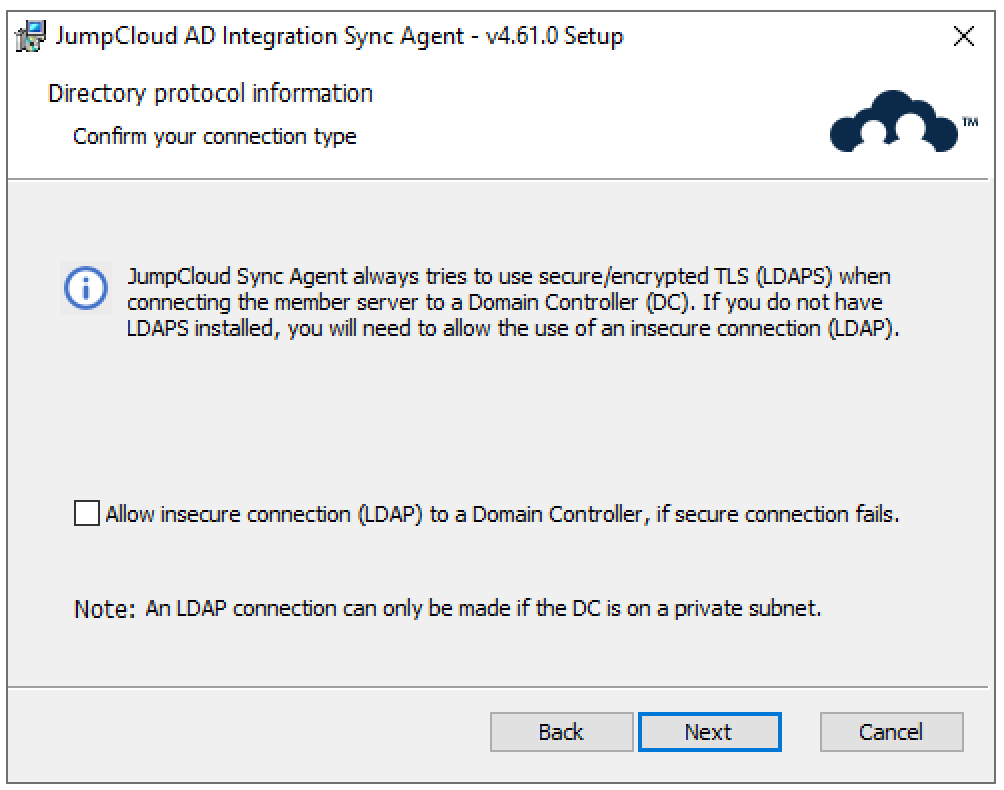
- If you checked Allow insecure connection (LDAP) to a Domain Controller, if secure connection fails, you must confirm that you understand the risk before you can proceed.
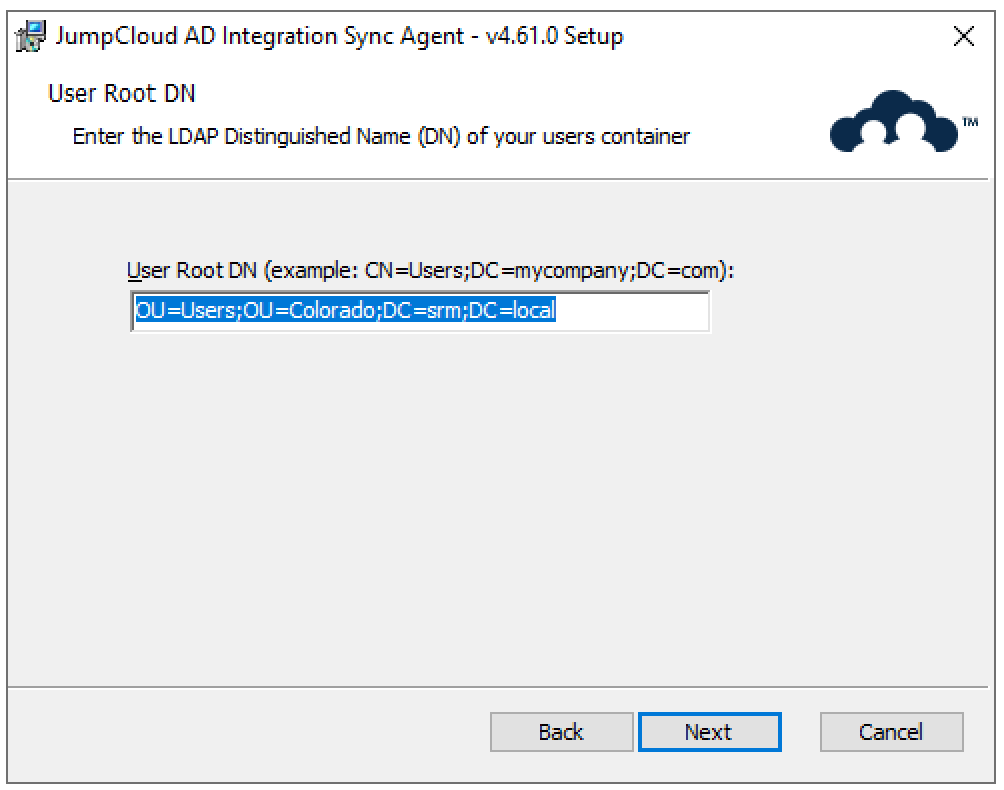
- Enter in the Root User Container you noted in the Determine the Root User Container in AD section above. If you’re using the default AD Root User Container, the value will be CN=Users;DC=company;DC=com. If you’ve chosen another Root User Container, enter the value you noted.
- In this example, we’ve modified the Root User Container. The value is: OU=Corporate Users;DC=example;DC=com
![]()
Case is important when entering the User Root DN, always use capital “OU”, “CN”, and “DC”.
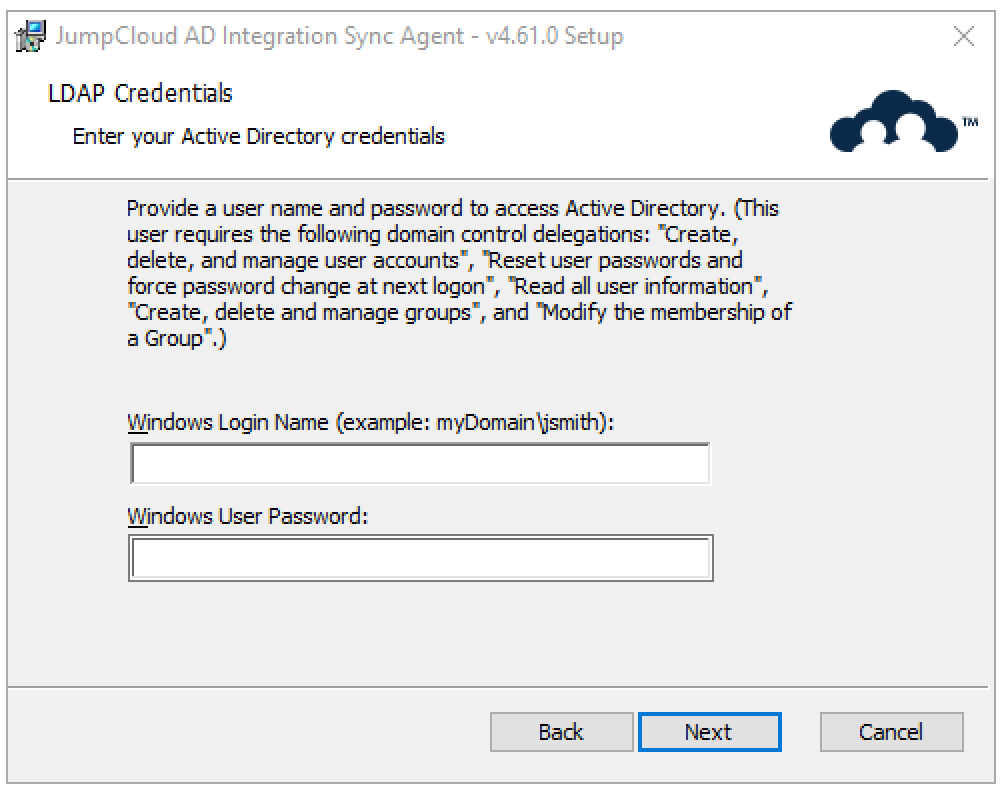
- Enter the AD Sync Agent’s Service Account you’ve created. This should be the jcsync User Account you created in the Create the AD Sync Service Account section above. Then click Next.
![]()
Case is important when entering the Windows Login Domain, use the same case that was used when creating the AD domain instance in JumpCloud.
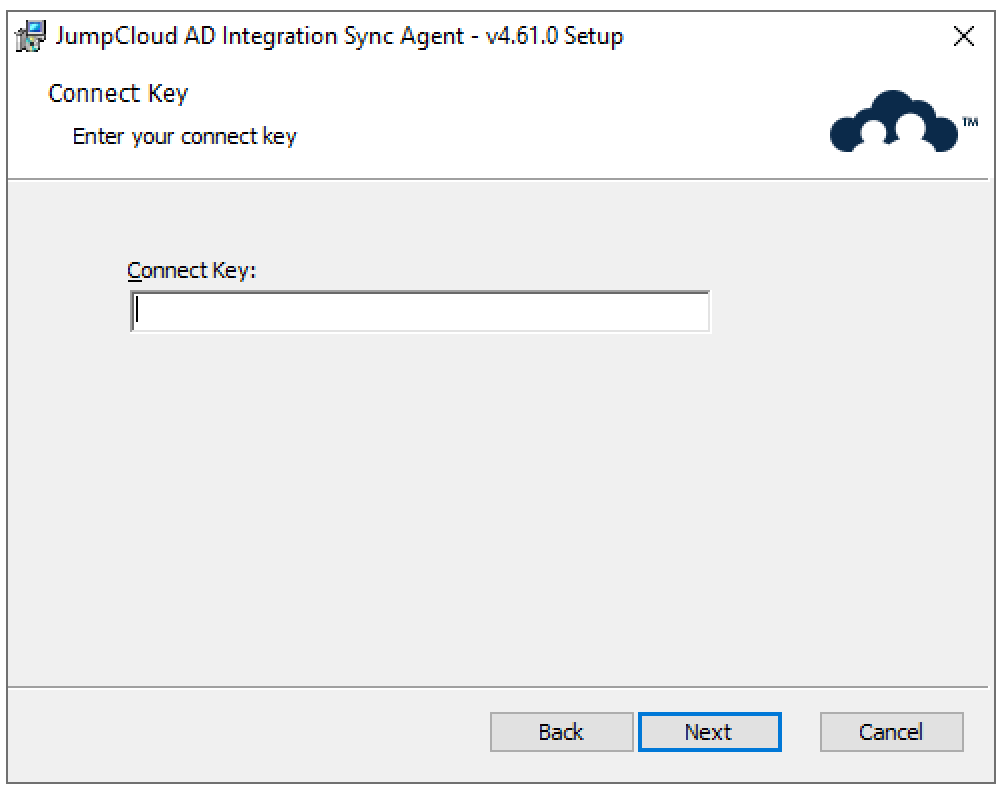
- Enter the Connect Key that was presented to you within the JumpCloud Admin Portal after downloading the AD Sync Agent. Then click Next.
The following steps allow you to select the sync agent's configuration settings, which will determine specific synchronization behaviors. Reference the Sync Agent section of Advanced Configurations for the Active Directory (ADI) for details about each setting.
- Select your ADI deployment configuration

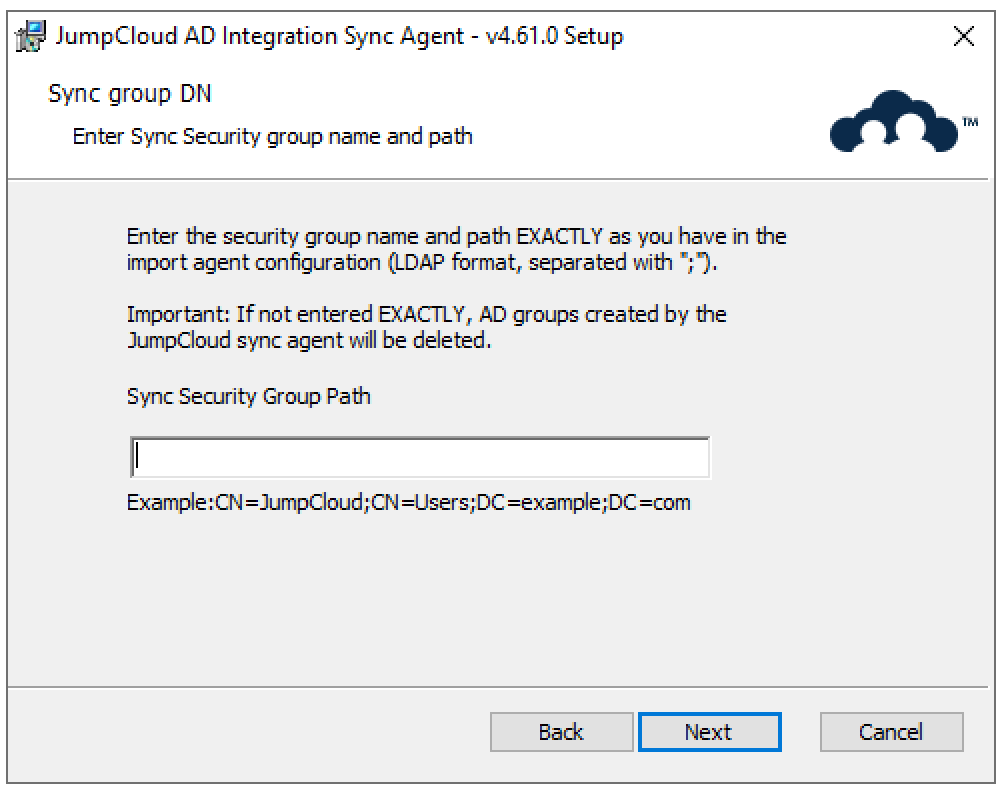
- Enter the Distinguished Name (DN) of an existing Active Directory security group (sync_group). This group will act as the parent for any new security groups that JumpCloud creates in AD, keeping them organized as sub-groups.
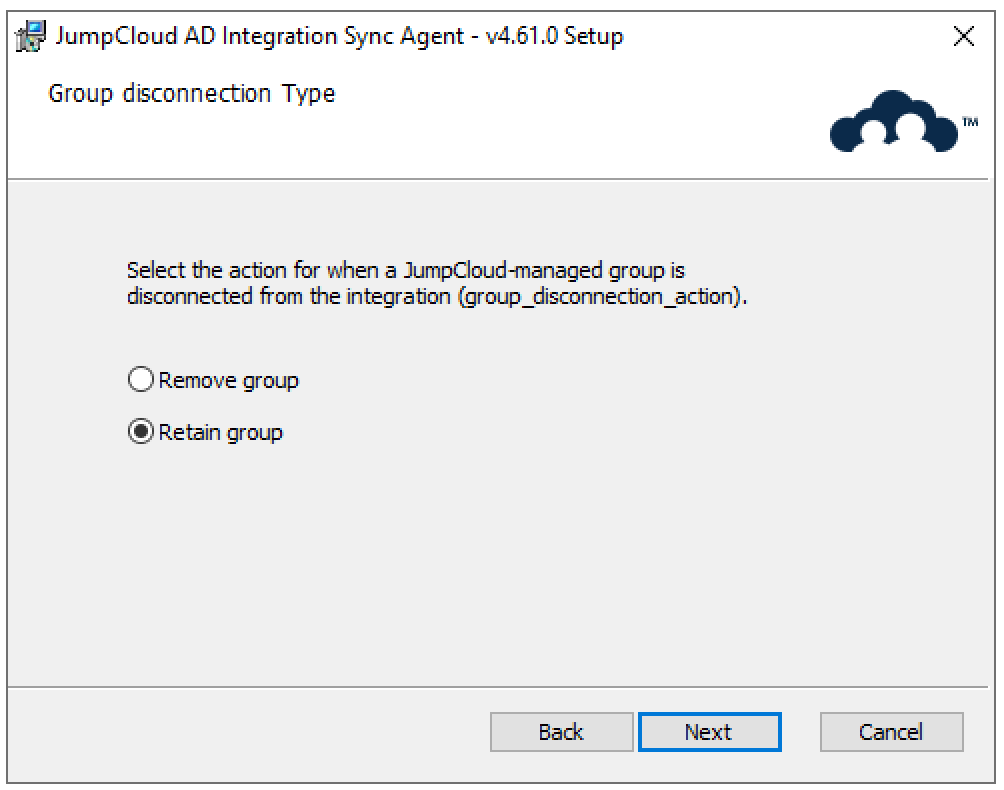
- Choose what happens to JumpCloud-managed Active Directory security groups if they are disconnected from ADI in the JumpCloud Admin Portal (group_disconnection_action).
- Remove: The security group is permanently deleted in AD.
- Retain (Default): The security group remains in AD, but JumpCloud will no longer manage it.
- Choose what happens to an AD user account when it's disconnected from JumpCloud's ADI (e.g., user deleted in JumpCloud while still connected to ADI or all connections removed); user_disconnection_action.
- Remove: The user's AD account is permanently deleted.
- Retain: The user's AD account remains active in AD.
- Disable (Default): The user's AD account is disabled in AD.

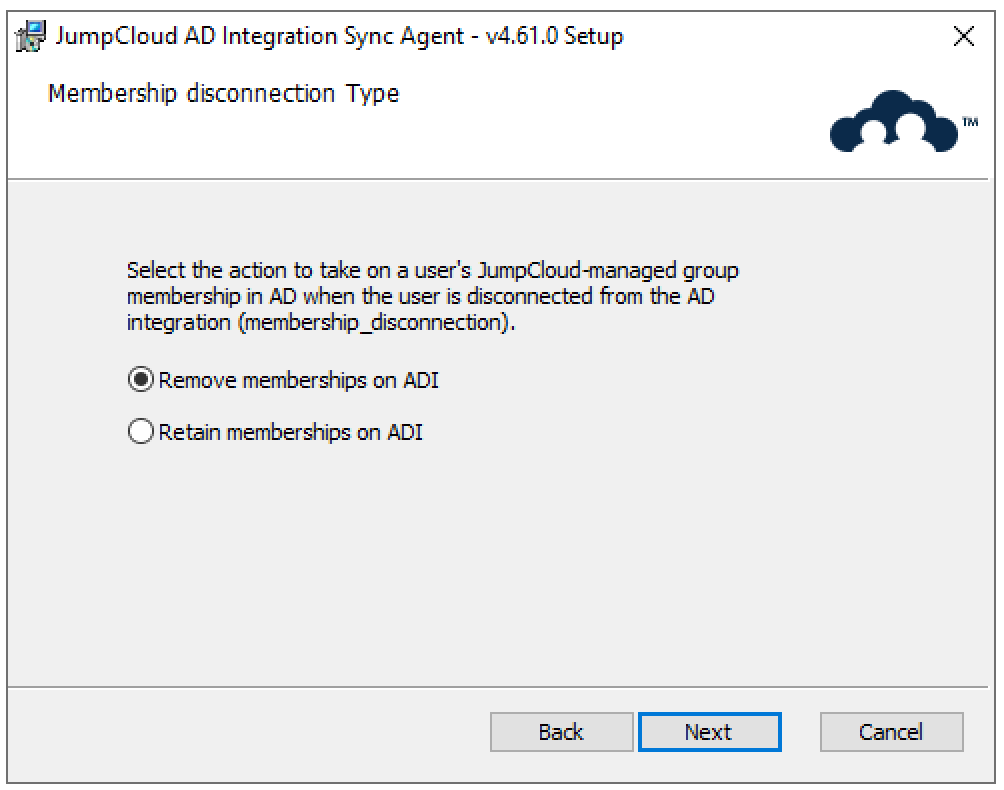
- Choose what happens to a user's memberships in JumpCloud-managed Active Directory security groups when that user is disconnected from ADI (membership_disconnection_action).
- Remove (Default): The user is removed from all JumpCloud-managed AD security groups.
- Retain: The user remains a member of these groups in AD.
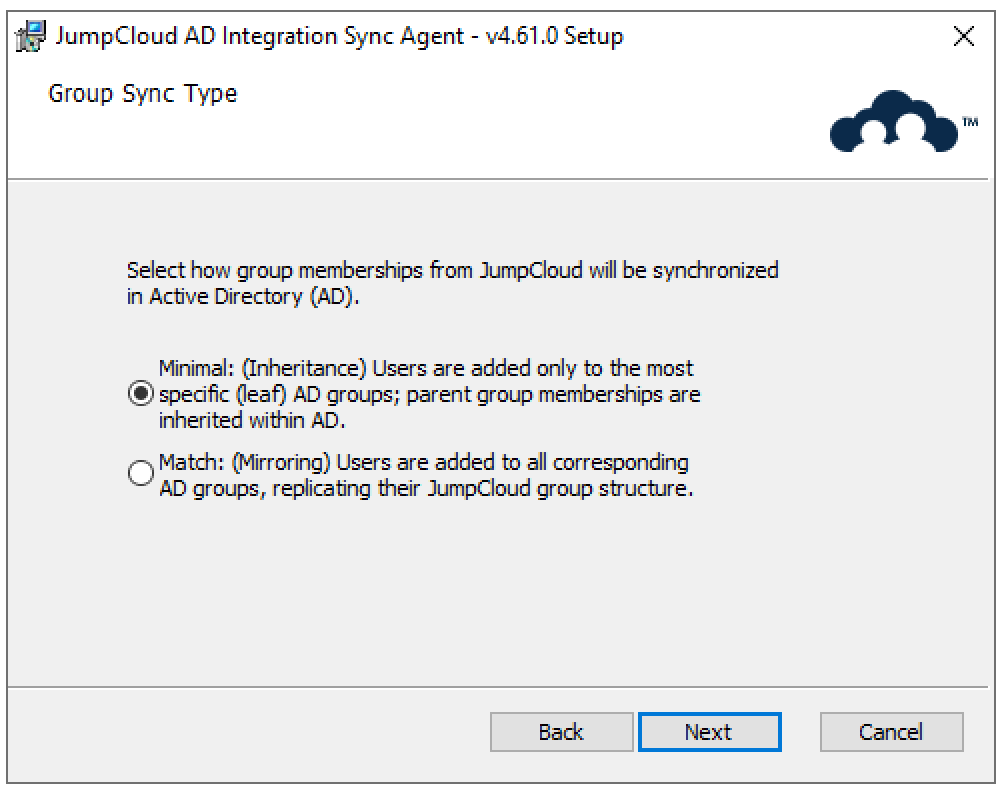
- Choose how JumpCloud manages a user's memberships within Active Directory's nested group structures (group_membership_sync_type).
- Minimal (Inheritance): Users are added only to the most specific (leaf) AD group; parent group memberships are then handled by AD's standard inheritance.
- Match (Mirroring): Users are added directly to all relevant AD groups in the nested structure, creating an exact match of their JumpCloud group memberships within AD.
- Choose how JumpCloud controls unlocking a user's Active Directory account (SyncAccountLockedOutStatus).
- True: JumpCloud will unlock the AD account only if the JumpCloud account is specifically unlocked. (Recommended for precise control.)
- False (Default): The AD account may be unlocked by JumpCloud during any user attribute update.

- Finally, click the Install button to install the AD Sync Agent. This could take up to 3 minutes.
![]()
You DO NOT need to reboot the servers after the AD Sync Agent installation.
Congratulations! You’ve installed the AD Sync Agent. You are ready to verify that the AD Sync Agent is communicating properly.
Verify AD Sync
Once you’ve installed and configured AD Sync within your AD environment, you can easily verify that the JumpCloud AD Sync Agent is working. Please ensure the following are present and visible:
- The JumpCloud AD Sync Agent should be shown as green and active within the Admin Portal under Directory Integrations > Active Directory > Your ADI Integration > Details > Domain Agents section.

![]()
If the AD Sync Agent(s) are showing red or are in a non-connected state, please check services.msc to see if the service is running.
Perform a one-time import of users from AD to JumpCloud (Optional)
If you need to import all your users or a subset of users from AD to JumpCloud, there are two options:
- Import users using a CSV
- Install the AD import agent and sync users
Option 1: Import users using a CSV
- Export all users you want created in JumpCloud to a .csv file
- Follow the instructions in Import Users from CSV with the PowerShell Module.
Option 2: Install the AD import agent and sync users
- From the Details tab of the Active Directory Domain instance you create above, click Update Configuration
- Select Manage users and passwords in either system, or both
- Click Download Import Agent.
- Follow the instructions in Configure ADI to Manage Users, Security Groups, and Passwords in AD.
- Add all users you want imported into JumpCloud into the ADI security group you created.
- Verify that the users were created in JumpCloud.
- Open Start > Control Panel > Programs > Programs and Features in AD.
- Uninstall the JumpCloud AD Import Agent.
- Click the Domain Agents tab in the Active Directory Domain instance in JumpCloud.
- Verify that all rows are in yellow (i.e., no longer active).
- Click the delete button for each import agent.
- Click Update Configuration
- Select Manage users and passwords in JumpCloud
Next Steps
Please read the Use and Manage the Active Directory Integration article next.
Want additional assistance from JumpCloud?
If you’re having issues with getting JumpCloud’s ADI working, try the Troubleshooting Guide.
JumpCloud now offers myriad professional services offerings to assist customers with implementing and configuring JumpCloud. If you’re looking for assistance with Migrating from AD, or to integrate AD with JumpCloud, we recommend you reach out to JumpCloud’s Professional Services team on the following page: Professional Services - JumpCloud.