
JumpCloud® Asset Management enables tracking, management, and optimization of your organization’s IT assets throughout their entire lifecycle. Asset Management seamlessly integrates with JumpCloud Device Management to track new and existing JumpCloud-managed devices. You can also create assets manually, as well as import them in bulk via CSV. This article shows you how to enable and configure Asset Management.
![]()
Review Get Started: Asset Management for a feature overview and FAQ: Asset Management to explore commonly asked questions.
Prerequisites:
- JumpCloud Device Management must be enabled in your org and on devices to automatically sync managed devices into Asset Management. See MDM in JumpCloud to learn more.
- Managed devices require JumpCloud Agent version 2.133.0 or later to support automated accessory discovery
Considerations:
- Asset Management is a premium feature and requires the Platform Prime package. See JumpCloud Pricing to learn more.
- Devices, Accessories, and Locations are all classified as assets in JumpCloud Asset Management.
- Managed Devices refer to devices that meet the following criteria:
- macOS, Linux, and Windows devices with the JumpCloud Agent installed.
- iOS and iPadOS devices enrolled in Apple MDM.
- Android devices enrolled in Android EMM.
To start using JumpCloud Asset Management, enable it in the Admin Portal:
- Log in to the JumpCloud Admin Portal.
![]()
If your data is stored outside of the US, check which login URL you should be using depending on your region. If your organization uses LDAP, RADIUS, or requires firewall allow list configuration, the Fully Qualified Domain Names (FQDNs) will also be region specific. See JumpCloud Data Centers for the URLs, FQDNs, and IP addresses.
- Go to Device Management > Asset Management.
- Under Get Started with Asset Management, click Enable Asset Management.
After enabling Asset Management, existing JumpCloud-managed devices are added automatically. See FAQ: Asset Management to learn more.
Configuring General Settings
Go to Device Management > Asset Management > Settings and Fields > General Settings to configure and customize Asset Management.
Default Currency
Set the default currency while creating and editing assets. If your org uses multiple currencies, this will not convert between them.
Import Assets
Use a CSV file to add or update assets in bulk. Use this for devices not enrolled in JumpCloud management. peripherals without management capability, or for locations. Your last 5 CSV imports are listed here, or click See All for full import history. Jump to Importing Assets to learn more.
Enabling ABM Integration
Enable the Apple Business Manager Enabled toggle to leverage your existing JumpCloud ABM configuration. This automatically syncs your Apple devices into Asset Management, providing a precise and comprehensive inventory of procured Apple hardware. For details on captured data and field configuration, jump to Configuring Statuses for Managed Devices and Setting Default Values for Select Fields.
Prerequisites for ABM Integration Integration:
- Automated Device Enrollment Configuration must be set up in your JumpCloud org. If you have not configured this yet, see Configure Automated Device Enrollment for your Organization in Configure Automated Device Enrollment to learn more.
Considerations for ABM Integration Integration:
The integration can sync any device within your ABM environment that is assigned to the JumpCloud MDM service or server. Devices in ABM not assigned to the JumpCloud-managed service will not be pulled into Asset Management.
To enable the ABM Integration:
- Log in to the JumpCloud Admin Portal.
- Go to Device Management > Asset Management > Settings and Fields.
- Under General Settings, toggle Apple Business Manager Enabled to On.
![]()
Once the ABM integration is enabled, depending on the number of devices in your ABM, it may take a few minutes for the initial sync to complete and for device records to appear in Asset Management.
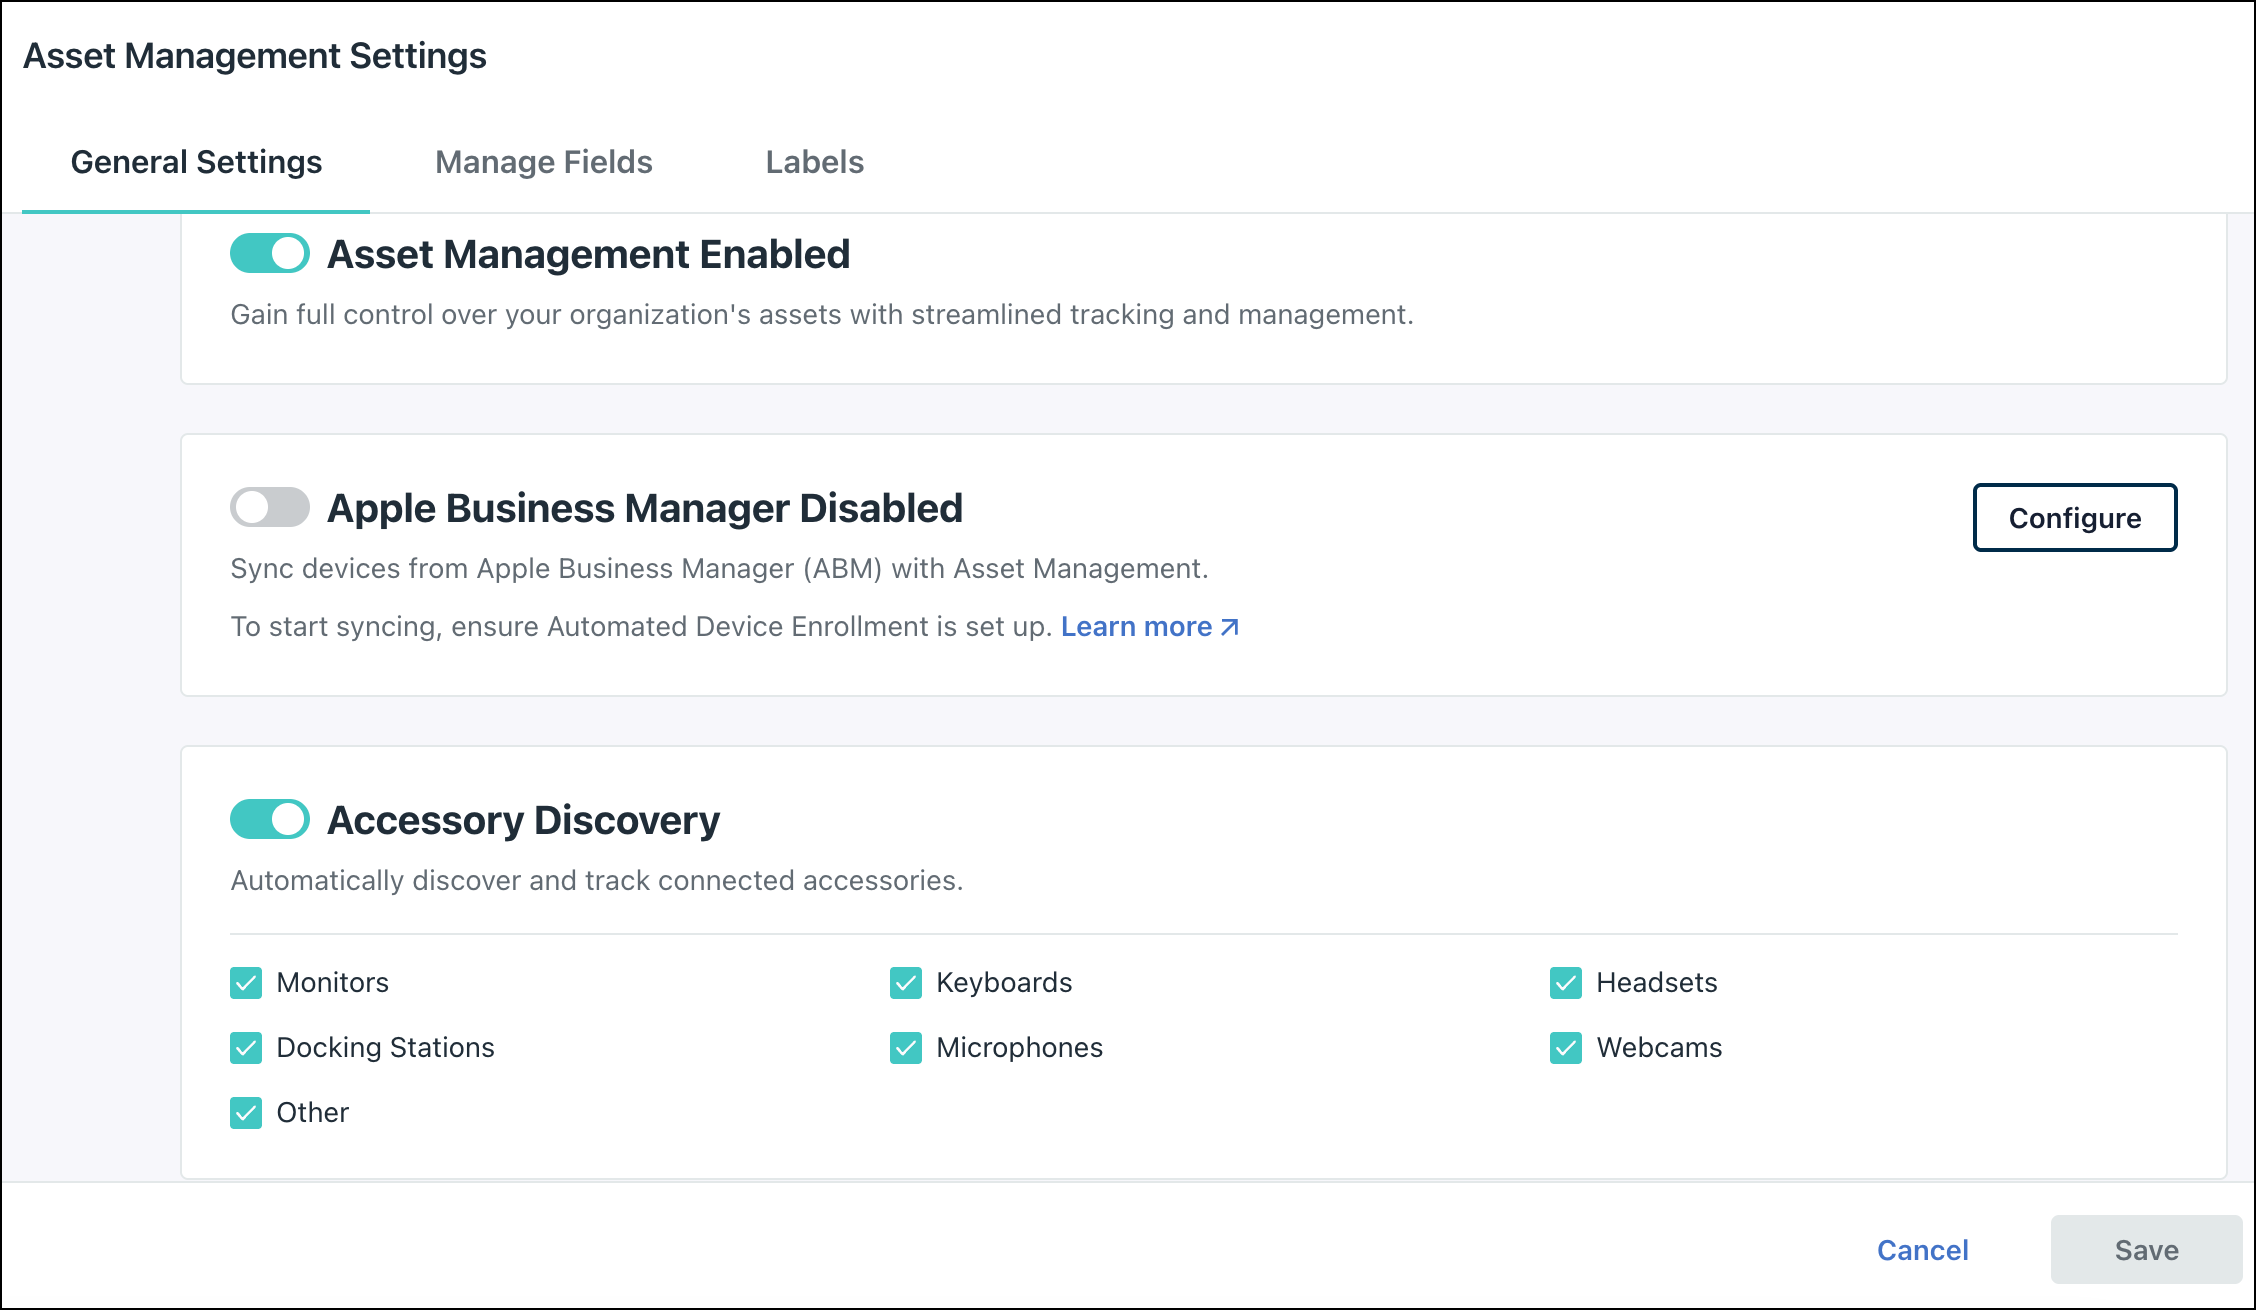
Configuring Accessory Discovery
Enable the automated accessory discovery feature and manage which hardware accessory categories the JumpCloud Agent detects on your endpoints.
To configure accessory discovery settings:
- Log in to the JumpCloud Admin Portal.
- Go to Device Management > Asset Management > Settings and Fields.
- Under General Settings, toggle Accessory Discovery to On.
- Select the checkboxes for the accessory types you want to automatically discover, such as Monitors, Keyboards, Mice, etc.

- Click Save.
![]()
- Default availability: Accessory Discovery is enabled by default for new orgs and disabled by default for existing orgs.
- Historical tracking: The JumpCloud Agent only supports historical tracking for USB accessories. It cannot retrieve historical connection data for other peripheral types, such as Bluetooth devices or displays.
- Unique identifiers required: To prevent duplicate entries, the agent does not track accessories that lack a unique hardware identifier (such as a serial number).
- Duplicate identifiers: If a newly connected accessory shares an identical hardware identifier with an already-tracked asset, the agent will not discover the new item to prevent data conflicts.
- Sync timing: The system requires some time to sync and display your discovered accessories in the admin portal.
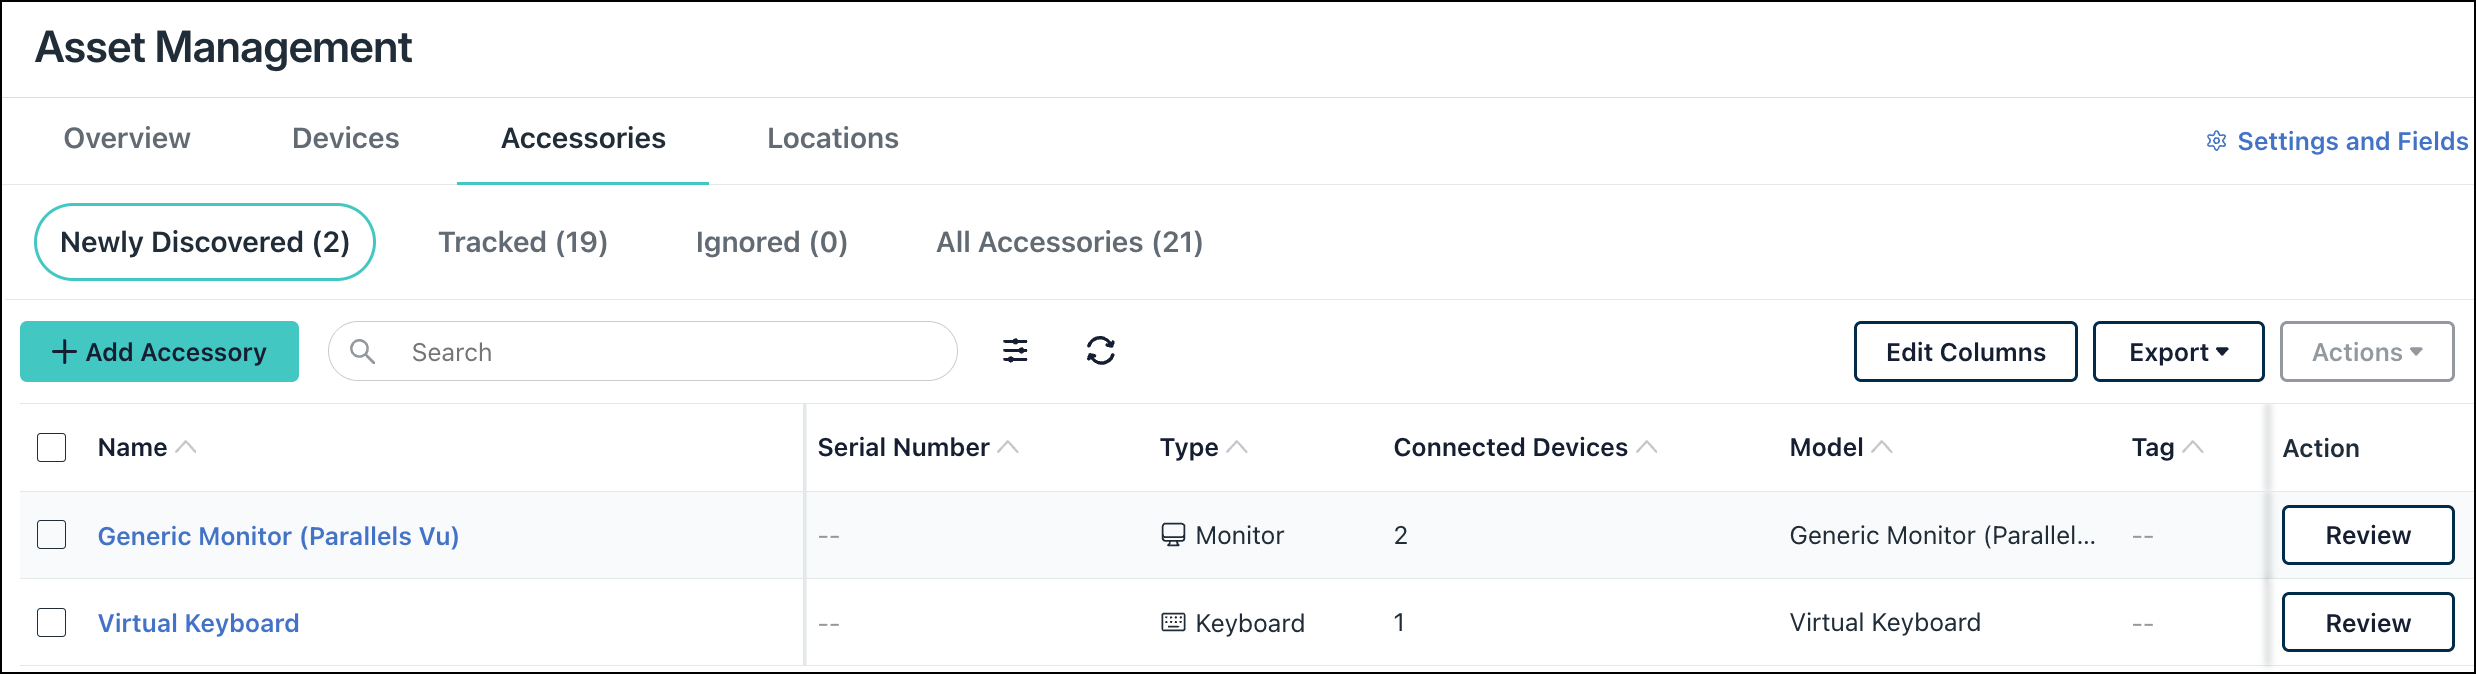
Reviewing and Classifying Discovered Accessories
Review discovered accessories and assign Ownership Type to maintain precise inventory tracking.
To classify accessories:
- Log in to the JumpCloud Admin Portal.
- Go to Device Management > Asset Management > Accessories.
- The Newly Discovered tab will display the items reported by the agent.

- Click Review for an accessory to open the Review Accessory window.
- Select an Ownership Type:
- Company-owned: Marks the asset as corporate property.
- BYOD: Marks the accessory as a personal user device.
- Ignored: Discards the item from tracking and moves it to the Ignored tab.
Disabling Accessory Discovery Tracking
Turn off tracking for specific accessory categories when you no longer need the agent to monitor those hardware types.
To disable tracking:
- Log in to the JumpCloud Admin Portal.
- Go to Device Management > Asset Management > Settings and Fields.
- Under the Accessory Discovery section, clear the checkbox for the accessory type you want to stop tracking.
- Click Save.
- Select Delete Accessory Data in the Disable Accessory Discovery? dialog box to remove historical tracking data.
- Click Disable.
![]()
This will immediately remove the accessory data from the dashboard, and permanently delete it from the records after 90 days.
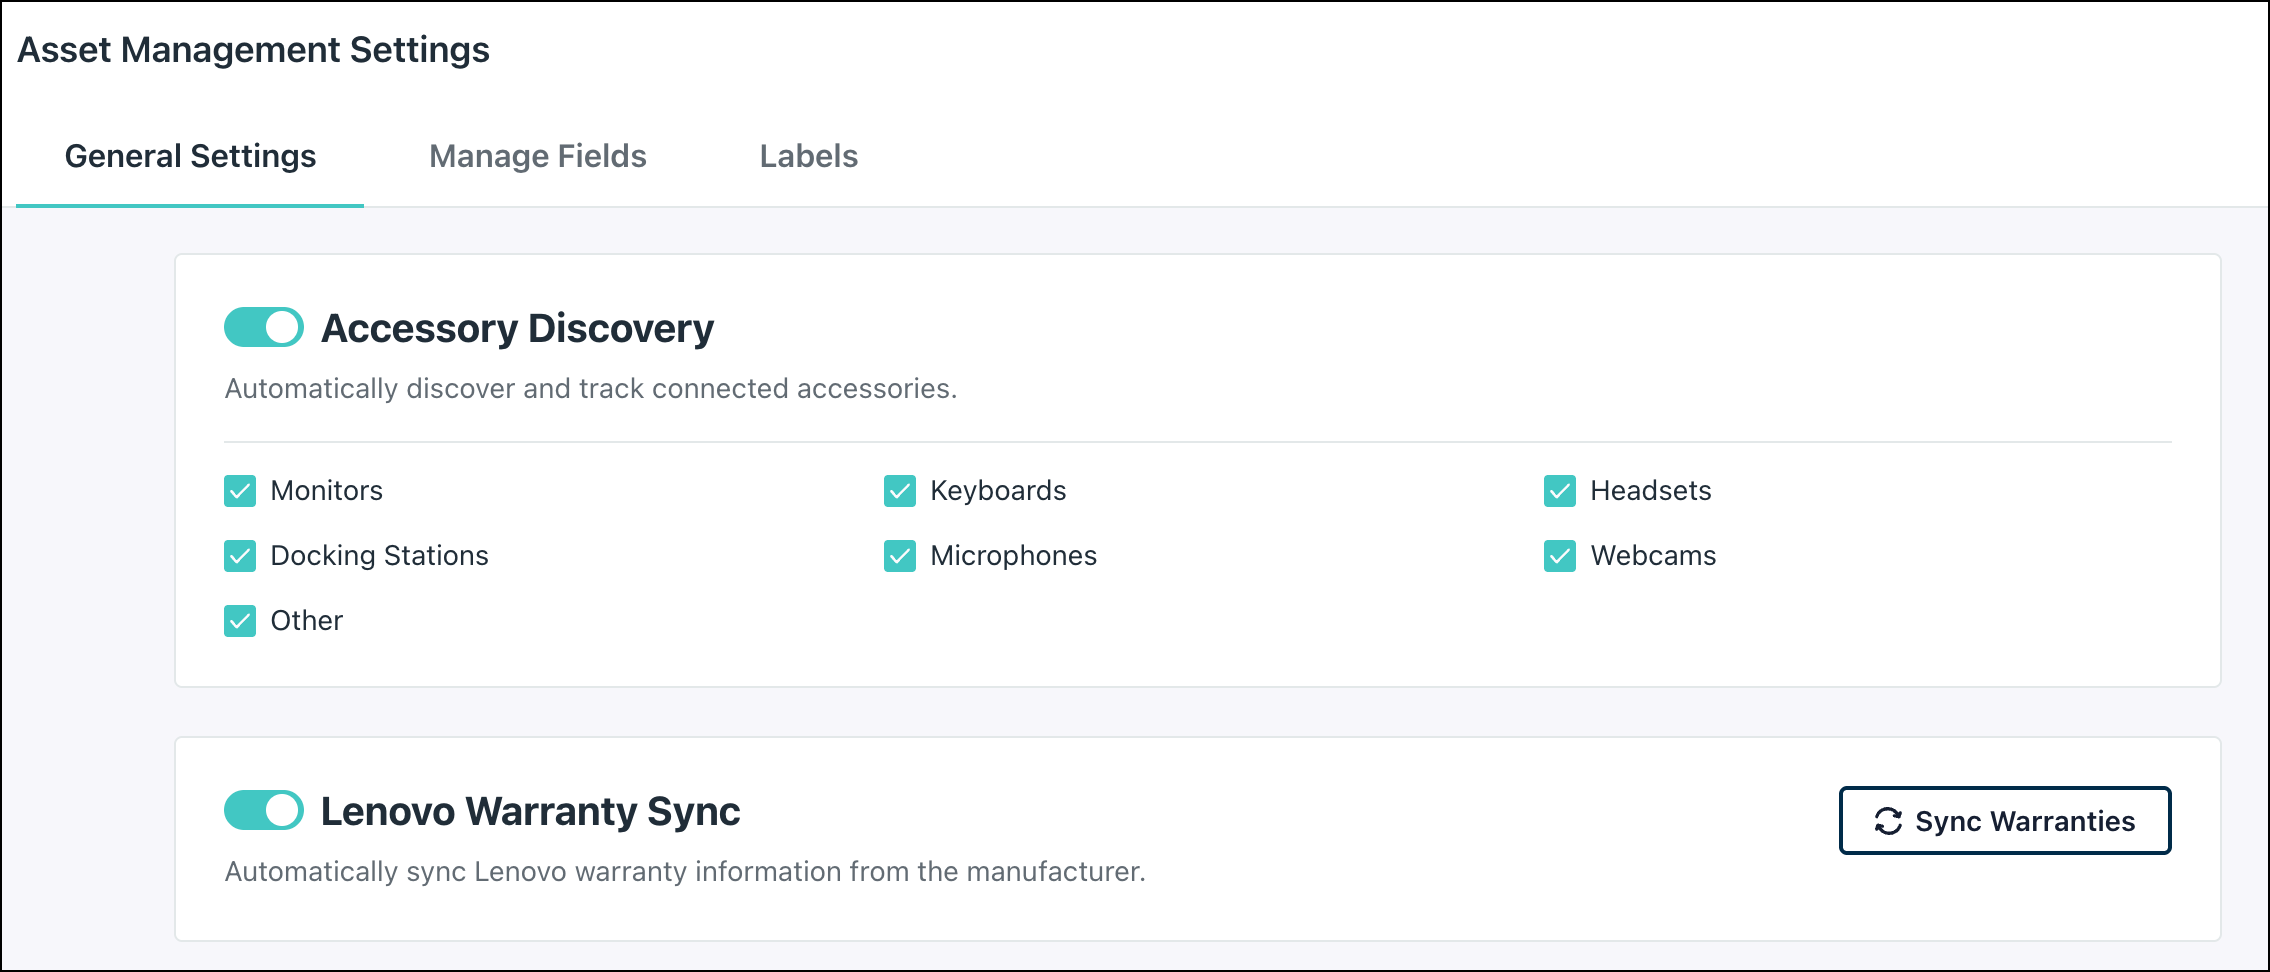
Enabling Lenovo Warranty Sync
Automatically sync warranty status, coverage dates, and support details for Lenovo devices. JumpCloud retrieves this information directly from Lenovo and syncs them to your asset record.
To enable the Lenovo integration:
- In the JumpCloud Admin Portal, go to Device Management > Asset Management > Settings and Fields.
- Under General Settings, toggle Lenovo Warranty Sync to On.

![]()
When you enable this feature, it will overwrite any existing manual warranty information on your Lenovo devices with data retrieved from the manufacturer. After the initial sync, any manual edits you make to a device's warranty information will be preserved and will not be overwritten by subsequent automatic syncs.
![]()
- The sync only identifies devices with the Vendor field set to 'Lenovo'. If a device has no vendor information or a different vendor listed, it will be excluded from the sync.
- After the initial sync, device asset records are updated automatically whenever new warranty information is available or new devices are added. You can also click Sync Warranties to manually trigger a sync for your entire fleet at any time.
Configuring Field Settings
Use fields to label, organize, and track specific information about your assets, like status, service tags, and service dates. You can modify the defaults or create custom fields. Fields are organized by asset class: Global, Devices, Accessories, and Locations.
![]()
- Each org can create up to 50 custom fields.
- Each Select field, including default and custom select types, can contain up to 50 options.
To edit a field:
- In Field Settings, go to the appropriate asset class subtab (Global, Devices, Accessories, or Locations).
- Fields are separated into categories. The categories and fields displayed differ depending on the asset class subtab you selected. Asset Details exists for all asset class subtabs.
- Click any existing field in the list to modify it. For this example, select Devices > Asset Details > Type.
- Under Types, you can customize from the existing list, or create a new one by clicking Add Device Type.
![]()
Some fields prevent you from modifying or removing certain details. For example, Status is automatically mapped to managed devices and cannot be removed. Jump to Device Asset Information to learn more.
Creating Custom Fields, Labels, and Tags
You can also create custom fields to use as labels or tags to better organize your assets. For example, you can create a custom field like "VM Environment" and label your virtual machines depending on their host environment, like Parallels or Virtual Box.
To create a custom field:
- In Field Settings, go to the appropriate asset class subtab (Global, Devices, Accessories, or Locations).
- For this example, select Devices.
- Under Asset Details, click Add Field.
- Enter a Label for the new field. This label appears as the column name in the asset table.
- (Optional) Enter a Tooltip to explain the label's use case.
- (Optional) Under Field Type, select the type of data associated with this field. The default is Text.
- Click Create.
The new custom field now appears in the details of every individual asset that matches this asset class. For example, all device assets will show this field under their Asset Details.
Configuring Label Settings
Generate standardized, printable QR or barcode labels directly from the JumpCloud Admin Portal to help identify and track physical hardware.
To configure label settings:
- In the JumpCloud Admin Portal, go to Device Management > Asset Management > Settings and Fields.
- Click the Labels tab.
- Under Size, select Small, Medium, or Large.

- Small: Best for small peripherals like headsets, adapters and thin bezels, this label size measures 1.75" x 0.5" (approx. 44.45mm x 12.7mm).
- Medium: As the size for laptops, tablets, monitors, and docking stations, this label measures 2.0" x 1.33" (approx. 50.8mm x 33.7mm).
- Large: Best for large equipment like servers and rack chassis, this label size measures 4.0" x 1.0" (approx. 101.6mm x 25.4mm).
- Select the required Fields, or Barcode with Asset ID, to include on the label.
- View the Live Preview to see the approximate layout and dimensions.
- Click Save Configuration.

Configuring Statuses for Managed Devices
Mapping Default Statuses for Managed Devices
By default, managed devices have four device activity statuses: active, inactive, not available, and deleted. You can choose how to map some of these statuses to fields in Asset Management, enabling more granular control and reporting.
To change the default status mapping:
- In Field Settings, go to the Devices subtab.
- In the list, click Status.
- Under Status, scroll down to Status Mapping.
- Optionally select a field to map to each status:
- Default is set to In Use.
- Deleted is set to Retired.
The following additional device statuses are available by default:
- Ordered
- Delivered
- Ready
- In Use
- Repair
- Maintenance
- Lost
- Retired
Fields Automatically Synced from ABM
For devices synced from ABM, the following fields are automatically captured and updated in Asset Management, even before the device is enrolled:
- Type
- OS Family
- Serial Number
- MDM Status
- OS Version
- Model
- Vendor
- Status (This is automatically added based on the Default ABM Device Status configuration)
Setting Default Values for Select Fields
You can set a default value for select field types. This reduces manual entry when creating new assets.
- In Field Settings, go to the appropriate asset class subtab (Global, Devices, Accessories, or Locations).
- In the list, click the field you want to modify (for example, Type).
- Scroll down to the Set Default Property section.
- From the dropdown (in this example, Default Type), select the value you want applied to new assets.
- Click Save.
![]()
Default values are supported on Select field types, such as Type and Location, and also for the custom fields of the Select type.
Mapping Statuses for ABM Devices
If the Apple Business Manager Integration is enabled, you can set a default status that is automatically assigned to ABM devices when they are added to Asset Management, and streamline deployment and provisioning workflows.
- In Field Settings, go to the Devices subtab.
- In the list, click Status.
- Under Status, scroll down to Apple Business Manager.
- From the Default ABM Device Status dropdown, select the status you want applied to devices synced from ABM.
- Click Save.
Sync Owner with Primary User
You can automatically sync the owner in Asset Management with the Primary User set in the Device object. See Users Tab - Primary User to learn more.
![]()
Enabling this setting prevents you from modifying the owner of synced device assets.
To sync owner with the primary user:
- In Field Settings, go to the Devices subtab.
- In the list, click Owner.
- Under Sync with Primary User, select Use the device’s Primary User as the Asset Owner.
Managing Assets
Devices, peripherals, and locations are all categorized as assets. Depending on the source and amount of data, you can import assets or create them manually.
![]()
Device assets synced with JumpCloud Device Management update automatically and they cannot be deleted. However, you can modify their type, status, location, and owner.
Overview Dashboard
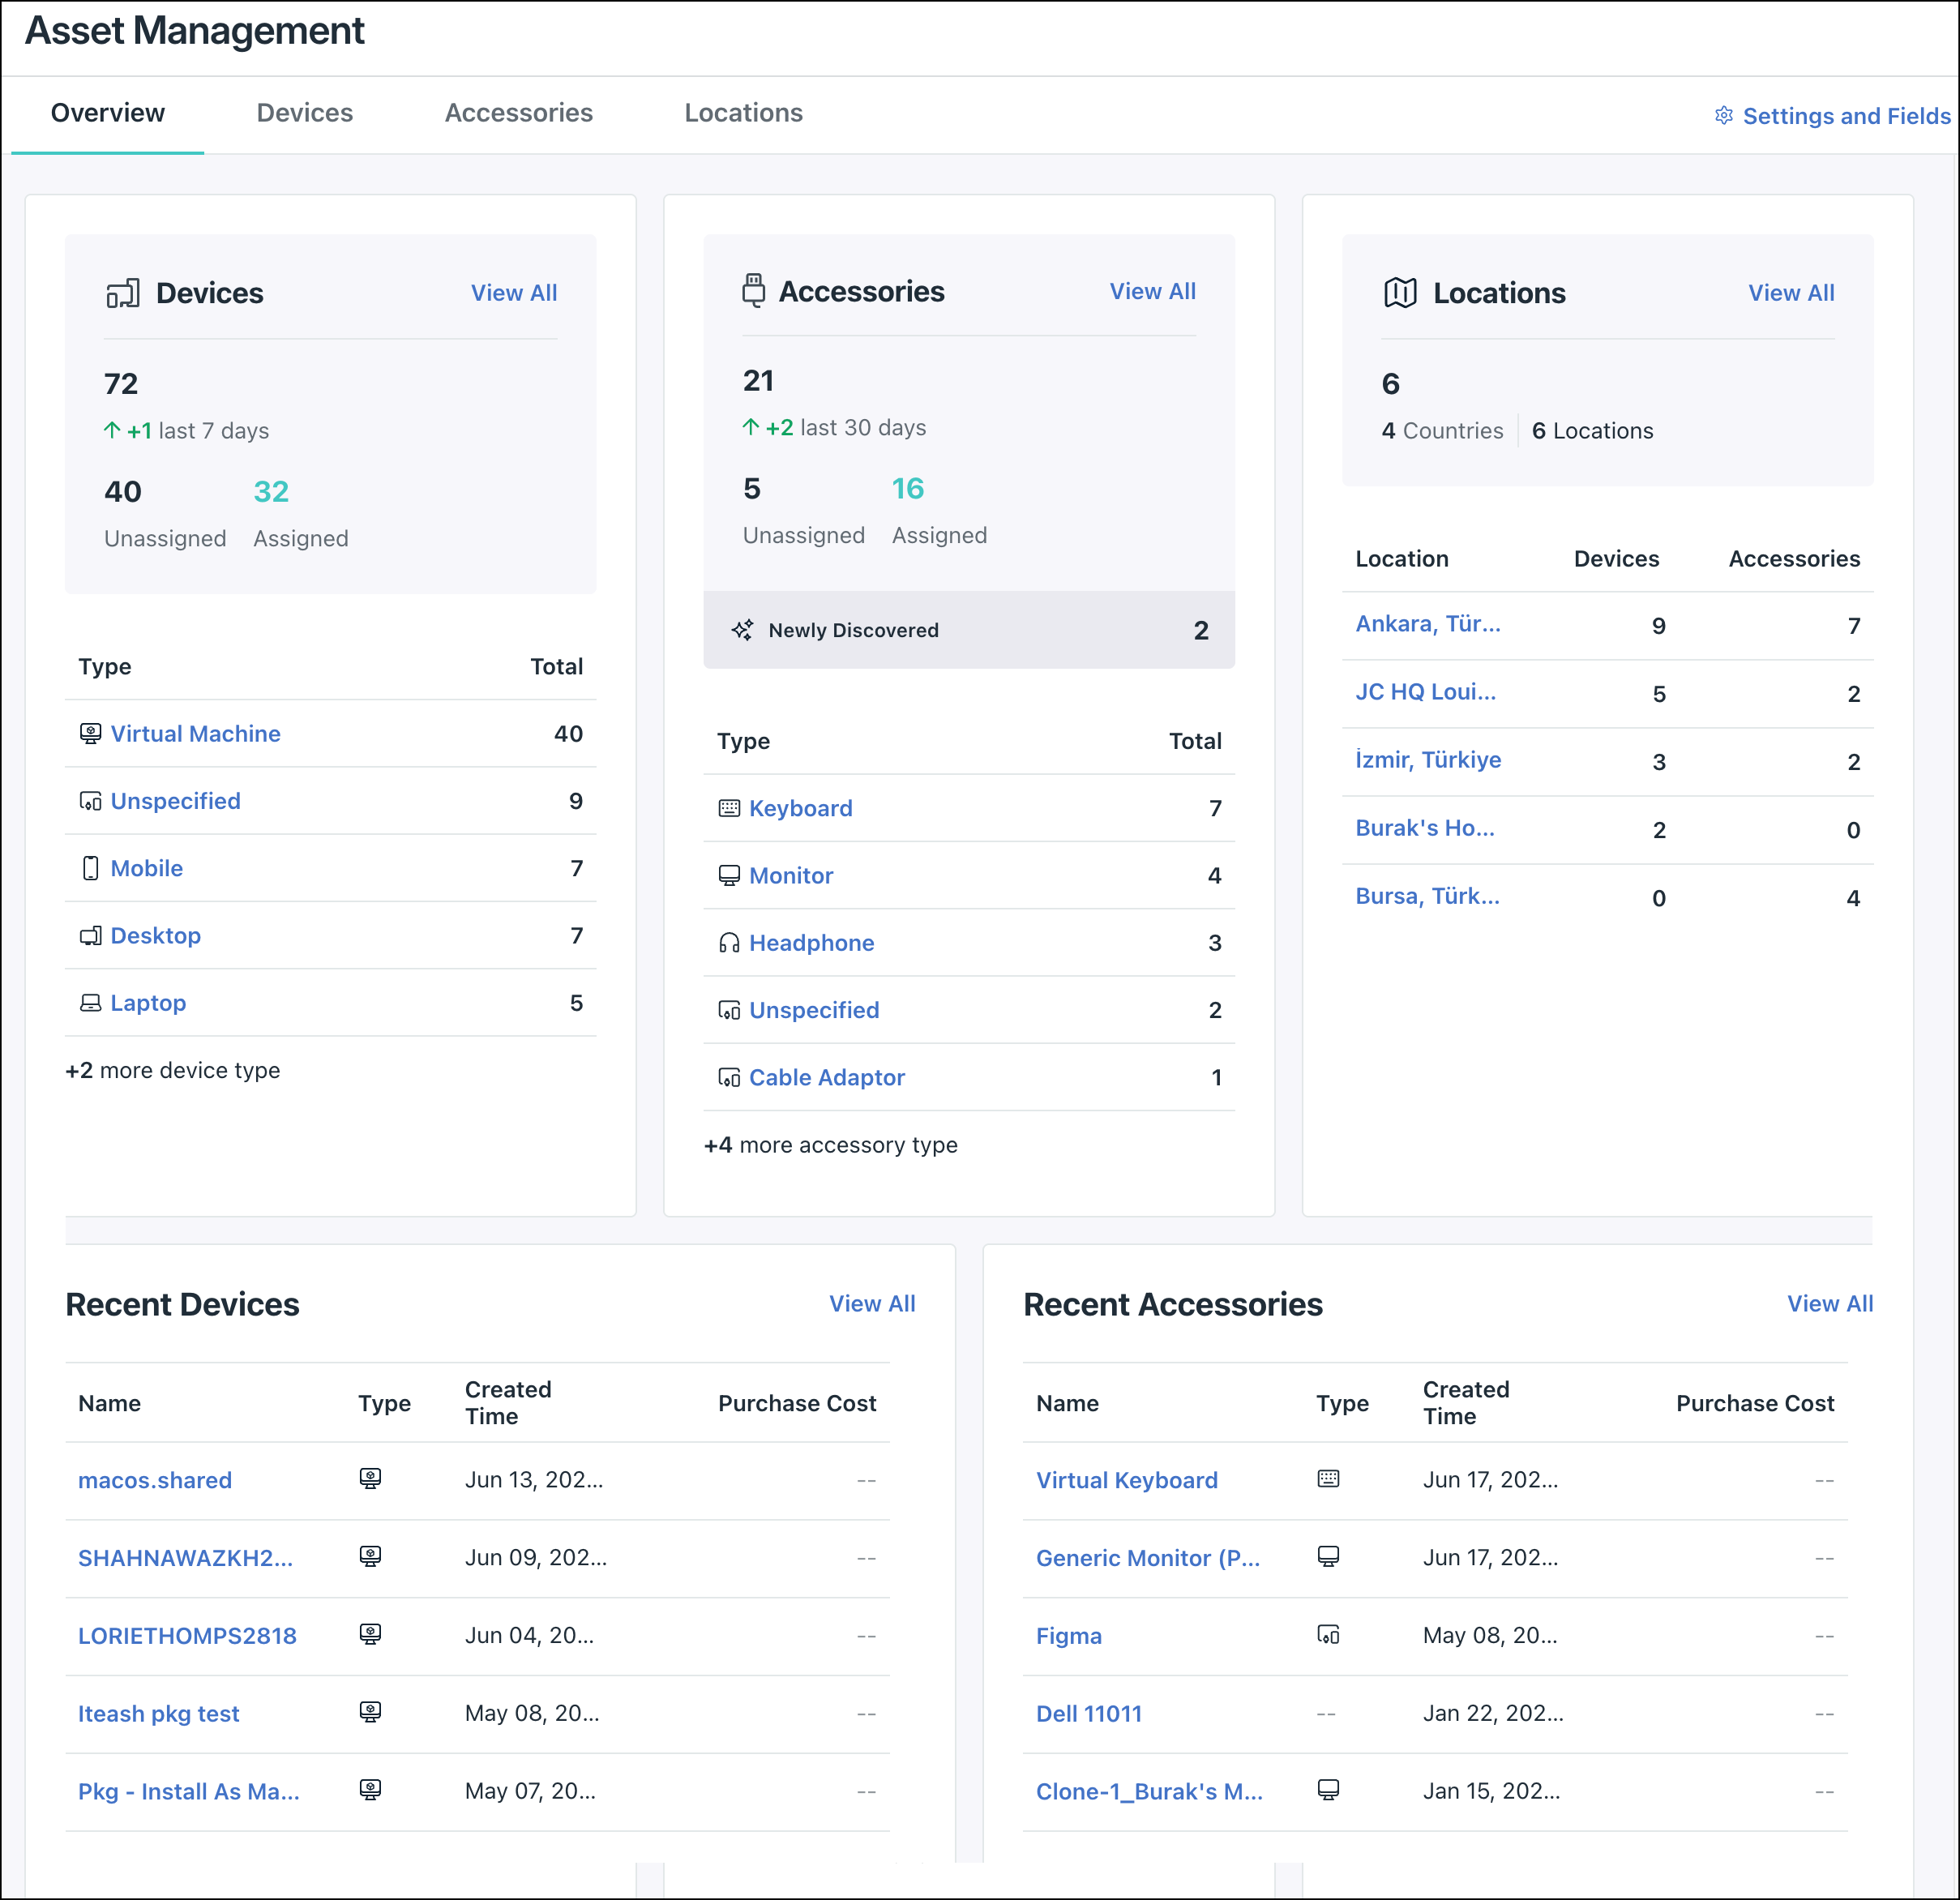
Use the Overview dashboard to monitor your organization's asset inventory at a glance. This dashboard provides a high-level summary of your devices, accessories, and locations, letting you track asset assignments and recent additions to your inventory.
The Overview tab displays the following summary cards and activity tables:
- Recent Accessories - Lists the most recently added accessories, including details such as the accessory name, type, creation time, and purchase cost.
- Devices - Summarizes your device inventory, including total counts, assignment status (assigned vs. unassigned), recent trends, and a breakdown by device type (for example desktop, laptop, and mobile).
- Accessories - Summarizes your accessory inventory, including total counts, assignment status, recent trends, and a breakdown by accessory type (for example keyboard and monitor).
- Locations - Displays the geographic distribution of your assets, listing specific locations alongside the count of Devices and Accessories assigned to each.
- Recent Devices - Lists the most recently added devices, including details such as the device name, type, creation time, and purchase cost.

Adding Assets Manually
In addition to bulk CSV import, you can also create individual assets. Use this when adding a new peripheral, location, or device not managed by JumpCloud.
To manually add an asset:
- In Asset Management, go to the appropriate tab of the asset to add. For example, go to the Devices tab to create a device.
- In the top left, click Add Asset.
- Under Asset Details, fill the following required fields:
- Name
- Status
- Enter the remaining fields depending on the asset type.
- Under Purchase Details, enter information such as asset Purchase Date, Cost, and Warranty Period.
- Under Hardware Specifications, enter information such as the OS Family, OS Version, Model, Vendor, RAM, and CPU.
- (Optional) Select Create another to create a duplicate asset.
- Click Add.
Cloning an Asset
Quickly create a new asset record by cloning an existing one with similar hardware specifications.
To quickly clone an existing asset:
- In Asset Management, go to the appropriate asset tab (for example, go to the Devices tab).
- Find the asset you want to duplicate in the list. In the Actions column, click the three dots (...) to open the menu, then click Clone Device.
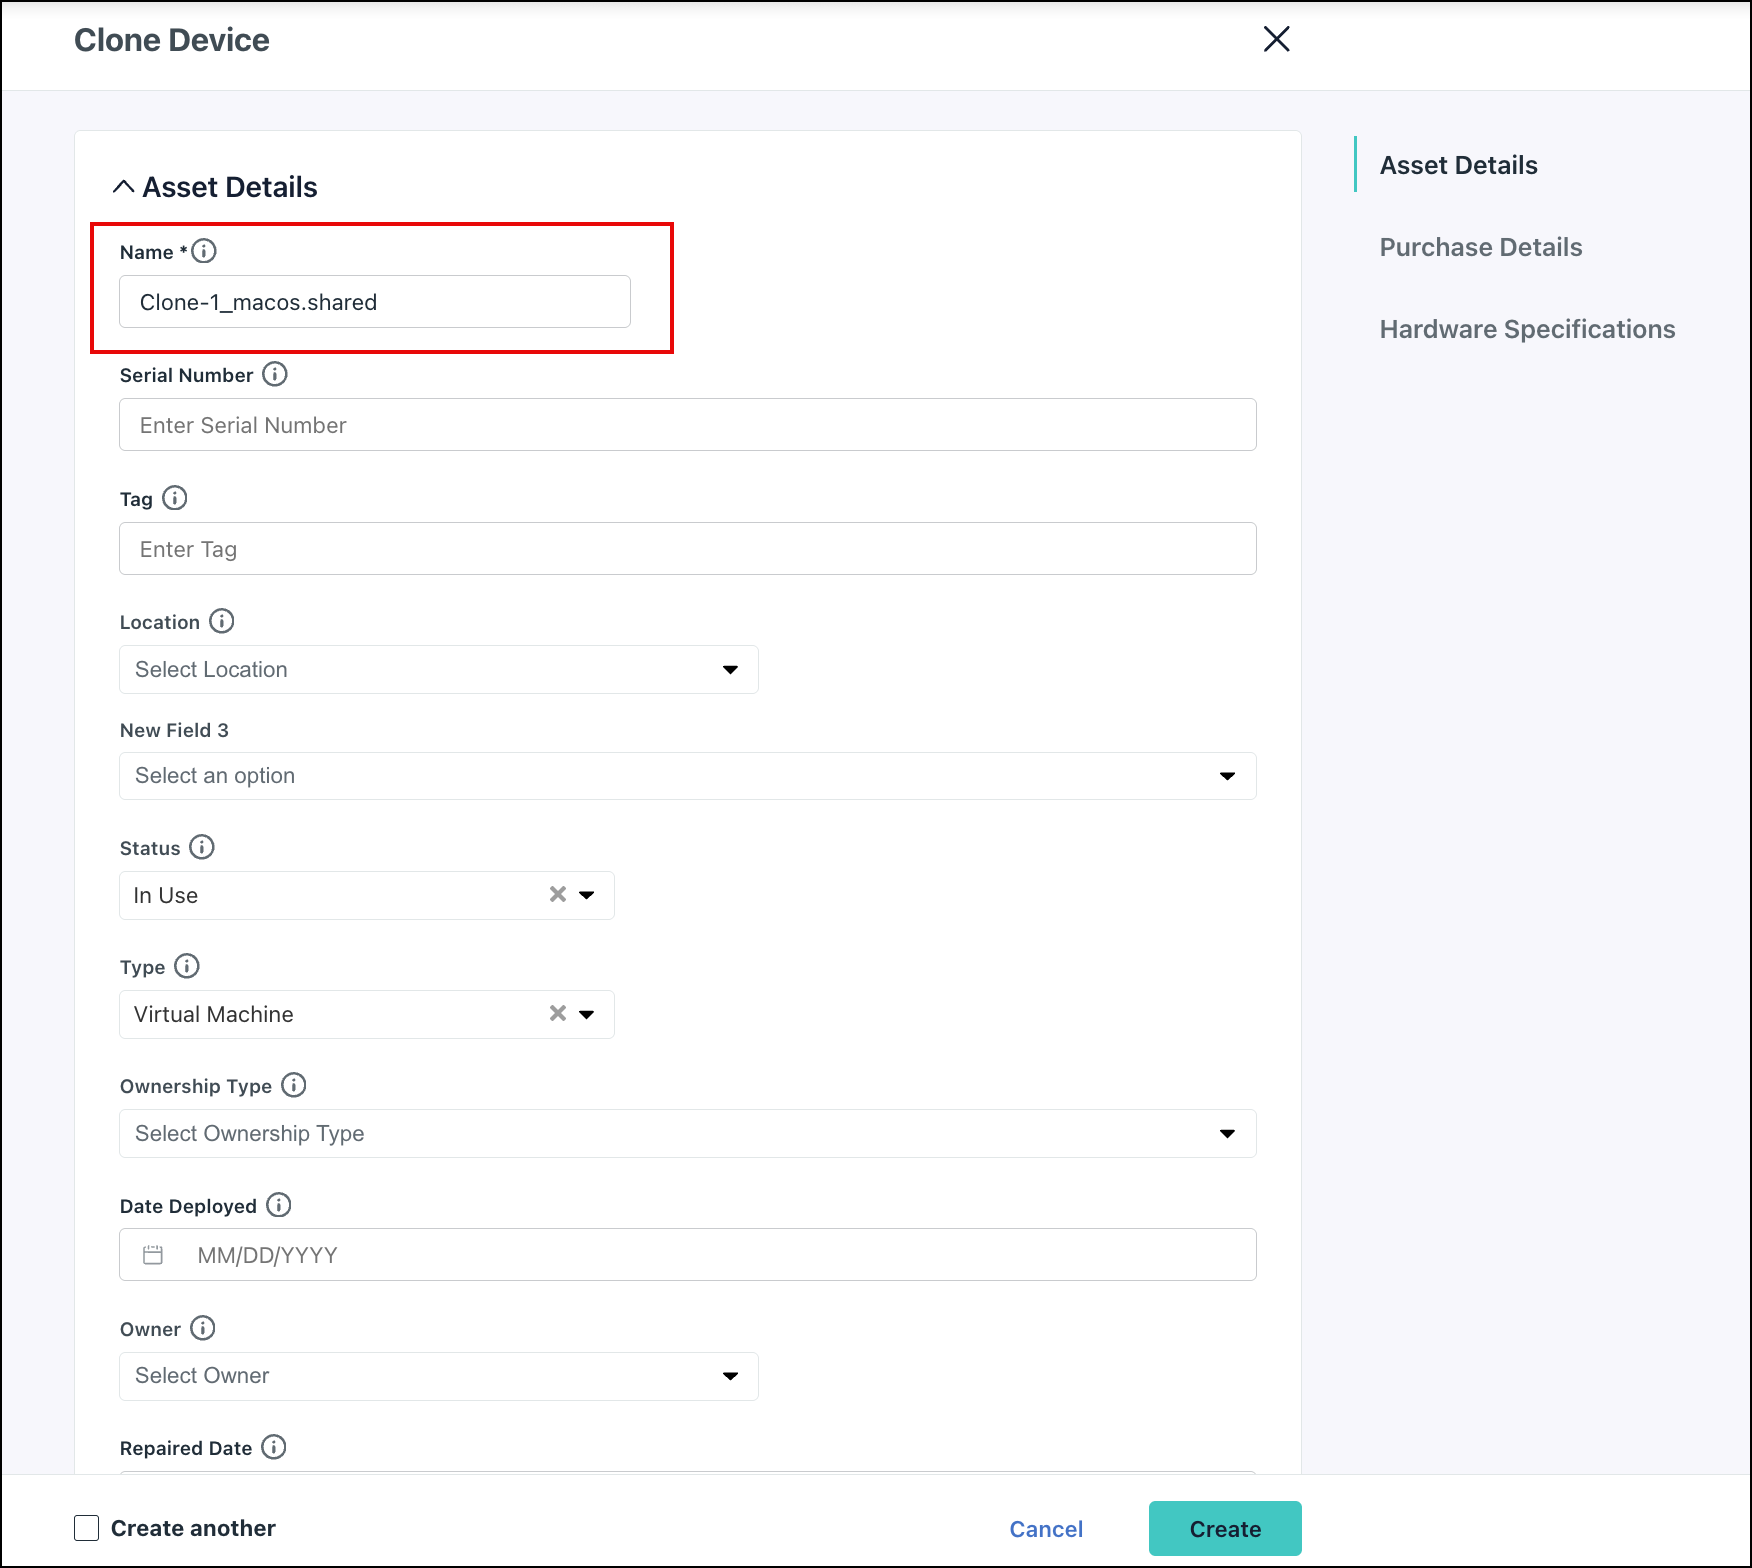
This will open the Clone Device screen with all previous asset information copied.
- Under Asset Details, update the unique required fields, such as the new Serial Number and any other changes to the details.
- Under Purchase Details and Hardware Specifications, update any fields that differ from the original asset (for example, the Purchase Date).
- (Optional) Select the Create another checkbox and click Create to make a clone and continue on the same screen to create another.
- Click Create.
Importing Assets
Use the import feature when adding assets in bulk or when migrating from another platform.
![]()
Ensure your CSV file follows the template and the values match expected formats to ensure successful upload and analysis.
To import assets:
- Go to Device Management > Asset Management > General Settings.
- In the General Settings tab under Import Assets, click Download Template and select from the appropriate template:
- Devices Template
- Accessories Template
- Locations Template
- Download All
- On your device, edit the CSV file and add asset information. You can export this from your existing asset management solution, or add it manually.
![]()
You can update specific information using partial CSV import. When creating the CSV file, ensure to include only the columns that contain information you want to update with an appropriate column identifier (for example serial number or tag). Upon import, only the information contained in the CSV is updated, preserving existing information in Asset Management.
- After editing and filling the template, click Import CSV.
- Any missing information from the template results in a partial upload to Asset Management and missing columns will be filled as empty.
- Under Import Assets, select the asset type: Devices, Accessories, or Locations.
- Click Upload CSV and select the file from your device.
- The system processes your file. This can take 2-5 minutes.
![]()
If analysis fails, you’re prompted with a warning to reanalyze the file. You may need to modify the CSV file and ensure it aligns with the template.
- After successful analysis, click Import.
- In the list of recent imports you can view the import status. If successful, assets are added to the appropriate area.
When formatting the CSV template, the columns (which correspond to fields in Asset Management) must be formatted with the appropriate value type for successful import. See the following table for all supported value types.
Asset Management CSV Value Types
| Value Type | Example |
|---|---|
| TEXT, TEXT_AREA |
Any plain text (for example lorem ipsum) |
| INTEGER |
Whole numbers between -2,147,483,648 and 2,147,483,647 (for example 100) |
| FLOAT |
Decimal numbers between -1.7976931348623157e+308 and 1.7976931348623157e+308 (for example 100.555) |
| BOOLEAN |
|
| DATE |
Must follow the format YYYY-MM-DD (for example 2006-01-02) |
| DATETIME |
Must follow the ISO format YYYY-MM-DDTHH:MM:SSZ±HH:MM (for example 2006-01-02T15:04:05Z07:00) |
| USER |
A valid user’s display name or ID in your organization (for example John Doe or 686cf22e8d9bd8000example) |
| USER_GROUP | A valid user group name or ID in your organization (e.g., Engineers or 686cf22e8d9bd800012a8b7a) |
| DEVICE_GROUP |
A valid device group name or ID in your organization (for example Mobile Devices or 686cf22e8d9bd8000example) |
| LOCATION |
A valid location asset name or ID in your organization (for example Ankara or 686cf22e8d9bd8000example) |
| SELECT_* fields (such as SELECT_DEVICE_TYPE, SELECT_ACCESSORY_STATUS, etc.) |
Use any valid option name or ID configured in your organization (for example In Use or 686cf22e8d9bd8000example) |
Using Asset History
Asset Management tracks all changes to your assets. These events provide you with a complete history and an audit trail to help you stay compliant. 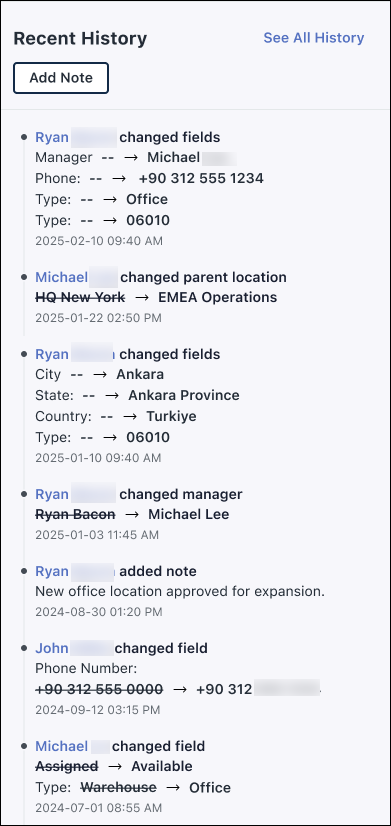
To access asset history:
- In Asset Management, go to the appropriate tab of the asset.
- Find the asset in the list.
- In the Overview tab, you can view the Recent History.
- For more details, go to the History tab.
Asset Management Event Types
Events are separated into generic and critical events. Most events expire after one year, but owner, status, and location changes are logged indefinitely.
| Event | Description | Priority |
|---|---|---|
| Asset Created | A new asset is added. | Generic |
| Asset Deleted | An asset is removed. | Generic |
| Asset Updated | Non-critical asset updates (for example purchase or cost information). | Generic |
| Note Added | An admin manually adds a note to an asset. | Generic |
| Owner Changed | An asset’s owner is updated. These are tracked indefinitely. | Critical |
| Status Changed | An asset’s status is changed. These are tracked indefinitely. | Critical |
| Location Changed | An asset is moved to a different location. These are tracked indefinitely. | Critical |
| Agent Version Changed | JumpCloud Agent version updated. | Critical |
| MDM Satus Changed | Device’s MDM enrollment status changes. | Critical |
| MFA Status Changed | Device’s MFA enforcement changes. | Critical |
Using Filters
By default, Asset Management displays all assets organized by tab: devices, accessories, and locations. You can use filters to narrow these lists based on specific attributes like location, status, model, and more. You can also leverage AI-powered filtering to describe the assets you're looking for.
To filter the asset list:
- In Asset Management, go to the appropriate tab (for example, Devices).
- To the right of the search bar, click Filters
 .
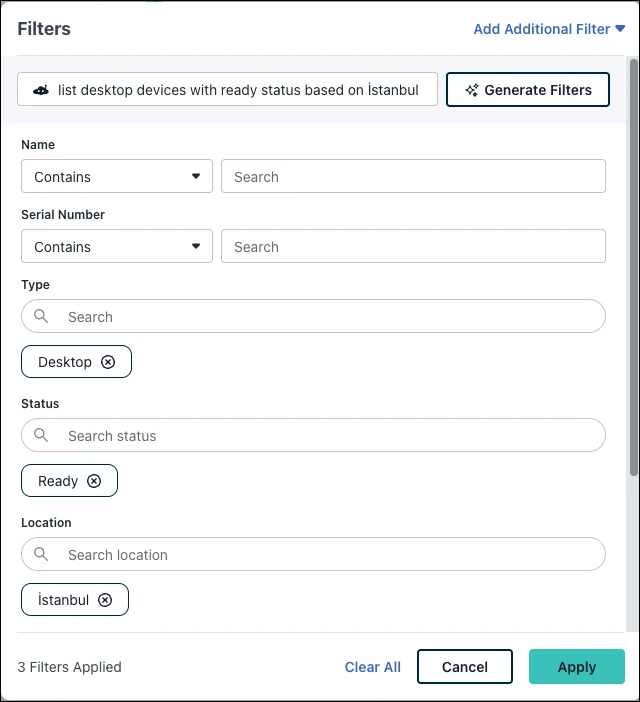
. - The Filters modal appears. Configure your filters in the following ways:
- Manual Selection: Choose options from the list of frequently used filters. To see more attributes, click Add Additional Filter.
- AI-Powered Filtering: In the top search bar, describe your filter using natural language (for example "desktop devices with ready status in istanbul") then click Generate Filters. The widget automatically applies the relevant filters.

- After adding your filters, click Apply.
- The active filter will show above the asset list.
Actions Menu
Use the Actions menu to quickly modify or delete one or multiple assets.
Accessing the Menu
- In Asset Management, go to the appropriate asset tab (for example, Devices).
- Select one or more assets in the list.
- In the top right, click Actions.
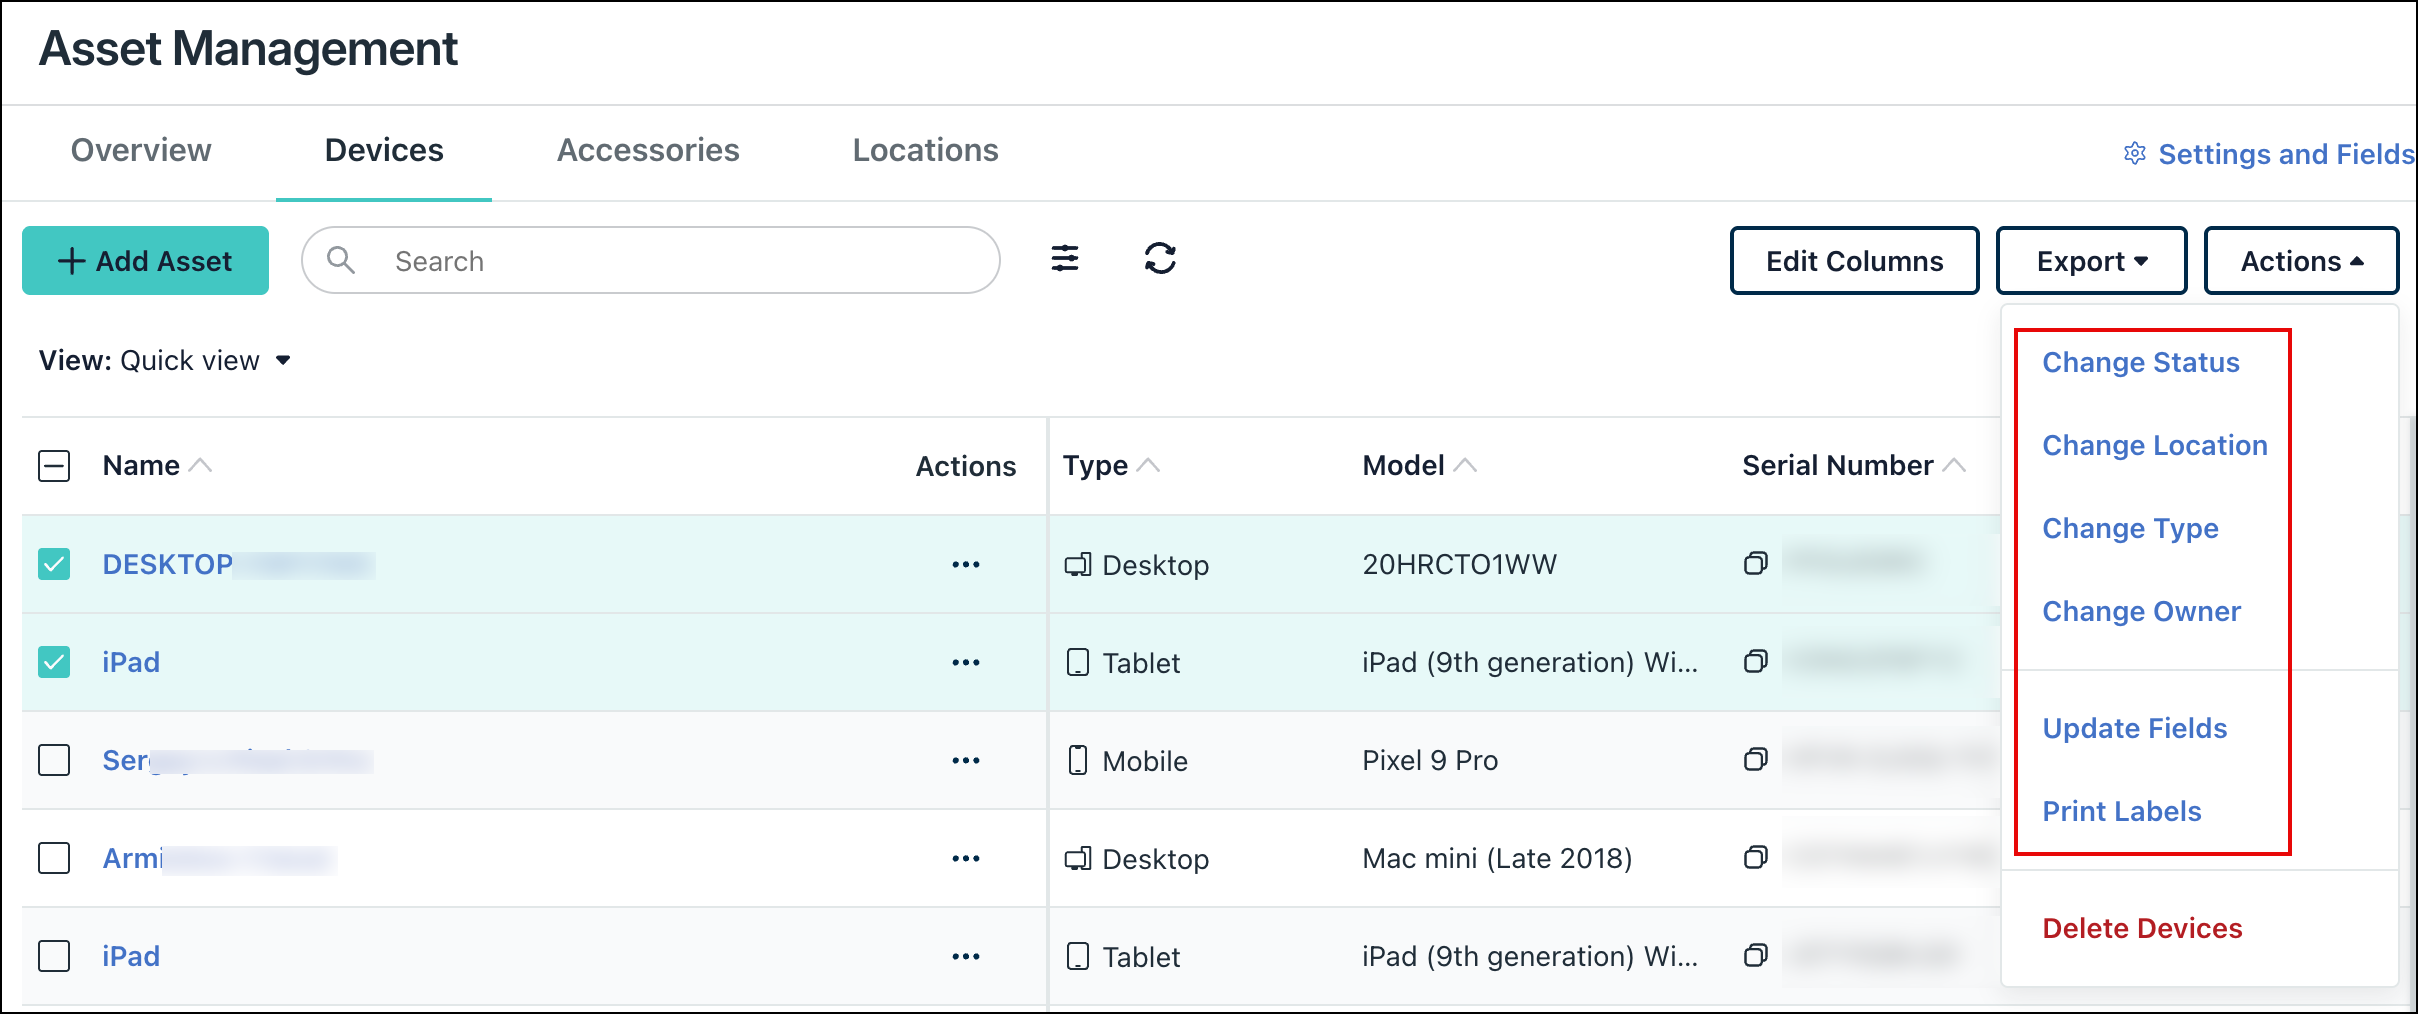
Action Options
- From the Actions menu, select from the following options: Change Status, Change Location, Change Type, Change Owner, Update Fields, or Print Labels. If you select a modification option (for example, Change Status), a change modal appears. Select the options from the dropdown, then click Save.
- Print Labels: Select one or multiple devices to generate and print standardized labels. You can choose from Small, Medium, or Large sizes and select a Label Sheet Template (for example, A4 - Avery 5167) to download or print your labels.
- To perform an action on a single asset, click the three dots (...) in the Actions column.

Updating Fields in Bulk
You can use the Update Fields action to modify multiple fields across selected assets in a single action, including purchase details and hardware specifications.
- Select the assets you want to modify in the asset list.
- In the top right, click Actions, then select Update Fields.
- In the left column, select the checkbox next to the fields you want to change (for example, Purchase Date).
- In the right column, enter the new values for the selected fields.
- Click Save.
![]()
You cannot update fields in bulk if they are unique, such as Serial Number, or if they are automatically synched from JumpCloud Device Management, such as OS or CPU. These fields remain locked to ensure data integrity.
To read the steps for cloning an asset, jump to Cloning an Asset.
Deleting Assets
![]()
Deleting assets permanently removes all associated data.
To delete assets:
- To delete a single asset: In the Actions column, click the three dots (...), then select Delete Asset.
- To delete multiple assets: In the top right, click Actions, then select Delete Asset.
In the Delete Asset modal, enter the number of assets to delete. Click Delete Asset to confirm.
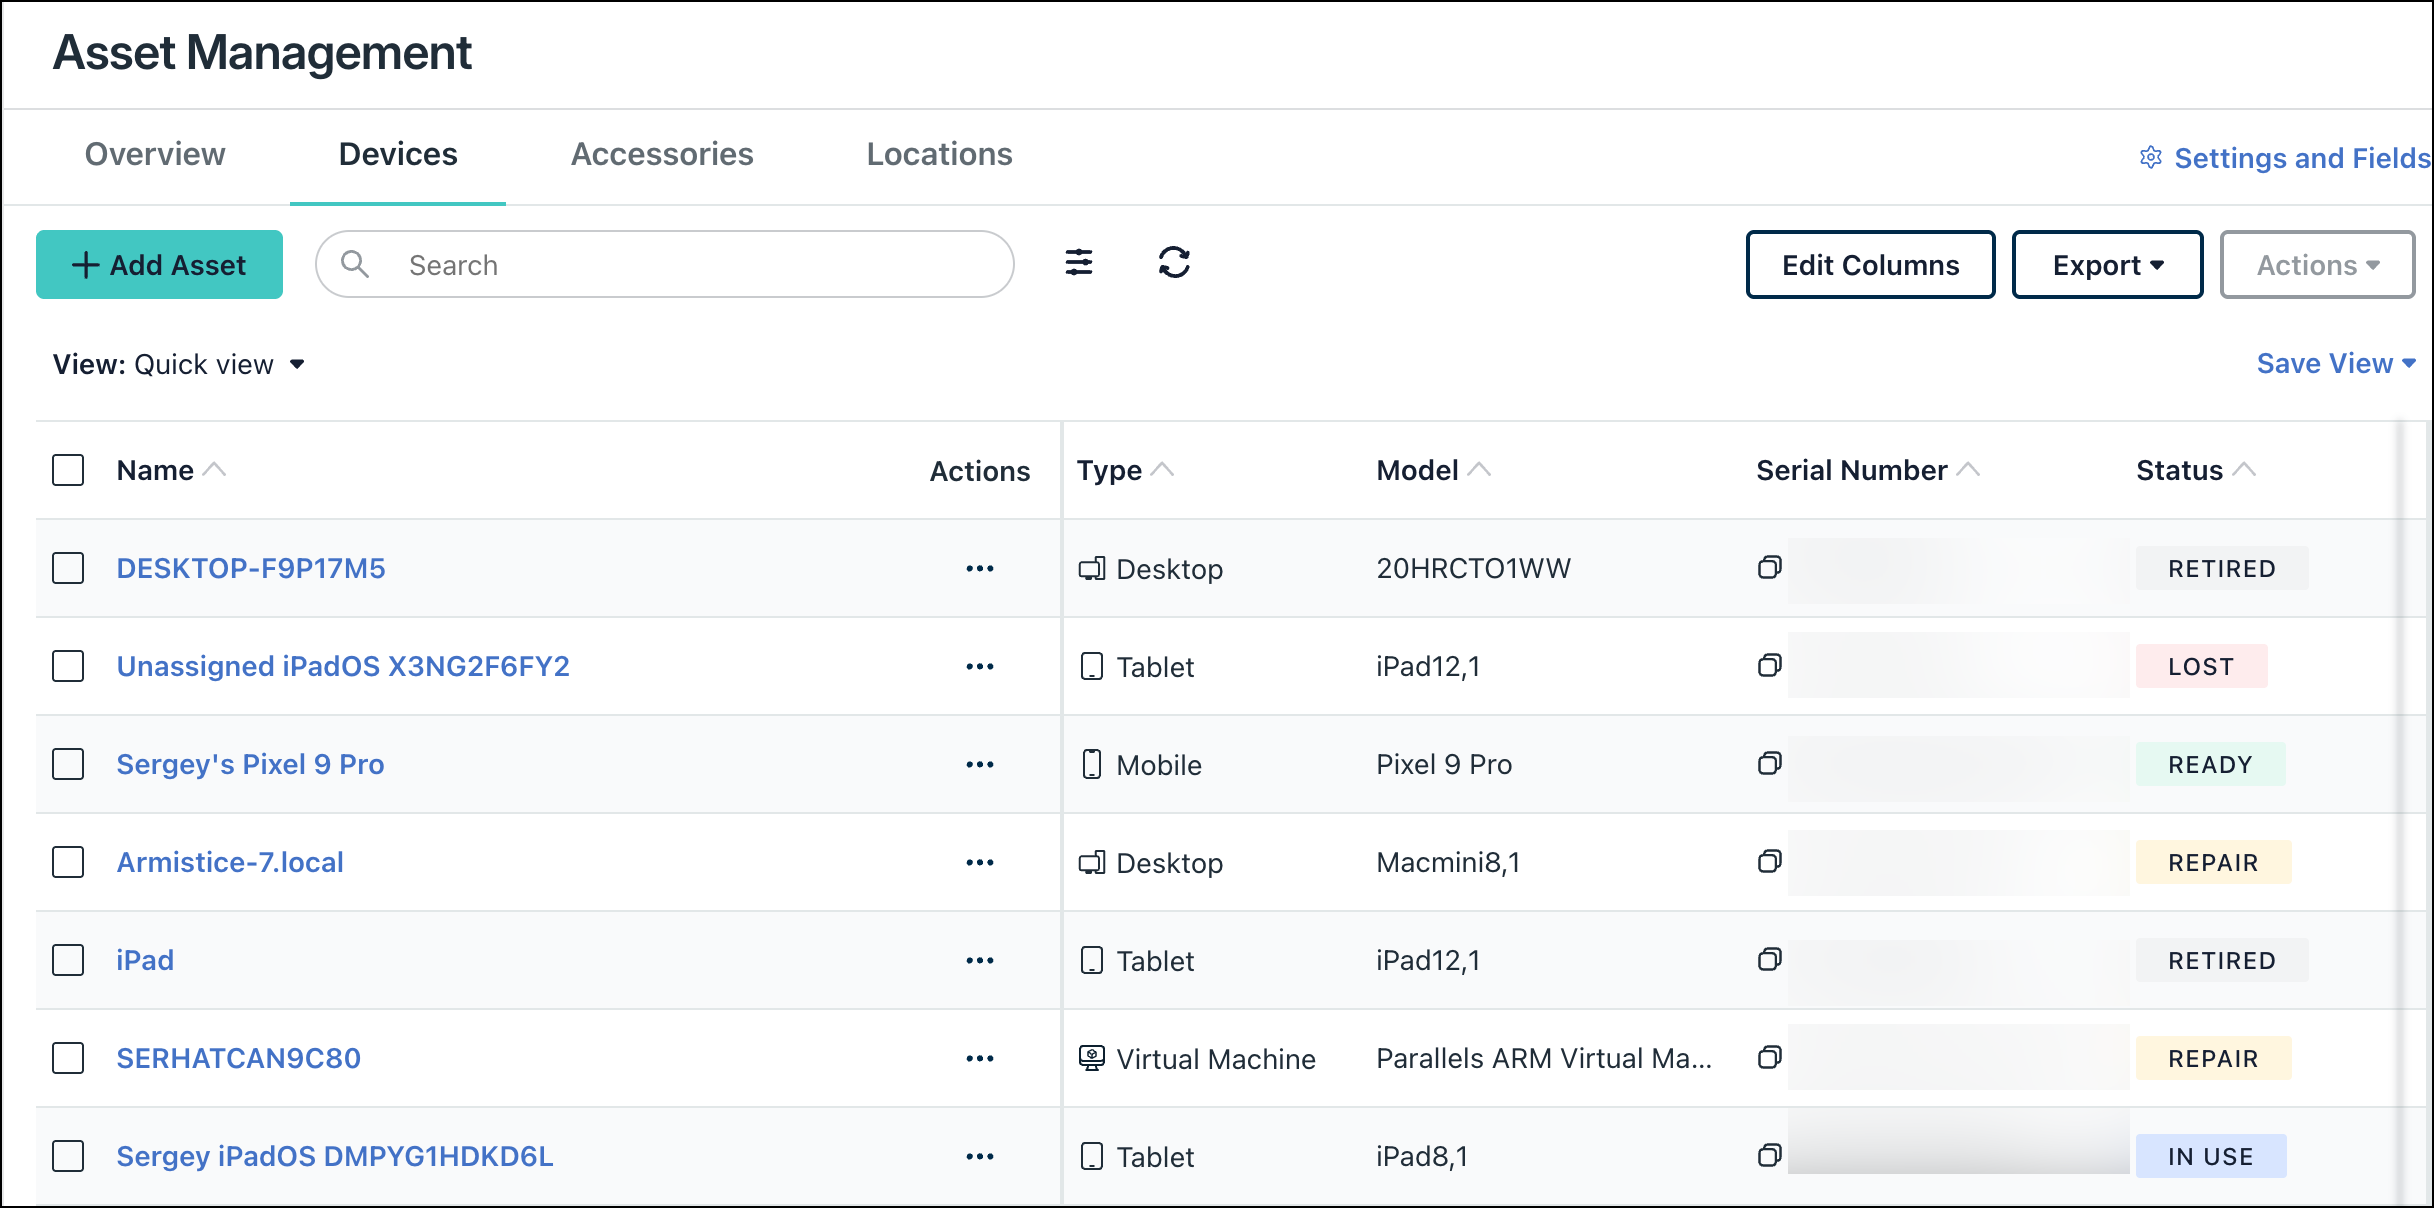
Devices Tab
Use the Devices tab to quickly view and manage all of your devices. JumpCloud-managed devices appear automatically, as well as any devices you’ve added manually or imported via CSV. Click on any asset in the list to view its details. The following information displays:
- Recent History: Shows a log of all changes to this device. Click See All History to view the entire list.
- Actions Menu: Lets you Edit Device, Clone Device, Manage Fields, and Delete Device.
- Asset Details: Covers the asset labels, and details such as ID, Name, Tag, Serial Number, etc. Click the print icon to print the QR code or barcode for a single device.
- Device Asset Information: See the following table.
Device Asset Information
| Section Name | Field Name | Description | Device Management Sync |
|---|---|---|---|
| Device Management | JumpCloud Agent Installed | Includes agent version, last sync date, and MFA status |
 |
| JumpCloud MDM | MDM enrollment status |
|
|
| Local Device Accounts | The list of the local users on a device |
|
|
| Asset Details | ID | A unique value assigned to the asset |
 |
| Created Time | When the asset was created |
|
|
| Last Updated Time | When the asset was last updated |
|
|
| Name | The asset name |
|
|
| Tag | Service tag value |
|
|
| Serial Number | Device serial number |
|
|
| Type | Device type |
|
|
| Status | Device status |
|
|
| Location | Asset location assigned to the device |
|
|
| Owner | Device owner (primary user) |
|
|
| Date Deployed | Date device deployed to production |
|
|
| Ownership Type | Company or personal device |
|
|
| Purchase Details | Purchase Date | Date asset was purchased |
|
| Purchase Cost | Cost of the asset |
|
|
| PO Number | Applicable PO for invoicing |
|
|
| Warranty Period | Length of manufacturer warranty |
|
|
| Warranty Expiry Date | Date manufacturer warranty expires |
|
|
| Supplier | Vendor asset purchased from |
|
|
| Invoice | Upload a file (example, invoice or contract) related to the asset |
|
|
| Hardware Specifications | OS Family | Darwin (macOS), Linux, Windows |
|
| Operating System (OS) | Specific OS |
|
|
| OS Version | Version of OS |
|
|
| Model | Device model |
|
|
| Vendor | Manufacturer |
|
|
| RAM | Amount of RAM |
|
|
| CPU | CPU type and architecture |
|
|
| Disk Encrypted | Enabled or disabled |
|
|
| IMEI | IMEI for mobile devices |
|
|
| Battery Health | Current capacity compared to max capacity |
|
|
| Disk Size | The total storage capacity of the device |
|
Accessories Tab
View and manage all of your IT accessories. These can include large peripherals like monitors, projectors, and printers, or small accessories like keyboards, mice, cables, and headphones.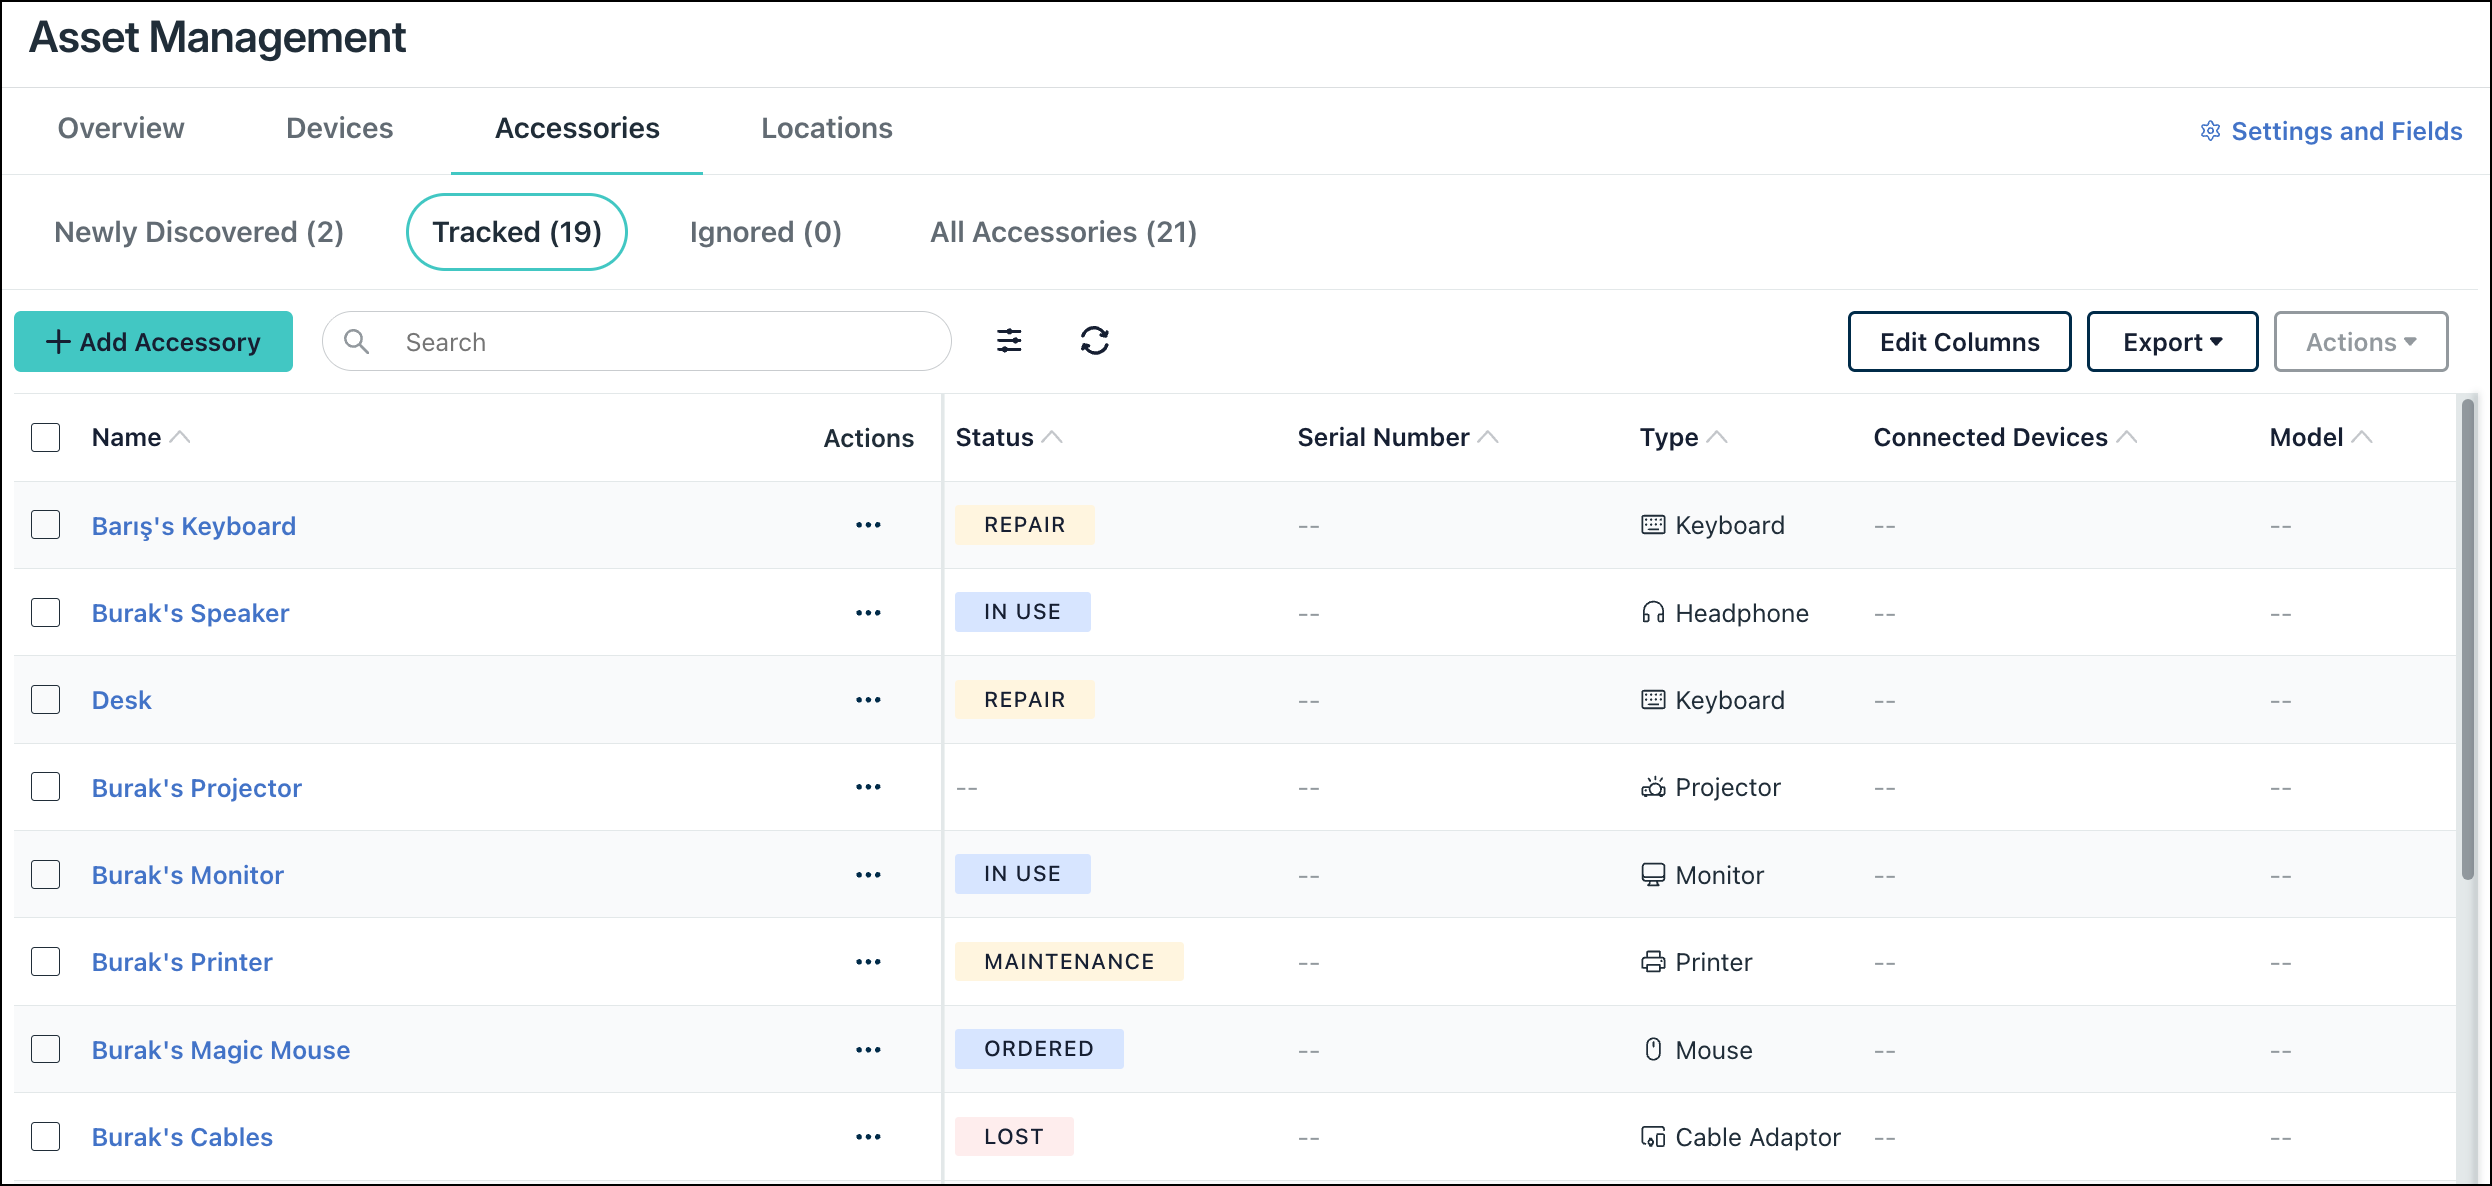
Go to Accessories and select the Tracked tab. Click any accessory in the list to view its details panel. The following information displays:
- Asset Details: Includes information about the peripheral including Type, Status, Location, and Model.
- Purchase Details: Information like the Cost, Date, PO Number, and Supplier.
Locations Tab
Create and track equipment locations like main and satellite offices. You can associate all of your assets with locations to help manage inventory levels. Jump to Adding Assets Manually to create a location.
Click on any location in the list to view its details. The following information displays:
- Asset Details: Name*, Tag, Description, Parent, Manager, Phone, Address, City, Stage, Country*, Postal Code.
- * indicates a required field.
- Recent History: Shows a log of recent changes to this location. Click See All History to view the entire list.
- Actions Menu: Lets you Edit Location, Clone Location, Manage Fields, and Delete Location.
Using Asset Management API
The Asset Management API lets you perform many of the same actions in the Admin Portal programmatically, enabling bulk operation and automation. You can modify device assets, accessories, and locations, as well as create lists of assets using various filters. You can also track asset history, add notes, and view historical changes.
Supported Operations:
- Assets
- List assets: Retrieve a list of all your assets, with options to filter the results.
- List asset IDs: Retrieve a list of asset IDs, using filters to refine the results, for use in batch operations.
- Get asset by ID: Retrieve a single asset by its ID.
- Get asset by JumpCloud system ID: Retrieve a single asset by its associated JumpCloud system ID.
- Create asset: Add new assets to your org.
- Update asset: Update existing assets in your org.
- Batch update asset: Perform bulk updates or deletions on multiple assets in one go.
- Delete asset: Permanently remove an asset.
- Asset History
- List asset history: Retrieve the history of an asset's lifecycle.
- Create asset history note: Add a note to an asset's history.
See JumpCloud API documentation to learn more.
Disabling Asset Management
![]()
When you disable Asset Management, all asset data is deleted from JumpCloud and is unrecoverable. JumpCloud agent and MDM managed devices will remain in Device Management.
To disable Asset Management:
- Log in to the JumpCloud Admin Portal.
- Go to Device Management > Asset Management > Settings and Fields.
- Toggle off Asset Management Enabled.