Configure Automated Device Enrollment
Apple Business Manager is now Apple Business. You might still see references to Apple Business Manager or ABM in this article or in the Admin Portal while we update our content. Both terms refer to the same platform.
Remotely enroll macOS, iOS, and iPadOS devices in Mobile Device Management (MDM). Automated Device Enrollment (ADE) lets you automatically enroll devices into JumpCloud MDM during the device out-of-box experience. After devices are enrolled in JumpCloud MDM, IT Admins have management and configuration control over managed devices. With a customized setting, Zero-Touch Automated Device Enrollment Onboarding can also automatically bind the user to the device after authentication.
First, you'll configure ADE for your organization. Next, you'll add your device to the MDM server. JumpCloud automatically syncs any new devices you add through Apple Business daily. Finally, you'll configure your end users' zero-touch experience.
- Configure ADE for your Organization
- Add Devices to the MDM Server
- Sync Devices to JumpCloud
- Configure End Users' Experience
- Renew Automated Device Enrollment Token Annually
To achieve a true zero-touch deployment where initial setup screens are automatically skipped according to your settings (such as Accessibility and Wi-Fi), devices require an active internet connection. For Macs, you can connect to a wired (Ethernet) network before powering on for the first time. See Troubleshoot: ADE Enrollment Issues to learn more.
Configure Automated Device Enrollment for your Organization
- Log in to the JumpCloud Admin Portal.
If your data is stored outside of the US, check which login URL you should be using depending on your region. If your organization uses LDAP, RADIUS, or requires firewall allow list configuration, the Fully Qualified Domain Names (FQDNs) will also be region specific. See JumpCloud Data Centers for the URLs, FQDNs, and IP addresses.
- Go to Device Management > MDM.
- On the MDM home page, click get started under Automated Device Enrollment Configuration.
- In Set Up Apple’s Automated Device Enrollment, click download under Generate a Key. JumpCloud downloads a certificate that contains a key. Apple uses this to encrypt the Automated Device Enrollment token.
- Under Sign in to Apple, click sign into Apple Business Manager and enter your credentials. If you have an education account, click sign into Apple School Manager.
- Add your MDM server:
- Select your profile name, then select Preferences.
- Under Device Management Services, click Add.
- Enter a name for your company’s MDM server and leave Allow this device management service to release devices selected.
- Under Service Settings, click Upload Certificate.
- Locate the jumpcloud-dep.pem file downloaded in Step 4, select it, and click Open.
- Click Save.
- Download the token by selecting the server and clicking Download Token, then clicking Download Server Token.
- In the Admin Portal, go to Set Up Apple’s Automated Device Enrollment and under Upload Automated Device Enrollment Token, install the new token by clicking Browse or dragging and dropping the server token for your MDM server.
- Click complete setup.
See Apple's Getting Started Guide for Apple Business to learn more about Automated Device Enrollment.
Managing Multiple ADE Tokens (Private Preview)
Configure and Manage Server Tokens
This feature is in Private Preview. If you don’t see it, contact your Account Manager to enable it. Features in Preview are continuing to evolve with the help of feedback directly from our users. If you have suggestions, let us know at the bottom of this article.
You can use multiple Automated Device Enrollment (ADE) server tokens to connect a single JumpCloud organization to device management services in Apple Business or Apple School Manager (ASM). These services can belong to the same Apple organization or different ones, but each requires its own token.
Each token has its own enrollment settings and device list, so you can tailor deployments for different departments or subsidiaries. An Apple device management service can connect to only one JumpCloud organization at a time.
Prerequisites
- An active Apple Push Notification service (APNs) certificate in JumpCloud. See Set up Apple MDM.
- Permission to modify Apple MDM settings in JumpCloud.
- An Apple Business or Apple School Manager organization.
- A valid, unexpired server token for each Apple device management service you want to connect.
Adding a Server Token
Adding a token does not replace your existing tokens. JumpCloud rejects invalid, expired, or already connected tokens.
- Log in to the JumpCloud Admin Portal.
- Go to Device Management > MDM > Apple.
- Select the ADE subtab.
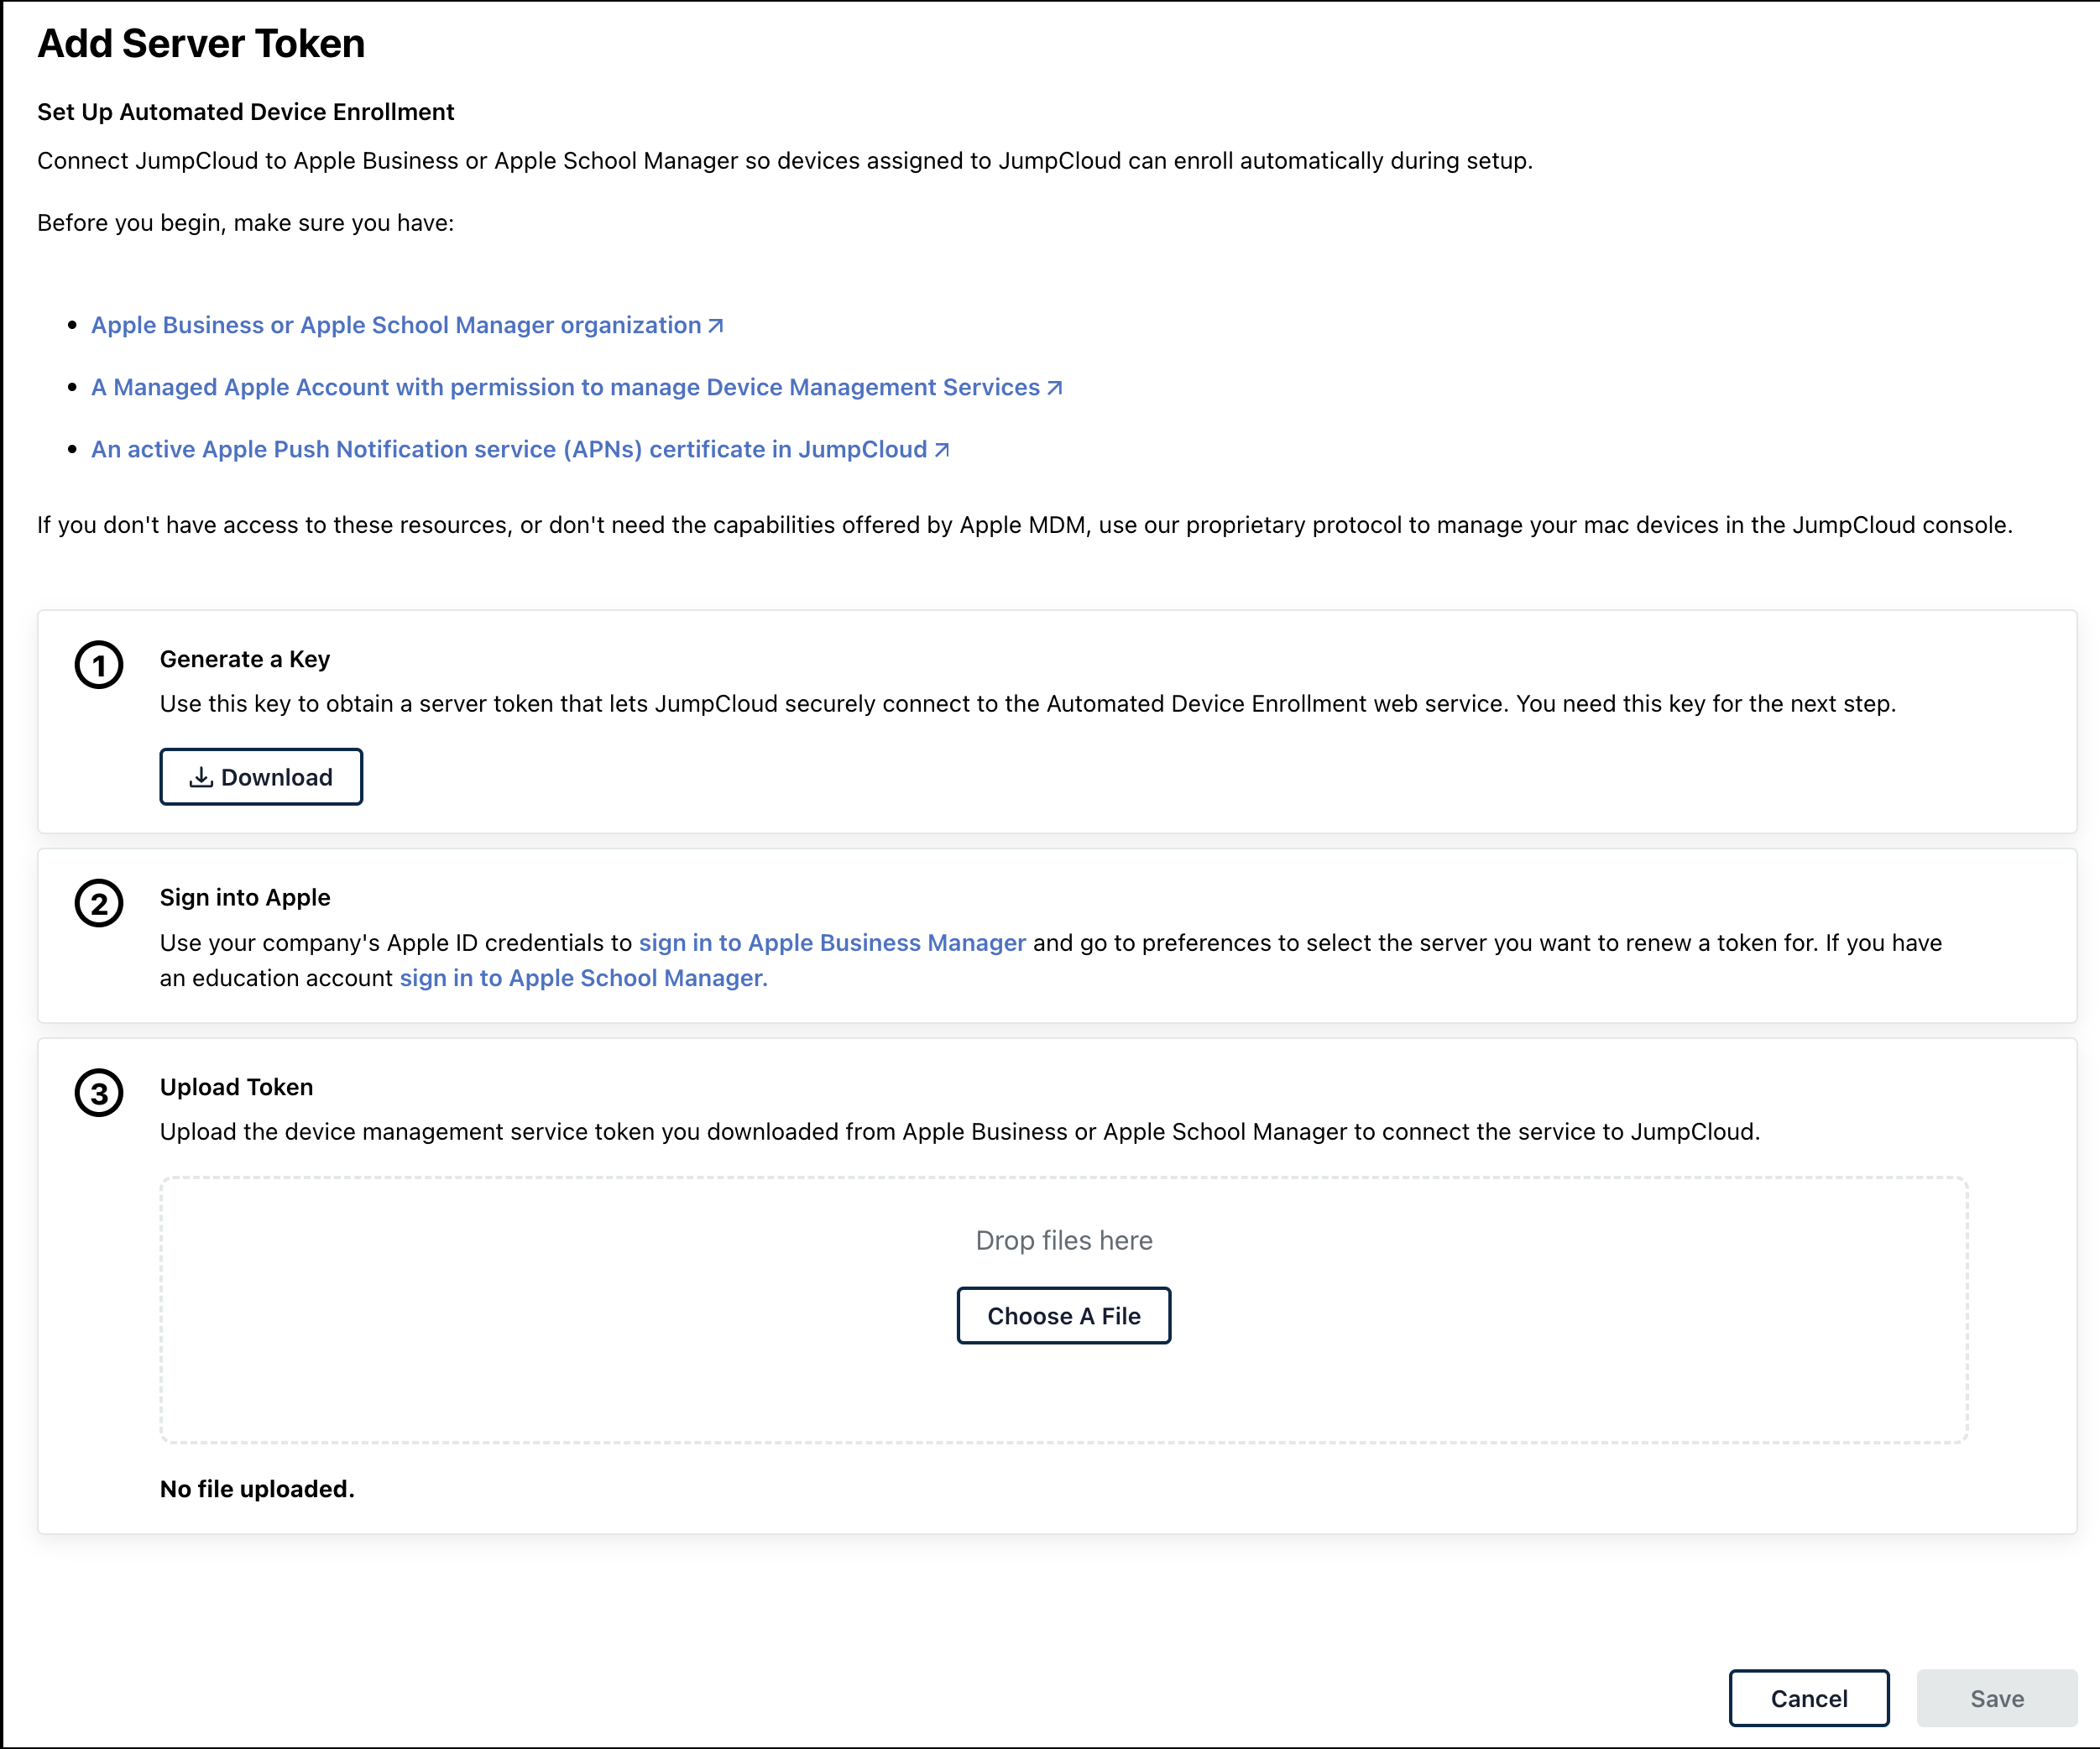
- In Server tokens, click + Add. The Add Server Token page opens.
- Under Generate a Key, click Download. Use this key when configuring the device management service in Apple.
- Under Sign into Apple, click sign in to Apple Business Manager or sign in to Apple School Manager, as applicable.
- In Apple Business or ASM, create or select the distinct device management service you want to connect. Upload the JumpCloud key and download the server token. See the Apple-side steps in Configure Automated Device Enrollment for your Organization above.
- Return to Add Server Token in JumpCloud.
- Under Upload Token, click Choose A File and select the downloaded server token, or drag and drop the file into the upload area.
- Click Save.
Reviewing Server Tokens
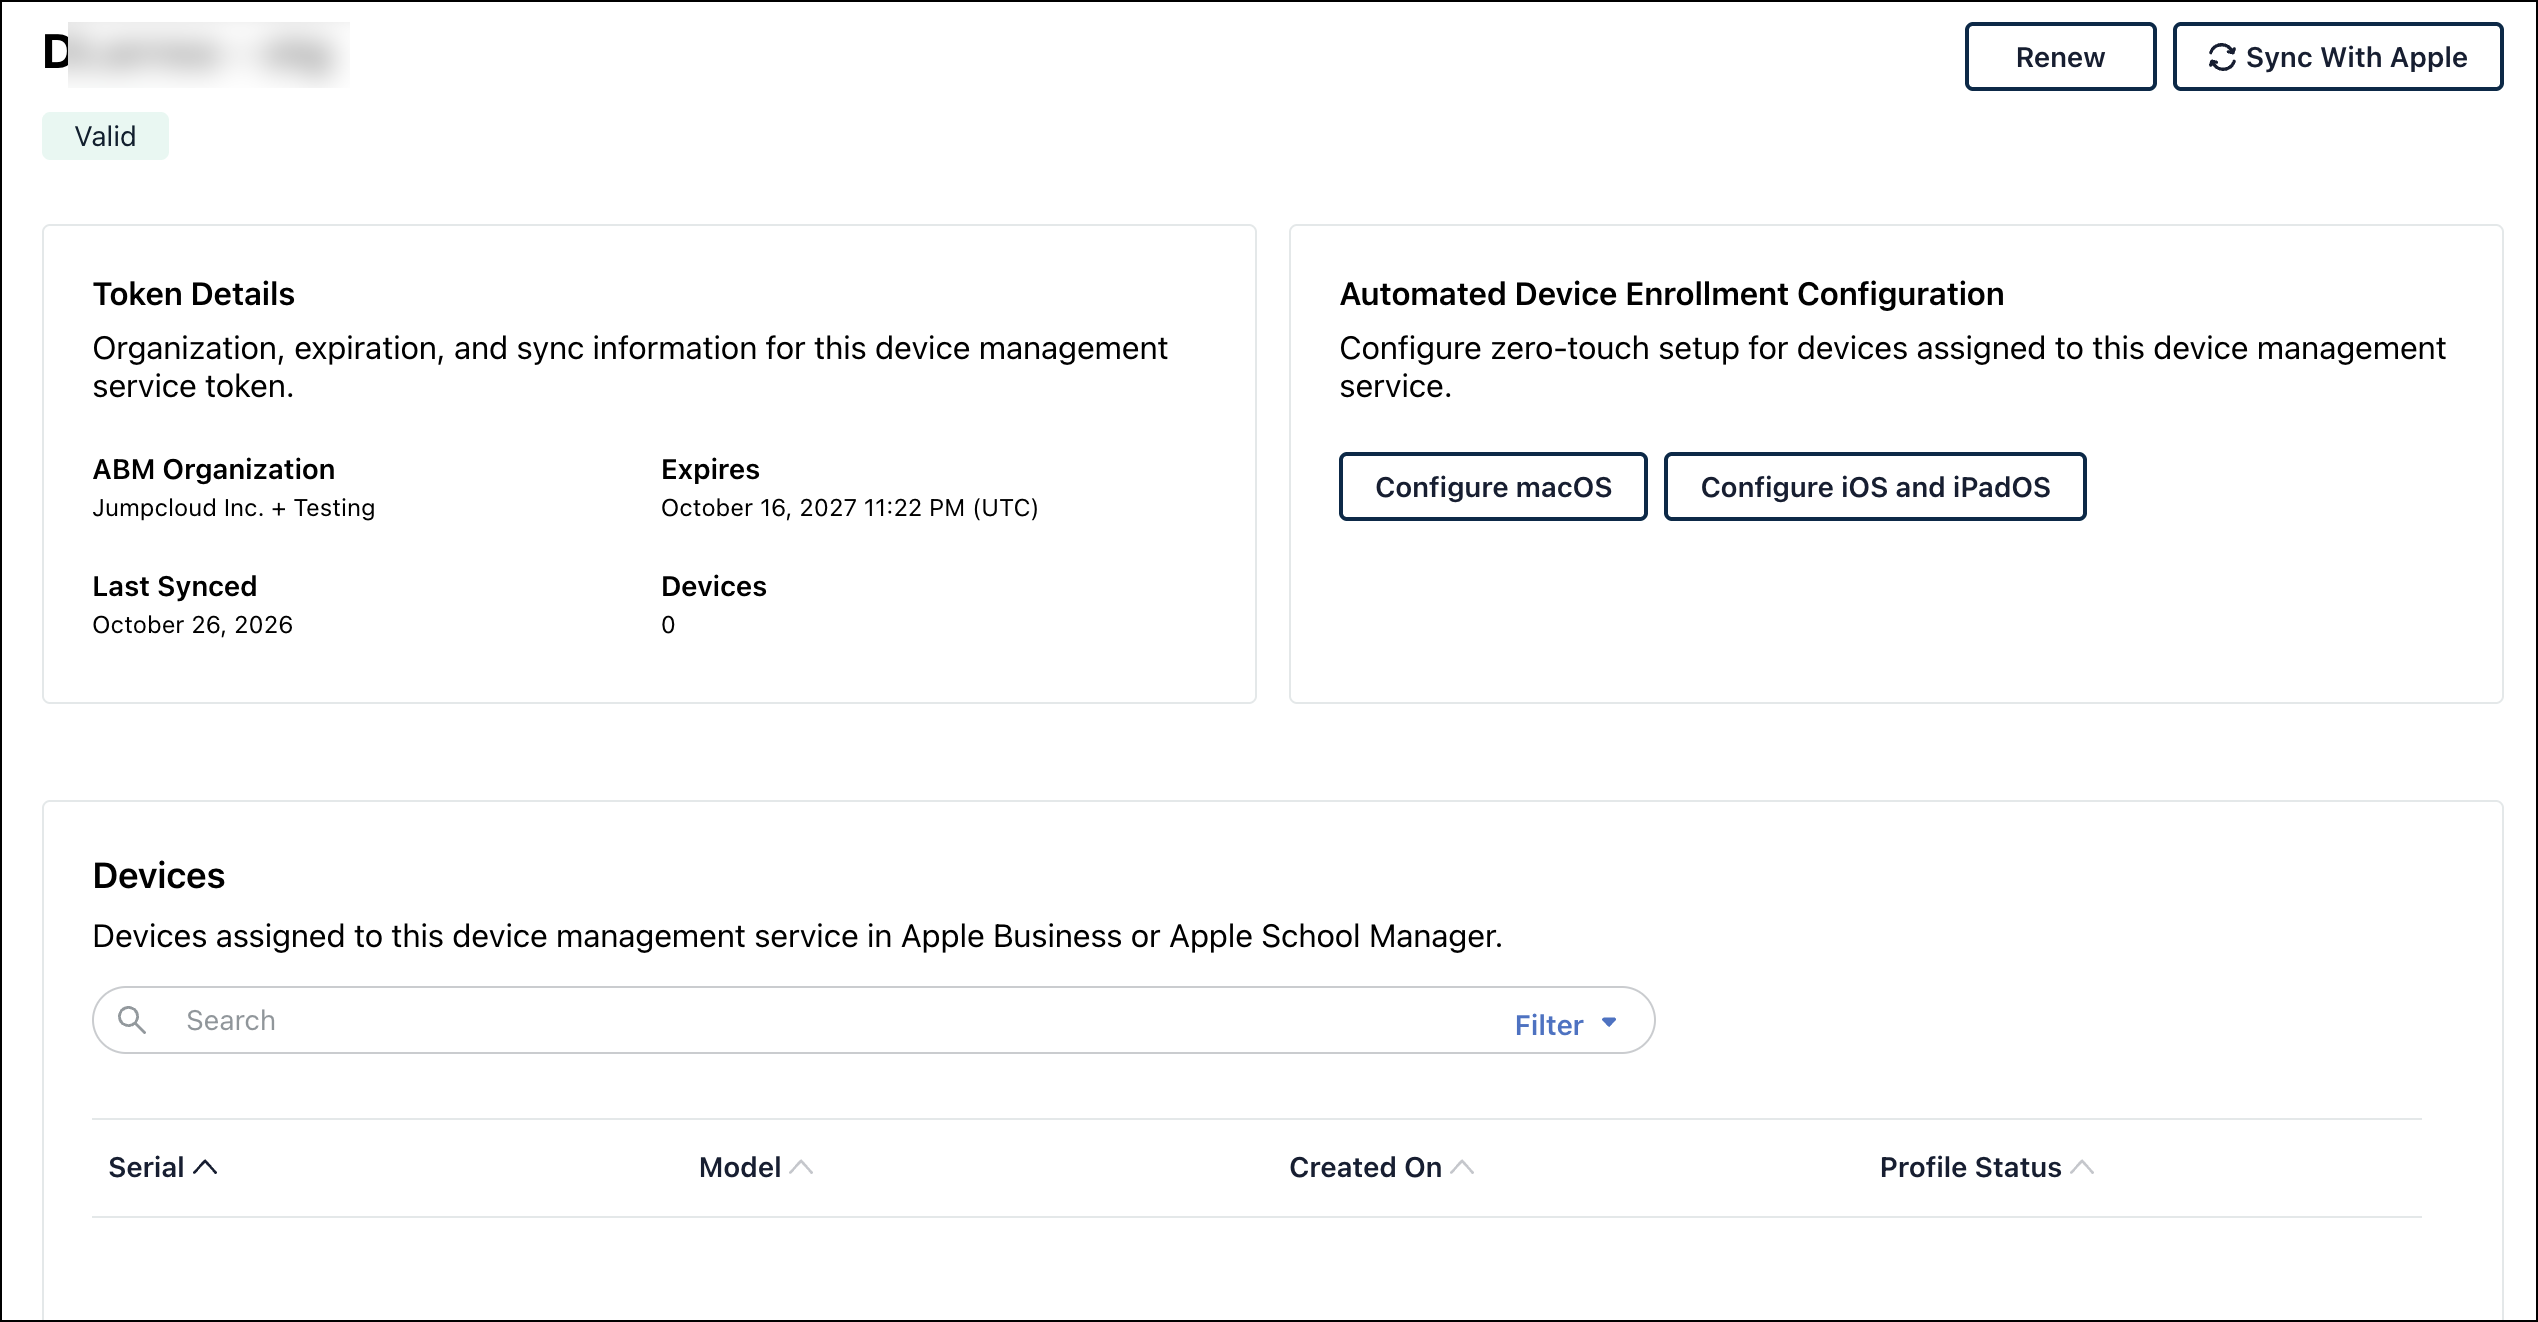
Use the Server tokens list to check token statuses, expiration dates, and device counts across your Apple organizations. Tokens are labeled using the service names configured in Apple.
- Click a token name to review its details, configure enrollment profiles, sync devices, or renew the token.
- Click the device count to navigate directly to that token's Devices section.
Configuring Enrollment for Each Token
You can configure distinct macOS and iOS/iPadOS enrollment settings for each token. These settings apply only to the devices associated with that specific token.
- From the Server tokens list, select a token name.
- Under Automated Device Enrollment Configuration, click Configure macOS or Configure iOS and iPadOS.
To customize the enrollment experience, follow the steps in Configure your macOS users’ zero-touch experience or Configure your iOS users’ zero-touch experience below.
Syncing and Reviewing Devices
After assigning devices to a service in Apple Business or ASM, sync its token to refresh the device list in JumpCloud.
- In Server tokens, select the token name.
- Select Sync With Apple.
Renewing a Server Token
Tokens must be renewed annually to continue enrolling devices. Renewing a token preserves its existing enrollment settings and device associations.
You must download the replacement token from the same Apple organization and device management service. The Apple Business Org Name column in the table indicates which organization is associated with the token.
- In Server tokens, select the token name.
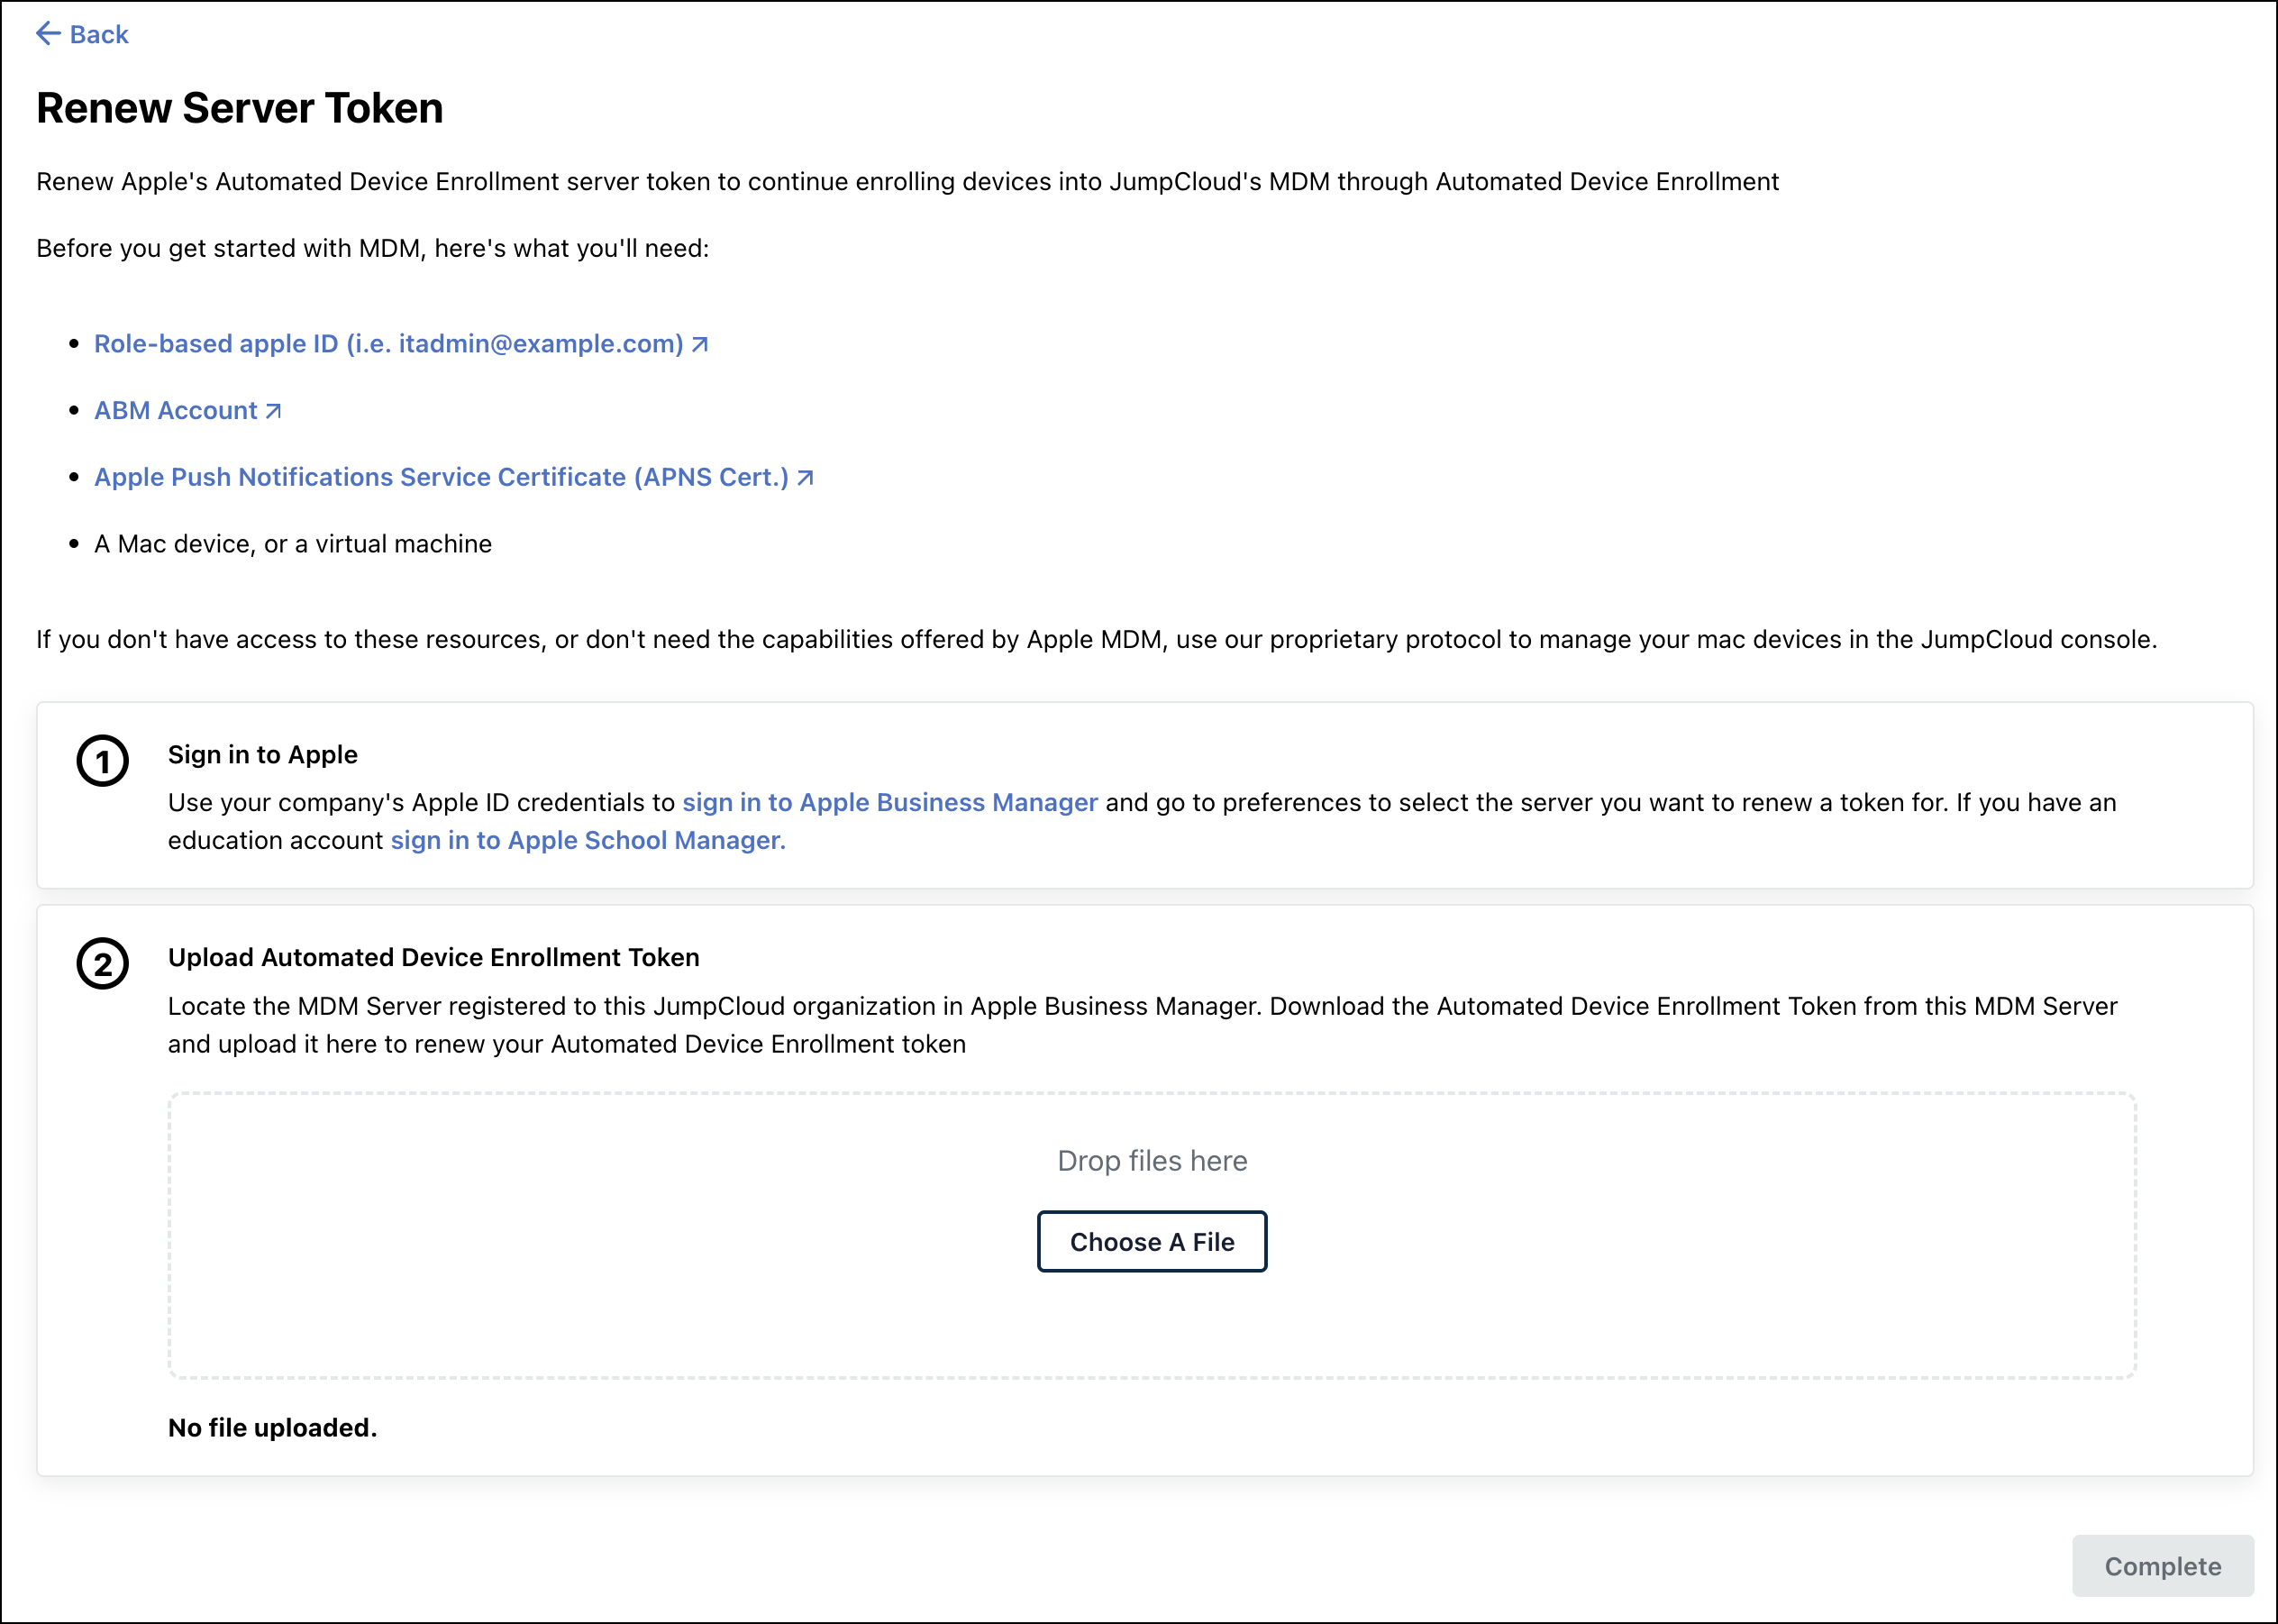
- Click Renew. The Renew Server Token page opens.
- Under Sign in to Apple, click sign in to Apple Business Manager or sign in to Apple School Manager, as applicable.
- In Apple Business or ASM, select the same device management service and download its server token.
- Return to Renew Server Token in JumpCloud.
- Under Upload Automated Device Enrollment Token, click Choose A File and select the downloaded token, or drag and drop it into the upload area.
- Click Complete.
Add the Device to the MDM Server
- Log in to Apple Business or Apple School Manager (ASM).
- Go to Devices > Inventory and select your device. You may want to search for it by serial number.
- Select Assign Device Management and choose your MDM server from the list.
- Click Continue, then click Confirm.
- Verify that the device was added to your MDM server.
The sync process between Apple and JumpCloud ensures the device will contact JumpCloud’s MDM server on first boot to enroll in MDM.
Sync the Device to JumpCloud
JumpCloud automatically syncs devices added through Apple Business daily, so long as your Automated Device Enrollment token is within date. If you want to refresh the list immediately, you can follow the manual process detailed below to sync new devices.
- Go back to the MDM section in the JumpCloud Admin Portal.
- On the MDM home tab, under Automated Device Enrollment Devices, click Sync With Apple to update the list from Apple Business or ASM.
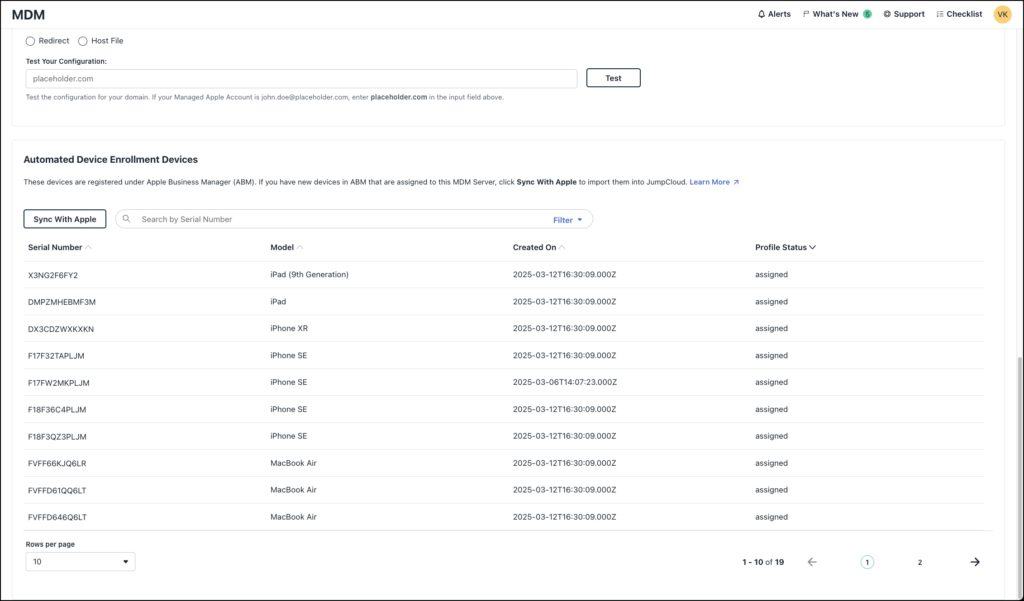
The list in the Automated Device Enrollment Devices section shows all devices that are registered under Apple Business, including the following information for each:
- Serial Number - Serial number assigned to the hardware
- Model - Hardware
- Created On - Timestamp that the device record was created in Apple Business
- Profile Status - Reports the status of the enrollment profile on the device. See the following table for details on possible statuses:
| Profile Status | Definition | Behavior in JumpCloud |
|---|---|---|
| Empty | Unassigned. The device is visible in Apple Business, but no MDM server has been linked to it. | The device will not attempt to enroll in JumpCloud during initial setup. |
| Assigned | Configured but Not Enrolled. The device is linked to both Apple Business and JumpCloud, and a specific enrollment profile is ready. | The device is "staged." It will prompt for JumpCloud enrollment the next time it is powered on (or factory reset). |
| Pushed | Enrollment Complete. The device has successfully downloaded the profile and is now actively managed. | The device is enrolled in JumpCloud MDM and should now appear on the Devices page of the admin console. |
| Removed | Released. The device has been released from Apple Business or ASM. | JumpCloud can no longer manage this device via Automated Device Enrollment. It must be re-added to Apple Business to return to a managed state. |
Narrow the list view by entering a full or partial Serial Number in the search bar, or filter by Model or Profile Status.
From here, you can configure your end users' experience on company-owned Apple devices from day one. For macOS users, see Configure your macOS users' zero-touch experience. For iOS users, see Configure your iOS users' zero-touch experience.
Configure your End Users’ Experience
Configure your macOS users’ zero-touch experience
- Go back to the MDM section in the JumpCloud Admin Portal.
- On the Apple tab, under Automated Device Enrollment Configuration, click Configure MacOS to configure your zero-touch experience.
- Configure the Default Group Association.
- Select the JumpCloud device group to automatically bind this device to. Default device groups can use a policy to ensure that all devices enrolling in Automated Device Enrollment get the security and compliance levels applied immediately during enrollment.
- None - This device won’t be bound to a device group.
- An existing group - Select a macOS group that you've already created.
- Create New group - Click Create New Group to add a new device group and then return here to bind the device to it.
- Select the JumpCloud device group to automatically bind this device to. Default device groups can use a policy to ensure that all devices enrolling in Automated Device Enrollment get the security and compliance levels applied immediately during enrollment.
If the default device group you select is configured to update group membership dynamically, ensure that the group's membership rules are compatible with the devices you're expecting to auto-enroll. See Configure Dynamic Device Groups to learn more.
Verify that you’ve included all the policies you want for the device group. Do not include the JumpCloud MDM Enrollment policy, as this is already implemented during automated enrollment.
- Configure the Welcome Screen details, such as title, description, button name, and logo that your users see:
- Screen Title - Update the title of the Welcome screen.
- Description - Add critical information to the Welcome screen.
- Button - Type a new name for the button. The default is continue.
- Logo - Add your logo to the Welcome screen by going to Settings, selecting Organization Profile, and uploading it there.
- Configure the Setup Assistant Settings. Select the screens that you do not want your users to see during account configuration. Controlling what users see can help you troubleshoot any onboarding issues:
- Select all - None of these screens show during account configuration.
- Select a screen - Select a specific screen to exclude it during account configuration:
- Skip Accessibility setup - macOS 11+
- Skip Analytics
- Skip Apple Pay setup
- Skip Privacy Consent screen
- Skip restoring from backup
- Skip Screen Time screen
- Skip Siri setup
- Skip iCloud Analytics
- Skip Unlock Your Mac with Apple Watch - macOS 12+
- Skip Apple Intelligence setup - macOS 15+
- Skip Wallpaper setup - macOS 14.1+
- Skip Liquid Glass setup - macOS 27+
- Skip OS Showcase setup - macOS 26+
- Skip iCloud Documents and Desktop setup
- Skip Location Services setup
- Skip Appearance setup
- Skip Apple ID sign-in
- Skip Touch ID setup
- Skip DisplayTone setup
- Skip manual FileVault setup
- Skip Terms and Conditions
- Skip Lockdown Mode setup - macOS 14+
- Skip Terms of Address setup - macOS 13+
- Skip Additional Privacy Settings setup - macOS 26+
- Skip Software Update Completed screen - macOS 26+
- Under User authentication, select Enable to turn on User authentication, which requires users to authenticate during Automated Device Enrollment. A successful macOS authentication automatically binds the user's JumpCloud account to the device with Sudo Admin permissions. If users aren’t prompted to authenticate when they power up their devices, you didn’t enable user authentication here.
After the macOS user authenticates, you can change the user's permissions to remove Sudo Admin permissions. See Set Admin/Sudo Permissions to learn more.
- Click save.
- You can require users to change a password when authenticating during Automated Device Enrollment:
-
Go to Identity Management > Users.
-
Select the checkbox for one user or select all users, then click more actions.
-
Choose Force Password Change. The user must reset the password when authenticating during Automated Device Enrollment.
-
Click force change.
-
- After the user authenticates, verify that the user was automatically bound to the macOS device and has Sudo permissions:
-
Go to Device Management > Devices, then select the Devices tab.
-
Select the device and select the Users tab.
-
Verify that the correct user appears as an Admin with Sudo permissions on the device. Each macOS device requires at least one admin account per device as part of MDM enrollment.
-
To see a simulation of what your macOS user will see when they open the box to log into their new device, see our simulations linked in Additional Resources below.
The actual screens might be slightly different depending on the screens that you chose when you customized the zero-touch settings.
If an unsupported macOS device is assigned to the JumpCloud MDM server in Apple Business, it will attempt to install the agent, which will generate an error and cause the device to hang at the install screen. The device will need to have the JumpCloud MDM server unassigned in Apple Business. This can be done by removing the JumpCloud MDM server from the Default Device Assignment under Device Management Settings or by changing the Device Management settings for the individual device.
Configure your iOS users’ zero-touch experience
- Go back to the MDM section in the JumpCloud Admin Portal.
- Under Automated Device Enrollment Configuration in the MDM home tab, click configure iOS and iPadOS to configure your zero-touch experience.
- Select a JumpCloud iOS device group to automatically bind to this device. Default device groups can use a policy to ensure that all devices enrolling in Automated Device Enrollment get the security and compliance levels applied immediately during enrollment.
- None - This device won’t be assigned to a device group.
- An existing group - Select an iOS device group that you already created.
- New group - Click Create New Group to add a new group and then return here to bind the group to the device.
Verify that you’ve included all the policies you want for the device group. Do not include the JumpCloud MDM Enrollment policy, as this is already implemented during automated enrollment.
- Customize the Welcome Screen details, such as title, description, and button name that your users see:
- Screen Title - Update the title of the Welcome screen.
- Description - Add critical information to the Welcome screen.
- Button - Type a new name for the button. The default is continue.
- Logo - Add your logo to the Welcome screen by going to Settings, selecting Organization Profile, and uploading your logo.
- Configure the Setup Assistant Settings. Select the screens that you do not want your iOS users to see during device configuration. Controlling what users see can help you troubleshoot any issues:
- Select all - None of these screens show during device configuration.
- Select a screen - Select the screens to exclude during configuration.
- Skip Privacy Consent screen
- Skip Passcode setup
- Skip restoring from backup
- Skip Move from Android
- Skip Apple Pay setup
- Skip Keep Your Device Up To Date
- Disable iMessage and FaceTime
- Skip Location Services setup
- Skip Siri setup
- Skip Appearance setup
- Skip Display Zoom setup
- Disable Apple Watch Migration
- Skip Home Button overview - iPhone 7, 7 Plus, 8, 8 Plus, and SE
- Skip Apple Intelligence setup - iOS 18+
- Skip Terms of Address setup - iOS 16+
- Skip Web Content Filtering setup - iOS 18.2+
- Skip Multitasking setup - iOS 26+
- Skip Liquid Glass setup - iOS 27+
- Skip TouchID/FaceID setup
- Skip Device Migration
- Skip Restore Completed screen - iOS 14+
- Skip Apple ID sign-in
- Skip Terms and Conditions
- Skip Software Update Completed screen - iOS 14+
- Skip iMessage screen
- Skip Screen Time screen
- Skip Analytics
- Skip True Tone setup - iPhone 8 and later, iPad Pro 12.9-inch (3rd generation), Pro 11-inch, Pro 12.9-inch (2nd generation), Pro 10.5-inch, Pro (9.7-inch), Air (3rd generation), mini (5th generation)
- Skip Getting Started screen
- Skip Set Up Cellular screen
- Skip Action Button setup - iOS 17+
- Skip Safety setup - iOS 16+
- Skip Camera Button setup - iPhone 16, 16 Plus, 16 Pro, and 16 Pro Max
- Skip Safety and Handling setup - iOS 18.4+
- Skip OS Showcase setup - iOS 26+
- Under User Authentication, select the checkbox next to Enable if you want to require users to authenticate during Automated Device Enrollment. A successful iOS authentication automatically assigns the JumpCloud user to the device. If users aren’t prompted to authenticate when they power up their devices, you did not enable user authentication here.
- Click save.
- To increase device security, you can require users to change their password when authenticating during Automated Device Enrollment:
-
Go to Identity Management > Users.
-
Select the checkbox for one user or select all users, then click more actions.
-
Choose Force Password Change. The user must reset the password when authenticating during Automated Device Enrollment.
-
Click force change.
-
- After the user authenticates, verify that the user is assigned to the device and that the device appears in the Devices list.
- Go to Device Management > Devices, then select the Devices tab.
- Select the device, then select Users.
Default Password Sync
By default, any new users associated to devices have their JumpCloud password synced to their device password. Toggle this Off to disable password sync and have users enter a local password to log into their device instead. See Device Password Sync to learn more.
Renew Your Automated Device Enrollment Token Annually
You need to renew Apple’s Automated Device Enrollment server token every year to continue enrolling new devices with Automated Device Enrollment. Your token expiration date is visible in the MDM home page under Automated Device Enrollment Configuration.
- Go back to the MDM section in the JumpCloud Admin Portal.
- On the MDM home tab, click renew under Automated Device Enrollment Configuration.
- Under Sign in to Apple, click sign into Apple Business Manager, then enter your credentials. (If you have an education account, click sign into Apple School Manager.)
- In Apple Business or ASM, select your profile name and choose Preferences.
- Under Your MDM Servers, select your MDM server.
- Click Download Token, then click Download Server Token.
- In the JumpCloud Admin Portal, return to the Renew Apple’s Automated Device Enrollment page.
- Under Upload Automated Device Enrollment Token, click Browse or drag and drop the new Automated Device Enrollment token for your MDM server.
- Click complete. A message on the MDM home tab indicates that your Automated Device Enrollment configuration was renewed.
Renewing the Automated Device Enrollment (ADE) token is a targeted action that addresses only ADE issues. It will not affect any of your current MDM functionality, device configurations, or other devices.
Troubleshooting
Resolving Errors after a Major OS Version Release
When a new major OS version is released by Apple, the Software License Agreement for macOS, iOS, iPadOS, and tvOS is typically updated. Apple ensures that you review and accept their Terms and Conditions by restricting access to VPP licenses and ADE processes for new devices (currently enrolled devices are not affected) until the terms are accepted.
If you see the following errors on the MDM page in the JumpCloud Admin Portal after a new major OS release, you will need to log in to your Apple Business or Apple School Manager account and approve the updated Terms and Conditions:
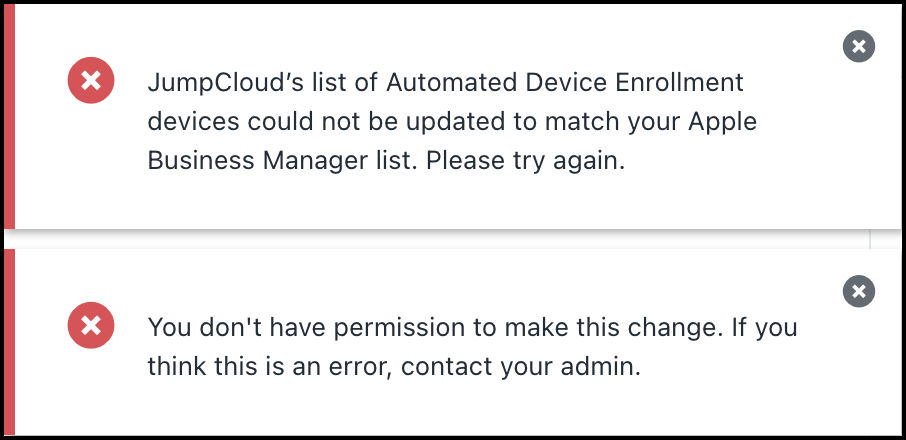
JumpCloud's list of Automated Device Enrollment devices could not be updated to match your Apple Business Manager list. Please try again.
You don't have permission to make this change. If you think this is an error, contact your admin.
Repairing an Out-of-Sync Automated Device Enrollment Token
You can repair an out-of-sync Automated Device Enrollment token when it is invalidated or when a Mobile Device Management (MDM) server in Apple Business has been deleted.
Prerequisites:
- An account with Apple Business or Apple School Manager (ASM) is required, with the role of Administrator or Content Manager.
When an MDM Server token is out of sync, the JumpCloud Admin Portal displays the following message when attempting to refresh your Automated Device Enrollment Device List:
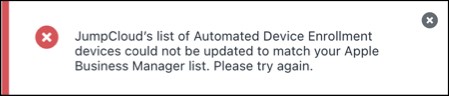
JumpCloud's list of Automated Device Enrollment devices could not be updated to match your Apple Business Manager list. Please try again.
If your MDM server token is out of sync, you can re-upload a JumpCloud-generated Automated Device Enrollment Key into your MDM Device Server to re-sync your Apple devices with JumpCloud.
Retrieve your MDM ID using the JumpCloud API and the curl command from a supported command line interface like Terminal on macOS or Command Prompt on Windows. After JumpCloud MDM is configured, a unique MDM ID is generated. This ID is necessary to make changes to your MDM settings.
macOS – Terminal instructions
- Start by fetching your MDM ID. The output of this GET request will generate your MDM ID.
curl -X GET https://console.jumpcloud.com/api/v2/applemdms \
-H 'accept: application/json' \
-H 'content-type: application/json' \
-H 'x-api-key: {API_KEY}'
- For MSPs, run this command with the
x-org-idvariable:
curl --location 'https://console.jumpcloud.com/api/v2/applemdms' \
--header 'x-org-id: {ORG_ID}' \
--header 'x-api-key: {API_KEY}'
- Use your MDM ID to generate your JumpCloud Automated Device Enrollment Key:
curl -X GET https://console.jumpcloud.com/api/v2/applemdms/{MDM_ID_FROM_ABOVE_HERE}/depkey \
-H 'Accept: application/x-pem-file' \
-H 'content-type: application/json' \
-H 'x-api-key: {API_KEY}'
- For MSPs, use the MDM ID and Organization ID to generate your JumpCloud Automated Device Enrollment Key:
curl --location 'https://console.jumpcloud.com/api/v2/applemdms/{MDM_ID}/depkey' \
--header 'x-org-id: {ORG_ID}' \
--header 'Accept: application/x-pem-file' \
--header 'x-api-key: {API_KEY}'
- The resulting certificate should resemble the output below:
-----BEGIN CERTIFICATE-----
Q2xvdWQgTURNMB4XDTIxMDgxMzE3MDEyNloXDTIxMDkxMjE3MDEyNlowGDEWMBQG
ggEBAKU3pjvrGUi4pZfEbiN0C8tJmIHBkBSAl3nlcIXFaJ/o9thtwEQ8iXrQRIq1
apwKAz5cF+J9M155Qj04mjrEIrZc3x34S5dvAKkDfxTzGBqBxBeCFfWa+IM9FOqt
C7gOW70rxPUyC1pYkYo4rwTU9PH406iCnMaL2amTPbdsQQjgI8zui04AcyRhsoGB
GEUattwIFK/1XnyUE8fqnS0nnL5yH4a8nROb6SOMwrd8F4H/U+kpUcnDIX3L8j2a
A1UEAxMNSnVtcENsb3VkIE1ETTCCASIwDQYJKoZIhvcNAQEBBQADggEPADCCAQoC
rbx0O2hzag0x2rih0jQ+pdQ+HsUCAwEAAaMCMAAwDQYJKoZIhvcNAQELBQADggEB
ABI9C9zUsVVCVoyAoCD7Qqcx1EbsN4q9KcCkp0fIwe0ttKKBxWwQPVzWwwjAtDoZ
mOG6Ow1Avnd7EQzItDdqbtOA+Waji7NWdzvwSx7t0HcgrzUFE4zd57hZVemrwkK4
t34z2S+vcsK+8zazDYdSnRmAhvwkoHkaWpj7pM6lg9gvZhau3eGffaQBqLhm/0sN
eTVrJuE/+FZtcF5+7aQuK8YXMikwonMtOhN0wcgpgjQVUZw1VMROBcWkgUAS87wT
1I4PFW/iPHZg7apOW8VCzeka/ZXvwAEh+5qtXxE8zbxTS0YZHq6HMy1thLNlQETh
MIICrTCCAZWgAwIBAgIBATANBgkqhkiG9w0BAQsFADAYMRYwFAYDVQQDEw1KdW1w
F+QRpHuWQHkTB4xAxqRPnfADH4dQq0nTjRkj89zsZI3umtav40gy+dScgrrWAGlw
mVqzP/HnSggPQ3LusHdNop8=
-----END CERTIFICATE-----
- In a text editor, create a new file and paste the Automated Device Enrollment key, including Begin Certificate and End Certificate:
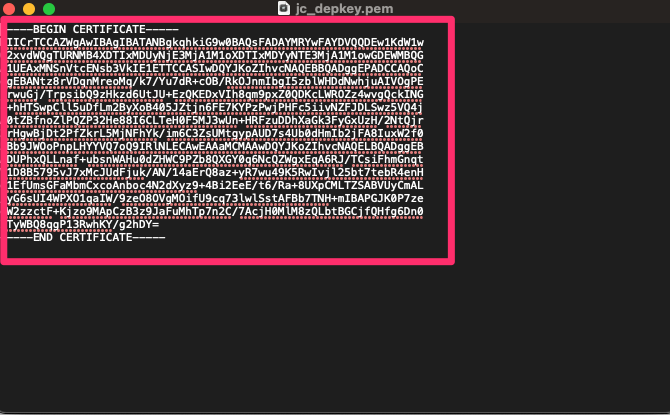
- Save the file.
- Log in to your Apple Business or ASM account.
- Select your profile name, then click Preferences.
- Select MDM Server Assignment, then select the MDM server you want to sync with JumpCloud.
- Click Edit.
- Under MDM Server Settings, click Upload New, then upload the file you just created.
- Click Save.
- Click Download Token.
- Log in to the JumpCloud Admin Portal.
- Go to Device Management > MDM.
- In the MDM Home page under Automated Device Enrollment Configuration, click renew.
- Upload the newly downloaded token from Apple Business or ASM.
- Click Complete.
- After the token is renewed, click sync with Apple to refresh your Automated Device Enrollment Device List. A successful synchronization will display the following message, and your Automated Device Enrollment devices will be listed as expected.
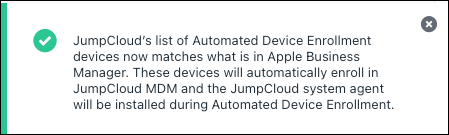
Windows – Command Prompt instructions
- Start by fetching your MDM ID.
curl --location "https://console.jumpcloud.com/api/v2/applemdms" --header "x-api-key: {API_KEY}"
- For MSPs:
curl --location "https://console.jumpcloud.com/api/v2/applemdms" --header "x-org-id: {ORG_ID}" --header "x-api-key: {API_KEY}"
- Use your MDM ID to generate your JumpCloud Automated Device Enrollment Key:
curl --location "https://console.jumpcloud.com/api/v2/applemdms/{MDM_ID_FROM_ABOVE_HERE}/depkey" --header "Accept: application/x-pem-file" --header "x-api-key: {API_KEY}"
- For MSPs:
curl --location "https://console.jumpcloud.com/api/v2/applemdms/{MDM_ID_FROM_ABOVE_HERE}/depkey" --header "x-org-id: {ORG_ID}" --header "Accept: application/x-pem-file" --header "x-api-key: {API_KEY}"
- In a text editor, create a new file and paste the Automated Device Enrollment key, including Begin Certificate and End Certificate:
- Save the file.
- Log in to your Apple Business or ASM account.
- Select your profile name, then click Preferences.
- Select MDM Server Assignment, then select the MDM server you want to sync with JumpCloud.
- Click Edit.
- Under MDM Server Settings, click Upload New, then upload the file you just created.
- Click Save.
- Click Download Token.
- Log in to the JumpCloud Admin Portal.
- Go to Device Management > MDM.
- In the MDM Home page under Automated Device Enrollment Configuration, click renew.
- Upload the newly downloaded token from Apple Business or ASM.
- Click Complete.
- After the token is renewed, click sync with Apple to refresh your Automated Device Enrollment Device List. A successful synchronization will display the following message, and your Automated Device Enrollment devices will be listed as expected.
Windows – PowerShell instructions
- Start by fetching your MDM ID.
$headers = New-Object "System.Collections.Generic.Dictionary[[String],[String]]"
$headers.Add("x-api-key", "{API_KEY}")
$response = Invoke-RestMethod 'https://console.jumpcloud.com/api/v2/applemdms' -Method 'GET' -Headers $headers
$response | ConvertTo-Json
- For MSPs:
$headers = New-Object "System.Collections.Generic.Dictionary[[String],[String]]"
$headers.Add("x-org-id", "{ORG_ID}")
$headers.Add("x-api-key", "{API_KEY}")
$response = Invoke-RestMethod 'https://console.jumpcloud.com/api/v2/applemdms' -Method 'GET' -Headers $headers
$response | ConvertTo-Json
- Use your MDM ID to generate your JumpCloud Automated Device Enrollment Key:
$headers = New-Object "System.Collections.Generic.Dictionary[[String],[String]]"
$headers.Add("Accept", "application/x-pem-file")
$headers.Add("x-api-key", "{API_KEY}")
$response = Invoke-RestMethod 'https://console.jumpcloud.com/api/v2/applemdms/{MDM_ID_FROM_ABOVE_HERE}/depkey' -Method 'GET' -Headers $headers
$response | ConvertTo-Json
- For MSPs:
$headers = New-Object "System.Collections.Generic.Dictionary[[String],[String]]"
$headers.Add("x-org-id", "{ORG_ID}")
$headers.Add("Accept", "application/x-pem-file")
$headers.Add("x-api-key", "{API_KEY}")
$response = Invoke-RestMethod 'https://console.jumpcloud.com/api/v2/applemdms/{MDM_ID_FROM_ABOVE_HERE}/depkey' -Method 'GET' -Headers $headers
$response | ConvertTo-Json
- In a text editor, create a new file and paste the Automated Device Enrollment key, including Begin Certificate and End Certificate:
- Save the file.
- Log in to your Apple Business or ASM account.
- Select your profile name, then click Preferences.
- Select MDM Server Assignment, then select the MDM server you want to sync with JumpCloud.
- Click Edit.
- Under MDM Server Settings, click Upload New, then upload the file you just created.
- Click Save.
- Click Download Token.
- Log in to the JumpCloud Admin Portal.
- Go to Device Management > MDM.
- In the MDM Home page under Automated Device Enrollment Configuration, click renew.
- Upload the newly downloaded token from Apple Business or ASM.
- Click Complete.
- After the token is renewed, click sync with Apple to refresh your Automated Device Enrollment Device List. A successful synchronization will display the following message, and your Automated Device Enrollment devices will be listed as expected.
Postman instructions
- Reference the steps in Configure JumpCloud API Endpoints in Postman to download and import the following API Endpoints into Postman:
- List Apple MDMs - Retrieve your MDM ID
- Note you will need to supply your API Key
- If you are an MSP, you will also need to supply the OrgID. Otherwise, this can be left blank in Postman.
- Get Apple MDM DEP Public Key - Generate your JumpCloud Automated Device Enrollment Key
- Note you will need to supply your API Key and the MDM ID you retrieved above.
- If you are an MSP, you will also need to supply the OrgID. Otherwise, this can be left blank in Postman.
- List Apple MDMs - Retrieve your MDM ID
- In a text editor, create a new file and paste the Automated Device Enrollment key, including Begin Certificate and End Certificate:
- Save the file.
- Log in to your Apple Business or ASM account.
- Select your profile name, then click Preferences.
- Select MDM Server Assignment, then select the MDM server you want to sync with JumpCloud.
- Click Edit.
- Under MDM Server Settings, click Upload New, then upload the file you just created.
- Click Save.
- Click Download Token.
- Log in to the JumpCloud Admin Portal.
- Go to Device Management > MDM.
- In the MDM Home page under Automated Device Enrollment Configuration, click renew.
- Upload the newly downloaded token from Apple Business or ASM.
- Click Complete.
- After the token is renewed, click sync with Apple to refresh your Automated Device Enrollment Device List. A successful synchronization will display the following message, and your Automated Device Enrollment devices will be listed as expected.
Additional Resources
Show Me:
Was this information helpful?