


 Subscribe to Help Center RSS Feed
JumpCloud’s Model Context Protocol (MCP) Server for admins lets you connect compatible AI tools to JumpCloud and interact with your organization’s data and administrative capabilities. With MCP, you can view, edit, and modify many aspects of your JumpCloud org directly within your existing AI tools like code editors, large language models (LLMs), and AI agents.

MCP is not a replacement for existing APIs or any automations you’ve already configured. It offers similar functionality of our APIs but using protocols AI agents can better understand and utilize.
Understanding the Benefits:
JumpCloud's MCP server helps integrate your organization's data with your existing AI tools:
- Find and view JumpCloud objects: Users, admins, devices, groups, SSO applications, Directory Insights (DI) events and more.
- Modify objects: Grant or revoke user access, reset passwords and MFA, send device security commands, modify group memberships and SSO application access.
- Perform bulk actions: Manage multiple users, devices, groups, and SSO applications in bulk.
Prerequisites:
- JumpCloud Administrator account with API access. See JumpCloud APIs to learn more.
Known Issues and Limitations:
- MCP servers typically support three elements: resources, tools, and prompts. JumpCloud’s MCP server currently supports tools only.
- JumpCloud’s MCP server currently supports Streamable HTTP only as the transport mechanism. Stdio is not supported.
Supported Clients
JumpCloud's MCP server currently supports the following AI tools:
- AI Tools
- Code Editors
Enabling the MCP Server
To enable JumpCloud MCP:
- Log in to the JumpCloud Admin Portal.

If your data is stored outside of the US, check which login URL you should be using depending on your region. If your organization uses LDAP, RADIUS, or requires firewall allow list configuration, the Fully Qualified Domain Names (FQDNs) will also be region specific. See JumpCloud Data Centers for the URLs, FQDNs, and IP addresses.
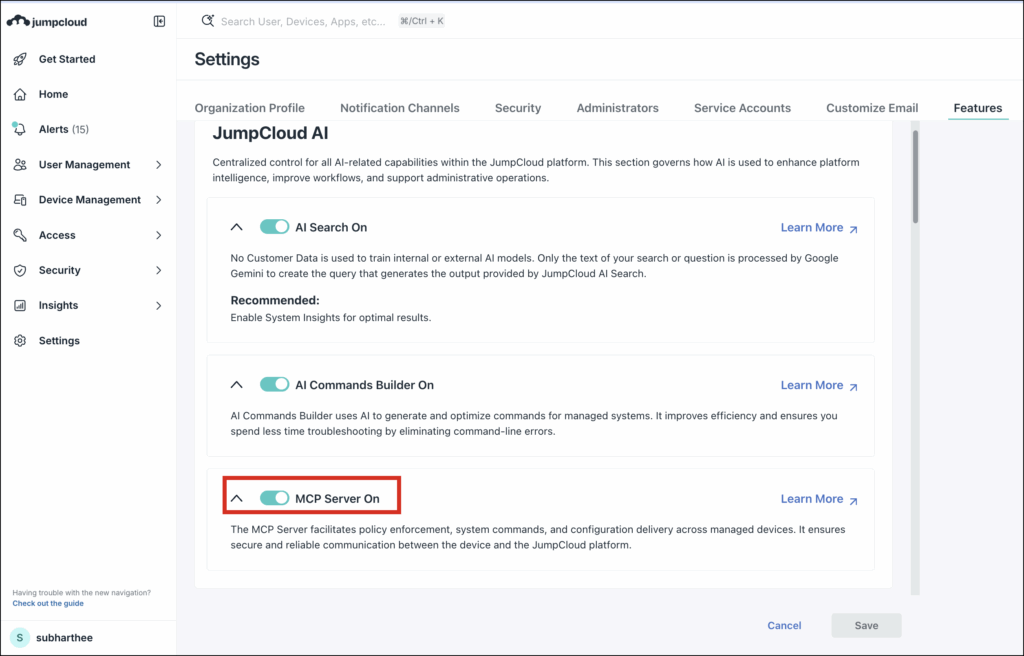
- In the left menu, click on Settings.
- Go to the JumpCloud AI tab.
- Toggle MCP Server for admins to On.
Using the MCP Server
The JumpCloud MCP server endpoint differs depending on your datacenter region:
The MCP server currently supports API key and OAuth authentication. The MCP server doesn’t support the entirety of JumpCloud’s APIs. Instead, it offers structured tools specifically designed for AI clients, focusing on the following key areas:
- User and device management
- Directory Insights (DI) events and related information
- Applications and user groups
If you are a Managed Service Provider (MSP) using the Multi-Tenant Portal (MTP) to manage multiple organizations, you'll need to append the MCP server URL with the organization ID of the specific child org you want to connect to. See Manage Organizations in the MTP to learn more. Replace {orgId} with the child org's ID:
- US: https://mcp.jumpcloud.com/v1?organizationId={orgId}
- EU: https://mcp.eu.jumpcloud.com/v1?organizationId={orgId}
API Authentication
This method transmits the API key to public API endpoints, mirroring your exact permissions in JumpCloud.
While our standard API accepts API keys in the x-api-key header, the MCP server requires the key to be sent in the Authorization header using the Bearer scheme:
- Correct Format: Authorization: Bearer jca_xxxx
- Incorrect Format: x-api-key: jca_xxxx
OAuth Authentication
This method uses browser-based authentication to JumpCloud to generate a token and enable MCP with the client. After configuring the MCP server in the client, you’ll be redirected to JumpCloud to authenticate via OAuth. Successful admin authentication activates the integration.
Connecting with Claude
Claude doesn't support API authentication. You must use OAuth authentication to connect to the MCP server.
To integrate JumpCloud's MCP server with Claude:
- In Claude, at the bottom left, click your account details and go to Settings.
- Under Settings, go to Connectors.
- At the bottom of the Connectors list, click Add custom connector.
- In the Add custom connector modal:
- Enter a Name for the connector, for example JumpCloud.
- Under Remote MCP server URL, enter the JumpCloud MCP Server URL depending on your datacenter region:
- US: https://mcp.jumpcloud.com/v1
- EU: https://mcp.eu.jumpcloud.com/v1
- Note: For MSPs, Claude doesn't support appending the specific child org's ID to the MCP server URL. You cannot use your provider admin account and instead must connect to the MCP server using an administrator account directly within the child org.
- Click Add.
- To the right of the new connector, click Connect.
- Authenticate using your JumpCloud administrator credentials.
JumpCloud is now connected to Claude, and you can ask or perform supported JumpCloud operations directly in your chats.
Connecting with Cursor
To integrate JumpCloud's MCP server with Cursor:
- In Cursor, go to Cursor Settings.
- In Tools & Integrations, under MCP Tools, click New MCP Server.
- In the mcp.json file, enter the following configuration examples depending on your preferred authentication type.
To use OAuth:
- In the mcp.json file, enter the configuration using the following example. Ensure you use the correct MCP server URL for your datacenter region:
- US: https://mcp.jumpcloud.com/v1
- EU: https://mcp.eu.jumpcloud.com/v1
- Note: For MSPs, append the specific child org's ID to the URL. For example: https://mcp.jumpcloud.com/v1?organizationId={orgId}
{
"mcpServers": {
"jumpcloud-mcp": {
"url": "https://mcp.jumpcloud.com/v1"
}
}
}
- Go back to Cursor Settings.
- Under Installed MCP Servers, click Connect next to jumpcloud-mcp.
- You'll be redirected to your browser to authenticate to the Admin Portal.
- When finished, click Open Cursor in your browser to return to the app and complete authentication.
To use API authentication:
- In the mcp.json file, enter the configuration using the following example format, replacing YOUR_JUMPCLOUD_API_KEY with your JumpCloud API Key, and using the correct MCP server URL for you datacenter region:
- US: https://mcp.jumpcloud.com/v1
- EU: https://mcp.eu.jumpcloud.com/v1
- Note: For MSPs, append the specific child org's ID to the URL. For example: https://mcp.jumpcloud.com/v1?organizationId={orgId}
{
"mcpServers": {
"jumpcloud-mcp": {
"url": "https://mcp.jumpcloud.com/v1",
"headers": {
"Authorization": "Bearer YOUR_JUMPCLOUD_API_KEY"
}
}
}
}
After adding the configuration, you can use Cursor to start a session and ask questions and perform operations related to JumpCloud. For example “How many Windows devices are in my JumpCloud account?”
See Cursor - Model Context Protocol (MCP) documentation to learn more.
Connecting with Visual Studio Code
- JumpCloud MCP server supports HTTP Streaming Protocol.
- See Microsoft's Add an MCP server to a workspace 'mcp.json' file to learn how to connect MCP servers.
To add JumpCloud's MCP server to VS Code using the Commands Palette:
- In VS Code, go to Settings > Command Palette.
- Enter mcp and select MCP: Add Server.
- Under Choose the type of MCP server to add, select HTTP.
- Under Enter Server URL, enter the JumpCloud MCP Server URL for your datacenter region:
- US: https://mcp.jumpcloud.com/v1
- EU: https://mcp.eu.jumpcloud.com/v1
- Note: For MSPs, append the specific child org's ID to the URL. For example: https://mcp.jumpcloud.com/v1?organizationId={orgId}
- Under Enter Server ID, enter a name for the server, for example JumpCloud MCP.
- The entry will be added to your mcp.json file and prompt you to authenticate.
- Connect to the JumpCloud MCP server by providing an API key or signing into your JumpCloud account when prompted.
To manually add JumpCloud's MCP to VS Code using the mcp.json file:
- In VS Code, go to File > New File and create an mcp.json file by entering the following in the search bar: .vscode/mcp.json
- Paste the following into the file, replacing jca_**** with your API key:
{
"servers": {
"jc-mcp": {
"url": "https://mcp.jumpcloud.com/v1",
"headers": {
"Authorization": "Bearer jca_****"
}
}
}
}
- Save the file, and then click Start above the server name.
- Under The MCP Server Definition wants to authenticate to mcp.jumpcloud.com, click Allow.
- Connect to the JumpCloud MCP server by providing an API key or signing into your JumpCloud account when prompted.
You can now interact with your JumpCloud org's data using MCP.
Managing Connected OAuth Sessions
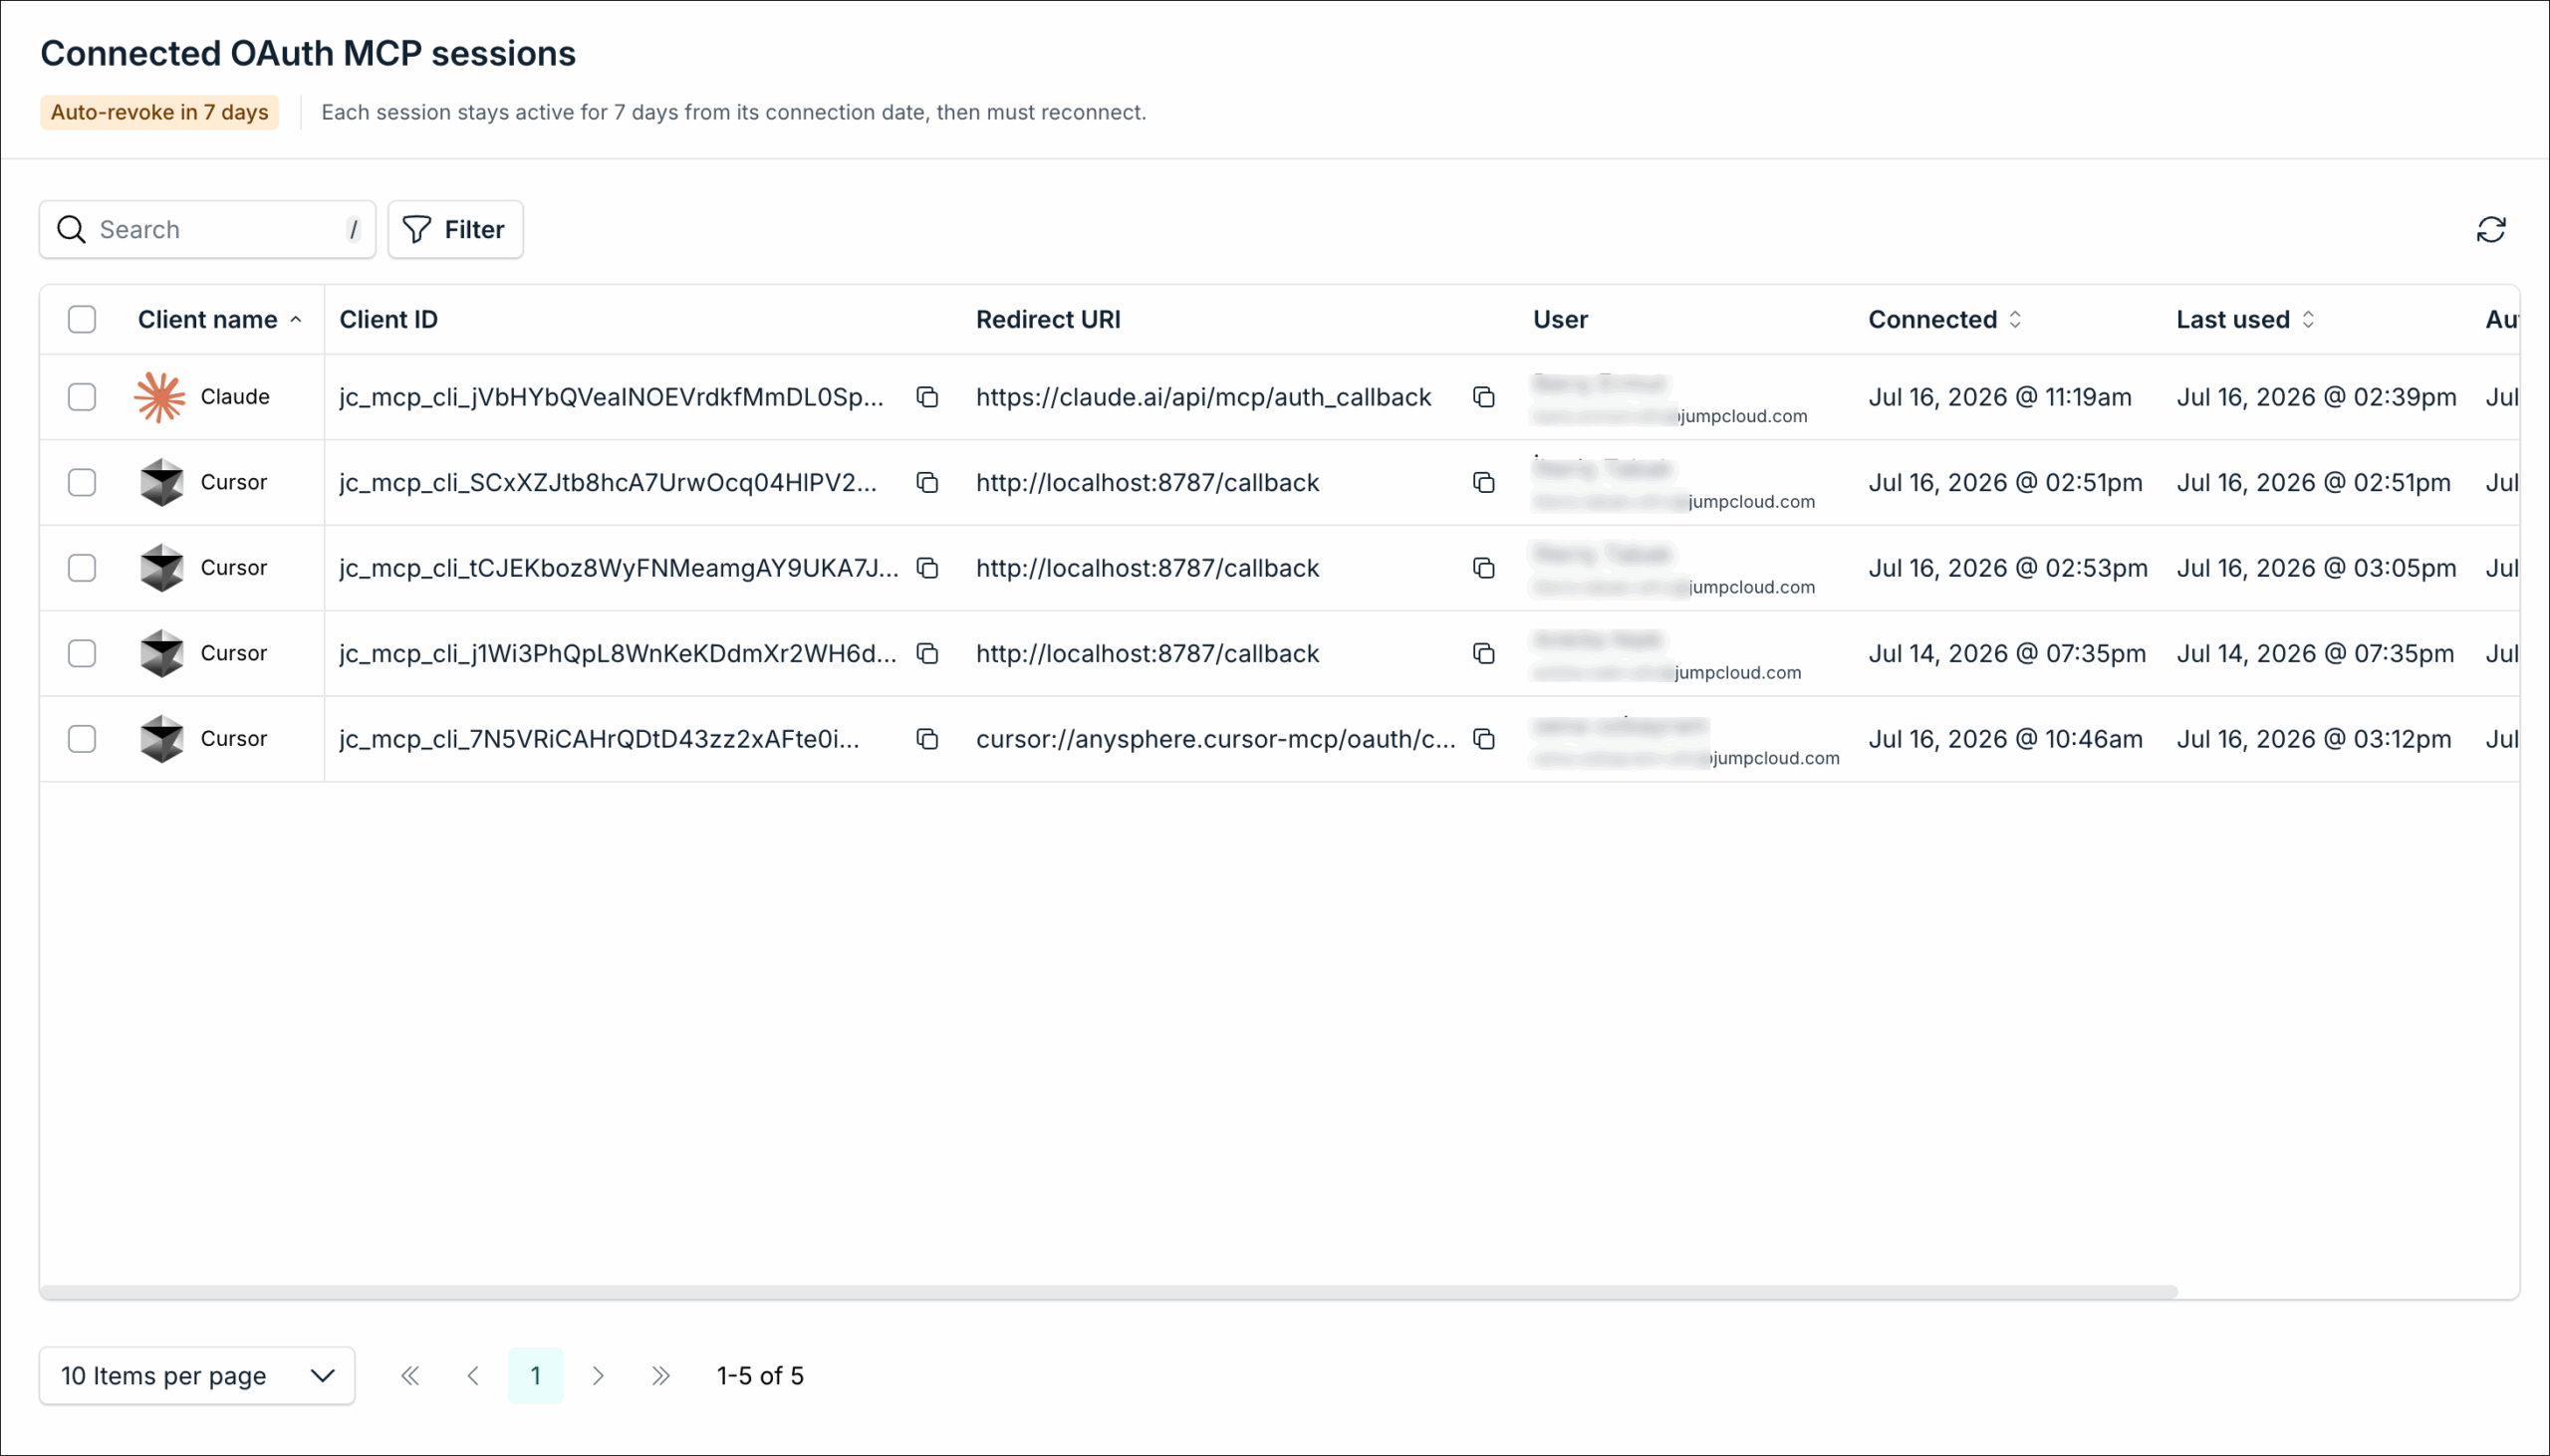
You can view and manage third-party MCP OAuth clients that have active sessions with your JumpCloud organization.
OAuth session data does not populate historically. Data appears only when a new session is established or an existing one reconnects.
To monitor and manage connected OAuth clients:
- From the JumpCloud Admin Portal, go to Settings > JumpCloud AI.
- Under MCP Server for admins > Connected OAuth clients, click Manage.
- Note: The UI displays the current number of active sessions, such as 5 Connected OAuth clients.
- In the Connected sessions page, a list of active MCP server connections displays with the following information:
- Client name - The name of the connected third-party application or client.
- Client ID - The unique identifier for the OAuth client session.
- Redirect URI - The callback URL used during the OAuth authentication process.
- User - The JumpCloud administrator account that authorized the connection.
- Connected - The date and time when the session was initially authenticated.
- Last used - The date and time when the client last interacted with the JumpCloud MCP server.
- Auto-revokes - The date and time when the session will automatically expire and require re-authentication.
- (Optional) To immediately terminate an active connection, click Revoke next to the specific client session.

Configuring Auto Revoke Access
Set how long each session stays active after the initial connection. Expired sessions are automatically revoked and the client must reconnect.
To configure auto revoke access:
- From the JumpCloud Admin Portal, go to Settings > JumpCloud AI.
- Under MCP Server for admins > Auto revoke access, select the timeframe from the drop-down menu (for example, 30 days).
Supported JumpCloud Tools
JumpCloud’s MCP Server for admins currently supports the following AI tools:
Access Requests
- access_requests_list
- access_request_get
Active Directory
- active_directories_list
- active_directory_translation_rules_list
- active_directory_translation_rules_preview
- active_directory_translation_rules_recommendation
Admins
- admin_list
- admin_get
- admin_update
- admin_reset_totp
- admin_reactivate
Alerts
- alerts_list
- alerts_stats
- alert_get
- alert_occurrences
Apple MDM
- applemdms_list
- applemdm_abm_devices
- applemdm_os_versions
Applications
- applications_list
- application_get
- application_associations_list
- application_catalog_list
- application_import_schedules_list
- application_resources_list
- application_resource_get
Assets
- assets_list
- asset_get
- asset_update
- asset_delete
Commands
- command_get
- commands_list
- command_run
- command_results_list
- command_result_get
- command_result_list
- command_devices_list
- command_device_groups_list
- command_manage_associations
Devices
- device_get
- devices_list
- device_lock
- device_restart
- device_shutdown
- device_update
- device_erase
- bind_user_to_device
- unbind_user_from_device
Groups
- user_groups_list
- user_group_get
- user_group_membership
- user_group_delete
- device_groups_list
- device_group_get
- device_group_membership
- device_group_create
- device_group_delete
- manage_user_group_membership
- manage_device_group_membership
Health Monitoring
- health_rules_list
- health_rule_get
- health_rules_stats_get
- health_rule_templates_list
- health_rule_template_get
Identity Providers
- identity_providers_list
- identity_provider_get
- idp_ldap_list
- idp_ldap_get
- idp_policies_list
- idp_policy_get
Other
- softwareapp_list
- di_events_get
Patch Management
- patch_coverage_get
- patch_critical_devices_list
- patch_critical_summary_get
- patch_kbs_list
- patch_device_groups_list
- patch_devices_list
- patch_summary_get
Policies
- policies_list
- policy_get
Provider Admins
- provider_admins_list
- provider_admin_invite
- provider_admin_remove
SaaS
- saas_applications_list
- saas_application_get
- saas_application_create
- saas_application_edit
- saas_application_delete
- saas_application_review
- saas_licenses_list
- saas_application_licenses_list
- saas_application_accounts_list
- saas_account_get
- saas_account_delete
Search
- search_api_execute — proxies to POST /api/v2/genai/nli/search/execute
Users
- user_send_reset_password_email
- user_get
- users_list
- user_create
- user_delete
- user_suspend
- user_reactivate
- user_unlock
- user_force_password_reset
- user_reset_mfa
- user_add_mfa
- user_remove_mfa_requirement
- user_send_activation_email
FAQ
MCP is an open standard that enables communication and synchronization of data between external tools (like JumpCloud) and AI models such as large language models (LLMs) and AI agents.
No. The MCP server utilizes many of the same key areas of JumpCloud that APIs administer, but connects directly with AI models instead of custom automation tools or scripts.
MCP server related events are generated in DI.
To view MCP server events in DI:
- Log in to the JumpCloud Admin Portal.
If your data is stored outside of the US, check which login URL you should be using depending on your region. If your organization uses LDAP, RADIUS, or requires firewall allow list configuration, the Fully Qualified Domain Names (FQDNs) will also be region specific. See JumpCloud Data Centers for the URLs, FQDNs, and IP addresses.
- Go to Insights > Directory Insights.
- Select the appropriate Time Range (for example, 7 days).
- Filter based on User Agent Name. The following events are available:
- jumpcloudmcp-cursor-bot
 In this Article
 Learn More