


 Subscribe to Help Center RSS Feed
You can configure a wireless network for your macOS devices using this policy. The device must be enrolled in Apple MDM.

This policy only supports WiFi networks configured with pre-shared key (PSK) authentication. For WiFi networks configured with WPA2 Enterprise (for use with JumpCloud RADIUS for example), see Configure Your WiFi Clients to use RADIUS and Configure EAP-TTLS/PAP on mac & iOS for RADIUS.
Prerequisites
- Apple Mobile Device Management (MDM) must be configured for your organization and Mac computers must be enrolled in JumpCloud MDM. See Set up Apple MDM.
- This policy is supported on Mac computers running macOS 10.7 and later.
- Devices must have an active network connection for this policy to take effect.
Considerations
- The policy configuration settings are applied automatically and do not require a system restart.
Creating the Policy
To create a WiFi Configuration policy for Mac computers, do the following:
Selecting the Policy Template
- Log in to the JumpCloud Admin portal.

If your data is stored outside of the US, check which login URL you should be using depending on your region. If your organization uses LDAP, RADIUS, or requires firewall allow list configuration, the Fully Qualified Domain Names (FQDNs) will also be region specific. See JumpCloud Data Centers for the URLs, FQDNs, and IP addresses.
- Go to Device Management > Policy Management. The Policy Management page is displayed.
- On the Policy Management page, click +Add New.
- Select Device Policy to assign the policy to devices and device groups. On the New Device Policy page:
- Select the macOS tab.
- Search and select the required policy and click Configure. The Details tab of the policy is displayed.
- On the Details tab, configure the required policy configuration settings.
- (Optional) In the Policy Name field, enter a new name for the policy or keep the default. Policy names must be unique.
- (Optional) In the Policy Notes field, enter details such as creation date of the policy, and information on testing and deployment of the policy.
Configuring the Policy
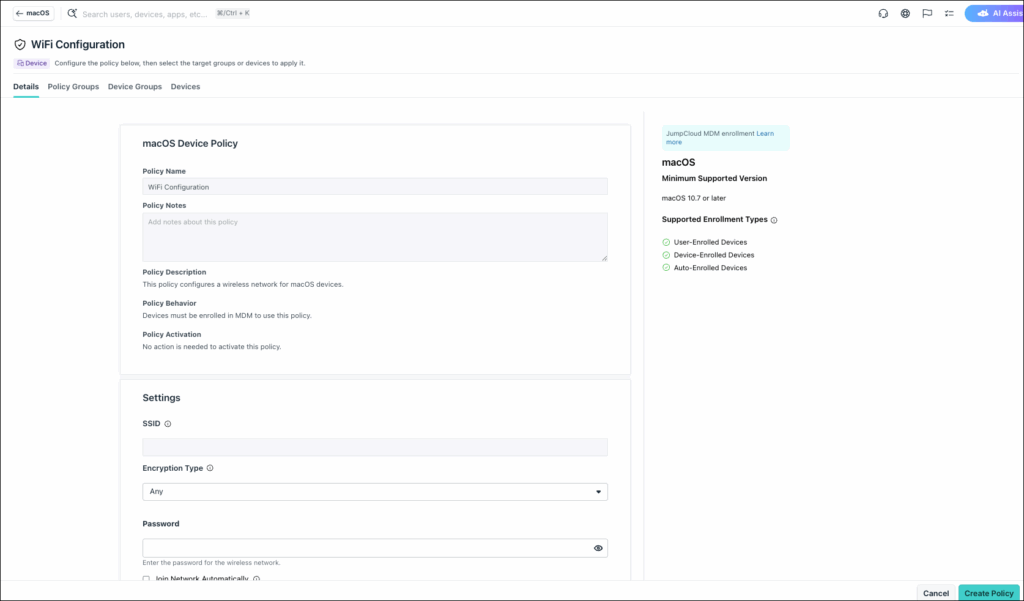
- Under Settings, enter the name of the wireless network for SSID.
- For Encryption Type, choose the type of encryption used by this network:
- WEP
- WPA
- WPA2
- WPA3
- Any
- None
- For Password, enter the WiFi network password. It does not display if your network is not encrypted.
- For Join Network Automatically, select to determine whether the device will automatically join the network.
- For Show Hidden Network, select this to determine whether the network is shown in the list of available networks. If the network does not appear, the user must type in the network name to access it.
- (iOS 18+ & macOS 15+ only) Select Disable MAC Randomization to turn off MAC address randomization for a Wi-Fi network while the device is associated with that network. This feature also shows a privacy warning within System Settings indicating that the network has reduced privacy protections.
Applying the Policy
- (Optional) Select the Policy Groups tab. Select one or more policy groups where you want to add this policy.
- Select the Device Groups tab. Select one or more device groups where you want to apply this policy. For device groups with multiple OS member types, the policy only applies when a user logs into a supported Mac computer that is enrolled in Apple MDM.
- Or, select the Devices tab. Select one or more devices whom you want to add this policy to.
- Click Create Policy. A success message is displayed indicating the completion of policy creation.
Viewing Policy Status
- Select the Status tab.
- To see the last Result Log for a device where this policy is applied, click view.
- If any errors occur, they're listed in Exit Status. If you have an Exit Status of 0, no errors occurred when applying or enforcing this policy.
 In this Article
 Learn More