Create a Policy
You can create policies in JumpCloud Admin Portal and deploy them in the following ways:
- Device policies to a single device or device group
- User policies to a single user or user group
- Or use a policy group to combine policies and assign them in bulk based on policy type, for example a group of device policies can be applied to a device group.
After a policy takes effect, you can view a policy's status. A policy lets you customize your managed devices and keep the devices secure.
JumpCloud’s Agent and MDM policies apply automatically without requiring any manual activation on the target device. They take effect the moment they are assigned to a user or device.
If a policy's status is green, the policy was applied successfully but it might not be in effect yet.
Prerequisites
- See Get Started: Policies before you get started with policies.
- To assign a policy to a device, you must have an active device running on a supported OS.
- To assign a policy to a device group, you must have defined device groups. See Get Started: Groups
Considerations
- If the JumpCloud Agent for a device is out-of-date, JumpCloud may be prevented from enforcing all policies on that device.
- Update the JumpCloud Agent to the latest version on the device to ensure seamless policy enforcement.
- Windows Home is not supported.
Creating a Policy
You can set up policies to enforce specific behavior on the devices you manage. All JumpCloud policies can be renamed if you have specific conventions or want to include a category for the devices.
Some policies require you to take an additional step after creating the policy and applying it before the policy is active on a device. This action is listed in Policy Activation and should be the final step in the procedure.
Create a User Level Policy
To create a user level policy:
- Log in to the JumpCloud Admin Portal.
If your data is stored outside of the US, check which login URL you should be using depending on your region. If your organization uses LDAP, RADIUS, or requires firewall allow list configuration, the Fully Qualified Domain Names (FQDNs) will also be region specific. See JumpCloud Data Centers for the URLs, FQDNs, and IP addresses.
- Go to Device Management > Policy Management.
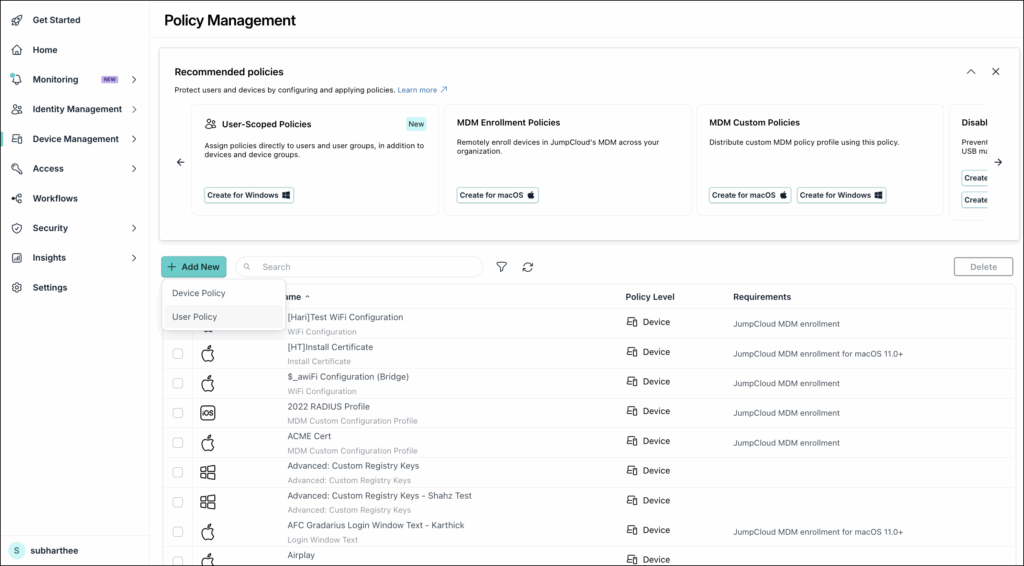
- On the Policy Management page, click +Add New.
-
Select User Policy if you want to bind the policy to users or user groups.
-
On the New Policy panel, select a tab for the desired OS. For user level policies, the following OS are available:
- Windows
- macOS
-
Select a policy from the list, then click configure.
-
Review the customized information on the left side about the policy and which OS versions are required to run the policy:
- Minimum Supported Version - This policy must be run on a device with this minimum supported OS version.
- Deprecated Versions - This policy cannot run on a device with this OS version or later. Supported Enrollment Types -
- User-Enrolled Devices - These Windows or Mac computers are owned by the user and enrolled by the user.
- Device-Enrolled Devices - These Windows or Mac computers are owned by the corporation and enrolled by the IT Admin or the user.
- If there is no Minimum Supported Version or Deprecated Versions, these fields are not visible. If there is no Enrollment Type visible, then all enrollment types are supported for this policy.
-
(Optional) In the Policy Name field, enter a new name for the policy or keep the default. Policy names must be unique.
-
(Optional) In the Policy Notes field, enter information you want to retain such as testing notes, config details, admin responsible for configuring, historical information, and intended use.
-
If needed, use these instructions to configure the appropriate items in the Settings section (not all policies have configurable fields in the Settings section:
-
Select the User Groups tab. Select one or more device groups where you'll apply this policy. For device groups with multiple OS member types, the policy is applied only to the supported OS.
-
Select the Users tab. Select one or more devices where you'll apply this policy.
Note: You must select either a user or user group to create and apply this policy. -
If applicable, select the Details tab and read the Policy Activation section to determine if there are any additional steps you need to take after saving the policy before it takes effect.
-
Click save.
-
If prompted, click save again to see the policy appear in the Policy List.
-
(Optional) Complete any additional steps listed in Policy Activation.
-
After the policy is created, you can apply it to additional groups and users in the following ways:
- Select the policy and select User Groups.
- Select the user group and select Policies.
- Select the policy and select Users.
- Select the user and select Policies.
After a policy is created and saved, it may take a few minutes for the policy to be enforced on the user’s device. When the policy is running, you can view its status to determine if the policy was successfully applied or if it requires additional steps.
Create a Device Level Policy
To create a device level policy:
- Log in to the JumpCloud Admin Portal.
If your data is stored outside of the US, check which login URL you should be using depending on your region. If your organization uses LDAP, RADIUS, or requires firewall allow list configuration, the Fully Qualified Domain Names (FQDNs) will also be region specific. See JumpCloud Data Centers for the URLs, FQDNs, and IP addresses.
- Go to Device Management > Policy Management.
- On the Policy Management page, click +Add New.
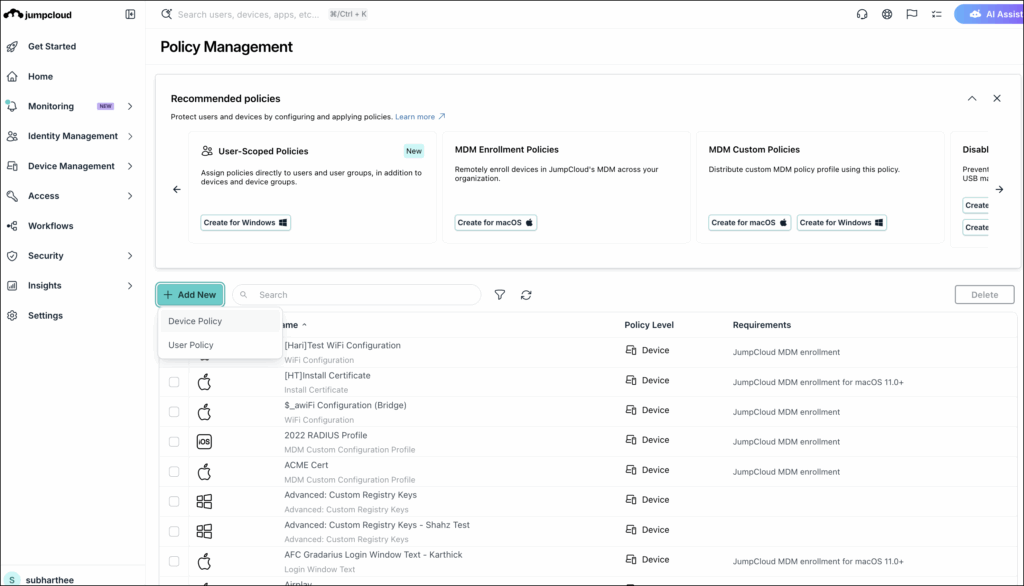
- Select Device Policy if you want to bind the policy to devices or device groups.
- On the New Policy panel, select a tab for the desired OS. For device level policies, the following OS are available:
- Windows
- macOS
- Linux
- iOS
- Android
- Select a policy from the list, then click configure.
- Review the customized information on the left side about the policy and which OS versions are required to run the policy:
- Minimum Supported Version - This policy must be run on a device with this minimum supported OS version.
- Deprecated Versions - This policy cannot run on a device with this OS version or later.
- Supported Enrollment Types -
- User-Enrolled Devices - These iOS or iPadOS devices are owned by the user and enrolled by the user.
- Device-Enrolled Devices - These iOS or iPad devices are owned by the corporation and enrolled by the IT Admin or the user.
- Auto-Enrolled Devices - These devices are owned and enrolled by the corporation through Apple’s Automatic Device Enrollment. This option is not currently supported.
- If there is no Minimum Supported Version or Deprecated Versions, these fields are not visible. If there is no Enrollment Type visible, then all enrollment types are supported for this policy.
- (Optional) In the Policy Name field, enter a new name for the policy or keep the default. Policy names must be unique.
- (Optional) In the Policy Notes field, enter information you want to retain such as testing notes, config details, admin responsible for configuring, historical information, and intended use.
- If needed, use these instructions to configure the appropriate items in the Settings section (not all policies have configurable fields in the Settings section:
- (Optional) Select the Device Groups tab. Select one or more device groups where you'll apply this policy. For device groups with multiple OS member types, the policy is applied only to the supported OS.
- (Optional) Select the Devices tab. Select one or more devices where you'll apply this policy.
- If applicable, select the Details tab and read the Policy Activation section to determine if there are any additional steps you need to take after saving the policy before it takes effect.
- Click save.
- If prompted, click save again to see the policy appear in the Policy List.
- (Optional) Complete any additional steps listed in Policy Activation.
- After you save, the policy takes effect on active devices in the selected groups in near real-time, but could take up to a few minutes in some instances. The policy is enforced on any inactive devices the next time they next become active. After the policy is created, you can apply it to additional groups and devices in the following ways:
- Select the policy and select Device Groups.
- Select the device group and select Policies.
- Select the policy and select Devices.
- Select the device and select Policies.
After a policy is created and saved, it may take a few minutes for the policy to be enforced on the device. When the policy is running, you can view its status to determine if the policy was successfully applied or if it requires additional steps.
To view policy status:
- In the JumpCloud Admin portal, go to Device Management > Policy Management.
- Select the policy
- Select the Status tab.
- To see the last Result Log for a device where this policy is applied, click view.
If any errors occur, they're listed in Exit Status. If you have an Exit Status of 0, no errors occurred when applying or enforcing this policy.
Considerations:
- When applying multiple policies at the same time, they can take several hours to fully apply.
- Since our policies are group policy based, issue a gpupdate /force command, then a reboot or log out/log in to speed up the policy application process.
Removing a Policy
You can manage a device’s behavior after creating a policy in the following ways:
- Remove a specific device from the policy without removing the policy itself.
- Remove groups of devices from the policy without removing the entire policy.
- Reconfigure the settings in the policy to disable some features.
- Remove the policy completely.
You must unbind the device from the policy before deleting the policy.
These steps show how to remove a specific device or device group from a policy, and how to completely remove the policy.
To remove devices or device groups from the policy:
- In the JumpCloud Admin portal, go to Device Management > Policy Management.
- To remove devices from the policy, select the policy.
- Select the Devices tab and select the checkbox next to the device to remove it from this policy.
- To remove a group of devices from the policy, select the policy.
- Select the Device Groups tab and select the checkbox next to a device group to remove it from this policy.
- Click save, then click save again.
- If the activation step requires it, restart all devices you removed from the policy.
To remove users or user groups from the policy:
- In the JumpCloud Admin portal, go to Device Management > Policy Management.
- To remove users from the policy, select the policy from the list.
Note: You can also use the filter options to narrow down your search when you need to remove a policy from a user or user group. - To remove users from the policy:
- Select the Users tab and select the checkbox next to the device to remove it from this policy.
- To remove a group of users from the policy:
- Select the User Groups tab and select the checkbox next to a user group to remove it from this policy.
- Click save, then click save again.
- If the activation step requires it, restart all devices you removed from the policy.
To remove a policy:
- In the JumpCloud Admin portal, go to Device Management > Policy Management.
- Select the checkbox next to the policy that you want to remove.
Note: You can also use the filter options to narrow down your search when you need to remove a policy from a user or user group. - Click delete.
- On the Delete Policy dialog, click continue.
- If the activation step requires it, restart all devices where you applied the policy that was just deleted.
After the removal procedure has been completed, a gpupdate /force command may need to be issued on the machine before the reboot or log out/log in action.
If a JumpCloud policy is removed, the policy is immediately removed and no longer enforced. For example, if you remove the macOS Restrict Apple Intelligence policy, you can immediately create new, customized, AI-generated emojis on your Mac computers.
Creating a Policy Group
You can save time by creating a policy group, adding multiple policies to it, and applying the group to device group(s). For example, you can create a policy group for macOS devices that uses JumpCloud’s Lock Screen policy to automatically turn on the screen saver if a device is inactive for a specific amount of time. The policy group could also contain a policy to control Apple App Store purchases to allow only updates to existing apps.
Policies must be created and configured before you can add them to a policy group.
To create a policy group:
- Verify that policies have been created.
- In the JumpCloud Admin portal, go to Device Management > Policy Management.
- Click (+), then select Policy Group.
You can select Policy Group From Template from the dropdown to utilize a pre-configured template. Templates should be reviewed and tested in a non-production environment to confirm they have the desired outcome for your org.
- On the Details tab, enter a name for the policy group.
- In Description, describe the purpose of this policy group.
- Click the Policies tab, then select the policies you want to include in this group.
- Select Device Groups to assign this policy group to an existing device group.
- Click save. The new group appears in the Policy Groups List.
After you create a policy group, you can choose to assign the policy group to a device group later.
To assign a policy group to a device group:
- On the Device Groups page, select a device group.
- Select the Policy Groups tab.
- Select one or more policy groups to apply to this device group.
- Click Save.
To delete a policy group:
You must unbind the device group from the policy before deleting the policy.
- In the Policy Groups page, select the checkbox next to the policy group you want to remove.
- Click delete.
- Enter the number of policy groups you want to remove and click delete.
Viewing Policy Results
Jumpcloud users can apply several policies to enrolled devices. You can view the results of the policies applied to an enrolled device from the Devices page. See View Policy Results to learn more.
Was this information helpful?