
Use this article to configure EAP-TTLS/PAP authentication for wireless clients on macOS and iOS. Because additional configuration is required for this protocol, you'll first create a .mobileconfig profile using a tool like Apple Configurator or iMazing, and then install it on your devices or deploy it using a Mobile Device Management (MDM) solution.
![]()
- JumpCloud recommends using EAP-TTLS/PAP only when configuring delegated authentication with Entra ID. See Configure JumpCloud RADIUS with Delegated Auth for Entra ID to learn more.
- For all other use cases, we recommend using PEAP as no additional configuration is necessary (with rare exceptions). See Configure your WiFi Clients to use RADIUS and RADIUS Protocol Support to learn more.
Prerequisites:
- A configured JumpCloud RADIUS server. See RADIUS Configuration and Authentication to learn more.
- A wireless access point (WAP), VPN, or router configured for RADIUS. See Configure a Wireless Access Point (WAP), VPN or Router for RADIUS to learn more.
- A configuration profile editor capable of creating a .mobileconfig file, for example Apple Configurator 2 or iMazing Profile Editor. The following instructions walk step by step through this process utilizing Apple Configurator.
Creating the Profile with Apple Configurator
- On a Mac, open Apple Configurator from your Applications folder.
- At the top of your screen, click the Apple File Menu and choose New Profile.
Saving the Profile on Mac
- Select Wi-Fi from the left navigation, then click Configure.
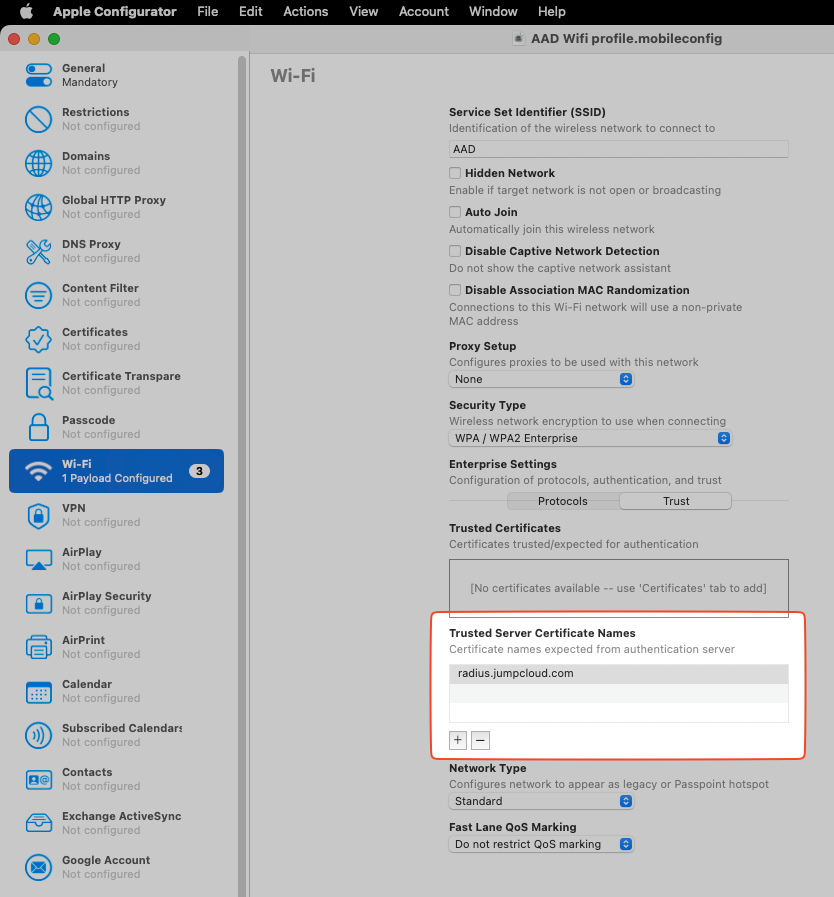
- Once in this screen, configure the following settings as pictured:
- Under Service Set Identifier (SSID), enter the name of your WiFi network configured to use JumpCloud RADIUS.
- Under Security Type, select WPA/WPA2 Enterprise.
- Under Accepted EAP Types, select TTLS.
- Under Inner Authentication, select PAP.

- On the Wi-Fi page, under Enterprise Settings, select Trust.
- Under Trusted Server Certificate Names, click + to add and then enter radius.jumpcloud.com

- After completing the profile, click Save.
- On the profile warning, select Save Anyway.
- Select General from the left navigation.
- Enter in a Name for the Profile, populate the remaining settings, and Save.
- To distribute, click the Apple File menu at the top of your screen and click Sign Profile...
- Search for and open the Profiles utility on the Mac where the Profile is to be saved
- Select the Add Profile symbol
- Select the Profile you saved while creating the WiFi profile per the steps above.
- You will initially be prompted to confirm you want to install the profile. Click Continue.
- You may be prompted to ensure you want to continue to install the profile. Click Continue.
- When installing, you will be prompted for a user name which can be left blank. Click Install.
- When prompted, sign in to the Mac with administrator privileges.
- The Profile will then be successfully installed.

![]()
It is recommended to remove other profiles to ensure there are no conflicts.
Logging into the RADIUS-Integrated WAP
- From the WiFi icon in your topbar, select the Wireless SSID you input in your Apple Configurator Profile.
- You will be prompted to see the certificate for the JumpCloud RADIUS server
- You will then be prompted to authenticate against the RADIUS
Removing Wireless Network Profile
If you choose to utilize PEAP for authentication instead of EAP-TTLS/PAP, or are possibly looking to remove the service, you will be required to delete the existing wireless connection. After the connection has been successfully removed you may again connect to your WAP or Router device using non-EAP-TTLS methods. No additional configuration is required for PEAP with JumpCloud RADIUS, so with the old profile removed the user may connect to networking device normally.
- Click on the Apple menu and choose System Settings.
- Select Privacy & Security and scroll to Others.
- Select Profiles.
- Click on the wireless network that applies to your RADIUS EAP-TTLS configuration in the left pane.
- Once selected, click the minus (-) displayed at the bottom-left of the window to delete.