
User identities are at the core of JumpCloud. As an open directory platform, one of the key capabilities of the platform is providing a centralized, authoritative version of those identities, so the employee can use a single set of credentials across all resources, including devices, LDAP, RADIUS, applications, etc. Users can be added in a number of ways, including manually, importing through a CSV file, or from another directory or application. See Add Users to the Admin Portal for information on how to add users. Custom integrations are also available with a REST API or SCIM integration.
Setting a Default User State for User Creation
A user state represents where a user is in the identity lifecycle and controls access to JumpCloud provided resources. For more information, see Manage User States.
To set or change a default user state for new users:
- Log in to the JumpCloud Admin Portal.
![]()
If your data is stored outside of the US, check which login URL you should be using depending on your region. If your organization uses LDAP, RADIUS, or requires firewall allow list configuration, the Fully Qualified Domain Names (FQDNs) will also be region specific. See JumpCloud Data Centers for the URLs, FQDNs, and IP addresses.
- Go to Identity Management > Users > Settings.
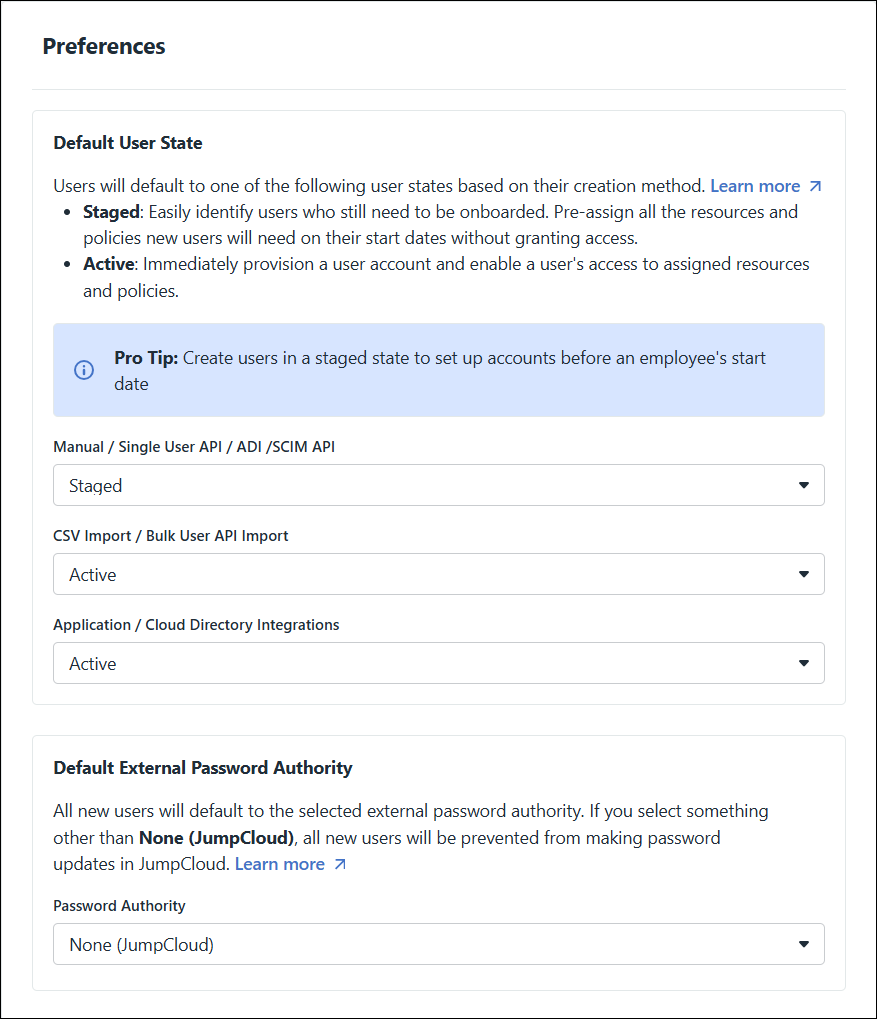
- Review and, if necessary, update the Default User State to Staged or Active for the following user types:
- Manual / Single User API / ADI / SCIM API
- CSV Import / Bulk User API Import
- Application / Cloud Directory Integrations
- Set the Default External Password Authority:
- None (JumpCloud) - default setting
- Active Directory
- SCIM Integration
- Click Save and then Yes, Continue (to accept the change) or No, Cancel (to go back to User Settings).
![]()
See JumpCloud's Integration Catalog for the most current list of supported applications.
Connecting a User to Resources
Once you add users to the Admin Portal, you can connect them to any of the resources connected to JumpCloud from a device to applications, networks, etc. If the user is created in a Staged user state, they will not gain access to their assigned resources until they are activated. If a user is created in an Active user state, they will immediately have access to their assigned resources. See Manage User States for specific information about when a user is provisioned.
Activating a user
To have access to all assigned resources, a user must be in an Active user state and have an ‘active’ user password. See Manage User States for more information.
An IT Admin can transition users to an ‘active’ state manually or via scheduled activation. Scheduled activation allows the admin to transition users between states on a specific date and time, thus minimizing the need to be available when a user starts while still providing them the right access at the right time. This feature is ideal when:
- Onboarding users
- Admins transitioning users from the ‘staged’ to ‘active’ user state.
- Reactivating contractors
- Returning contractors who have been suspended in JumpCloud.
- Reactivating employees
- Returning employees who have been suspended in JumpCloud while on extended leave.
- Rehired employees who have been suspended but not yet deleted in JumpCloud.
There are two ways to schedule a user’s activation; from the Actions menu or from the user's Details panel.
To schedule activation for a user from the Actions menu:
- From the JumpCloud Admin Portal, go to Identity Management > Users.
- Check the box next to the applicable user and click the Actions button above the Users list and select Schedule Activation. A prompt will open where you can enter a date and time for the selected users to be activated. You can also opt to send Welcome or Activation emails, which are dependent on the selected user(s) password status.
To schedule activation for a user from the user’s Details panel:
- From the JumpCloud Admin Portal, go to Identity Management > Users.
- Select an individual user by clicking anywhere on the user’s row.
- Click the dropdown next to Change, located in the left panel in the Current State Section
- Select Schedule Activation, and enter the preferred date and time for activation.
There are two ways to manually activate a user; from the Actions menu or from the user's Details panel.
To manually activate a user from the Actions menu:
- From the JumpCloud Admin Portal, go to Identity Management > Users.
- Check the box next to the applicable user and click the Actions menu above the Users list and select Activate Users.
To manually activate a user from the user’s Details panel:
- Log in to the JumpCloud Admin Portal, go to Identity Management > Users.
- Select an individual user by clicking anywhere on the user’s row.
- Click the dropdown next to Change, located in the left panel in the Current State Section.
- Select Activate Now, and confirm the activation when prompted.
After a user is activated and has an active password, the user can log in to any resource to which the user was granted access.
Other information may be tied to the user record using the API. Learn more: JumpCloud's API Documentation.
Notifying a User
You have control over user emails related to their new accounts. You will be able to specify the email address, or skip sending the email completely, when a user is moved from Staged to Active. If you create users in the Active state, you will be asked if you want to send an email when they are first Saved. The content of the email depends on the user’s password status:
- If you set an initial password, JumpCloud sends a welcome email to the user requiring them to log in with that password.
- If you don't set an initial password, JumpCloud sends an activation email to the user with a link that lets them set their own password.
Viewing Users and User Details
After you add a user to JumpCloud, you can view and interact with the user account(s) from the Users page or the user panel.
From the Users List page, you can:
- Add and delete users.
- Search for users.
- Filter the Users list.
- Click Edit Columns to add or remove sortable columns from the Users page.
- Click Export to export users, a specific user view or all data in a JSON or CSV format.
- Click the Actions menu to:
- Add To User Group: Add multiple users to a user group.
- Send Activation Email: Password Pending users will receive an activation email. Password Active users will receive a password reset request. Staged users will not receive emails.
- Send Password Reset Email: Users will receive an email to reset their JumpCloud password. Only Active users will receive this email.
- Force Password Change: Password will expire, and users are logged out of all JumpCloud managed resources immediately. Users will be prompted to change their password upon next login.
- Unlock User Accounts: Unlock accounts that have been locked due to repeated failed password attempts.
- Send TOTP MFA Reset Email: User TOTP keys will be reset and users will be required to set up TOTP MFA.
- Change User MFA Requirement: Require or remove MFA for selected users.
- Activate Users: User(s) state will change to Active.
- Suspend Users: User(s) state will change to Suspended. Suspending an account immediately revokes access to all JumpCloud-provided resources.
- Set External Password Authority: Password will be managed by AD or a SCIM integration.
- Set Delegated Authority: Password will be managed by an Active Directory Integration.
- Delete Users: This action will permanently remove the user from the Admin Portal.
![]()
See Export User Lists and Export Devices Lists.
- View details for a user.
Additional Resources:
- Enroll: Creating and Importing Users
- Show me: