
The Android WiFi Configuration Policy configures a wireless network for managed Android devices. One WiFi configuration policy is allowed. If you create a second WiFi policy, it replaces the first one. This policy works for devices running Android 6.0 and later that are enrolled in EMM.
Prerequisites
- JumpCloud’s Android EMM is configured for your organization. See Set up Android EMM.
- Your Android devices are enrolled in EMM. See Add and Manage Android Devices and Users: Enroll Your Personal Android Device.
To create an Android WiFi Configuration policy:
- Log in to the JumpCloud Admin Portal.
![]()
If your data is stored outside of the US, check which login URL you should be using depending on your region. If your organization uses LDAP, RADIUS, or requires firewall allow list configuration, the Fully Qualified Domain Names (FQDNs) will also be region specific. See JumpCloud Data Centers for the URLs, FQDNs, and IP addresses.
- Go to Device > Policy Management.
- In the All tab, click (+).
- On the New Policy panel, select the Android tab.
- Select the WiFi Configuration policy from the list, then click configure.
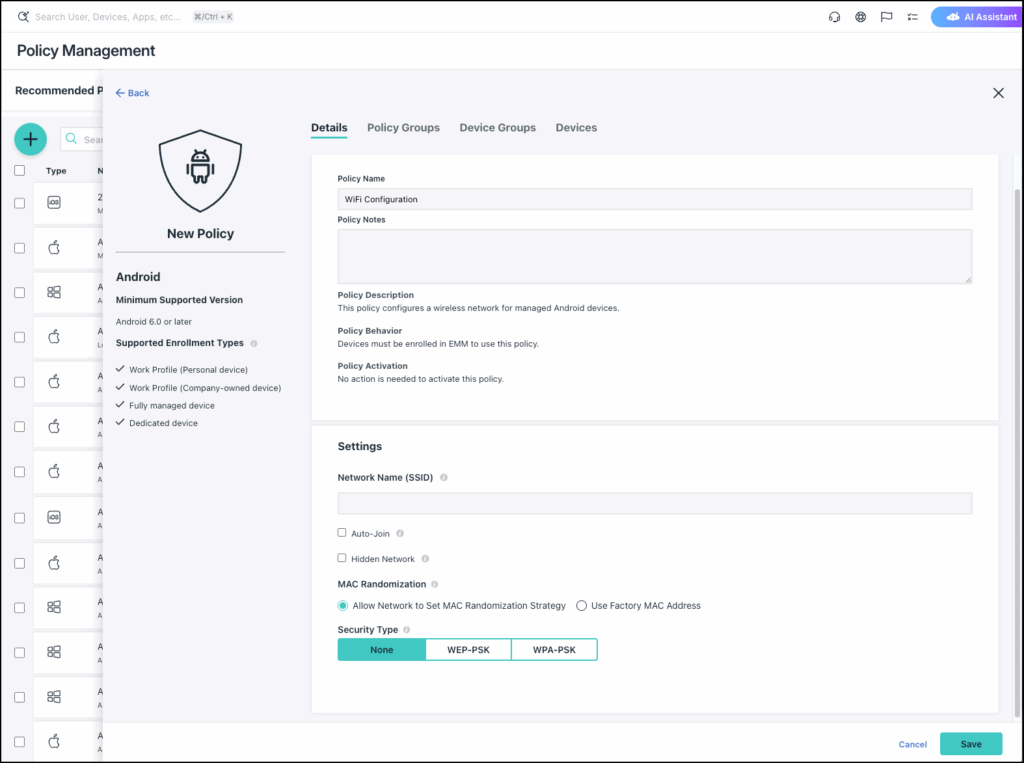
- On the New Policy panel, optionally enter a new name for the policy, or keep the default. Policy names must be unique.
- For Policy Notes, enter details like when you created the policy, where you tested it, and where you deployed it.
- Under Settings, go to Network Name (SSID) and enter a name or Service Set Identifier (SSID) for the WiFi network.
- Select Auto-Join to automatically connect to the WiFi network when the device is in its range, without manually tapping Connect on the device.
- Select Hidden Network to connect to a WiFi network that is not broadcasting its SSID.
- Select the MAC Randomization strategy. Note that this setting applies to devices on Android 13 or later only.
- Allow Network to Set MAC Randomization Strategy: Select this option to let the WiFi framework dictate the MAC randomization strategy.
- Use Factory MAC Address: Select this option to use the factory MAC address when connecting to the network.
- Select a Security Type to determine the access protocol for the WiFi network. Some options will require a password. Choose one of these options:
- None - If you select this, the Enable Password field does not appear.
- WEP-PSK - The Wired Equivalent Privacy Pre-Shared Key (WEP-PSK) protocol authenticates users on a WiFi connection. These passphrases support only 40-bit (10-digit) or 104-bit (26-digit). Selecting this field makes the Enable Password field appear.
- WPA-PSK - The WiFi Protected Access Pre-Shared Key (WPA-PSK) protocol authenticates users on a WiFi connection. The keys used by WPA are 256-bit, making it more secure than WEP. This selection applies to versions that are WPA, WPA2, and WPA3. Selecting this field makes the Enable Password field appear.
- For Password, if you selected WEP-PSK or WPA-PSK as the Security Type, enter the WiFi password.
- (Optional) Select the Device Groups tab. Select one or more device groups where you will apply this policy. For device groups with multiple OS member types, the policy is applied only to the supported OS.
- (Optional) Select the Devices tab. Select one or more devices where you will apply this policy.
![]()
For this policy to take effect, you must specify a device or a device group.
- Click save.