
The Android Lock Screen Restrictions Policy manages which features users can see before they unlock their device’s lock screen. The lock screen is also called a keyguard. This policy works for devices running Android 7.0 and later.
Prerequisites
- JumpCloud’s Android EMM is configured for your organization. See Set Up Android EMM.
- Your Android devices are enrolled in EMM. See Add and Manage Android Devices and Users: Enroll Your Personal Android Device.
To create an Android Lock Screen Restrictions policy:
- Log in to the JumpCloud Admin Portal.
![]()
Important:
If your data is stored outside of the US, check which login URL you should be using depending on your region. If your organization uses LDAP, RADIUS, or requires firewall allow list configuration, the Fully Qualified Domain Names (FQDNs) will also be region specific. See JumpCloud Data Centers for the URLs, FQDNs, and IP addresses.
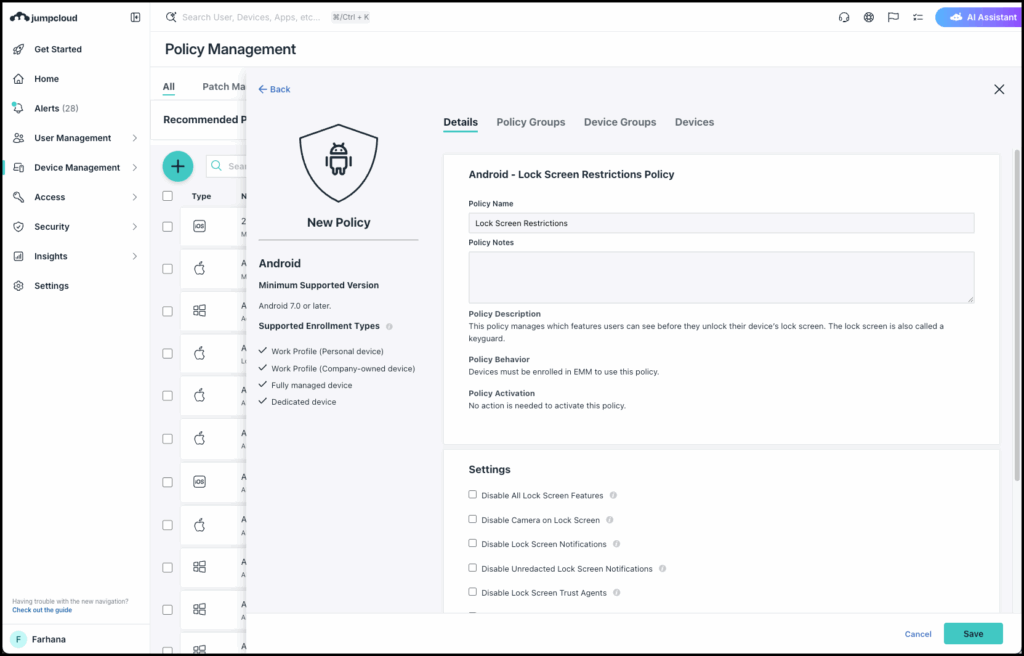
- Go to Device Management > Policy Management.
- In the All tab, click (+).
- On the New Policy panel, select the Android tab.
- Select the Lock Screen Restrictions policy from the list, then click configure.
- On the New Policy panel, optionally enter a new name for the policy, or keep the default. Policy names must be unique.
- For Policy Notes, enter details like when you created the policy, where you tested it, and where you deployed it.
- Under Settings, complete these fields:
- Select Disable All Lock Screen Features to prevent users from enabling lock screen customizations, such as widgets. This field applies to fully managed and dedicated devices.
- Select Disable Camera on Lock Screen to prevent users from accessing the camera on secure lock screens (such as a PIN screen). This field applies to fully managed and dedicated devices.
- Select Disable Lock Screen Notifications to prevent notifications from displaying on secure lock screens. This field applies to fully managed and dedicated devices.
- Select Disable Unredacted Lock Screen Notifications to prevent unredacted notifications on secure lock screens. This action blocks sensitive information from displaying when the device is locked.
- Select Disable Lock Screen Trust Agents to block lock screen customizations, such as Smart Lock, on a locked screen. This trust agent prevents users from adjusting lock screen settings if they’re not in a trusted location. A trust agent lets a user unlock a mobile device without entering a passcode when specific criteria is met.
- Select Disable Remote Input to block text entry into notifications on secure lock screens. This field applies to fully managed devices and dedicated devices running Android 6 and earlier.
- Select Disable Shortcuts to turn off all shortcuts on the lock screen. Note: This setting applies to devices running Android 14 and later.
- Select Disable Biometric Options to prevent biometric authentication on secure lock screens. This field applies to fully managed devices and dedicated devices.
- Select Disable Fingerprint Sensor to prevent users from using the device’s fingerprint sensor to unlock a device.
- Select Disable Face Scanning to prevent face authentication on secure lock screens. This field applies to fully managed devices and dedicated devices.
- Select Disable Iris Scanning to prevent iris authentication on secure lock screens. This field applies to fully managed and dedicated devices.
- (Optional) Select the Device Groups tab. Select one or more device groups where you will apply this policy. For device groups with multiple OS member types, the policy is applied only to the supported OS.
- (Optional) Select the Devices tab. Select one or more devices where you will apply this policy.
![]()
Tip:
For this policy to take effect, you must specify a device or a device group.
- Click Save.
Back to Top