
JumpCloud® AI & SaaS Management gives you visibility and control over shadow IT, including the SaaS and generative AI apps used, within your org. Using the JumpCloud Go™ browser extension and connectors, discover AI and SaaS apps used outside of your IT team’s visibility. Improve your org's security and compliance by choosing what apps users can access and how to restrict them. Warn or block users from accessing unapproved AI and SaaS apps and customize the messaging they see. Collect valuable usage insights that help streamline, simplify, and minimize unnecessary costs of your application portfolio.
![]()
Review Get Started: AI & SaaS Management for a feature overview and FAQ: AI & SaaS Management to learn more.
Prerequisites:
- To use browser extension tracking, the JumpCloud Go browser extension must be installed on end user devices. For the fullest and most seamless experience, it's recommended to enable the JumpCloud Go feature for your org. See Get Started: JumpCloud Go™ to learn more.
- To utilize discovery from devices, the JumpCloud Agent must be installed and running on managed macOS, Windows, and Linux devices. Device Agent Enabled must be toggled on in Settings to discover applications installed directly on user devices.
Considerations:
- JumpCloud AI & SaaS Management is a premium feature and requires the Platform Prime package. See JumpCloud Pricing to learn more.
- When you enable AI & SaaS Management, the JumpCloud Go browser extension collects specific data to discover and track AI and SaaS apps. See FAQ: AI & SaaS Management to learn more.
- To begin tracking, users must authenticate to the User Portal in their browser to establish a session. See Use JumpCloud Go™ to learn more.
- SSO apps configured in JumpCloud automatically appear in AI & SaaS Management as approved apps. See Get Started: SAML Single Sign-on (SSO) to learn more.
- AI & SaaS Management now tracks locally installed apps via the JumpCloud Agent.
- Track licensing information for discovered apps, including automated tracking for supported connectors and manual entry for others. Jump to Managing Licenses.
- When you delete a JumpCloud user with AI & SaaS Management enabled, their accounts remain listed in AI & SaaS Management without an owner. Enhancements are planned to improve this, giving admins a list of deleted users with the ability to act on their app and account details.
Enabling SaaS Management
To start using JumpCloud SaaS Management, enable it in the Admin Portal:
- Log in to the JumpCloud Admin Portal.
![]()
If your data is stored outside of the US, check which login URL you should be using depending on your region. If your organization uses LDAP, RADIUS, or requires firewall allow list configuration, the Fully Qualified Domain Names (FQDNs) will also be region specific. See JumpCloud Data Centers for the URLs, FQDNs, and IP addresses.
- Go to Access > AI & SaaS Management.
- Toggle on AI & SaaS Management Enabled.
After enabling AI & SaaS Management, existing JumpCloud SSO apps are added automatically. For SaaS app discovery on user devices, the browser extension begins tracking activity within five minutes. Users must authenticate to the User Portal first to establish a session for AI & SaaS Management to begin tracking.
![]()
Users aren't notified directly when AI & SaaS Management is toggled on. However, you can choose to display an info card in the User Portal to inform them. Jump to SaaS Management on User Portal to learn more.
Next, configure management settings to customize AI & SaaS Management behavior.
Configuring General Settings
Use these settings to fine tune browser extension, enable device discovery, exclude certain user groups, and customize action and responses to unapproved apps.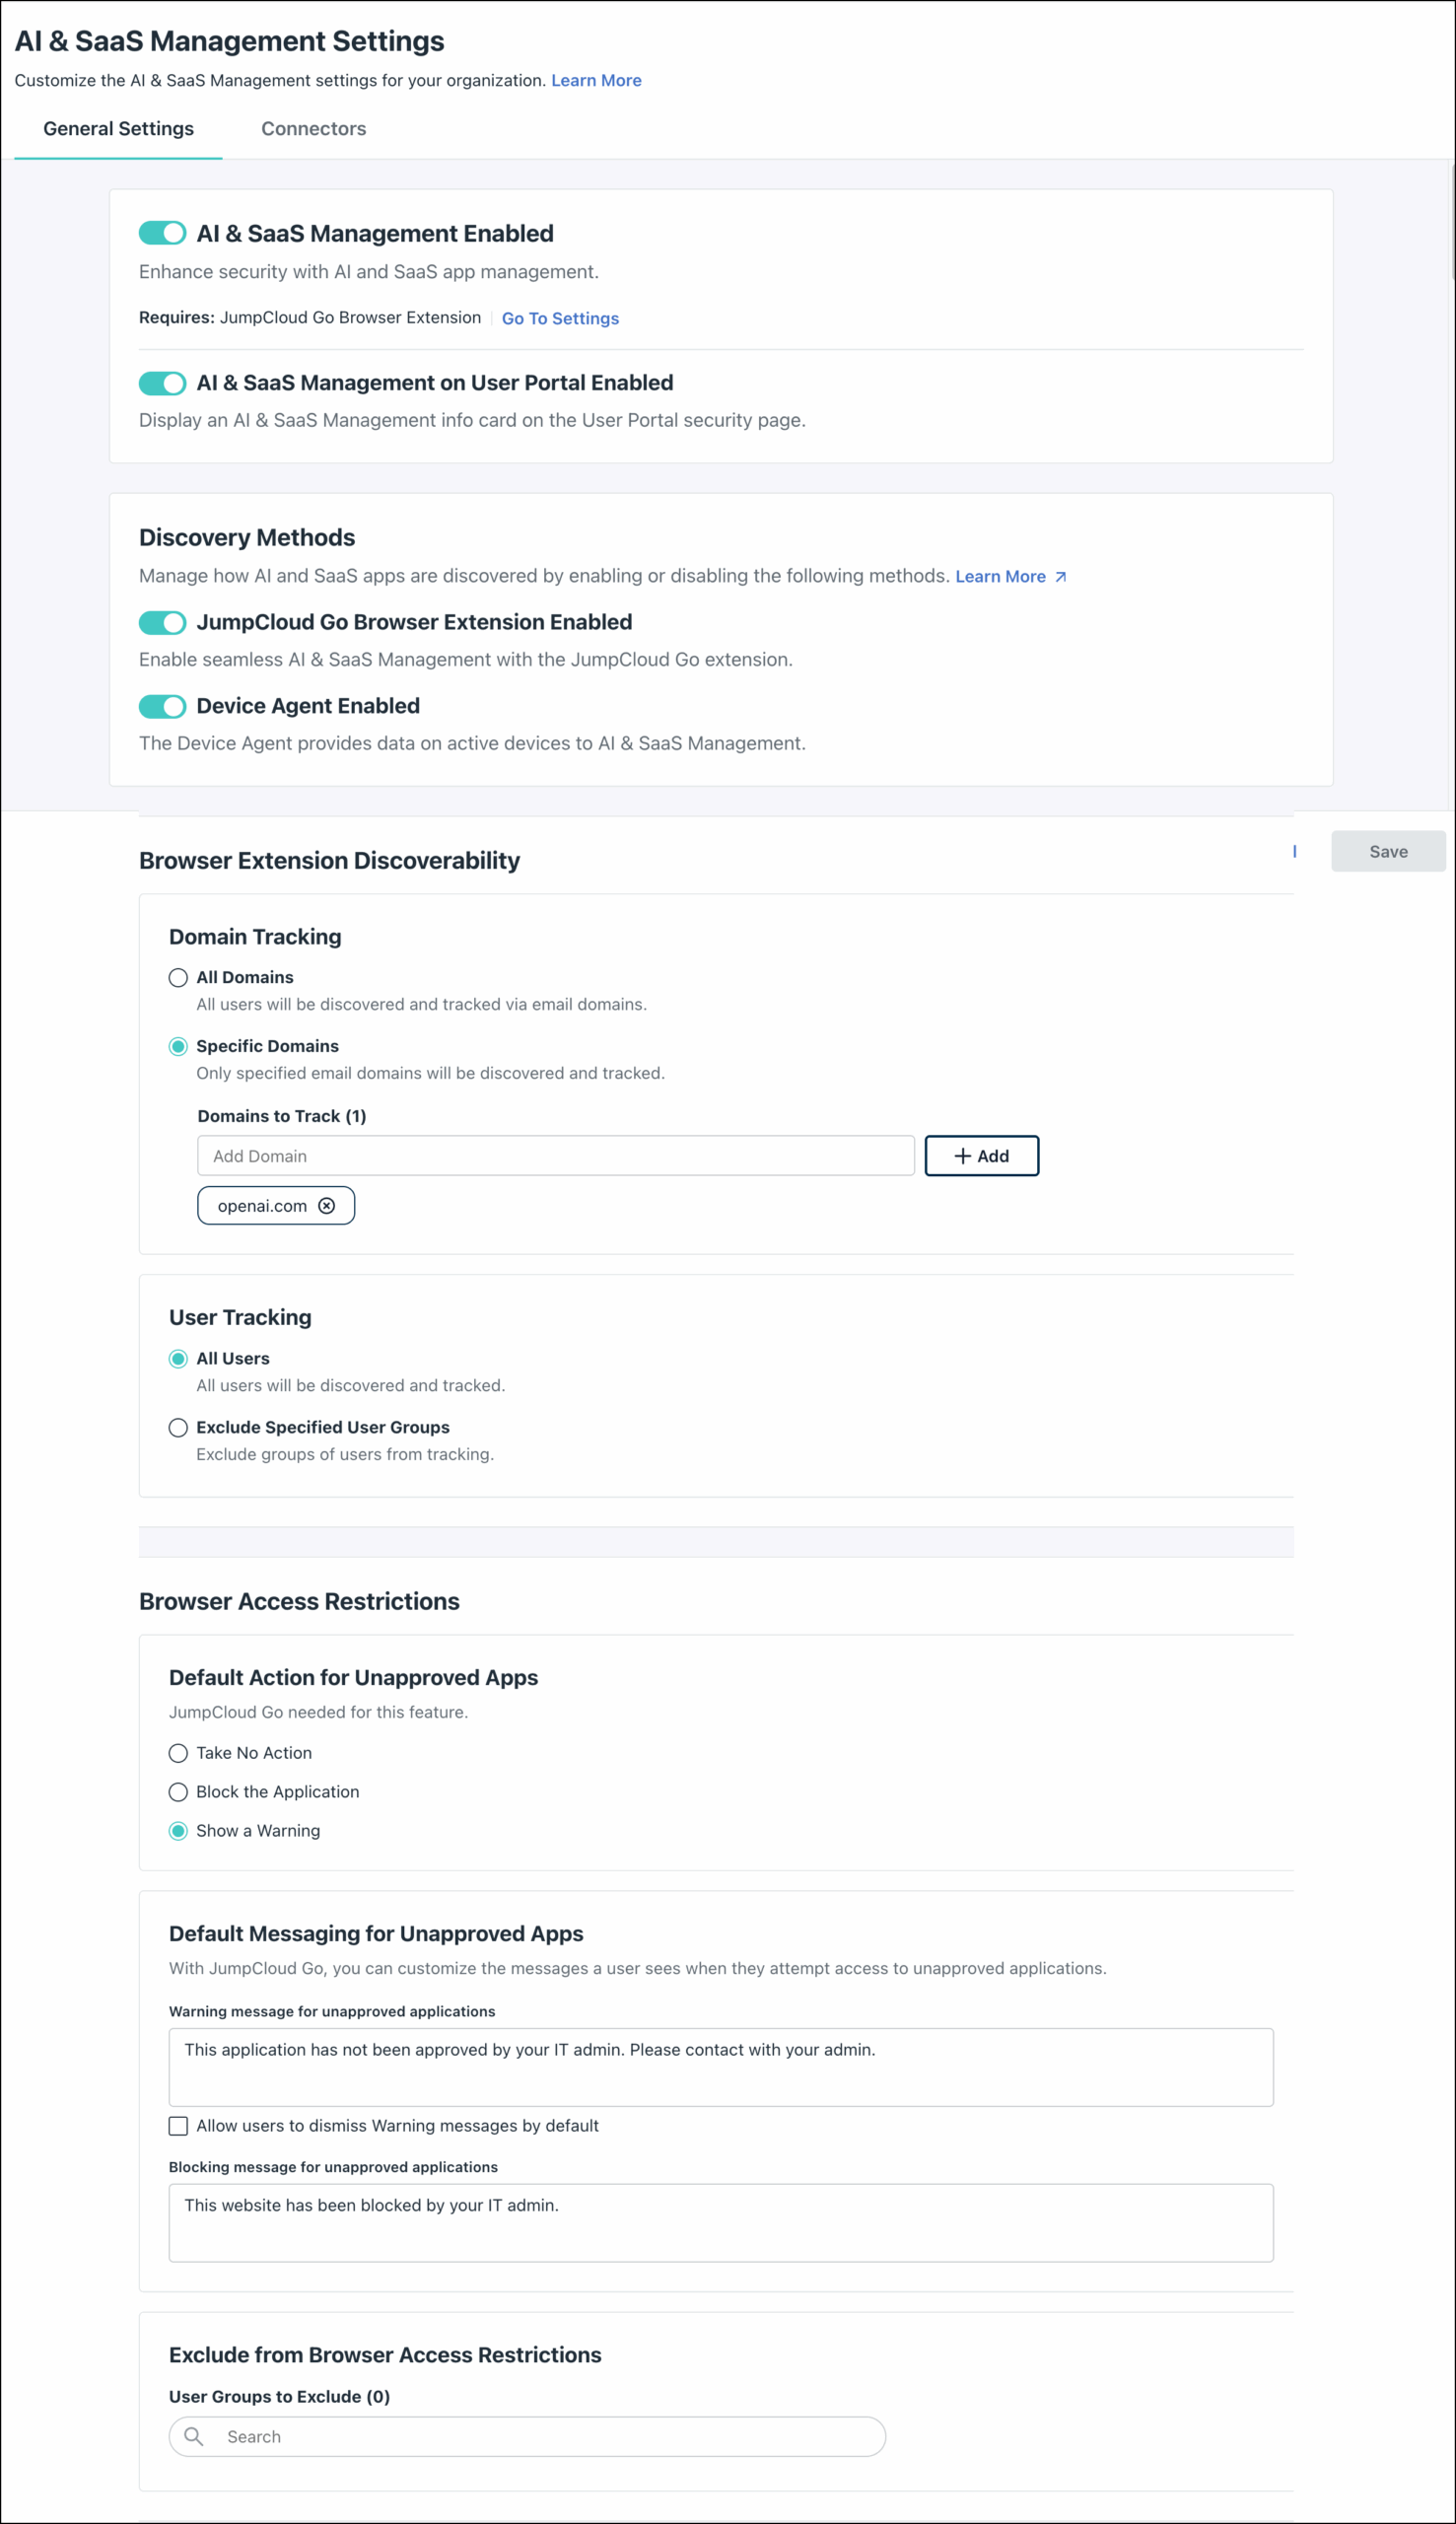
SaaS Management on User Portal
Choose to display a SaaS Management info card for users in their User Portal > Security page. This informs users that SaaS Management is enabled and which email domains are being tracked.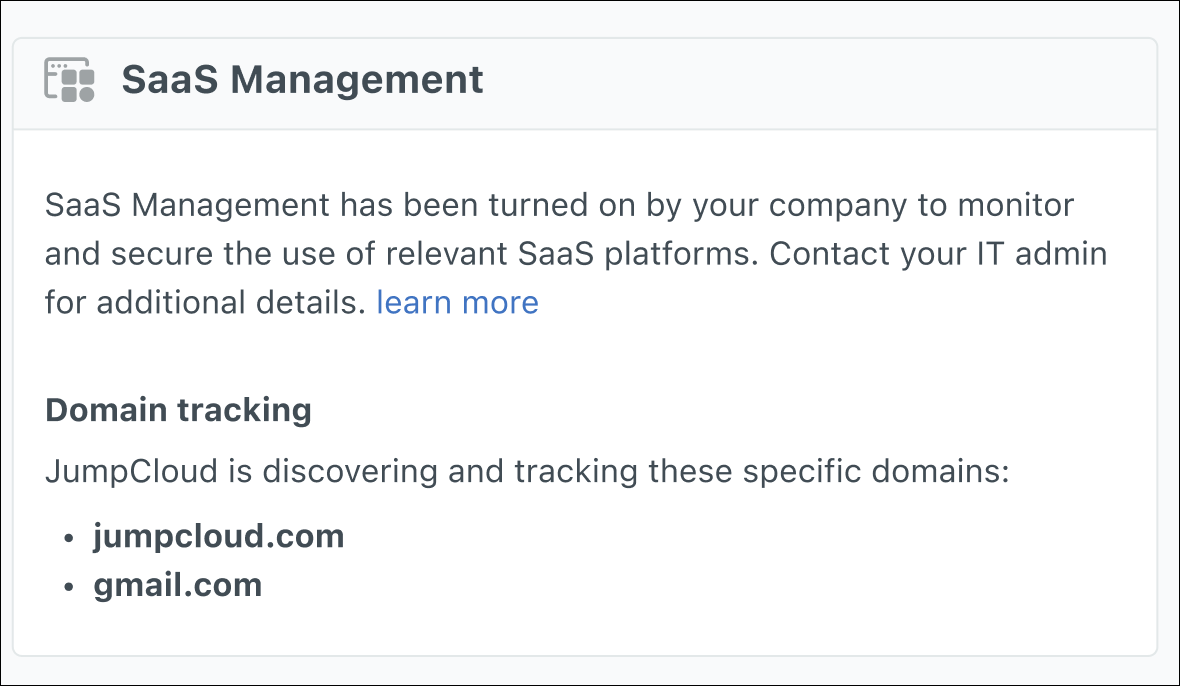
Discovery Methods
Configure the methods AI & SaaS Management uses to discover users and apps.
- JumpCloud Go Browser Extension Enabled: Discover applications accessed through the browser.
![]()
JumpCloud Go only tracks app usage after a user signs into the JumpCloud User Portal or a managed SSO app. Data for dormant accounts will not appear until the next user login occurs.
- Device Agent Enabled: Discover applications installed on managed devices.
![]()
The JumpCloud Agent checks every 30 minutes to see if an app is open and active. If it is, the Agent records the usage session.
Browser Extension Discoverability
Domain Tracking
When users register, log in, or return to a SaaS app, they use an email address or username to authenticate. Control what activity is captured based on the email address domain used:
- All Domains: Track SaaS app activity from all usernames and email domains.
- Specific Domains: Track activity only from specified email domains. Use this setting to limit tracking to your company’s email domain, excluding SaaS app activity from non-work email addresses.
User Tracking
Leverage user groups to control which users in your org are tracked by the browser extension.
- All Users: Track SaaS app activity for all users in your org.
- Exclude Specific User Groups: Select user groups to exclude from SaaS app tracking. For example, users with a specific role may need to be excluded from tracking.
Browser Access Restrictions
Default Action for Unapproved Apps
When you classify discovered apps as unapproved, select the default action AI & SaaS Management takes to warn or block users in their browser with the extension installed:
- Take No Action: Allow users to access unapproved apps as normal.
- Show a Warning: Prompt users with a warning banner in their browser when accessing an unapproved app. You can customize the message users receive in the next section. You can also choose to redirect users to an approved alternative app.
- Block the Application: Deny users access to unapproved AI and SaaS apps. Users receive a blocked message in their browser and can’t access the app. You can customize the block message in the next section.
![]()
Jump to Setting Browser Access Restrictions to see what these messages look like when displayed in the browser.
Default Messaging for Unapproved Apps
Customize the default warning and blocking messages users see when accessing unapproved apps.
![]()
You can override these default settings for each app individually when you review the app. Jump to Reviewing and Editing Apps to learn more.
- Warning message for unapproved applications: If you selected Show a Warning as the default behavior, enter the message users see when they are warned.
- (Optional) Select Allow users to dismiss warning messages by default to let users dismiss the warning banner.
- Blocking message for unapproved applications: If you selected Block the Application as the default behavior, enter the message users see when they are blocked.
Exclude from Browser Access Restrictions
Define groups of users who won’t receive warning or blocking messages and bypass AI & SaaS Management restrictions. You can also define excluded user groups for each app during the review process. Jump to Setting Browser Access Restrictions.
![]()
This feature requires JumpCloud Go browser extension version 1.3.10 and later.
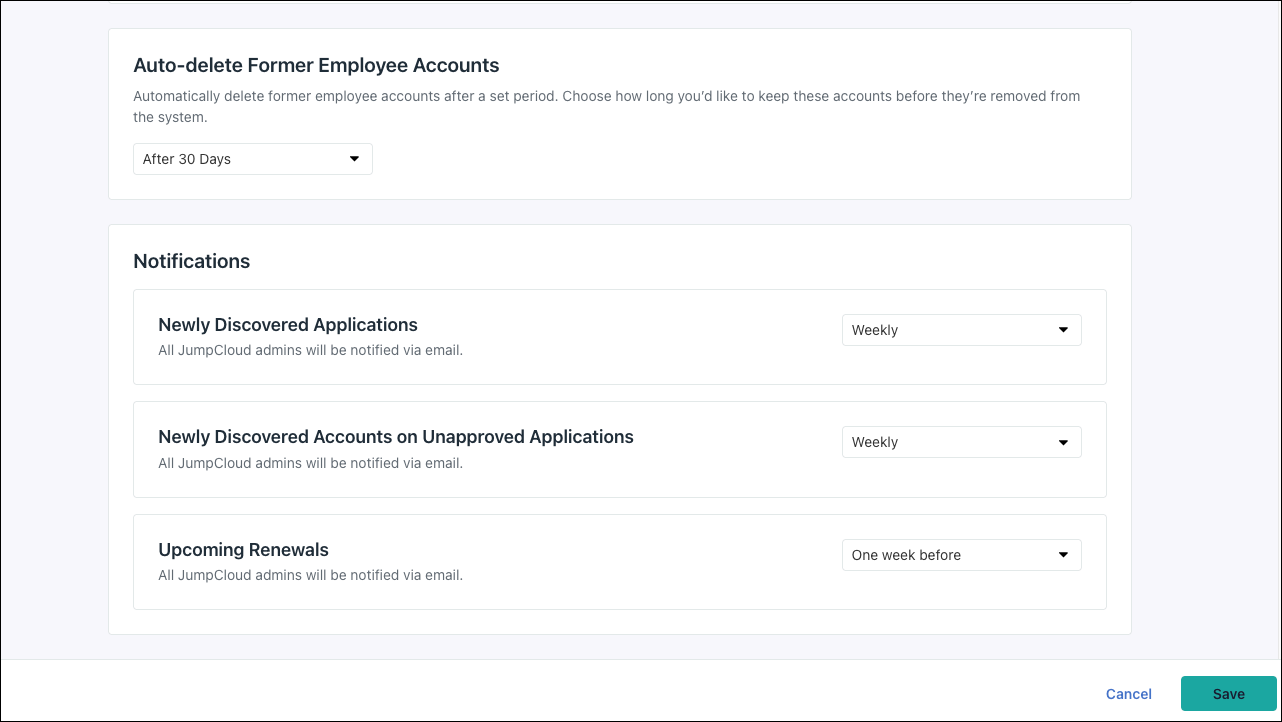
Auto-delete Former Employee Accounts
This setting automatically deletes app accounts associated with removed JumpCloud users. You can specify the number of days (15, 30, or 90) after a JumpCloud user is removed for their associated app accounts to be deleted. You can also set this to Never to prevent account auto-deletion.
Notifications
Customize how AI & SaaS Management sends email notifications to admins.
- Newly Discovered Applications: Set the frequency of notifications sent to all admins when an application is discovered. (Don’t send, Daily, Weekly, Monthly)
- Newly Discovered Accounts on Unapproved Applications: Set the frequency of notifications sent to all admins when a new account is discovered on an unapproved app. (Don’t send, Daily, Weekly, Monthly)
- Upcoming Renewals: Set the frequency of notifications sent to all admins when license renewals occur. (Don't send, One day before, One week before, One month before).

Monitoring Shadow AI
Proactively manage generative AI apps by setting their approval status before they are fully discovered in your org.
Shadow AI Dashboard
Manage AI usage, adoption, and governance across your org with a dedicated Shadow AI Dashboard. You can view key insights on AI adoption rate, users with AI access, usage by department, and most active users.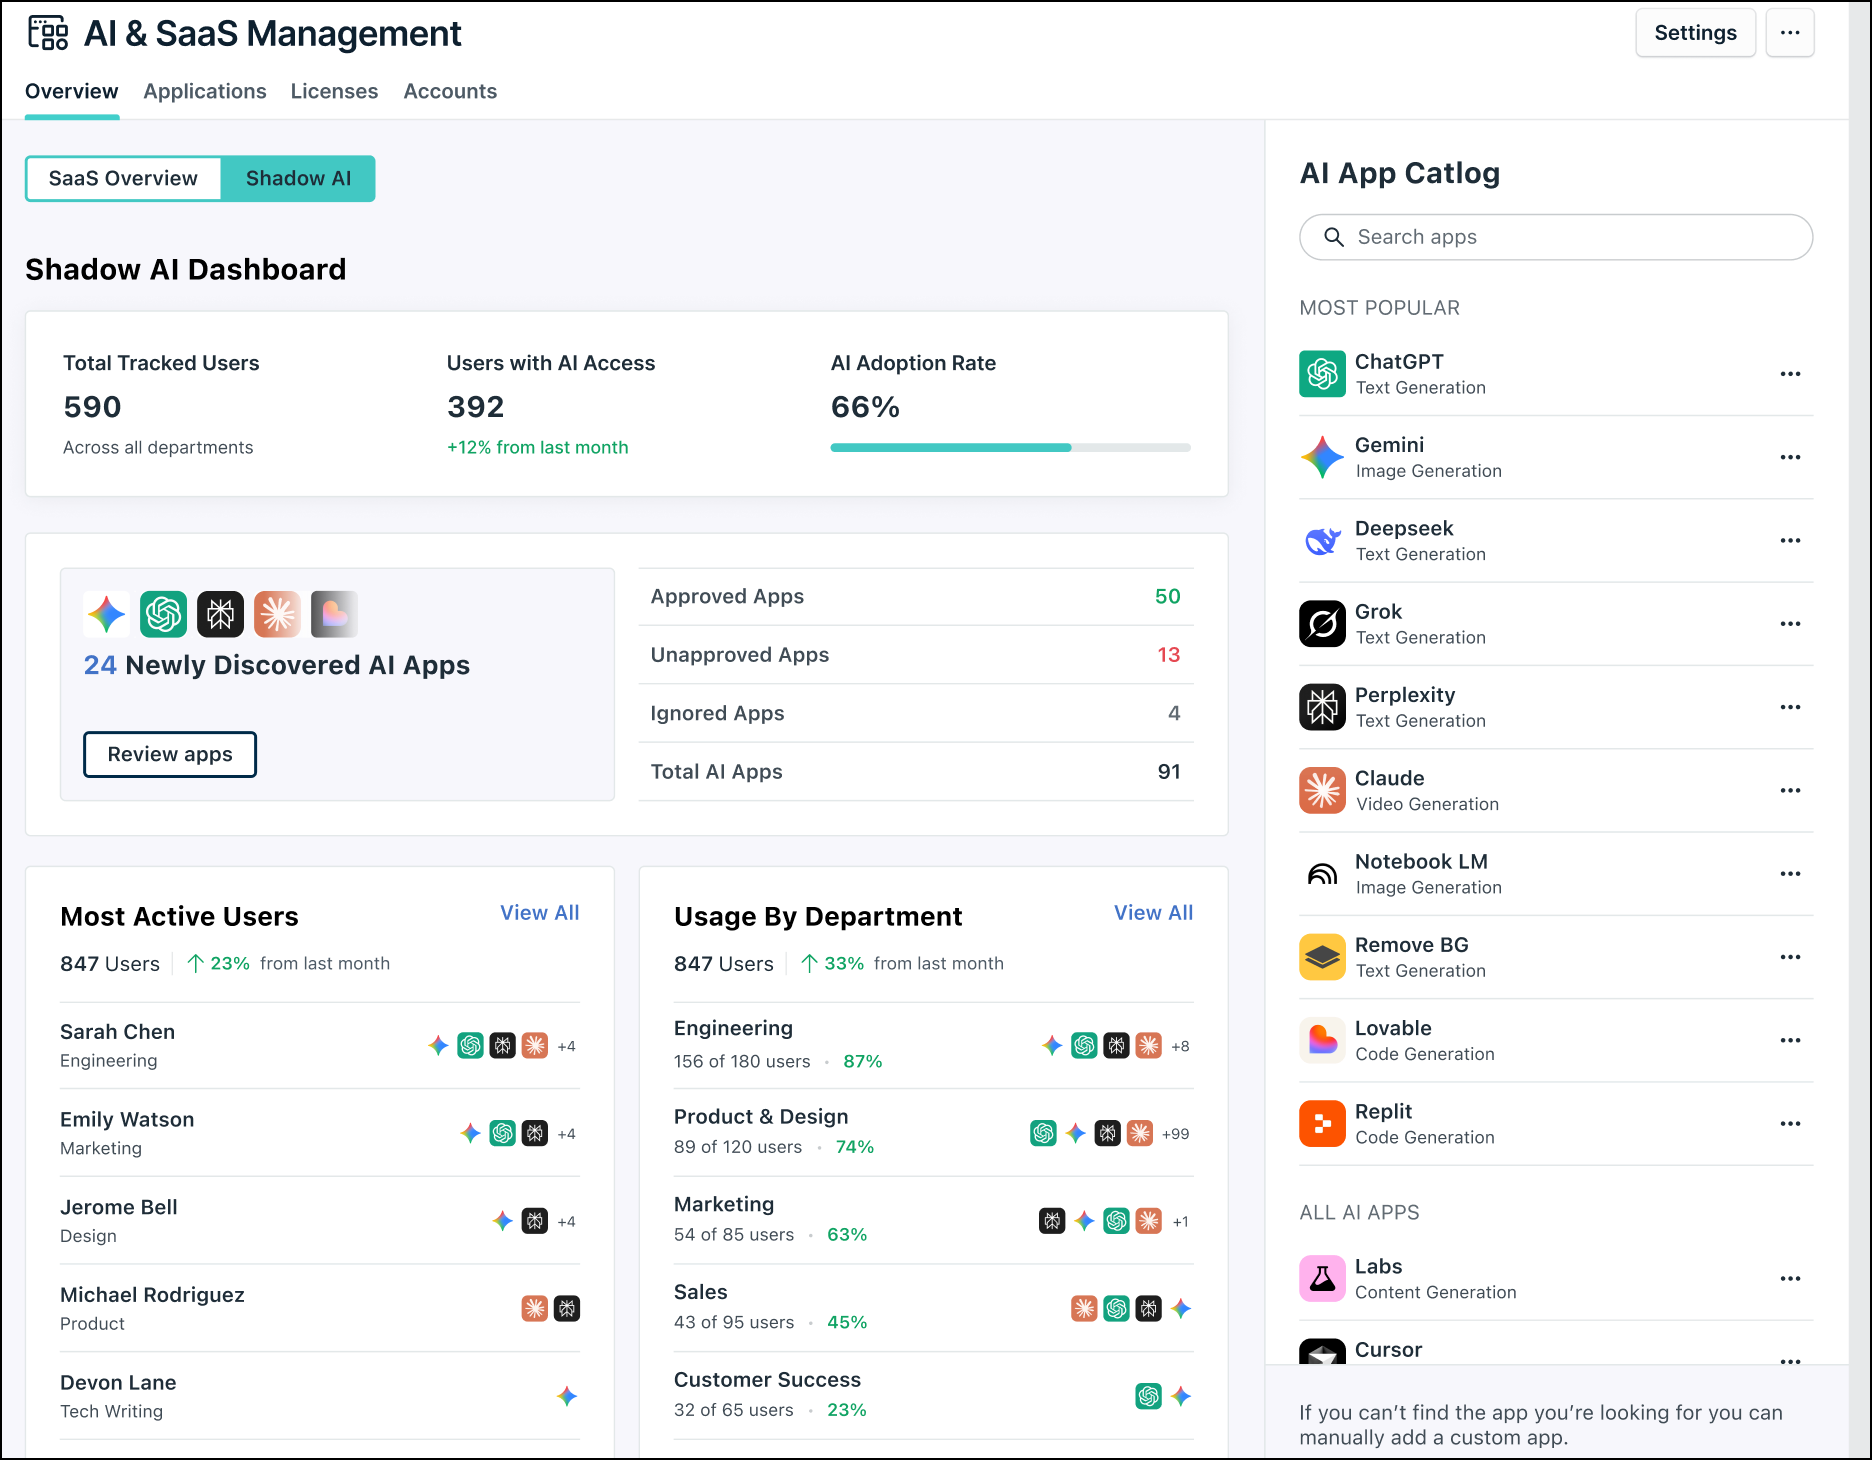
Defining AI App Status via the AI App Catalog
Approve, Unapprove, or Ignore applications in the AI App Catalog to define their status immediately, without waiting for discovery. This secures your org against high-risk generative AI apps from the start, providing early governance and control over which AI apps your users can access. Jump to Setting Browser Access Restrictions.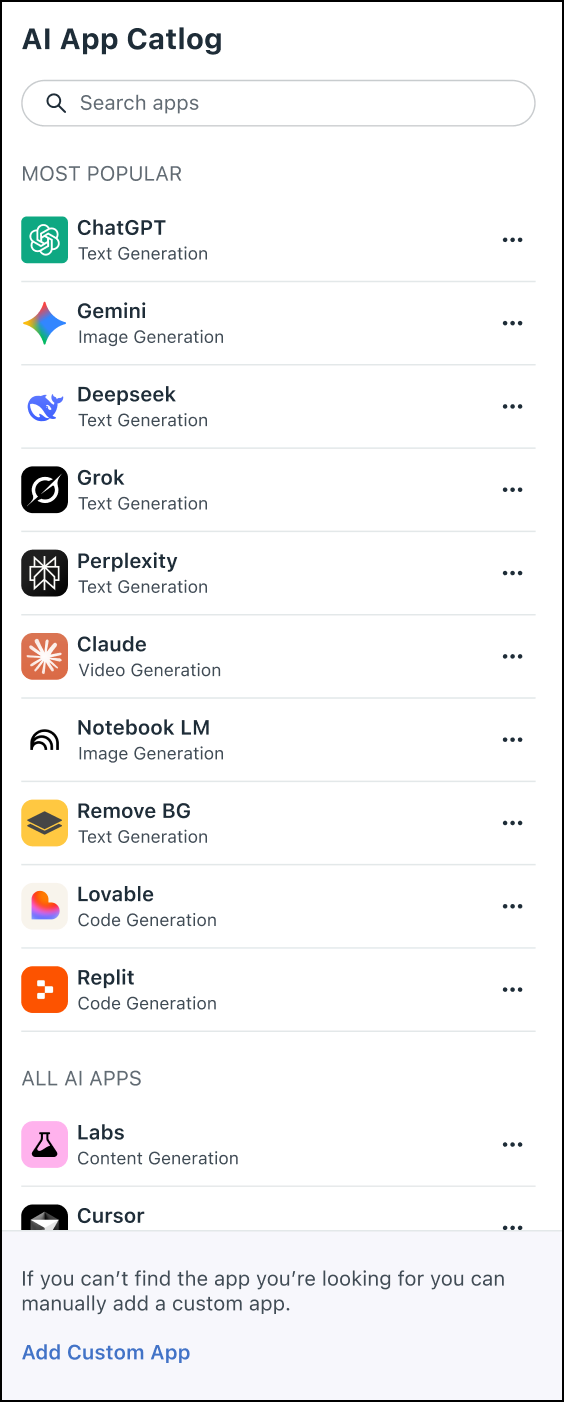
Configuring Connectors
Connect AI & SaaS Management directly to over 50 SaaS and upcoming AI service providers to expand discovery and tracking capabilities. Connectors use APIs to collect information directly from these service providers. See AI & SaaS Management Connectors to learn more.
Managing Applications
Now that you’ve enabled and configured AI & SaaS Management, you can review and manage your apps and connected users.
Overview Tab
When you enable AI & SaaS Management, JumpCloud begins tracking application activity via the browser extension, connectors, and the JumpCloud Agent. Once data populates, the Overview tab serves as a dashboard for all SaaS and desktop application activity within your org.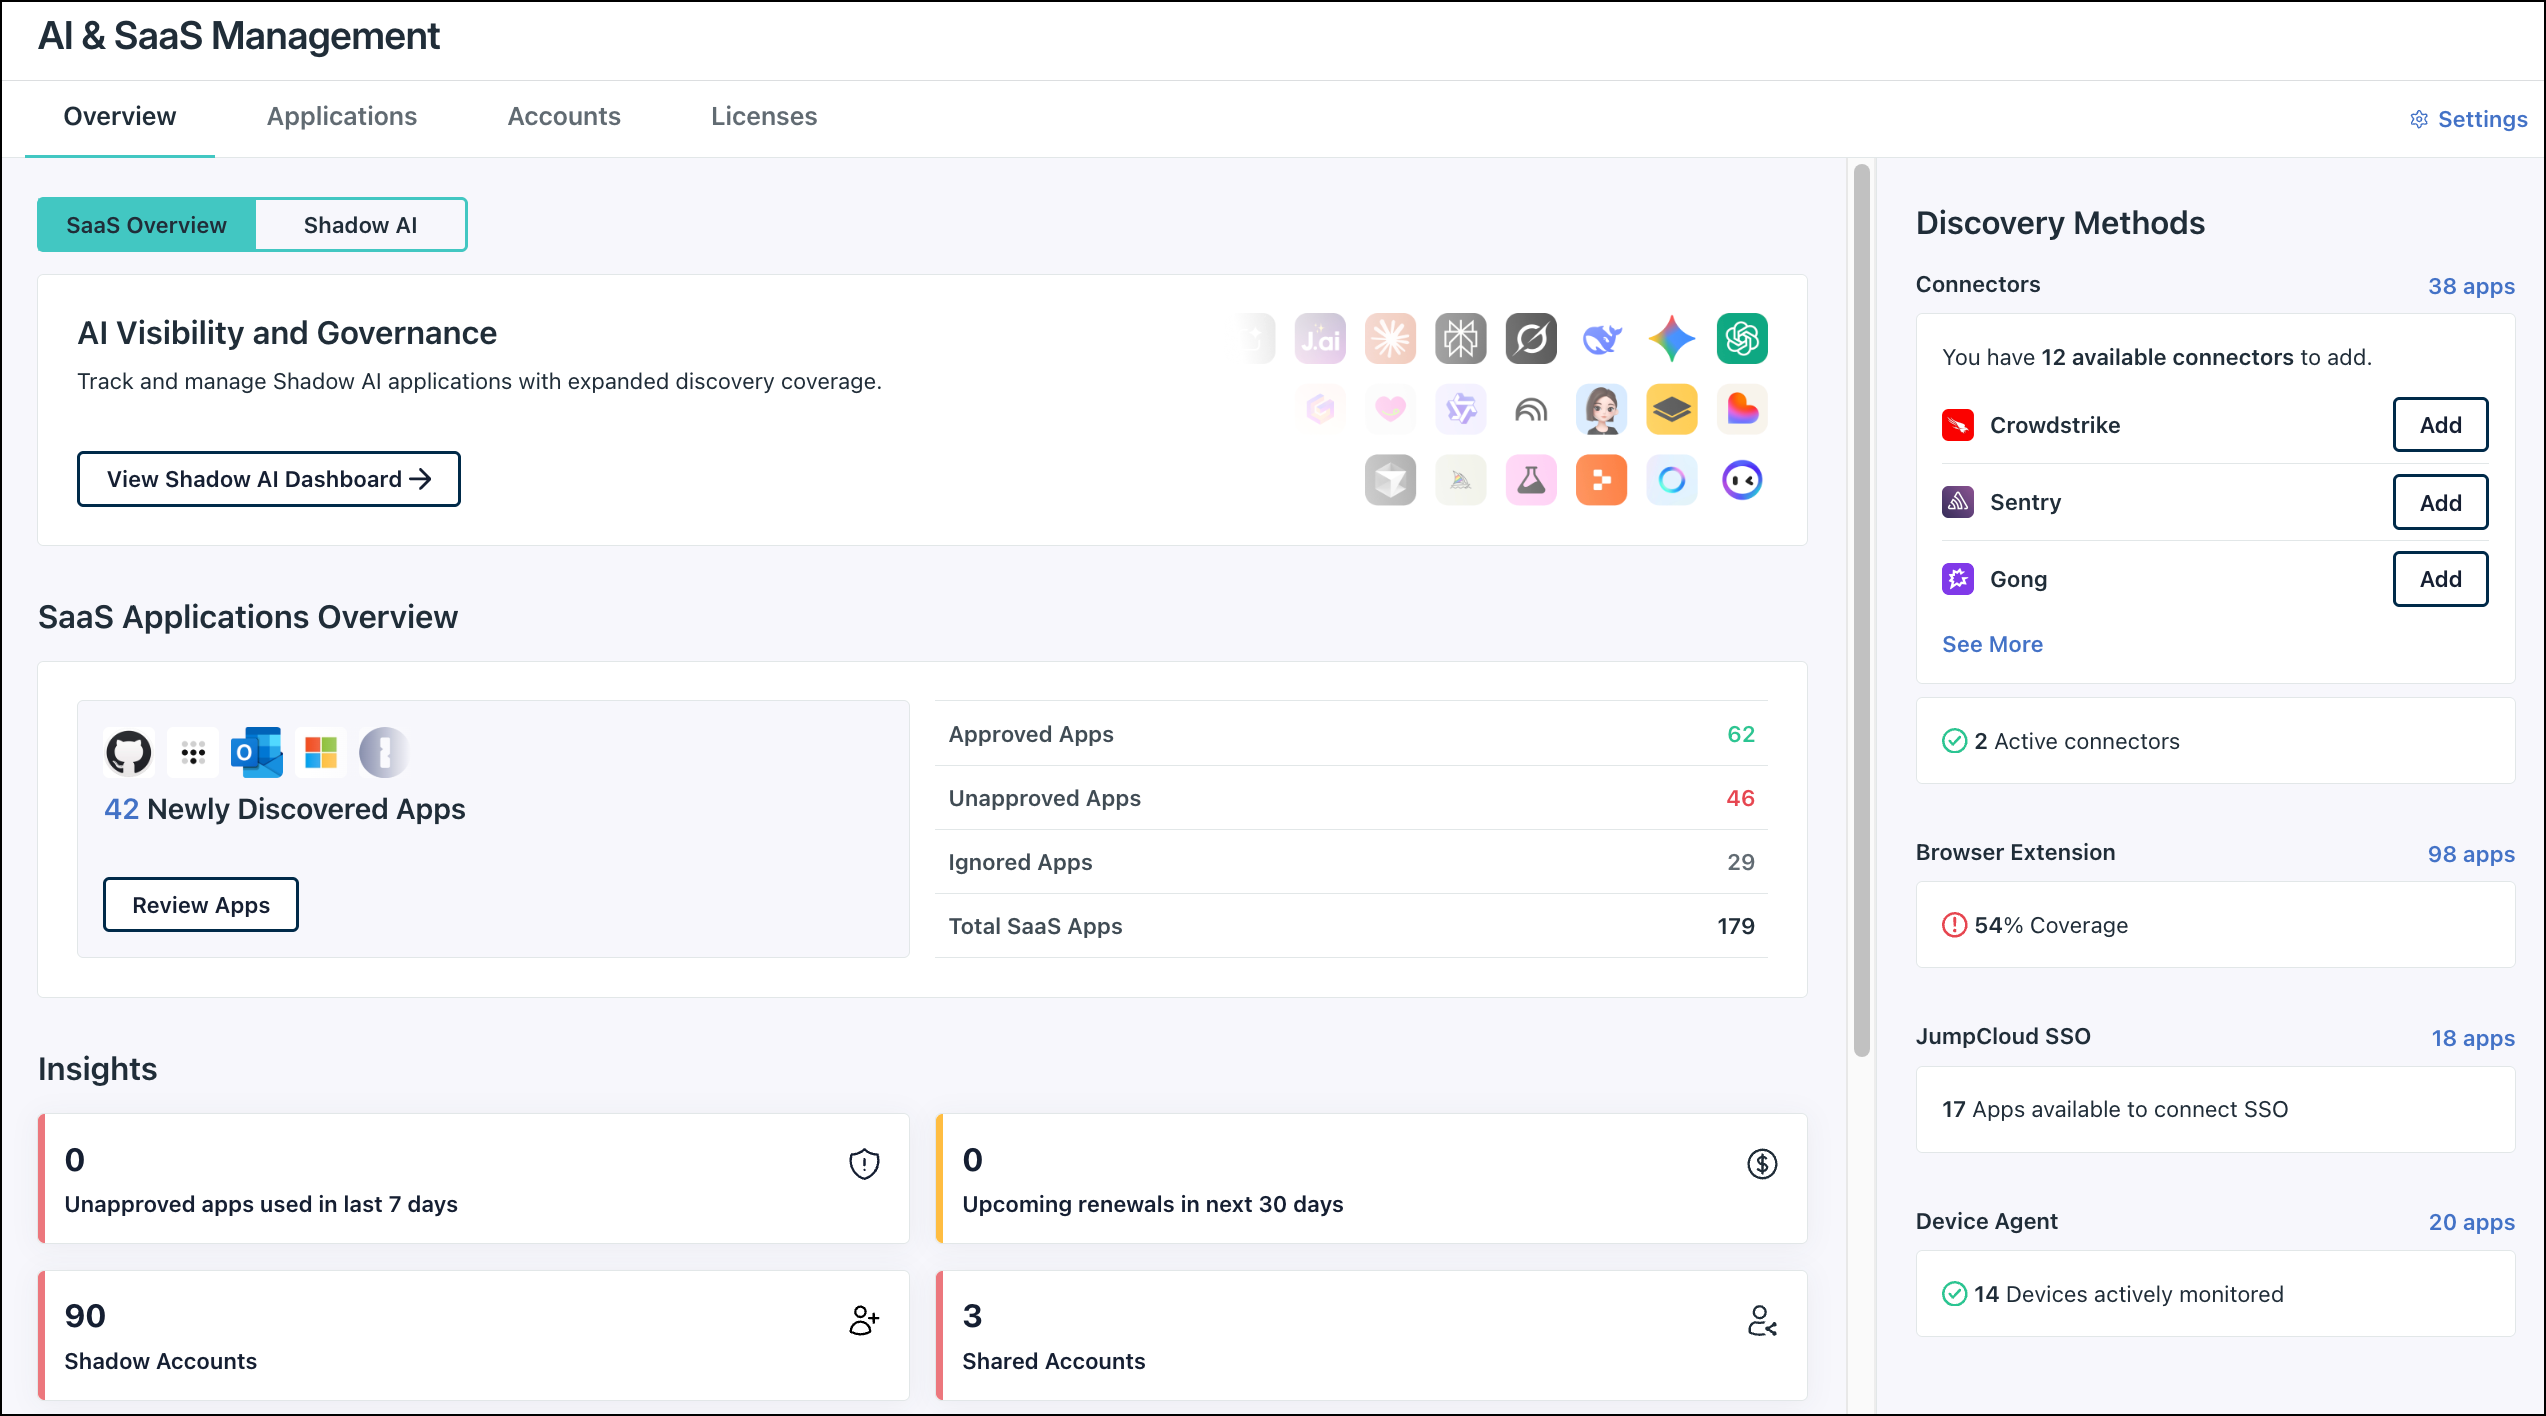
This tab includes key metrics and insights:
- SaaS Applications Overview: Displays counts for Newly Discovered Apps, Approved Apps (including existing JumpCloud SSO apps), Unapproved Apps, and Ignored Apps.
- Insights: Metrics related to potential security risks including Unapproved apps used in last 7 days, Shadow Accounts, Former Employee Accounts, Shared Accounts, and Apps with high risk OAuth permissions. Jump to Security Insights to learn more.
- Discovery Methods: This side panel provides a high-level view of your current tracking coverage across your browser extension, connectors, and the JumpCloud Agent.
Applications Tab
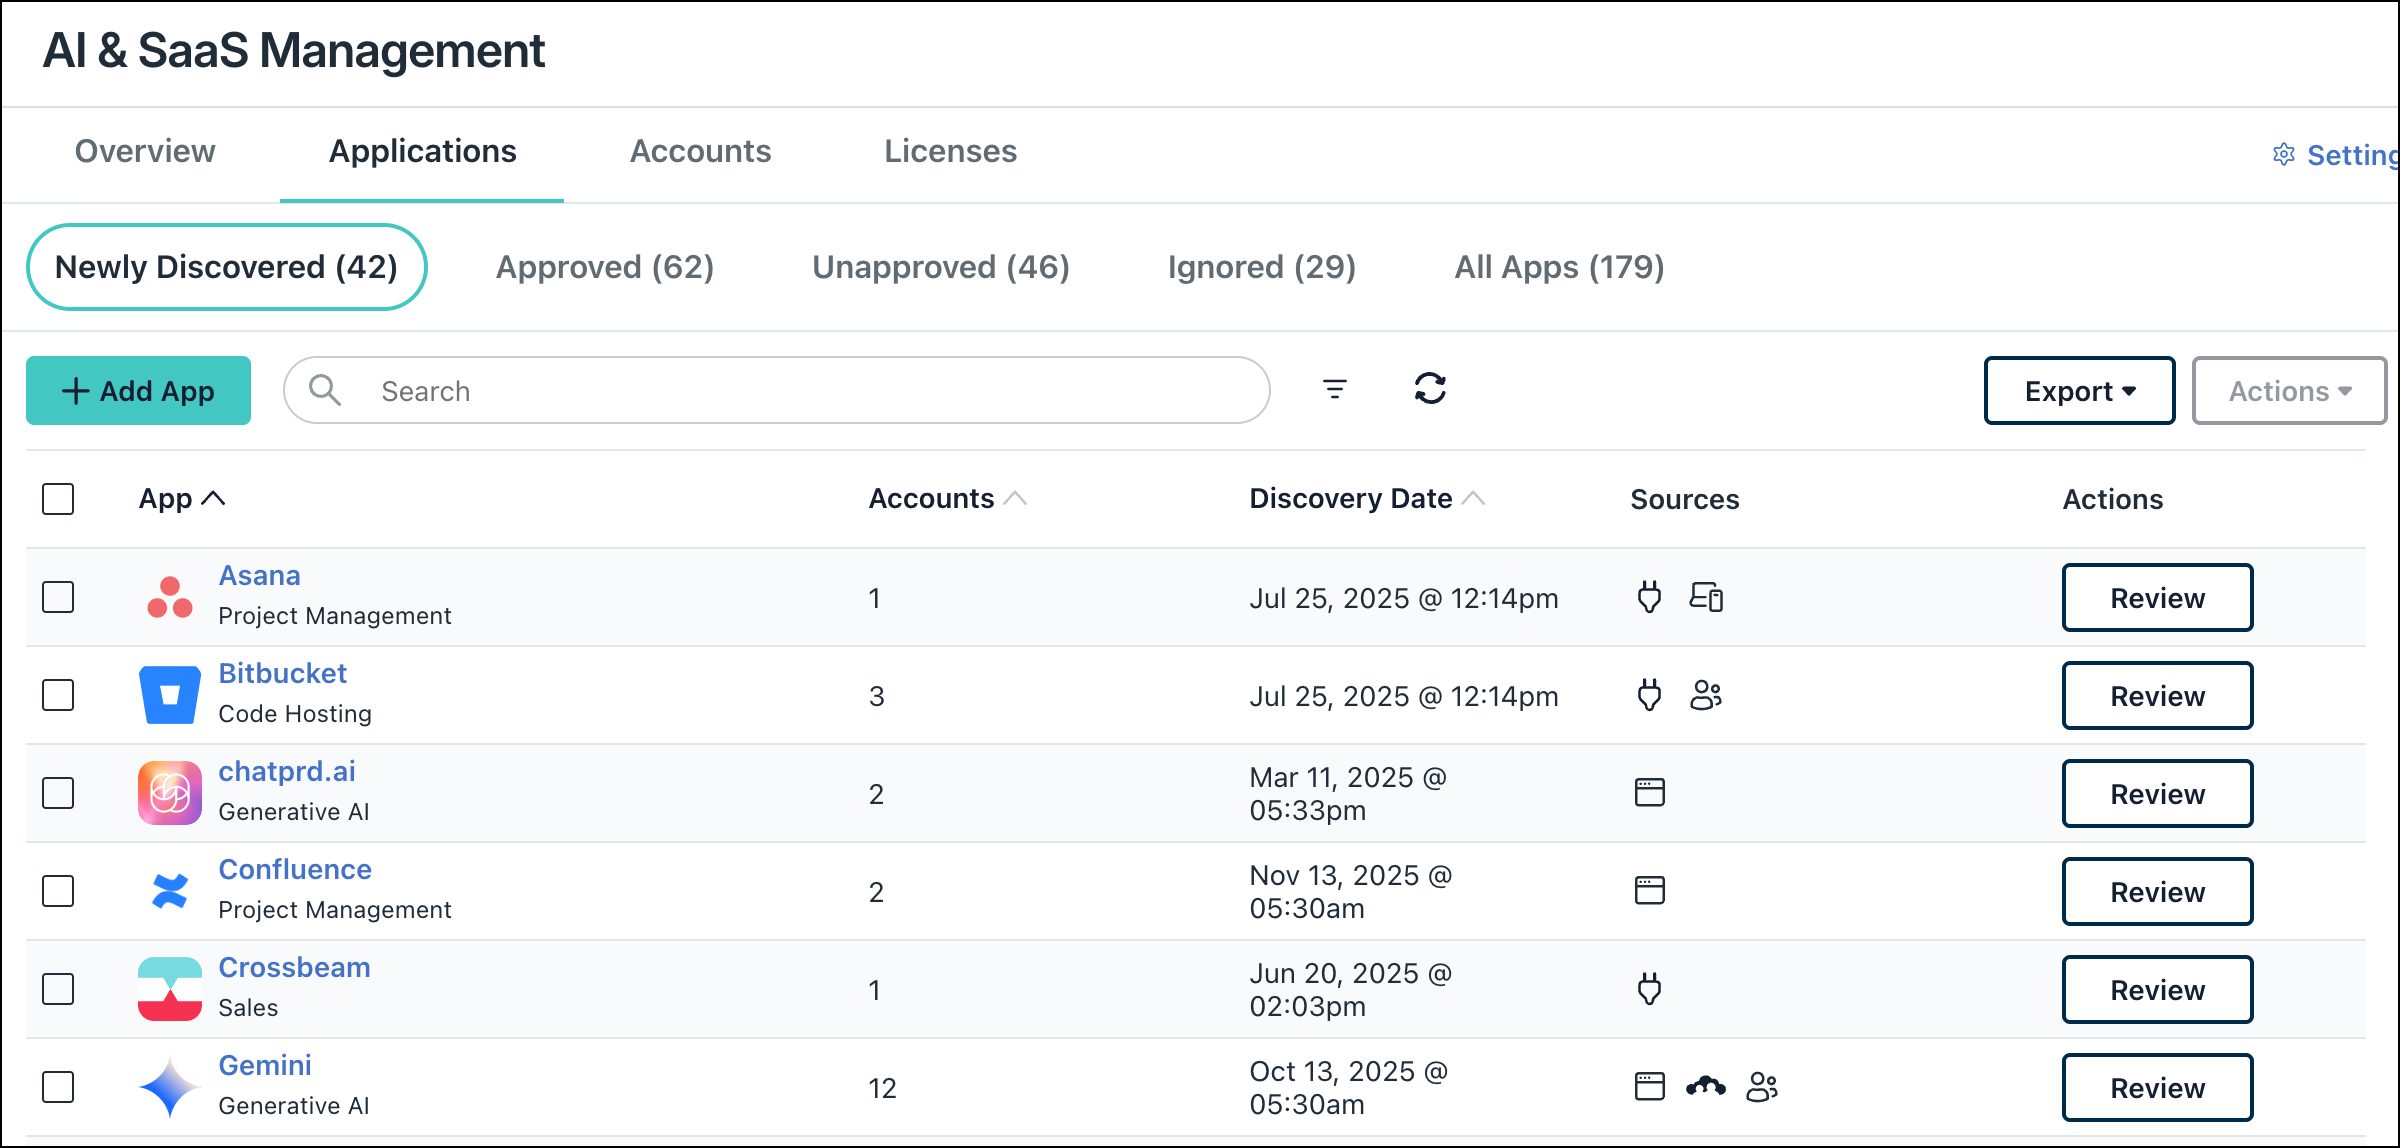
See a list of all SaaS apps discovered in your org. Apps are broken out into the following categories:
- Newly Discovered: Apps discovered that you haven’t categorized yet.
- Approved: Apps that you’ve approved for use within your org.
- Unapproved: Apps not approved for use. You can warn or block users when accessing in their browser.
- Ignored: Apps discovered but you've ignored. Use this category for apps you don’t want to restrict or appear in reporting.
- All Apps: A list of all discovered apps, regardless of categorization status.
Click Edit Columns to select columns to display. Click Export to export a CSV file of your applications list which can be used for financial or compliance reporting.
Manually Add Apps
In addition to automatic discovery, you can easily add applications manually to start tracking, warning, and blocking access when necessary.
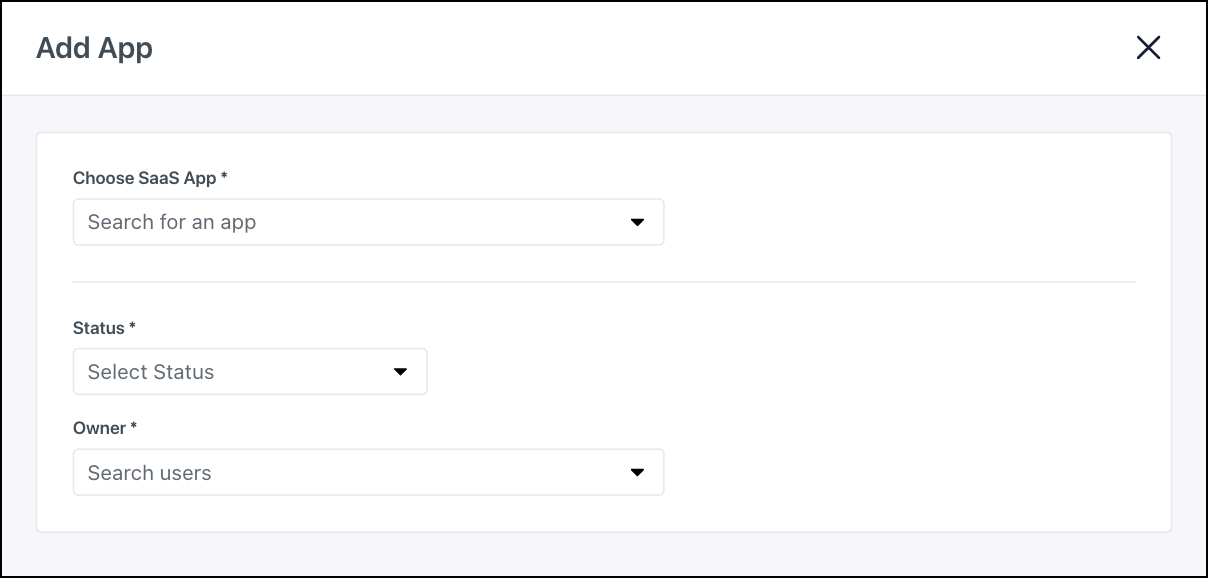
- Click + Add App.

- In the modal, search for the app.
- If the app is in our catalog, it appears in the dropdown list.
- If the search doesn’t show your app, you can click on Add Custom App.
- Custom apps are private and not added to the JumpCloud catalog.
- Add the Domain and (Optional) App Description.

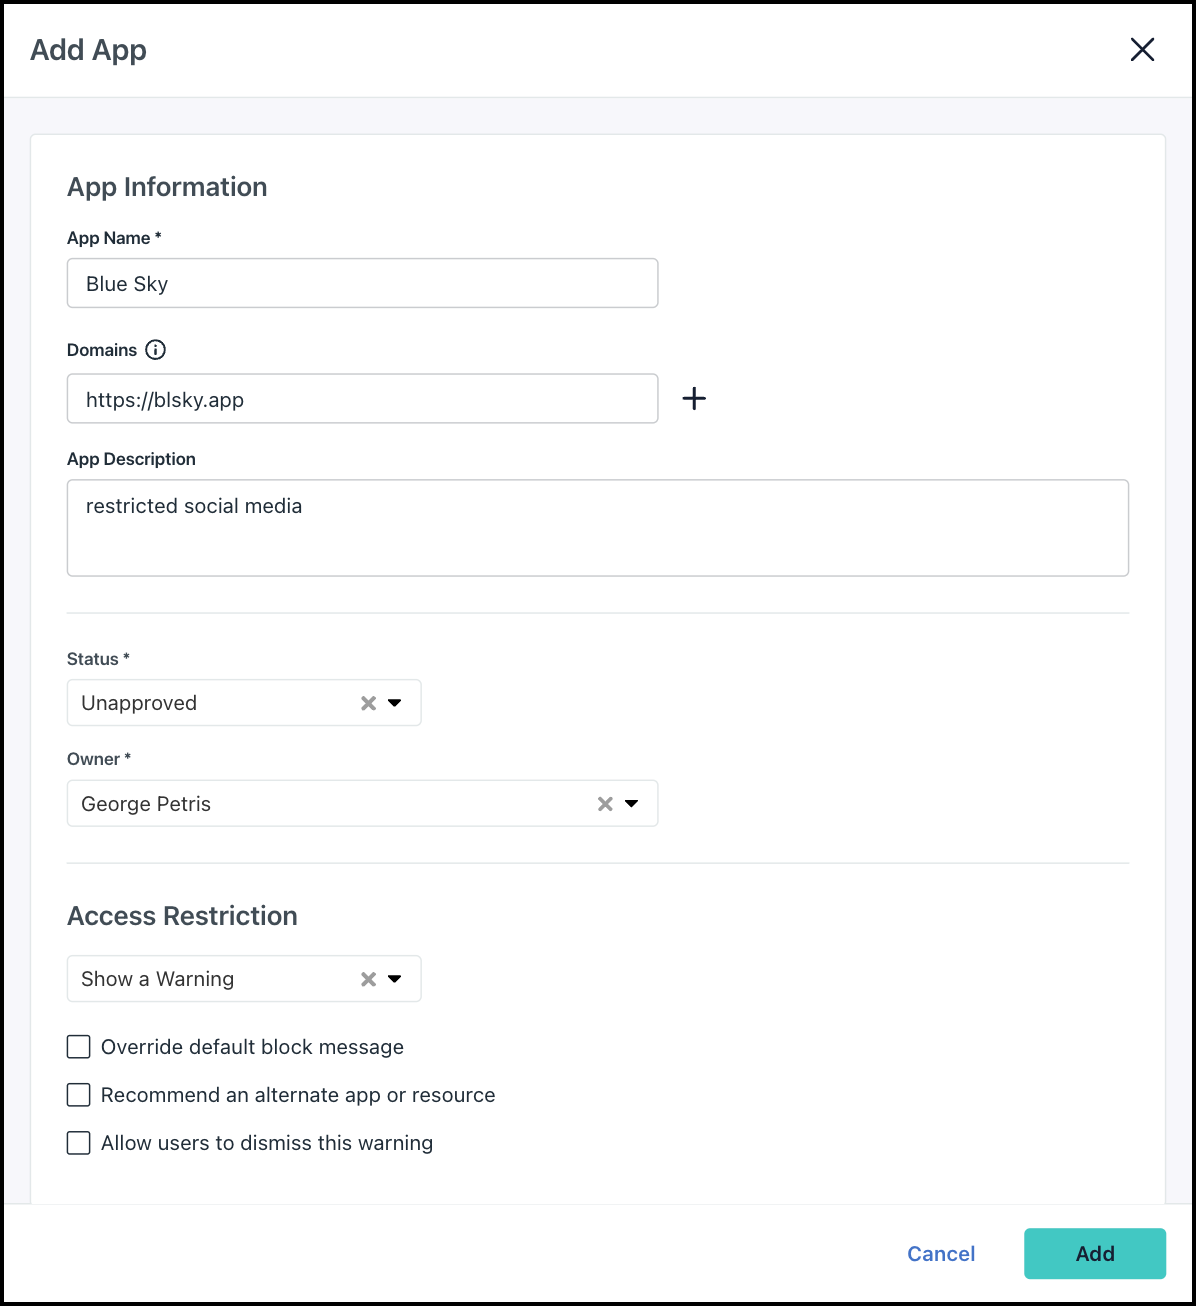
![]()
- The domain is required. If it matches an existing app in our catalog, you must choose that domain instead. If we add this app to our catalog after you've configured it, the custom app domain has priority and continues working.
- If you add a custom app to warn or block users from accessing it, logins and signups are still tracked (though discovery isn't guaranteed 100%).
- Set the Status and Owner.
- Click Add.
Reviewing and Editing Apps
Apps discovered by SaaS Management appear in the Newly Discovered tab until you classify them as approved, unapproved, or ignored. You can also edit details for apps already classified.
To review or edit apps:
- In the Applications tab, go to the appropriate category (for example, Newly Discovered or Approved).
- Find the app in the list, or select multiple apps for bulk review.
- Open the Review modal depending on the number of apps to review:
- To review a single app: In the Actions column, click Review.
- Alternatively, click the app's name in the App column, then in the top right, click Actions > Edit App Details from the details view.
- To review multiple apps: Ensure you've selected multiple apps in the list, then in the top right click Actions > Review Apps.
- To review a single app: In the Actions column, click Review.
![]()
When bulk reviewing apps, the same settings apply to all selected app.
- For Status, select one of the following:
- Approved: Approved for use. Users access normally without restrictions.
- Unapproved: Not approved for use. Users are warned or blocked based on the default action set in SaaS Management settings.
- Ignored: Discovered but ignored. These apps don't appear in reporting.
- Under Owner, select a user that manages the app (Optional for Ignored apps).
- For example, if the Accounting team owns the app, this may be the Director of Accounting.
![]()
You can also reclassify apps by going to appropriate tab (Approved, Unapproved, or Ignored), finding the app, and clicking Review.
Setting Browser Access Restrictions
If you set the app status as Unapproved, use Browser Access Restrictions to configure specific warning or blocking actions:
- For Browser Access Restrictions, select one of the following:
- Take No Action: Users access without restrictions.
- Show a Warning: A warning banner appears in the browser.

- Block This Application: Access is blocked in the browser

- (Optional) If you selected Show a Warning or Block This Application, choose from the following options:
- Overwrite default warning message: Enter a custom warning message for the user. This overwrites the default message set in Settings. Jump to Default Messaging for Unapproved Apps.
- Recommend an alternate app or resource: Direct the user to an alternative app. Enter the Link label and URL.
- Allow users to dismiss this warning: Users can collapse the warning banner.
- Exclude from Browser Access Restriction: Specified user groups won’t receive warning or block messages.


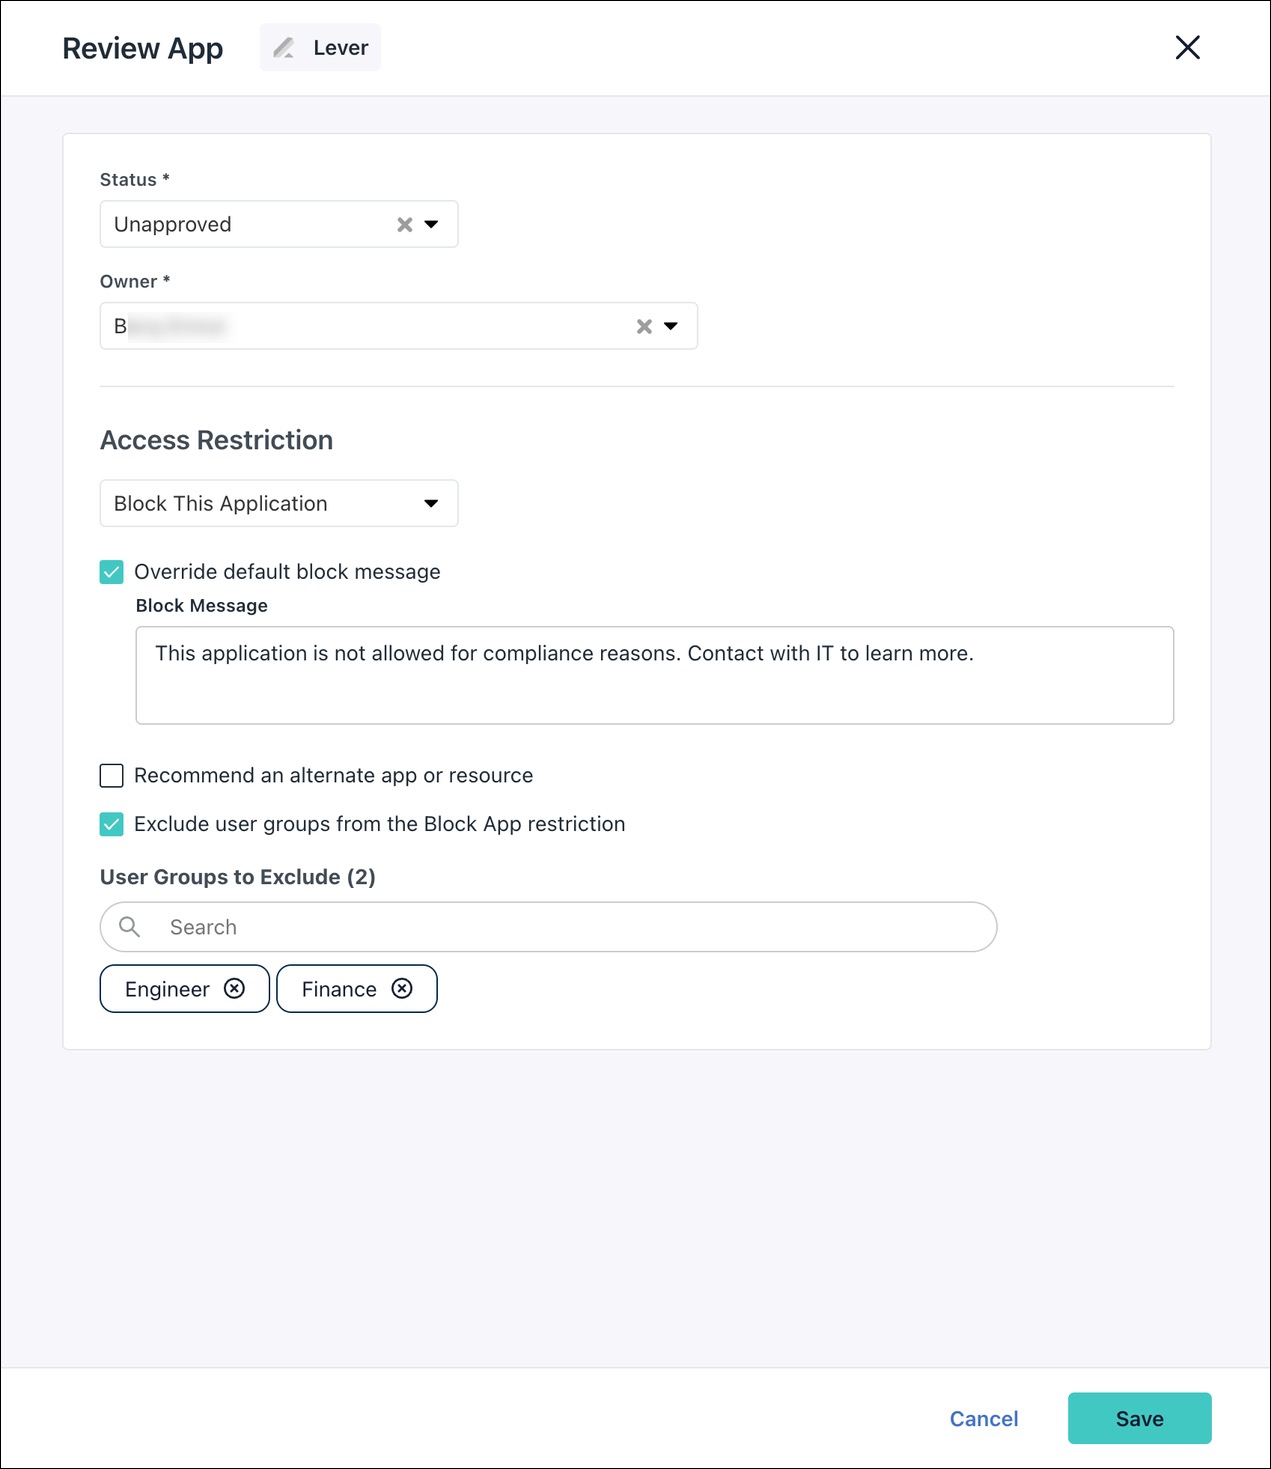
![]()
- This feature requires the JumpCloud Go extension version 1.3.10 or later.
- You can set this option globally in AI & SaaS Management Settings. Jump to Exclude from Browser Access Restrictions.
Viewing App Details
Select any app in the AI & SaaS Management list for an overview and additional information. Click the app’s name in the App column to open its details.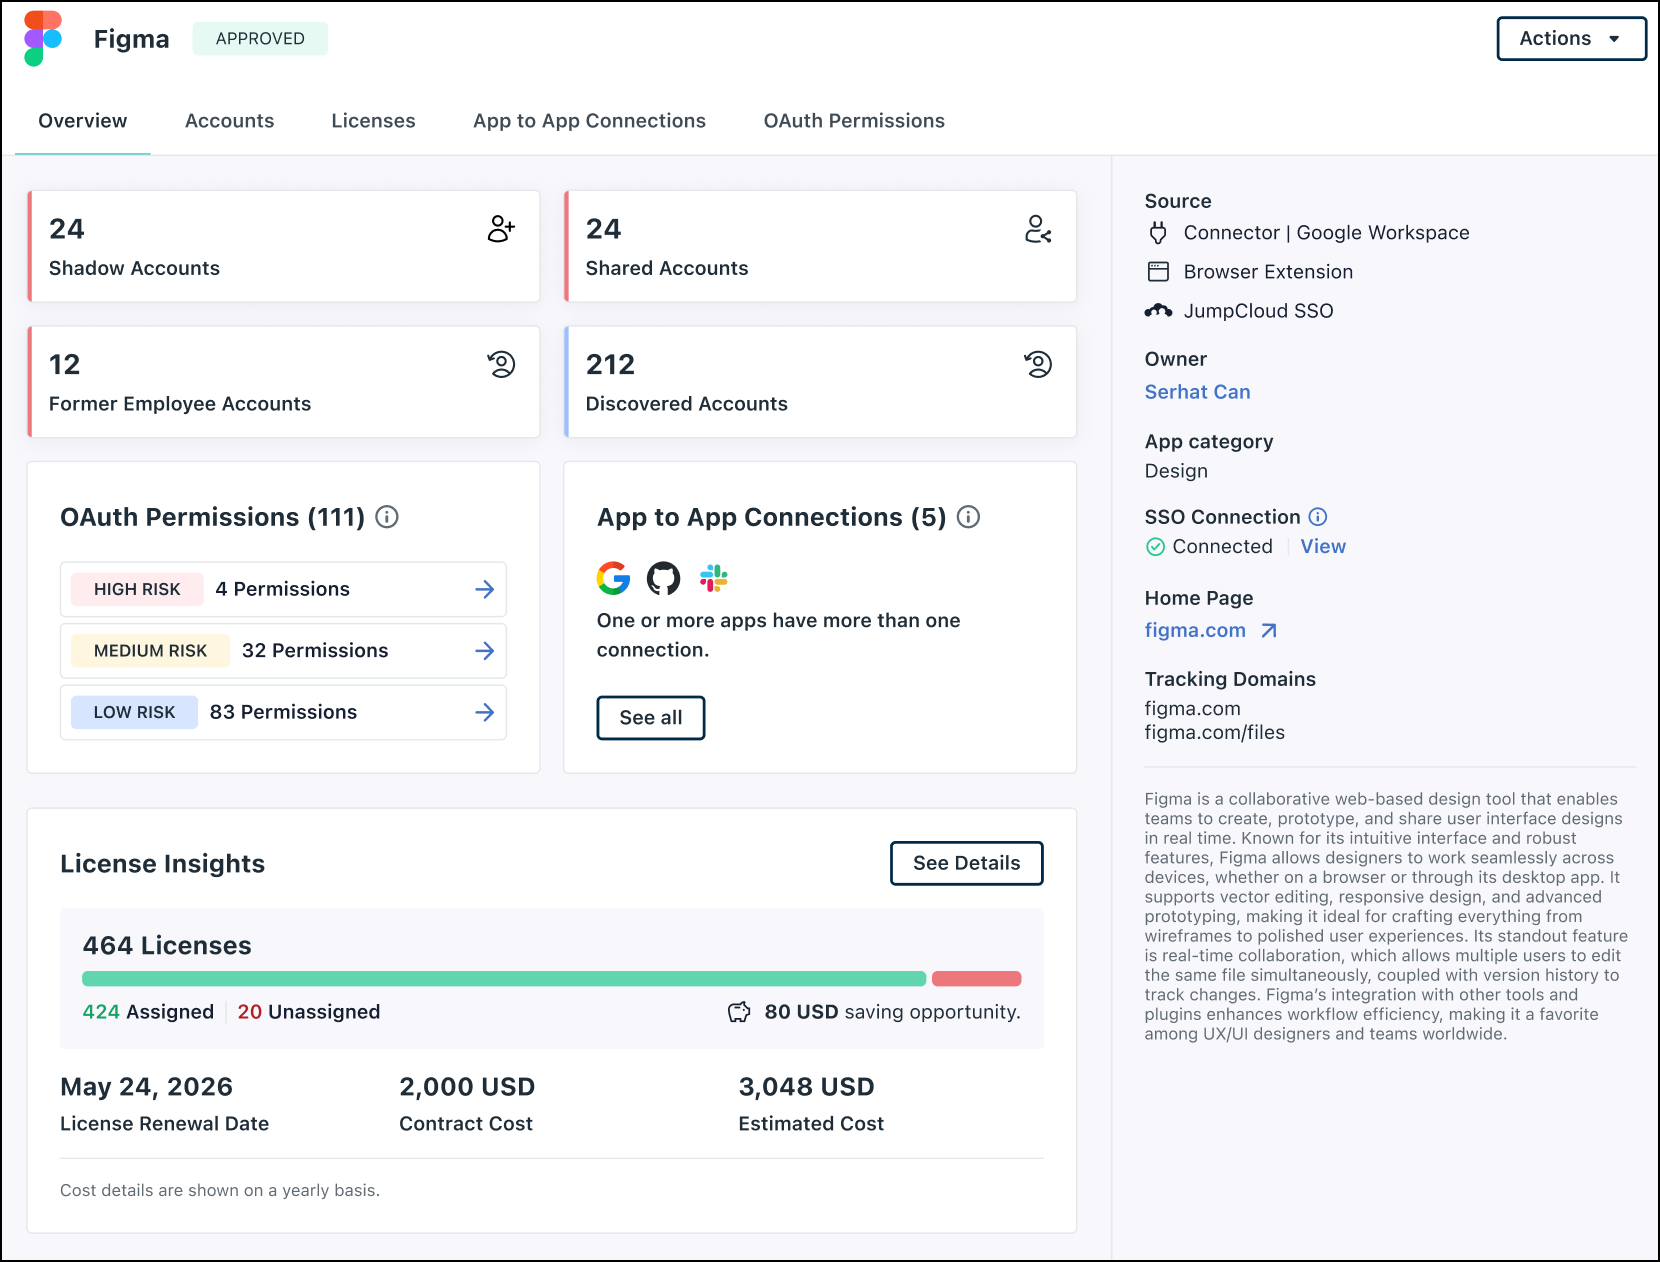
The Overview tab displays the following information:
- App Insights:
- Shadow Accounts: Accounts not linked to an existing JumpCloud user.
- Shared Accounts: Accounts used by multiple JumpCloud users.
- Former Employee Accounts: Accounts associated with a disabled JumpCloud user object.
- License Renewal Date: The date you’ve specified for the app’s license renewal.
- App Usage: A graphical view of the number of accounts that access this app per day.
- OAuth Permissions: View the permissions that users have assigned to accounts when logging in with Google OAuth (requires the Google Workspace Connector).
- App to App Connections: See third-party apps discovered by this app’s connector. Jump to Security Insights to learn more.
- License Insights: View your total licenses, including the breakdown of assigned vs. unassigned, and compare your contract costs against estimated costs to find saving opportunities.
Click See Details to open the Licenses page that provides a detailed, searchable table where you can view each app's status, license allocation, and cost. Jump to Managing Licenses to learn more.
The right-hand menu displays additional details:
- Source: The method by which the app was discovered.
- Owner: The JumpCloud user who manages the app. To customize, go to Actions > Review App.
- App Category: The app’s primary use case.
- SSO Connection: Indicates if this is an existing JumpCloud SSO application.
- Home Page: The app’s website URL.
- Tracking Domains: The URLs captured by AI & SaaS Management.
Security Insights
Insights help you identify and close security gaps across your organization. These insights use your discovery data to surface high-impact risks that require attention. View these metrics on the Overview dashboard or identify individual risk entries in the Risks column on the Accounts tab.
![]()
OAuth Permissions and App-to-App Connections are only available for apps with a configured connector.
For example, you must configure the Google Workspace connector to view OAuth permissions, or the Slack, Zendesk, or Opsgenie connectors to view integrations linked to those platforms. See AI & SaaS Management Connectors to learn more.
![]()
Click any metric card in the Insights section of your dashboard to jump directly to the filtered list of accounts or applications associated with that risk.
OAuth permissions
Review the specific permissions users grant to applications when they sign in with their Google identity.
- Prerequisite: Configure the Google Workspace Connector.
- Risk Levels: Permissions are categorized as HIGH RISK, MEDIUM RISK, or LOW RISK based on their level of access. For example, high-risk permissions typically include full write, delete, manage, and read access.
- Action: Review which users granted a specific permission and click Revoke to remove that access.
App-to-app connections
Identify third-party integrations linked to your core SaaS platforms, such as tools connected to your Slack workspace.
- Prerequisite: Configure the Slack, Zendesk, or Opsgenie connectors.
- Action: View the connection type, source, and target on the App To App Connections tab to identify hidden access paths between tools.
Shadow accounts
Detect accounts that don't match an existing JumpCloud user. This helps you identify unsanctioned access or administrative accounts created outside of your visibility.
- Prerequisite: Requires discovery data from the JumpCloud Go browser extension or the JumpCloud Agent.
- Action: On the Accounts tab, click Assign a User to link the account to a JumpCloud identity if the account owner is known. Associating the account with a managed user provides better visibility into your app usage and moves the account out of the shadow account state.
Shared accounts
Identify when two or more distinct JumpCloud users access a single account using the same credentials.
- Prerequisite: Users must have the JumpCloud Go browser extension installed.
- Action: After you investigate and migrate users to individual accounts, select the entry in the Accounts list and click Actions > Mark as Resolved to clear the risk from your dashboard.
Former employee accounts
Identify active accounts that belong to users you've off-boarded or deleted from JumpCloud.
- Prerequisite: This insight generates automatically when you delete a user if their accounts were discovered via Connectors, JumpCloud Go, or the JumpCloud Agent.
- Action: To automate this process, go to Settings and select a time frame from the Auto-delete Former Employee Accounts drop-down menu. If you want to keep a record without the active risk flag, select Never in the settings and manually click Actions > Mark as Resolved for that specific account.
Deleting an App
You can't delete connected SSO apps directly from AI & SaaS Management. Instead, delete them from JumpCloud SSO in the Admin Portal (Access > SSO Applications). See Get Started: SAML Single Sign-on (SSO) to learn more.
![]()
When you delete an app from AI & SaaS Management, all associated accounts, usage data, and insights are also deleted.
Managing Licenses
Streamline and track your licenses by adding them manually, or using License Management to automatically sync details for supported apps using connectors.
Editing Licensing Information Manually
Keep track of app costs and usage by manually entering license information for apps that don't support license management.
To edit license information manually:
- Go to Access > AI & SaaS Management > Applications.
- Click on an application from the list.
- Go to the Licenses tab.
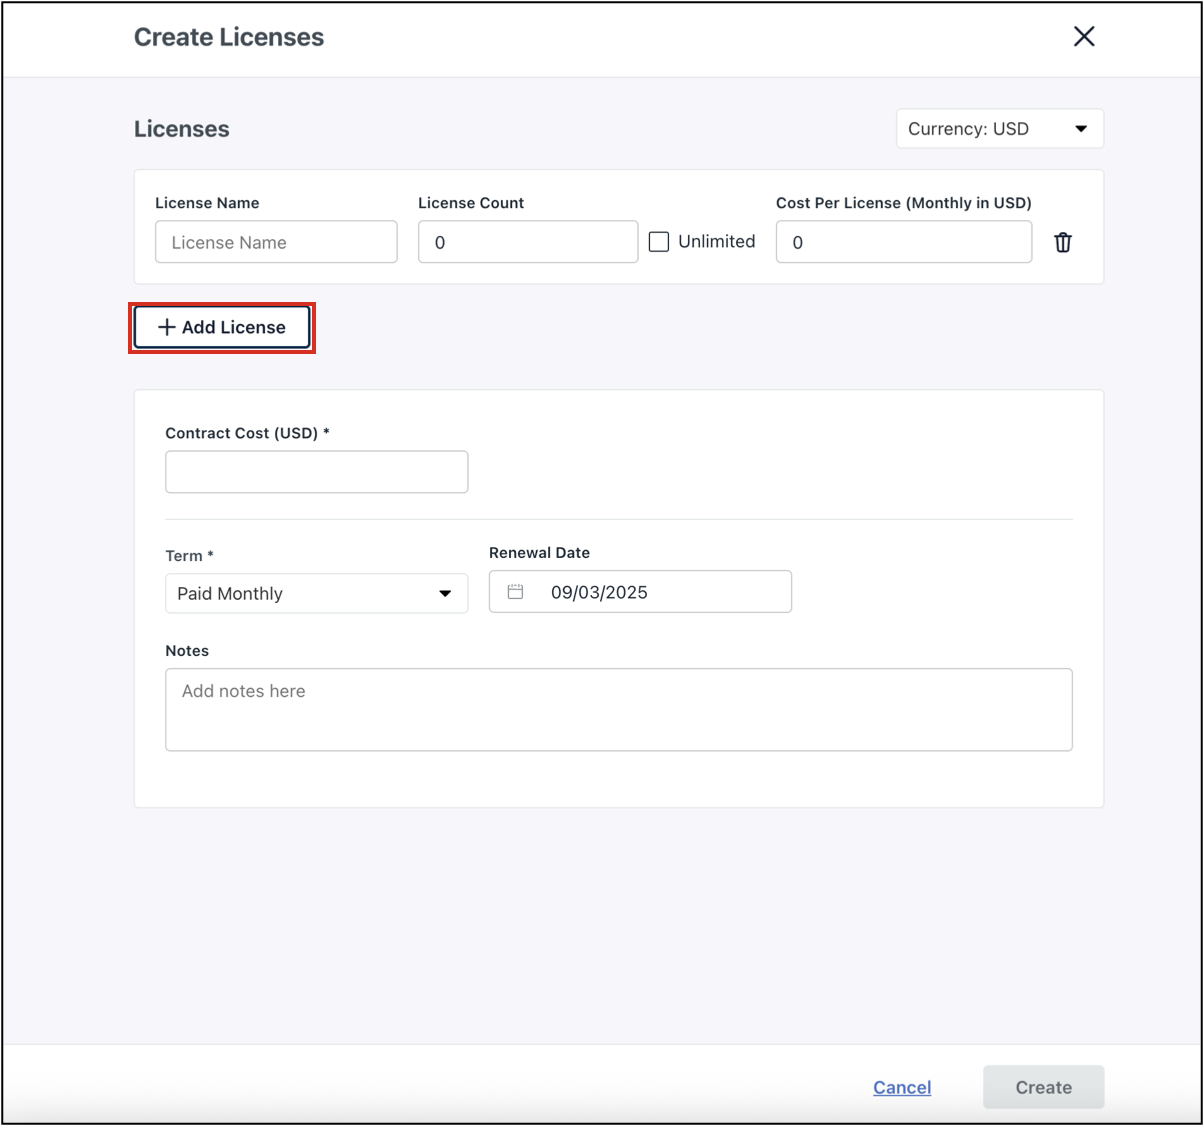
- Click Manage License. The Create Licenses page appears.

- Click + Add License.

- Select from the appropriate License Term: Free Subscription, Paid Monthly, or Paid Yearly.
- If you selected Paid Monthly or Paid Yearly, enter the Renewal Date, Cost, and Total Licenses.
- (Optional) In the Notes field, enter any other relevant information.
- (Optional) To add additional licenses, repeat steps 5 - 8.
- Click Save.
You can also leverage User Groups to manage license assignments.
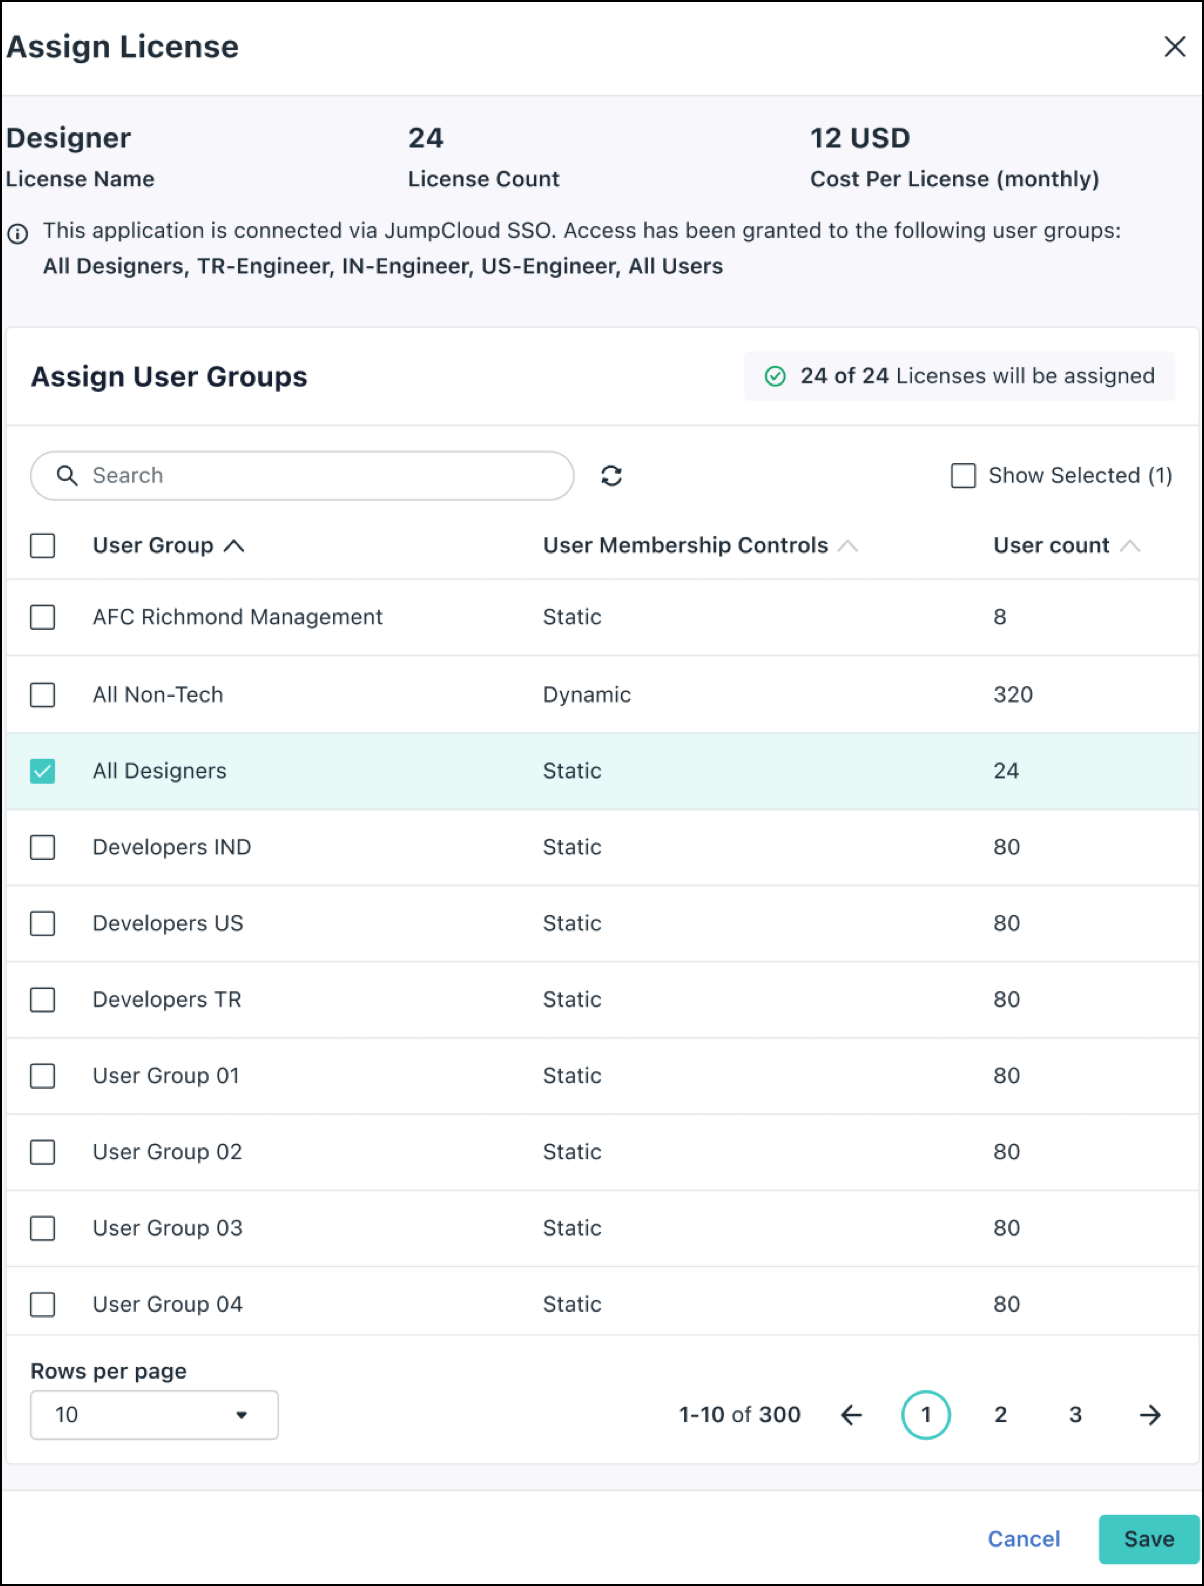
To assign licenses:
- Go to the Application > Licenses tab of the app you need to assign licenses.
- Under the license list in the License Assignment tab, click Assign.
- The Assign Licenses page appears.

- Select one or more User Groups to assign the license to.
- Click Save.
Automating License Tracking
Centralize and track your AI & SaaS application licenses with JumpCloud's License Management, which uses connectors to automatically import licensing information. This gives you an overview of your software assets directly in SaaS Management, helping you optimize usage and reduce manual tracking efforts.
Prerequisites:
- To automatically track licenses, you first need to configure the appropriate AI & SaaS Management connectors. See AI & SaaS Management Connectors to learn more.
- If you have already configured the required connectors, you can force a reconnect to apply the automated License Management feature.
- The following applications are supported for automated license tracking:
- Google Workspace
- PagerDuty
- Microsoft Entra ID
- Slack
Considerations:
- Captured licenses are automatically assigned to accounts when the connector provides the necessary information.
- Manually created licenses will be unassigned. You can then assign these licenses to specific users via user groups. This helps you track which licenses are in use, making it easy to identify and Reassign any that are unassigned, which helps reduce unnecessary costs.
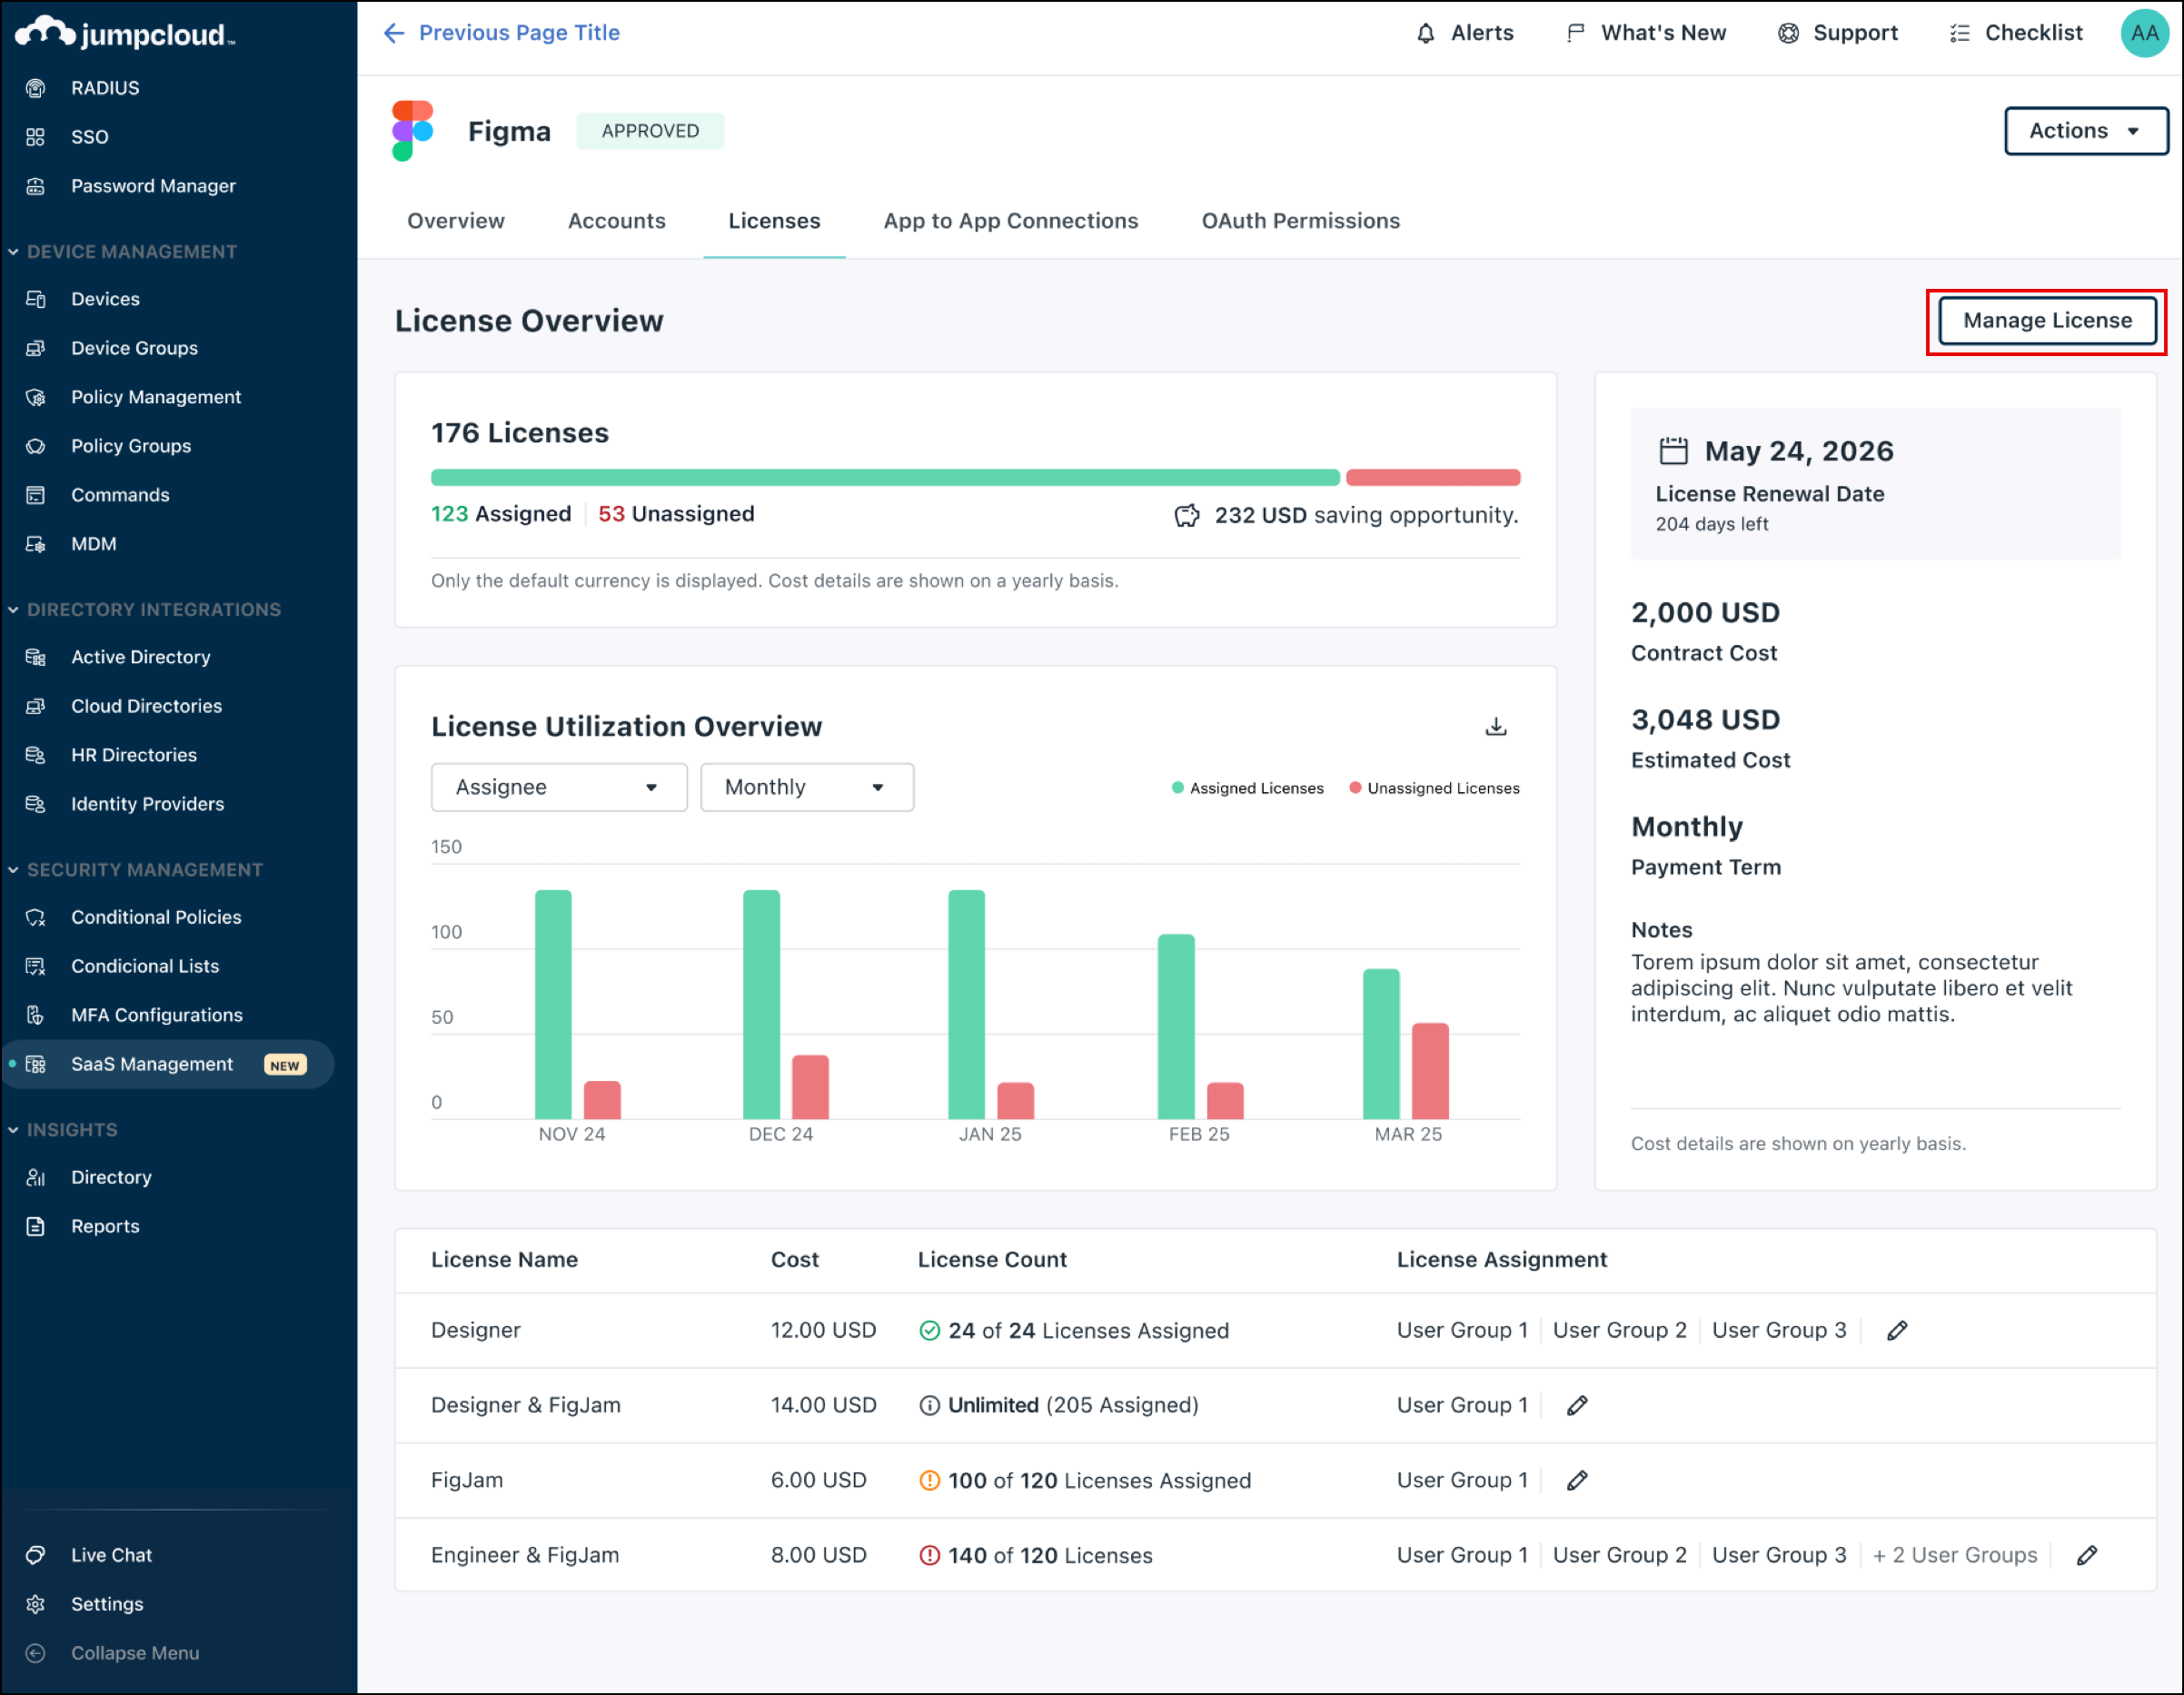
Viewing And Managing Licences
You can view and manage your licenses from two locations:
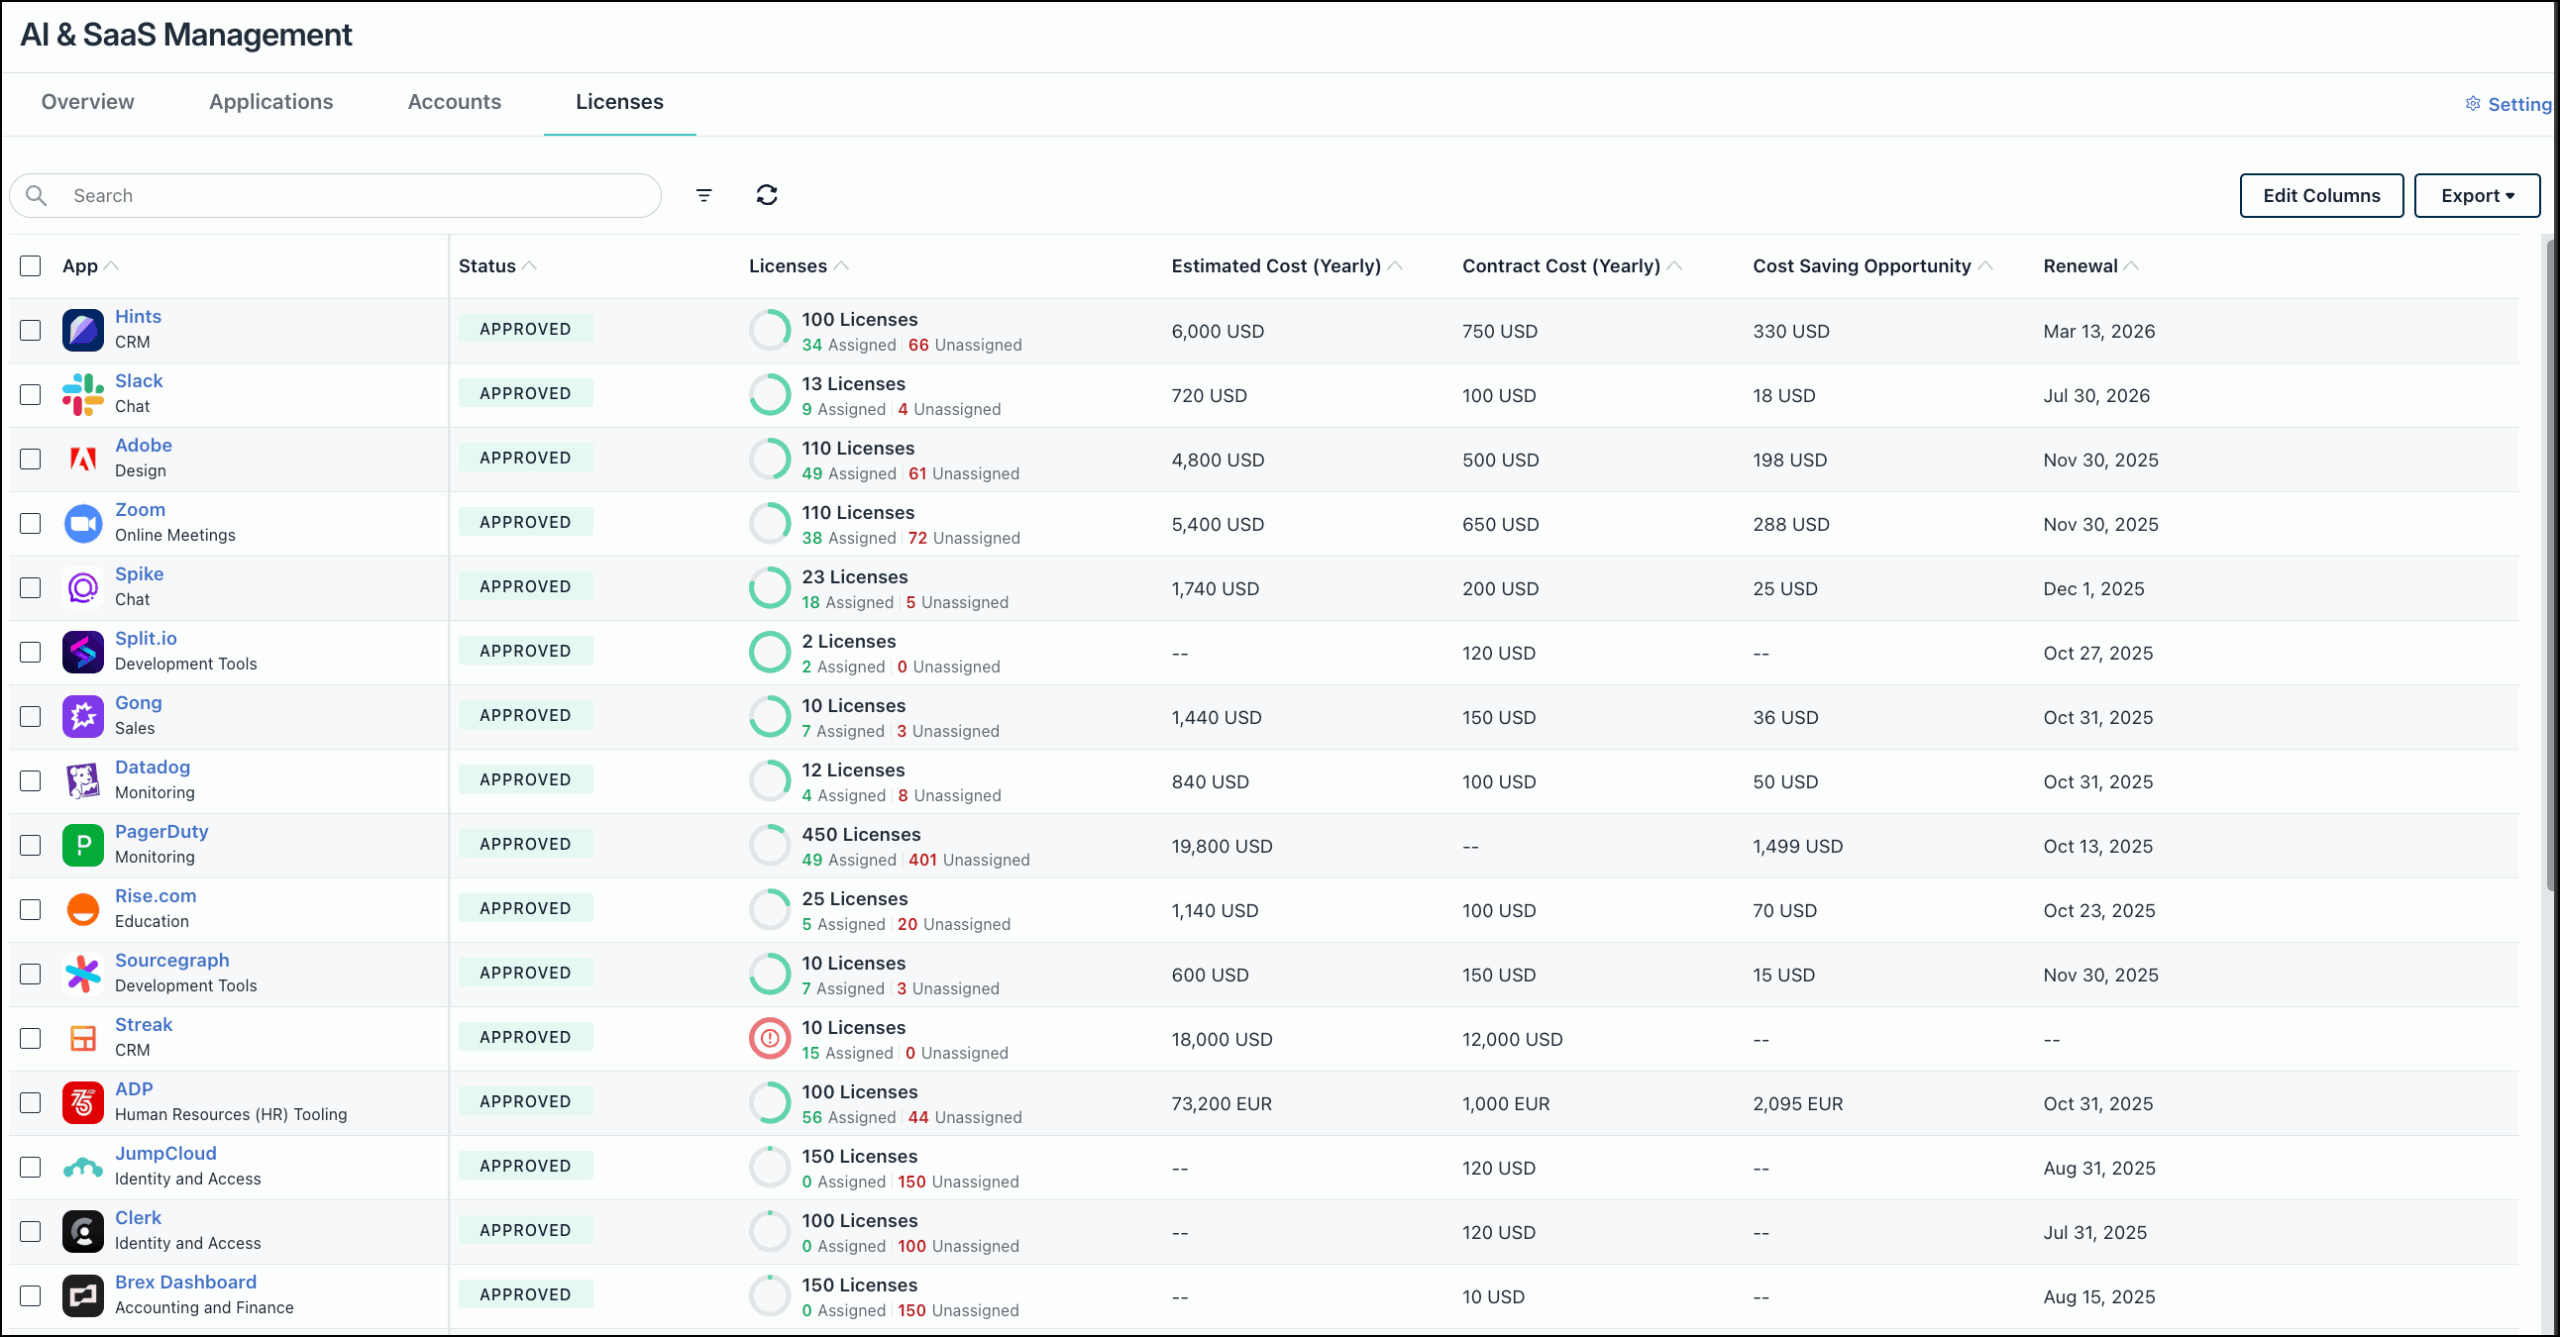
- To see all licenses across all of your applications, go to Access > AI & SaaS Management > Licenses.

- To see licenses for a specific application:
- Go to Access > AI & SaaS Management > Applications.
- Click on an application from the list.
- Go to the Licenses tab.
From the License Overview page, you can:
- View License Insights: Get an overview of your license usage, including the number of Assigned and Unassigned licenses.
- Track Unassigned Licenses: Identify licenses that are not currently assigned to any user. This allows you to Reassign them or adjust your subscription.
- View License Utilization Overview: Get a detailed breakdown of your licenses, including the License Type, Cost, and Renewal Date.

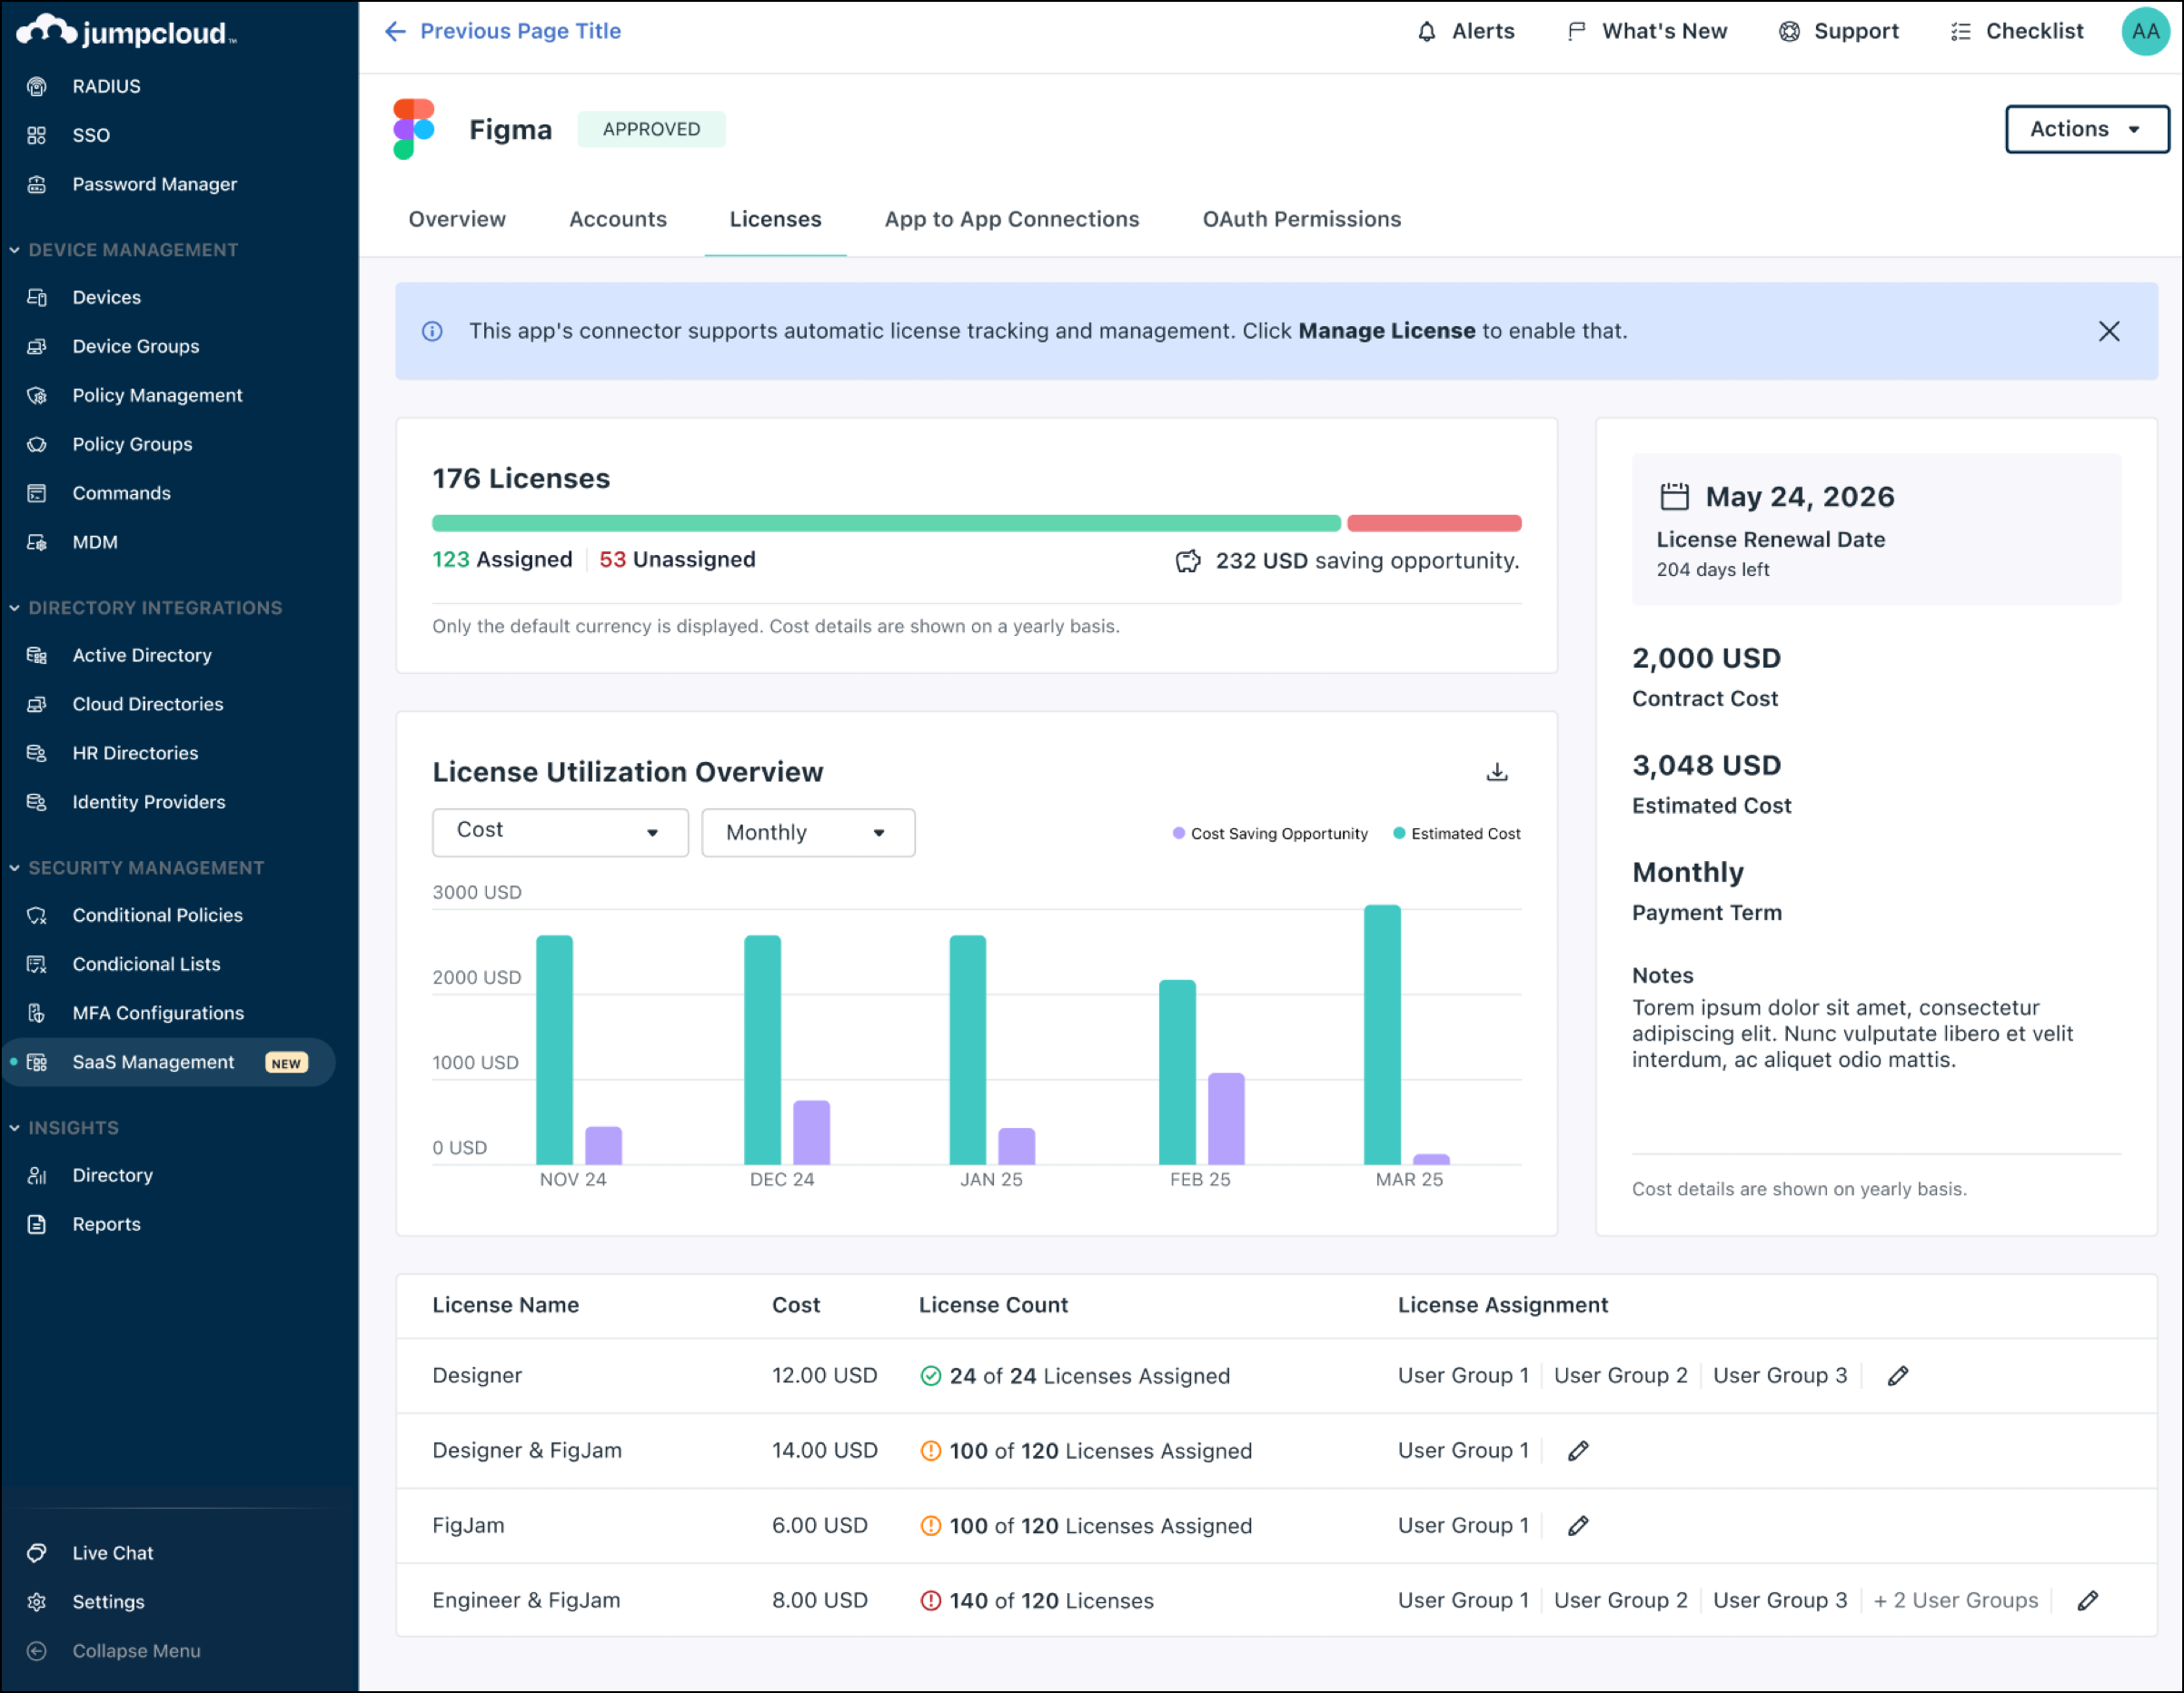
![]()
License management is for tracking and visibility purposes only. Assigning or unassigning a license in JumpCloud will not provision or deprovision the user's access in the SaaS application itself.
Managing Accounts
Accounts Tab
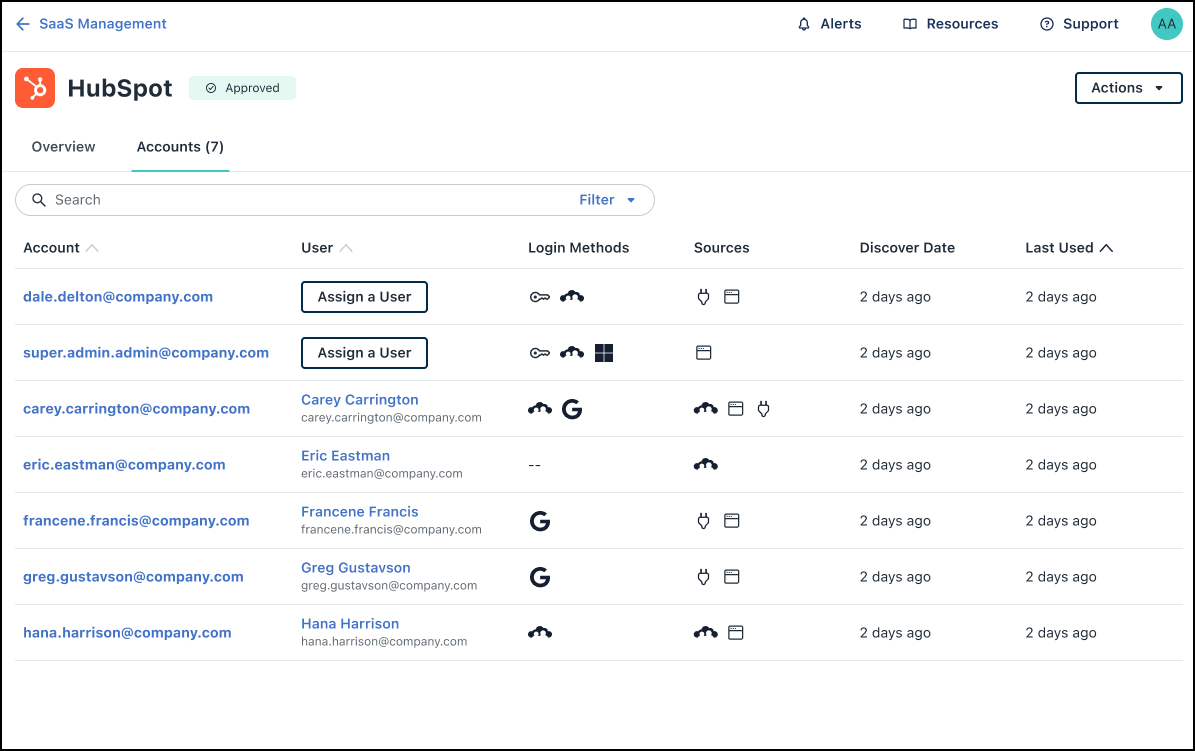
Use the accounts tab to view and manage all discovered accounts in one location. To access it, go to AI & SaaS Management > Accounts tab.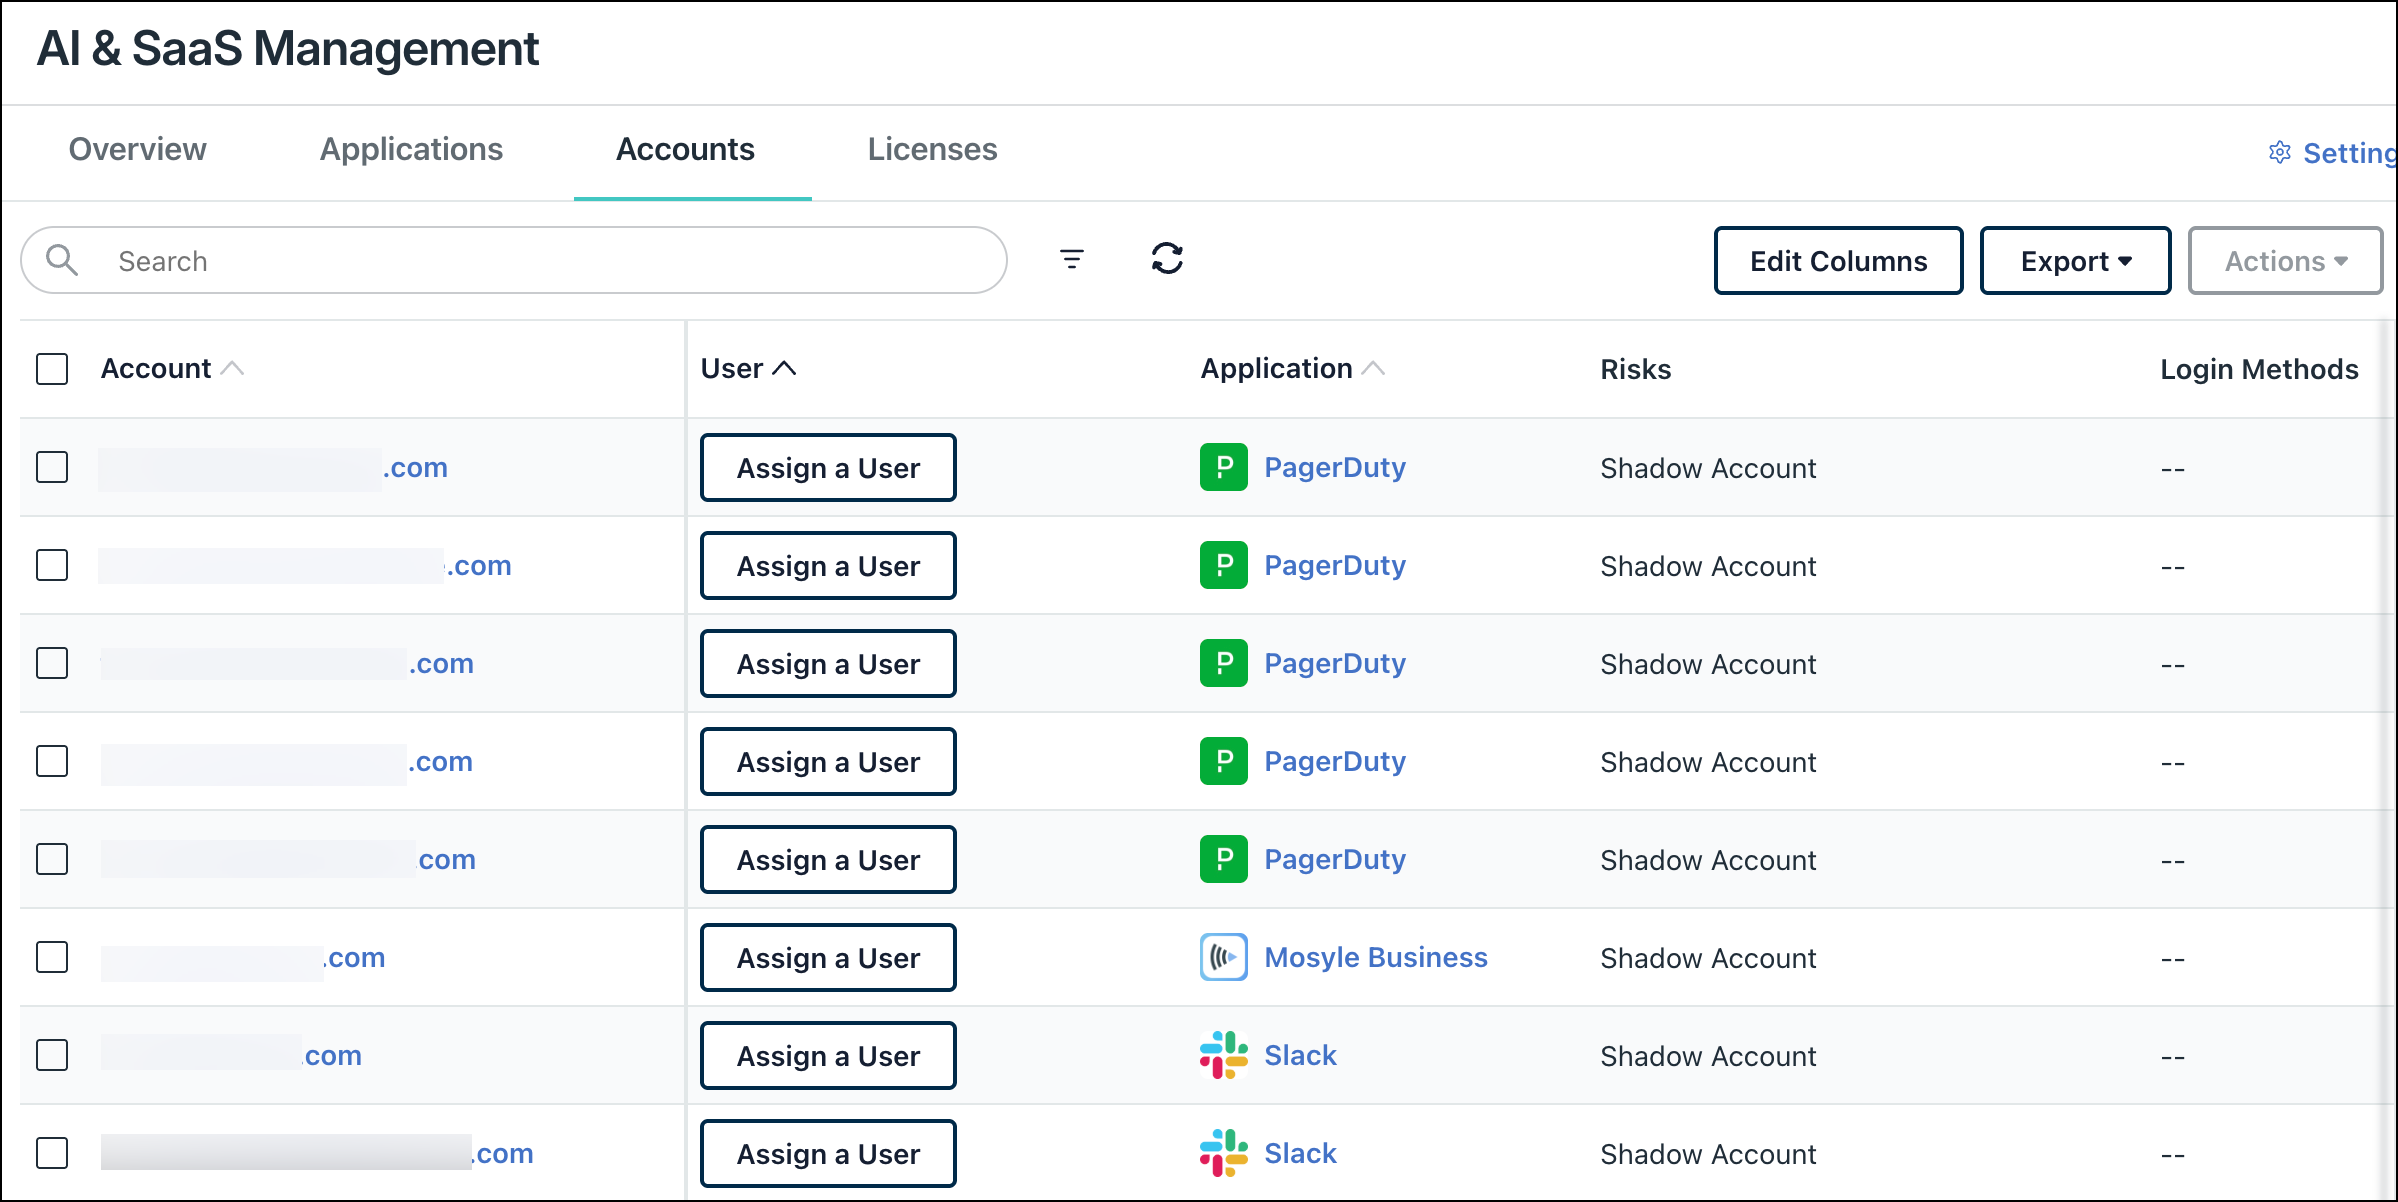
The following displays:
- Account: The account used to access a SaaS app.
- User: The associated JumpCloud user. If a user isn’t automatically assigned, click Assign a User.
- Application: The SaaS app associated with the account.
- Risks: Potential security risks.
- Jump to Security Insights to learn more.
- Login Methods: How the account was accessed (Password, JumpCloud SSO, Google, Microsoft).
- Sources: How the account was discovered (JumpCloud SSO, Browser Extension, Connector).
- Last Used: Date the account was last active.
- Discovery Date: Date the account was first discovered.
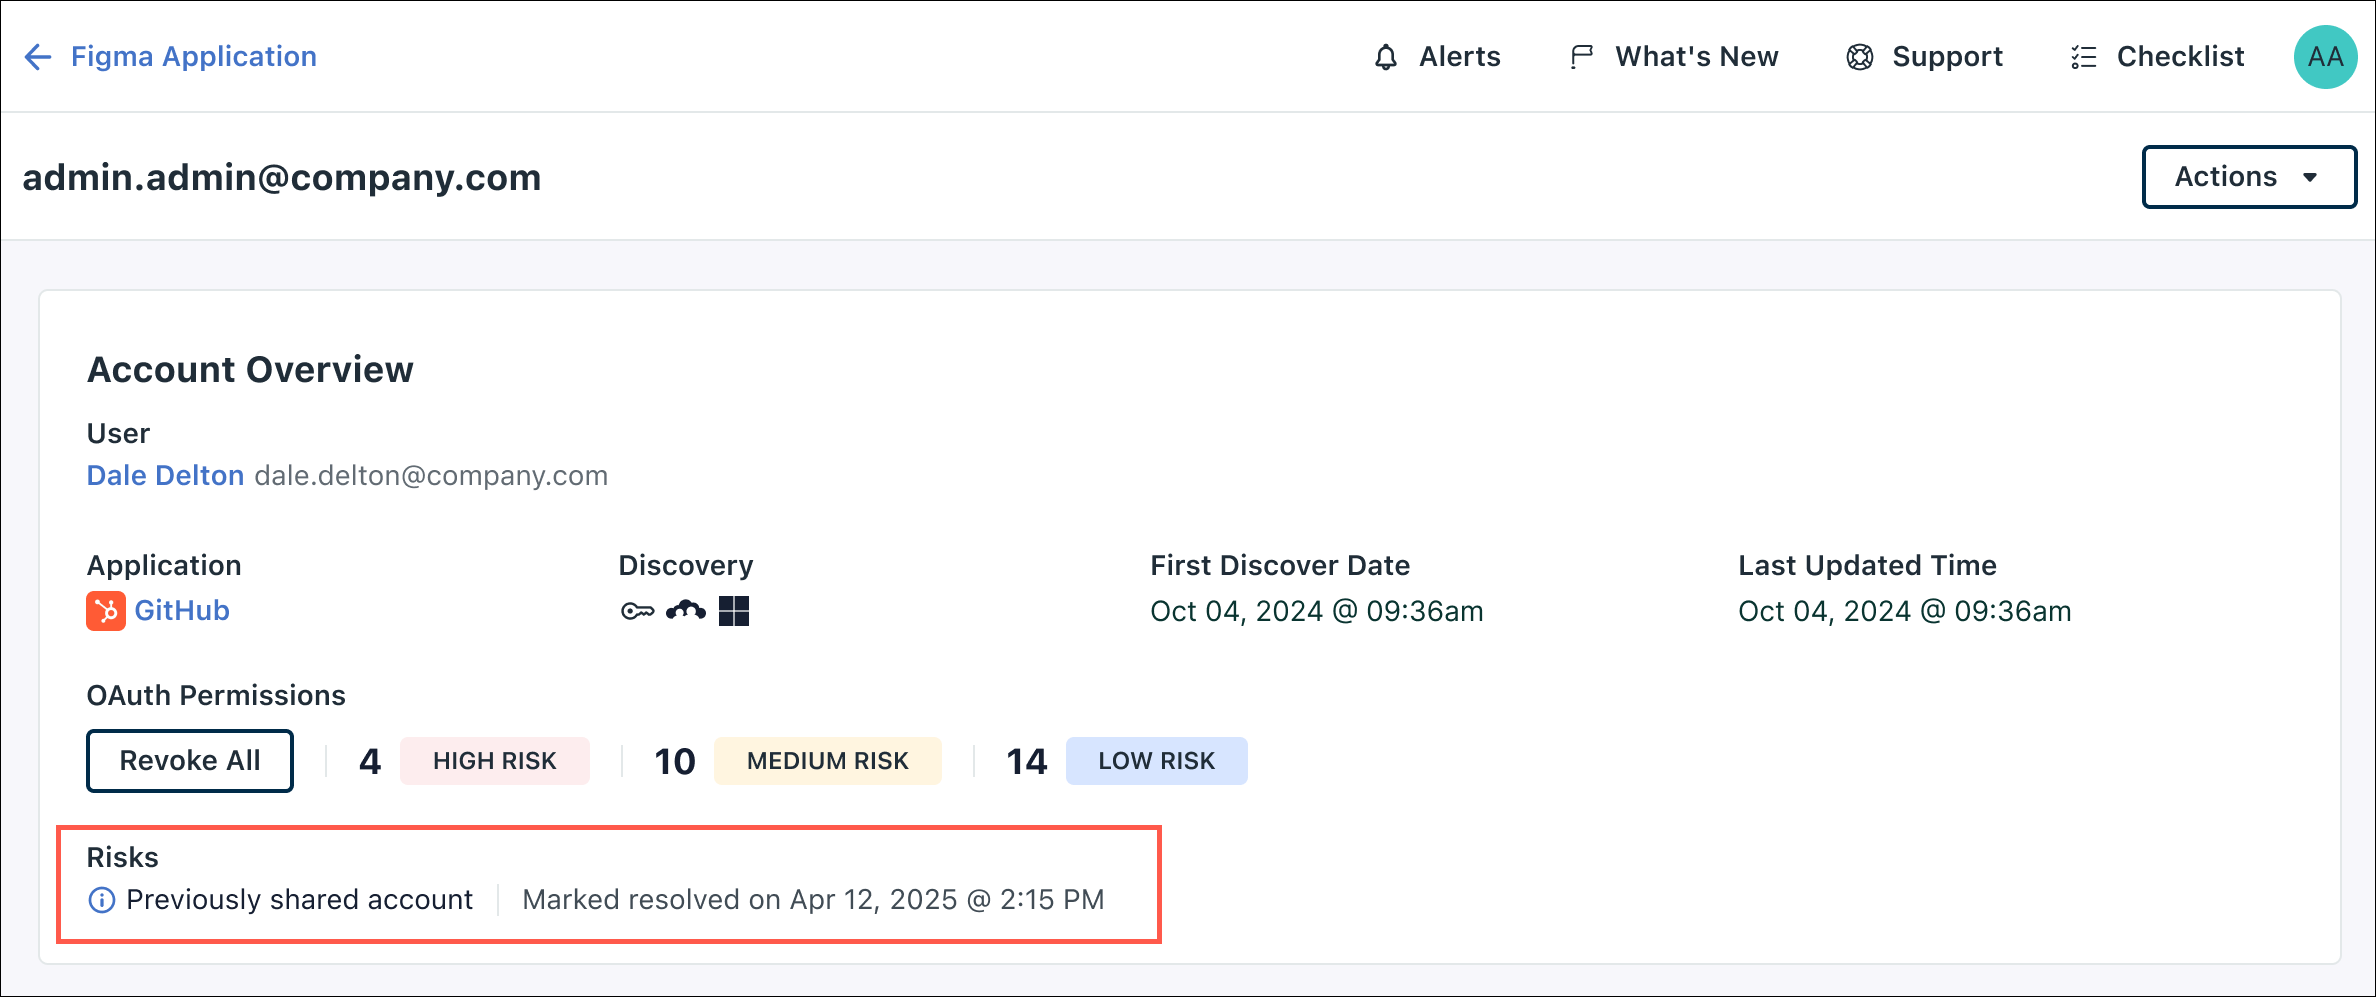
- Actions: Lets you delete the account or mark Former Employee and Shared Account risks as resolved.
- When you mark a risk as resolved, a summary with the action date appears in the Account details.

- When you mark a risk as resolved, a summary with the action date appears in the Account details.
Viewing Account Details
You can view details for individual accounts from the main Accounts tab, or from within an app's Accounts tab.
To view accounts details:
- Go to AI & SaaS Management > Accounts tab, or go to AI & SaaS Management > Applications tab, click the app name, and go to the Accounts tab within the app details.
- In the list, click the account name in the Account column.
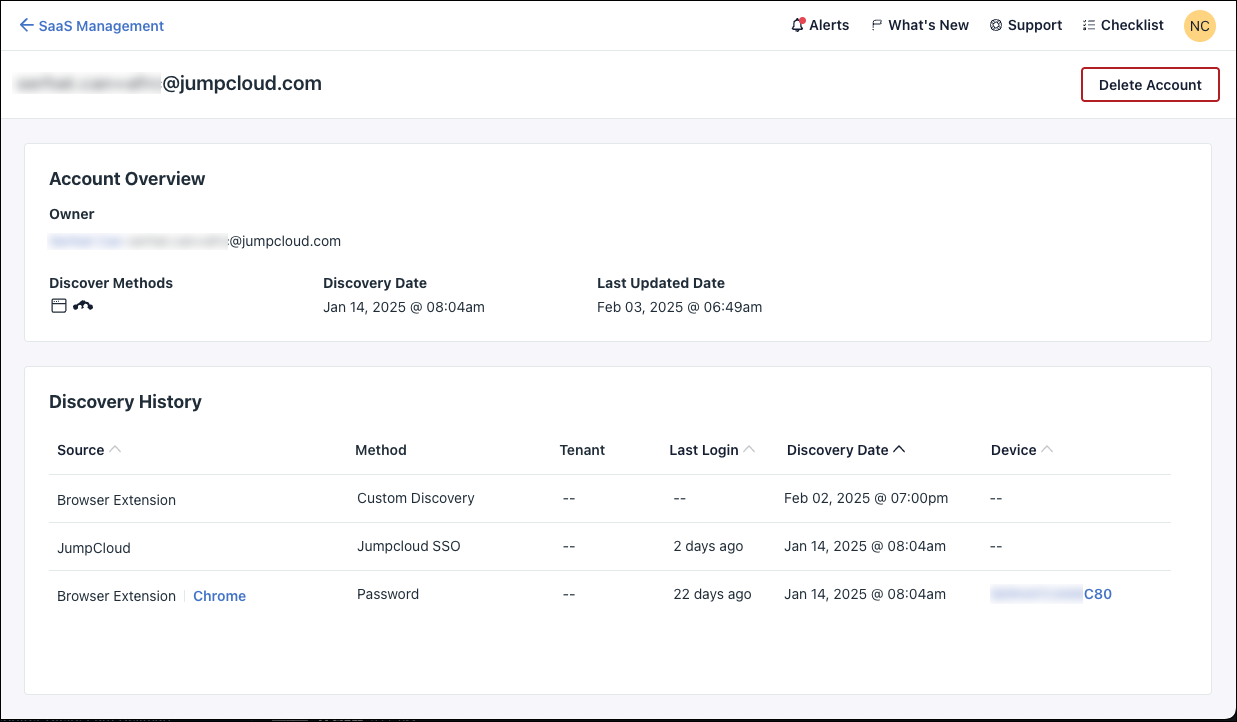
Account details include:
- Account Overview: Owner, Application, Discovery Method and Date, and Last Updated Date.
- OAuth Permissions (Google Workspace Connector required) and Risks.
- Jump to Security Insights to learn more.
- OAuth Permissions (Google Workspace Connector required) and Risks.
- Discovery History: How the account was discovered (Source, Method), the Tenant, Last Login, Discover Date, and Device.
![]()
To collect device information, JumpCloud Go authentication must be enabled for your org.
Viewing AI & SaaS Management User Details
You can manage a user's SaaS apps and accounts directly from their user details page. The SaaS Management card gives you an overview of the user's activity.
To view user details:
- In AI & SaaS Management, go to the Accounts tab.
- Under the Accounts list in the User column, click the associated user's name.
- You're redirected to the Highlights tab of the JumpCloud user object.
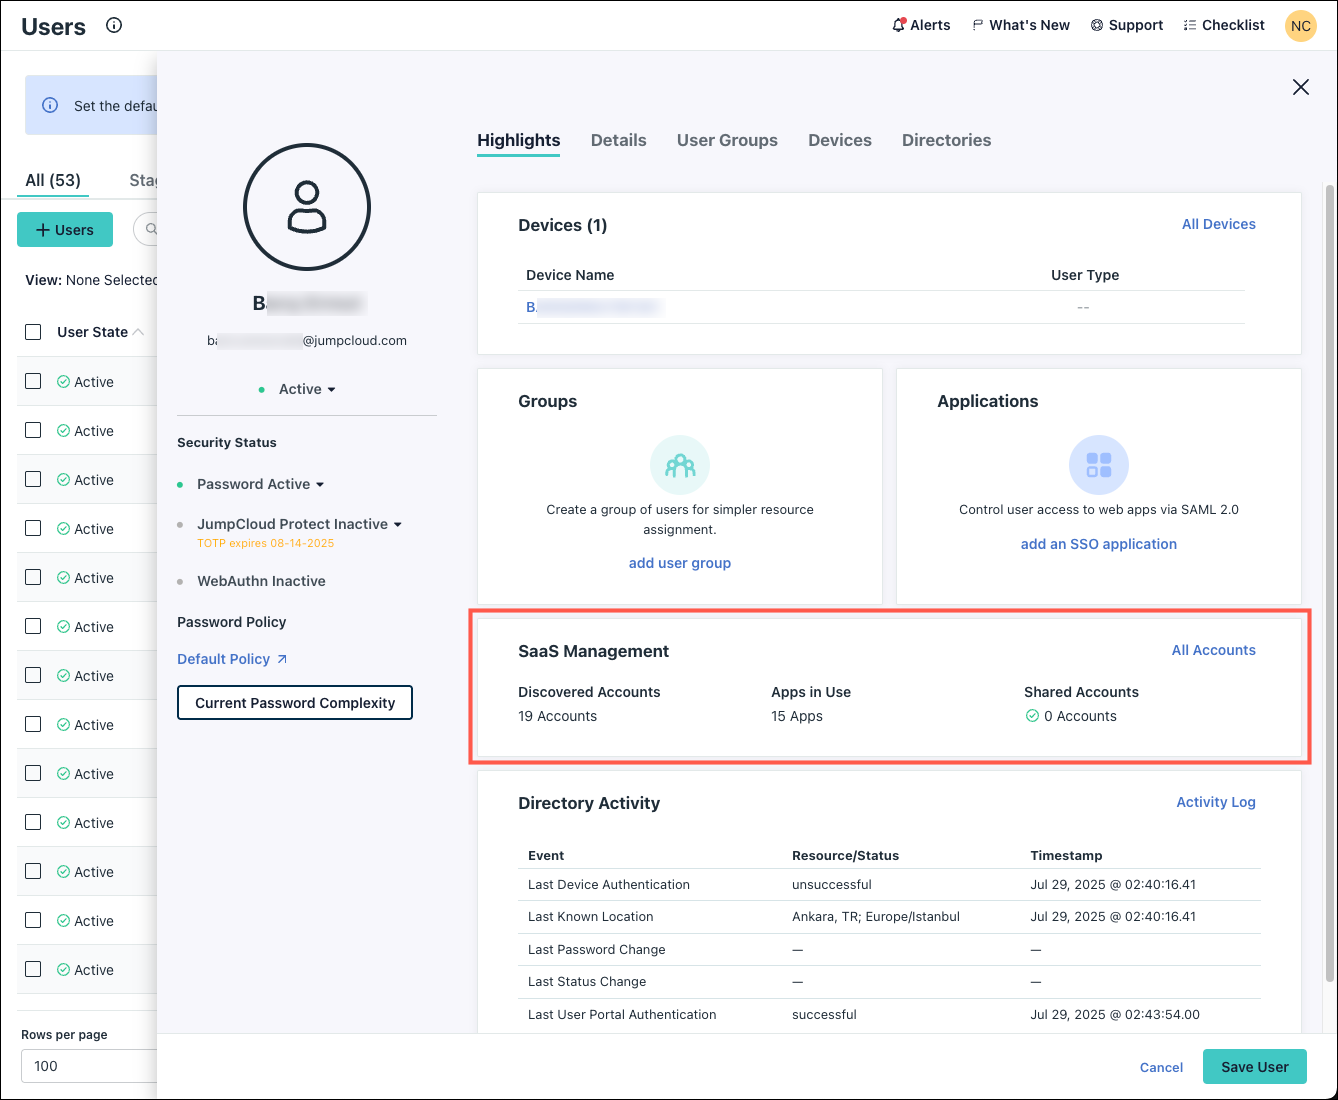
- Under SaaS Management, you'll see the following information:
- Discovered Accounts: The amount of discovered SaaS accounts.
- Apps in Use: The amount of SaaS apps the user has accessed.
- Shared Accounts: Informs you if this user accessed a SaaS app with a shared account.
- Click All Accounts to go back to AI & SaaS Management and see a list of all accounts associated with this user object.

Assigning Users
AI & SaaS Management may discover accounts through connectors that can't be linked to an existing JumpCloud user.
To assign a discovered account to a JumpCloud user:
- You can assign users from multiple areas in AI & SaaS Management:
- From the main Accounts tab, find the account in the list. In the User column, click Assign a User.

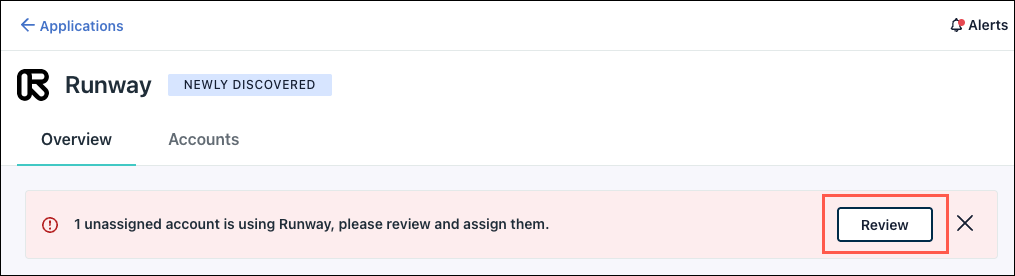
- From the AI & SaaS Management > Applications > Overview tab, if an unassigned accounts warning is present, click Review.

- From the main Accounts tab, find the account in the list. In the User column, click Assign a User.
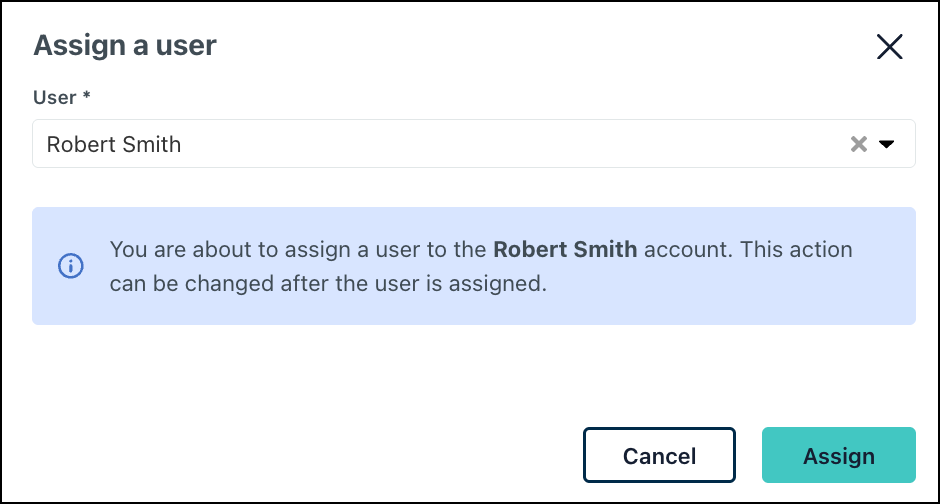
- In the Assign a user modal, search for and select the JumpCloud user. Click Assign.

Using AI & SaaS Management API
The AI & SaaS Management API lets you perform many of the same actions in the Admin Portal programmatically, enabling bulk operation and automation. You can modify applications and accounts, as well as create lists using various filters.
Supported Operations:
- Applications - create, update, list, delete
- Accounts - get, list, and delete
See JumpCloud API documentation to learn more.
Disabling AI & SaaS Management
![]()
When you disable SaaS Management, all data is deleted from the Admin Portal and on user devices. The JumpCloud Go browser extension remains on user devices but stops tracking user activity.
To disable SaaS Management:
- From the JumpCloud Admin Portal, go to Access > AI & SaaS Management > Settings.
- Toggle AI & SaaS Management Enabled to Off.
Additional Resources
- Enroll: AI & SaaS Management Course