
Zero-touch enrollment lets you remotely enroll and deploy new corporate Android devices without the need to handle and configure each device individually. This type of enrollment can save you time when you are deploying a large number of company-owned devices. For more information on Android's zero-touch portal, see Google’s Zero-touch enrollment for IT admins.
![]()
Looking for Zero-Touch Enrollment for macOS? We have that.
Zero-touch enrollment streamlines the procurement and enrollment process of corporate owned devices in four steps:
- Your company purchases supported devices from a designated reseller.
- The reseller sets up your company’s account within the Android zero-touch portal with your purchased devices. The devices are then shipped to your company.
- You create EMM configurations within the zero-touch portal that will apply to the devices.
- Your end users receive their devices, and the automated zero-touch flow ensures automatic enrollment and configuration of the device.
![]()
The zero-touch enrollment process requires completion of all steps for successful zero-touch enrollment. If any parts of the process are skipped, device enrollment will fail.
Prerequisites:
- Check the list of compatible devices at Android Enterprise.
- Android devices must run Android 9.0 or later.
- Pixel devices must run Android 7.0 Nougat or later.
- Devices must be purchased directly from an approved zero-touch reseller.
- To find a reseller, see the Android Enterprise Partners Device Resellers page.
- If your preferred reseller isn’t on the list, you can suggest they join the Android Enterprise Partners Program.
- Devices must support work profiles.
- To deploy Android devices with zero-touch enrollment in the JumpCloud platform, Android EMM must be configured for your enterprise.
- See Set up Android EMM.
Considerations:
- Organizations can only be linked to a single Android zero-touch account at a time. Multiple admins can access the same account only if the owner admin provides access.
- Before deleting your org from the Android zero-touch account, you should unlink your org from the account. If the zero-touch account is still linked to the org and the org is deleted, the zero-touch account becomes unrecoverable, preventing the ability to link that account to a new org.
Configuring Zero-Touch Enrollment
Once you have set up Android EMM, you will see an Android Zero-Touch Enrollment section, which includes a link to launch the Android zero-touch portal. To begin zero-touch enrollment, you will need a zero-touch enrollment token.
To generate a zero-touch enrollment token:
- Log in to the JumpCloud Admin Portal.
![]()
If your data is stored outside of the US, check which login URL you should be using depending on your region. If your organization uses LDAP, RADIUS, or requires firewall allow list configuration, the Fully Qualified Domain Names (FQDNs) will also be region specific. See JumpCloud Data Centers for the URLs, FQDNs, and IP addresses.
- Go to Device Management > MDM and select Google.
- Under Admin Android Configuration, select an enrollment type click Create Enrollment Token.
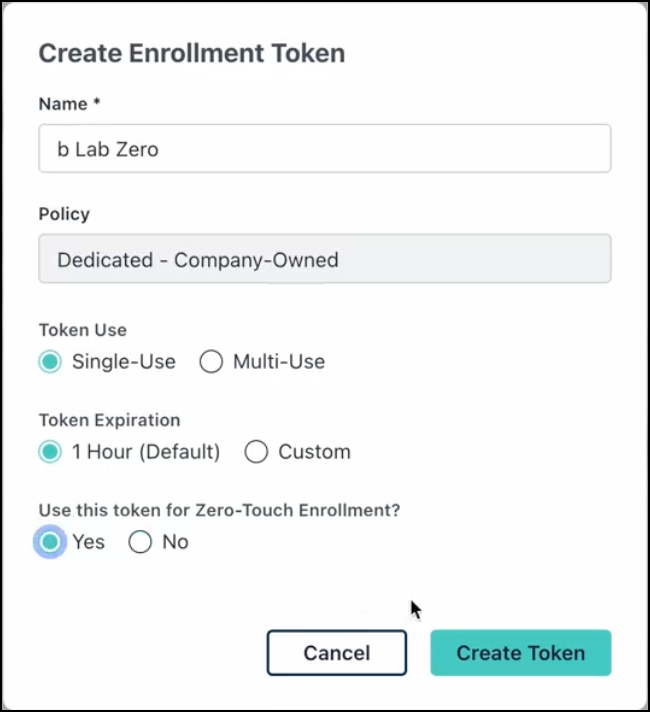
- In the Create Enrollment Token editor, configure the following:

- Name: Assign a name to the token so that it is identifiable to you.
- Policy: Pre-filled based on the enrollment type selected previously.
- Token Use: Choose whether the token will be single-use (individual) or multi-use (batch).
- Token Expiration: Choose the duration for which the token will be valid. The default is 1 Hour. If Custom, configure the following:
- Expires in: Enter a value that represents the length of time the enrollment token will be valid, from 1 to 10,000.
- Duration: Select from Minutes, Hours, Days, or Years.
- Use this token for zero-touch enrollment?: Select Yes.
- Click Create Token.
- Click Copy Zero-Touch Data. Alternatively, click Download Zero-Touch Data to save the data to your device. A success message appears. Continue with the steps below to configure the Android zero-touch portal with your zero-touch enrollment data.


To configure zero-touch enrollment in JumpCloud:
- Under Android Zero-Touch Enrollment, click Launch Zero-Touch Portal to open the zero-touch portal embedded in JumpCloud.
- Under Link your zero-touch account to your EMM provider, click Next.

- Under Choose an account, select the Google account associated to your zero-touch portal in order to link to JumpCloud Android EMM. If your account is not available, click Use another account and enter the account information that was provided to you by your authorized reseller partner.

- Under Choose accounts to link, you should see a list of zero-touch accounts. Select the account you want to link to JumpCloud Android EMM and click Link. Note: A zero-touch account can only be linked to one EMM tenant at a time.

- Once the account is linked, verify that the configuration is using com.google.android.apps.work.clouddpc. Click Next on the Zero-touch account linked page.

- On the Add support info screen, enter your organization's information that will be displayed to your end users during their zero-touch enrollment, and click Save.

- Click View devices in the zero-touch portal to open your Android zero-touch account in Google. Leave this tab open, as you will be entering your configuration from JumpCloud here.


Creating a Device Configuration
Now that zero-touch is configured in JumpCloud, create a device configuration in the Android zero-touch portal to assign to your zero-touch devices.
To create a zero-touch device configuration:
- In the zero-touch portal Configurations tab, click + to add a new configuration.

- In the Add a new configuration modal, enter the details for your configuration:

- Configuration name: Enter a short, descriptive name that describes the configuration's purpose and is easy to find in a menu. For example, "Sales team" or "Temporary employees".
- EMM DPC (device policy controller): Select Android Device Policy.
- DPC extras: Set your organization's EMM policy data that's passed to the DPC. Paste Zero-Touch Enrollment Data you generated and copied from the Admin Portal above.
- The configuration will force enroll the device(s) into a specific management mode (the enrollment type you configured earlier).
- DPC extras are not customizable at this time.
- DPC extras pasted from the JumpCloud Admin Portal contain a unique enrollment token with an expiration date set by you.
- Company name: Enter the name of your organization. This company name is displayed to end users during device provisioning.
- Support email address: Enter an email address that users can contact to get help, such as your internal support email address. This email address is shown to users before device provisioning. Users can't click the email address to send a message, so choose a short email address they can easily enter on another device.
- Support phone number: Enter a phone number users can call from another device to get help, such as the phone number of your IT support team. This number is shown to users before device provisioning. Use the plus sign, hyphens, and parentheses to format the telephone number into a pattern that users recognize.
- (Optional) Custom message: Enter 1–2 sentences to help users contact support or give them more details about what’s happening to their device. This message is shown before the device is provisioned.
- Click Add.
- (Optional) In the Default configuration section, select the configuration you just added and click Apply. This default configuration will be applied to any new devices added to your account by your reseller.


Managing Device Configurations
Applying a Configuration to a Single Device
When you apply a configuration to a device, the device automatically provisions itself on first boot or next factory reset. You can apply configurations manually or in bulk.
To apply a single device configuration:
- In the zero-touch portal, click the Devices tab.
- Find the device you want to apply the configuration to using its IMEI or serial number.
- Under Configuration, choose the configuration you want to apply.

- Click Update.
- The configuration will only apply on first boot of the device or when the device is factory reset.

![]()
Selecting No config removes the device from zero-touch enrollment. You will not be able to re-enroll the device without contacting your reseller.
Applying a Configuration to Multiple Devices
To apply a configuration to many devices at once, you can upload a CSV file that lists the configuration ID and hardware identifiers for each device. First, download the CSV template from the zero-touch portal to get started. For details, see Device configuration CSV file format.
![]()
- The CSV file has a size limit of 50 MB. If your file is larger, you will need to split the file into multiple uploads.
- A dual-SIM device includes 2 modems and has 2 IMEI or MEID numbers. To provision a dual-SIM device, use the first hardware ID. Zero-touch enrollment identifies devices by modem 1. If you provision a dual-SIM device using another IMEI or MEID number, the portal shows a new, separate device that zero-touch enrollment doesn't recognize or provision.
To download a template and upload a completed CSV file:
- In the zero-touch portal, click the Devices tab.
- Next to Devices, click the three dots. A menu opens.

- Click Upload batch configurations.
- (Optional) In the Upload batch configurations modal, click Download example CSV to download an example file.
- Click Upload and browse to your completed CSV file.
- Click Upload.

After processing, the portal shows a notification with a link to an upload status page. You also receive an email summary. In the email, click See details to open the status page. Any device that was not assigned to a configuration is listed with a reason for the error.
Editing a Configuration
![]()
To reapply a configuration to a device, the device will need to be factory reset. New devices will automatically provision on the first boot.
To edit a configuration:
- In the zero-touch portal, click the Configurations tab.
- Select the configuration you want to edit.
- When you are finished with your desired edits, click ADD.
Deleting a Configuration
To delete a configuration, the configuration must be removed from all devices where it has been assigned. You will not be able to delete the configuration profile until you have removed the profile assignment from the device.
To delete a configuration:
- In the zero-touch portal, click the Devices tab.
- Find a device where the configuration is applied. Under Configuration, select No config.
- In Update this device?, select UPDATE.
- Repeat the previous steps for each device where the configuration is applied.
- When the configuration is no longer assigned to any devices:
- In the Zero-Touch Portal, click the Configurations tab.
- Select EDIT next to the configuration you want to delete.
- Within the configuration pane, select DELETE.
Managing Devices
Deregistering a Device
![]()
This is an atypical workflow. You will not be able to re-enroll devices after deregistration without contacting your reseller. Proceed with caution.
To transfer ownership of a device, you need to deregister the device in the zero-touch enrollment portal. To register a device into zero-touch enrollment again after you deregister it, you must contact your reseller.
To deregister a device:
- In the zero-touch portal, click the Devices tab.
- Locate the device you want to deregister using its IMEI or serial number.
- Click Deregister > Deregister.
Temporarily Excluding a Device from Zero-Touch Enrollment
To prevent a device from enrolling automatically on startup, remove the zero-touch configuration in the zero-touch portal. This might be desirable if you want to keep a device separate for testing, for example.
To exclude a device:
- In the zero-touch portal, click the Devices tab.
- Locate the device you want to deregister using its IMEI or serial number.
- Under Configuration, select No config.
Enrolling Devices (End Users)
Your device is pre-registered for zero-touch enrollment by your IT Admin. When you first turn on the device, follow the on-screen instructions to set it up. Once setup is complete, the device is managed by your organization.
- Turn on the device.
- Follow the on-screen instructions until the screen prompts you to transfer your old data to the device (e.g. Bring your old data for quicker setup or similar).
- Select Skip this for now.
- Click Next.
- Continue following the on-screen instructions to set up the device.
![]()
For more information, see Google's Android Enterprise Help - Zero-touch enrollment for users.
Example Setup Workflow
![]()
This is a high-level walkthrough of the setup workflow you might experience using a Google Pixel device as an example. Your users' experience may vary depending on the device.
- Turn on the device. On the Welcome screen, tap Get started.
- Select a network to connect your device to WiFi and enter your network credentials.
- Your device will cycle through several loading screens, including:
- Getting your phone ready...
- Checking network info...
- Checking info....
- On the This device belongs to your organization screen, click Next.
- Getting ready for work setup....
- On the Let's set up your work device screen, click Accept & continue .
- Your device will cycle through more loading screens, including:
- Keep your work apps at your fingertips -
- (Privacy notice - This Pixel isn't private) Click Next.
- (Google services) - Click Accept.
- (Warranty information) - Click Next.
- Your device will cycle through several loading screens, including:
- Updating device...
- Checking code...
- Registering device...
Troubleshooting
Cause: The enrollment token entered into DPC extras field of the zero-touch portal has expired.
Resolution:
- In the JumpCloud Admin Portal, go to Device Management > MDM > Google > Admin Android Configuration.
- Select an enrollment type and click Create Enrollment Token to generate an updated enrollment token.
- Configure the enrollment token using the steps outlined above and click Create Token.
- Click Copy Zero-Touch Data. Your enrollment data is copied to the clipboard.
- Under Android Zero-Touch Enrollment, click Launch the Zero-Touch Portal.
- Navigate to Configurations.
- Select your device configuration and paste the new enrollment token you copied above into the DPC extras field and save.
- Reboot the affected Android device to enroll it using the updated token.