
Connect


Contents
Sudo is a command-line utility that allows you to temporarily grant administrative privileges to a regular user in order to run some (or all) commands as the root user. In the past, sudo stood for “super user do” but things have since changed and, according to its website, it is now shortened as su “do.”
In this guide, we will look at how to create a sudo user on Fedora in order to gain elevated privileges to run root-level commands.
sudo vs. su – What’s the Difference?
In Linux, there are two ways of running administrative tasks. You can decide to switch to the root user account, also known as superuser, or switch to a sudo user. The root user is the most privileged user and can virtually run any command on the system. To switch to the root user, simply run ‘su’ and provide the root account’s password.
The risk with administering a Linux system as root is that the root user can inadvertently run a dangerous command which can lead to a system crash or an unusable system. To avoid such a scenario, it is always recommended to run administrative tasks as a sudo user.
A sudo user is essentially a standard regular user with root privileges. The ‘sudo’ command is prepended to a command to allow the user to temporarily acquire and run administrative tasks as the root user. This differs from ‘su’ because the root is not prompted for a password when running tasks. With ‘su’ you are actually logged in as root and have permanent privileges. With ‘sudo’ the root privilege is only valid for a specific time whereupon expiration, you will be required to type your password again to get back root privileges.
Let’s see how you can create a sudo user in Fedora.
Step 1: Create a Regular Standard User
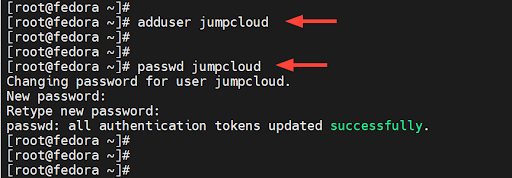
The first order of business is to create a standard login user. So, right off the bat, log into your server and run the `adduser` command with the username as the command-line argument. Here, we are creating a login user called ‘jumpcloud’.
# adduser jumpcloud
Next, assign a password to the user using the `passwd` command as shown. Be sure to provide a strong password and confirm it.
# passwd jumpcloud
In the end, you’ll get a confirmation indicating that the operation was successful.
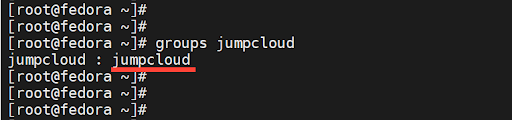
By default, once a user is created, they are placed in a primary group named after the username. In this case, the user jumpcloud is placed in a group called jumpcloud. To confirm this, run the groups command.
# groups jumpcloud
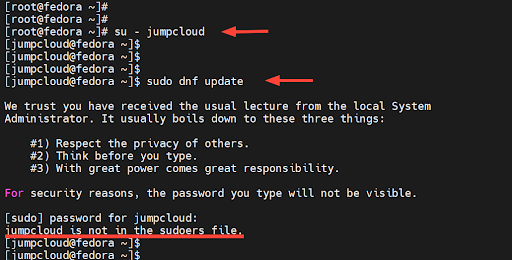
Now we are going to check if the regular user we just created can run commands with elevated privileges. To verify this, we will switch to the user.
# su – jumpcloud
Next, we will try to upgrade system packages to their latest versions.
$ sudo dnf update
Upon providing the password, you will get a notification that the user is not in the sudoers file. This implies that the user does not have elevated privileges to run administrative or root commands.
The next step is to grant sudo privileges to the user. Note that there should be a limited set of privileges granted and no alias commands allowed.
Step 2: Add the Regular User to the Sudoers Group
To grant sudo privileges to the user, we will add the user to a secondary group called wheel. This is a special user group in Arch and Red Hat-based systems that provides administrative access to a regular user in order to masquerade as the root user.
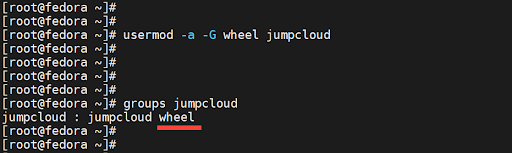
To add the user to the group, run the usermod command as shown.
# usermod -aG wheel jumpcloud
Or
# usermod -a -G wheel jumpcloud
The -a option appends the user to the group, while the -G option specifies the group, in this case, wheel. Now run the command to confirm that the user is now a member of the group.
# groups jumpcloud
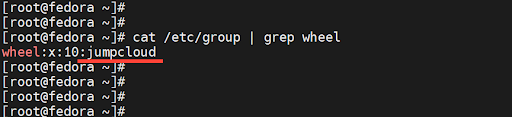
In addition, you can view the user accounts that belong to the wheel group as follows.
# cat /etc/group | grep wheel
Step 3: Test the Sudo User
It’s now time to put our sudo user to the test and verify its ability to run administrative privileges which are a preserve of the root user.
So, let’s now switch to the user.
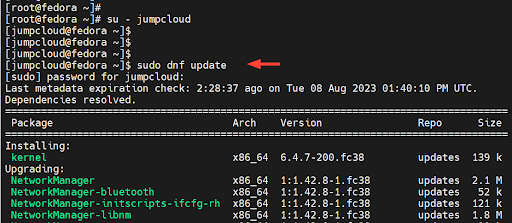
# su – jumpcloud
Once again, we will attempt to upgrade all the packages to their latest versions as shown.
$ sudo dnf update
This time around, the command executes without any issues. This is confirmation that we have successfully added the user to the sudo group and can execute elevated privileges.
Step 4: How to Remove a Sudo User (Optional)
If you no longer need a sudo user on your server, you can easily remove them using the gpasswd command-line utility. This is a tool for managing entries in the /etc/shadow and /etc/groups files.
To remove a sudo user, invoke the gpasswd utility as shown to remove the user from the “wheel” group.
$ gpasswd -d jumpcloud wheel
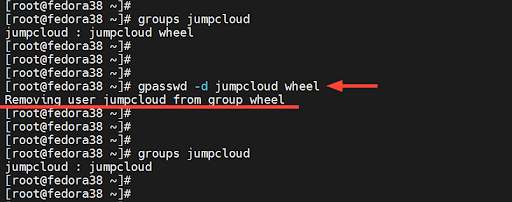
From the removal of the user from the “wheel” group, the user regains its initial primary group which is the default group that the user belongs to during creation.
Conclusion
In this tutorial, you have learned how to create a sudo user in Fedora and run elevated tasks which are a preserve of the root user. As you have observed, creating a sudo user is a simple procedure that takes only a few steps. If you’d like to learn how to create sudo users on other distros, check out one of the following tutorials: