Connect


Contents
A sudo user, or, superuser doer, is a user account in Linux-based operating systems that can execute commands with elevated administrator-level privileges.
By default, root users have full control and unrestricted access to all system resources. For anyone other than a high-level IT admin, however, this level of unrestricted access can pose significant security risks. Any accidental or malicious command executed by the root user can have drastic system-wide consequences, like data corruption, security breaches, or even deleting the whole system.
To mitigate these risks, sudo user accounts were created to provide more granular control over access and actions users are able to perform.
Benefits of Sudo User Accounts
Sudo user accounts are helpful for several reasons.
- Enhanced security: With a sudo user, you can limit administrative access to specific tasks or commands, reducing the risk of accidental system damage or unauthorized actions.
- Compliance: Many security best practices and regulatory requirements recommend using sudo users as a means to enforce the principle of least privilege and maintain a secure system environment.
- Accountability: By using a sudo user, you can track and log the commands executed with elevated privileges. This helps in identifying any malicious activities and ensures accountability for system actions.
- Collaboration: Sudo users allow multiple administrators or users to perform administrative tasks without sharing the root password. This promotes collaborative work and facilitates system management in a team environment.
- Granular access control: Sudo allows you to grant different levels of privileges to different users or user groups, providing fine-grained control over system resources. This enables administrators to delegate specific tasks without granting full root access.
Today, you’ll learn how to create sudo users on Rocky Linux. For this tutorial, we are using Rocky Linux 9, but this process works equally the same way on Rocky Linux 8.
About the Rocky Linux Distribution
Rocky Linux is an open-source Linux distribution designed to serve as a reliable and stable alternative to CentOS. It was created in response to the shift in CentOS’s direction, providing a seamless transition for users who relied on CentOS for their server infrastructure. Rocky Linux aims to deliver a free, enterprise-grade operating system that offers long-term support and compatibility with a wide range of applications.
One of the key features of Rocky Linux lies in its commitment to stability and reliability. It is built on a solid foundation, combining the proven technology of Red Hat Enterprise Linux (RHEL) and CentOS. This ensures that Rocky Linux uses the robust security features of RHEL while maintaining binary compatibility with CentOS packages. Rocky Linux also provides long-term support with regular updates and security patches.
Rocky Linux is a reliable, stable, and community-driven distribution. Its strengths lie in its commitment to stability, long-term support, compatibility, and the active involvement of its dedicated community. Whether you’re a system administrator, a beginner who just started learning Linux, or an enterprise user, Rocky Linux offers a platform that combines the best aspects of RHEL and CentOS, ensuring a seamless transition and a dependable operating system for your infrastructure needs.
How to Create Sudo Users for Rocky Linux
Without further ado, let’s get right into the steps you need to take to create sudo users for the Rocky Linux distribution.
Step 1: Log in to your Rocky Linux server
Ensure that you have a terminal or SSH client installed on your local machine. If you’re using Linux or macOS, you can use the built-in terminal application. For Windows users, popular options include PuTTY and Windows PowerShell with SSH.
Open the terminal or SSH client on your local machine and obtain the IP address or hostname of the Rocky Linux server you want to connect to.
In the terminal or SSH client, initiate the SSH connection by using the following command:
ssh username@server_ip_address
If it’s your first time connecting to the server, you may see a security warning about the authenticity of the host. Verify that the displayed fingerprint matches the expected fingerprint, and then proceed by typing ‘yes’ when prompted.

Next, you will be prompted to enter your password. Type in your password carefully, as you won’t see any characters being entered on the screen. Press ‘Enter’ after entering the password.
If the provided username and password are correct, you will be logged in to the Rocky Linux server via SSH, and the command prompt will change to reflect your remote connection.

Step 2: Create a new user
Run the following command in order to create a new user:
adduser jumpcloud
This command will create a home directory and assign a default shell and configuration files.
Next, make sure that you create a complex password for your newly created user. Do this by running the following prompt:
passwd jumpcloud
After that, make sure your user exists and has its own group by run the id command:
id jumpcloud
There you will see a similar output:

Step 3: Assign sudo permissions to the user
Now, you’ll elevate the permissions of the jumpcloud user so they can execute sudo commands.
Type the following command:
sudo usermod -aG wheel jumpcloud
Let’s break down the parts of this command.
- usermod is a command in Linux used to modify user account attributes. In this case, it’s modifying the attributes of the user specified in the command.
- -aG wheel are options for the usermod command.
- -a stands for “append.” It instructs the usermod command to append the specified user to the existing groups without removing them from any other groups.
- -G wheel specifies the group to which the user should be added. In this case, it adds the “jumpcloud” user to the “wheel” group.
Now, if you again run the id command, you’ll see that your user is in the ‘wheel’ group. In Linux systems, the ‘wheel’ group is typically used to grant higher permissions to certain users who are allowed to run commands with elevated privileges using the ‘sudo’ command.
id jumpcloud

This will now give you the ability to run commands as sudo.
Step 4: Test the sudo access
Now, test your sudo user. First, switch to your user by running the following command:
su – jumpcloud
If you try to execute a command that requires higher administrative access without sudo access, you will get the error that the operation is not permitted.
yum update

Now, try running it with the sudo command:
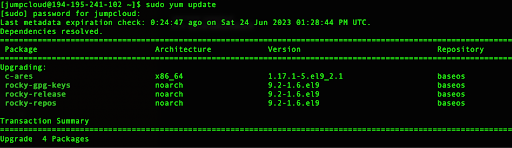
sudo yum update
The terminal prompt will ask for the password. After entering it and pressing ‘Enter’, You’ll be able to run the update process.
Step 5: Set up logging for all sudo commands
Enabling command logging for sudo users is a good security measure, as it helps in auditing and accountability, allowing you to track user actions and identify potential security issues or misuse of privileges. To log all commands performed by a sudo user in Rocky Linux, you can enable sudo command logging.
This can be done by editing the sudoers file. This file is the main configuration for the sudo command in Linux. It defines the rules and permissions for executing commands with elevated privileges using sudo.
First, log in to your Rocky Linux system as a root or sudo user. Then, change to the /var/log directory, then create a directory under /var/log/sudo:
cd /var/log
sudo mkdir sudo
Set the appropriate permissions on the log directory to ensure that sudo users can write to it:
sudo chmod 750 /var/log/sudo
Make sure that the sudo directory belongs to the root user and group:
sudo chown root:root /var/log/sudo
Next, open the sudoers file using a text editor. In Rocky Linux, it is recommended to use the visudo command, which provides syntax checking and prevents potential errors.
sudo visudo
Locate the line that starts with Defaults env_reset. This line specifies the default settings for sudo.

Press “i” to enter edit mode in Vi editor.
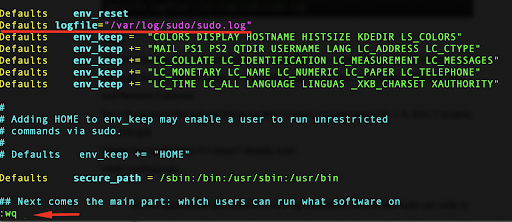
Add the following line below Defaults env_reset to enable command logging:
Defaults logfile=”/var/log/sudo/sudo.log”
Press ‘Esc’ and type wq so we can write the changes and exit the file. Then, press ‘Enter’ to exit.
From now on, all commands executed by sudo users will be logged to the specified file. You can examine the logs by checking the contents of the /var/log/sudo/sudo.log file using a text editor or the cat command.
Now with our jumpcloud user, let’s run a couple of commands that require sudo access:
sudo yum update
sudo iotop
Press ‘Ctrl + C’ to exit the iotop process
You can now check the log file, to see the commands executed by that sudo user:
sudo cat /var/log/sudo/sudo.log
You can see the output and the recorded commands for the sudo users.

In the output, you’ll see information about the user that performed the action and the exact timestamp of the action, which is very valuable for audit logs.
Improve Rocky Linux Security with JumpCloud
In this article, we’ve shown you how to create sudo users in Rocky Linux, to grant privileged access to specific users as necessary without putting your root system at risk. But while sudo users are important for good security, they aren’t the only feature that can improve the safety of your Rocky Linux system. Other measures, like enabling Full Disk Encryption (FDE) further increase security. Learn more about the benefits of FDE here.