
Connect


Contents
On Linux servers, allowing direct root access increases the risk of accidental or unauthorized changes that can harm your system. Instead, admins can create accounts for users that only have the access they need to perform their tasks – and no more (a principle known as least privilege). These accounts are known as sudo users.
What is a Sudo User?
The term sudo stands for “superuser do,” and it is a command that gives users the ability to perform system-level tasks without compromising the security of the entire system. Sudo privileges are often necessary for performing administrative tasks like managing and troubleshooting system configuration, installing software, and editing system files.
Sudo users are typically granted the ability to run specific commands or perform certain administrative tasks by modifying the sudoers file, which is a configuration file that defines the permissions and privileges associated with sudo. This allows system administrators to delegate certain administrative tasks to trusted users without giving them full root access, which can help enhance security and restrict unauthorized actions.
When a user with sudo privileges wants to perform a command with elevated privileges, they simply need to prepend the command with “sudo” and enter their password to authenticate. Once authenticated, the command is executed with the privileges of the superuser or root.
Using sudo helps maintain a separation of regular user privileges and administrative privileges, reducing the risk of accidental system changes or unauthorized actions.
Benefits of Sudo Users
Sudo users offer a flexible and secure approach to system administration, granting necessary privileges to trusted users while maintaining control and mitigating potential risks associated with unrestricted access to administrative functions. A few of sudo’s main strengths include:
- Enhanced Security: Restricts privileges to only trusted users
- Access Control: Admins can specify which commands or actions sudo users are allowed to perform
- Accountability: Sudo user actions are logged, including the specific command executed, leaving a good audit trail
- Flexibility: Allows users to perform administrative tasks without having to switch to the root or superuser account permanently
Today we will focus on creating sudo users when using Amazon Linux.
How to Create Amazon Linux Sudo Users
Amazon Linux is a popular choice when it comes to Amazon Web Services (AWS) environments because of its security and stability. Built on the CentOS and Fedora distributions, this distro option also provides regular patches and maintenance updates, keeping the system up-to-date and secure at all times.
Step 1: Log in to your Amazon Linux server
In this step, make sure that you have the right access to your Amazon Linux instance. When you create your instance, AWS recommends you use your SSH key when logging in.
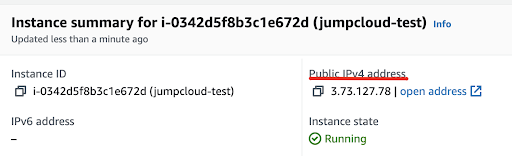
Log into your AWS console, select ‘EC2’ > ‘Instances.’ Then click on the ’Connect’ button.

Next, select the SSH client section:

Use your favorite terminal software and run the following command while replacing your own values for the name of the .pem key and also for the instance:
ssh -i “jumpcloud-key-pair.pem” ec2-user@ec2-3-73-127-78.eu-central-1.compute.amazonaws.com
You can also log in by selecting your instance and public IP address:
In that case, the command would be:
ssh -i “jumpcloud-key-pair.pem” ec2-user@3.73.127.78
Once logged in, you will see the Amazon Linux welcome screen.
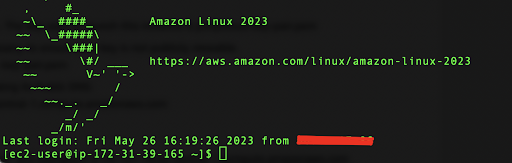
As you can see, the default user is ‘ec2-user’ so you don’t need to log in as root.
Step 2: Create a new user
Run the following command in order to create a new user:
sudo adduser jumpcloud
When you run adduser, it creates a home directory, assigns a default shell, and sets up various user-specific configuration files.
Next, make sure that you create a password for your newly created user by running:
sudo passwd jumpcloud
Tip: Create a strong, complex password. Since Amazon Linux is very security-focused, the system will warn you not to generate passwords that are less than eight characters. It’ll also show a warning if you use a simple password that’s easily cracked.
Make sure your user is in the correct group by running the id command:
id jumpcloud
There you will see a similar output:

- uid=1001(jumpcloud): This tells you the user identifier (UID) of the account. In this case, the UID is 1001.
- gid=1001(jumpcloud): This tells you the group identifier (GID) of the primary group for the user account.
- groups=1001(jumpcloud): This shows the additional groups to which the user belongs.
Step 3: Assign sudo permissions to the user
This step allows you to elevate permissions of the newly created user so you can grant sudo access. The first way to do this is to add the user to the wheel group.
sudo usermod -aG wheel jumpcloud
Run the id command again to double-check the group assignment.
id jumpcloud

This user should now have the ability to run commands via sudo permissions.
The second approach is by editing the sudoers file. You can jump to this step right after creating a new user and password.
All users that have sudo privileges are placed in the following file:
/etc/sudoers
This is a very important file on the Linux system since it defines the rules and settings for sudo. This file also holds default settings, host-specific settings, logging, and audit trails.
Begin editing this file by running the following command:
sudo visudo
This command, unlike other Linux text editors, presents you from corrupting the sudoers file.
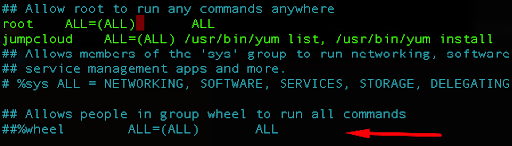
Within this sudoers file, locate the line:
## Allow root to run any commands anywhere
root ALL=(ALL) ALL
Add the new line just below that line:
jumpcloud ALL=(ALL:ALL) ALL

Press ‘Ctrl + O’ to write out the file and hit ‘Enter’. Then press ‘Ctrl + X’ to exit.
Let’s break down what we placed in the sudoers file:
- jumpcloud: This is the username or user alias to which the sudo privileges apply.
- ALL=(ALL:ALL): This represents the hosts and users to which the sudo privileges apply. The first “ALL” indicates that the sudo privileges apply to all hosts, and the second “ALL” defines that our jumpcloud user can run commands as any user. The third “ALL” defines that this user can run commands as any group.
- ALL: The last “ALL” in this line allows this user to run any command with sudo administrative privileges. This also gives the user full administrative access to the system.
Step 4: Test the sudo access for your user
Test your sudo user by running this command:
su – jumpcloud
Enter the password when prompted, then try to run a command that would require higher permissions and the sudo access:
sudo yum update
You will get the password prompt and also a notification from the system:
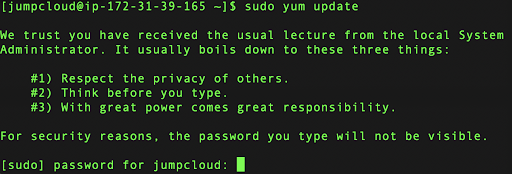
after entering the password make sure to press ‘Enter’.

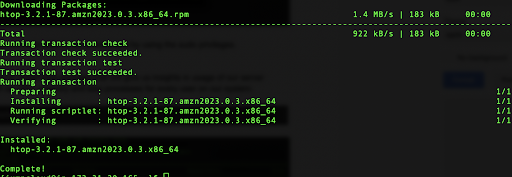
Next, install the htop package, which gives you insights into the usage of your server resources like CPU, memory, and processes for every user on your system.
sudo yum install htop
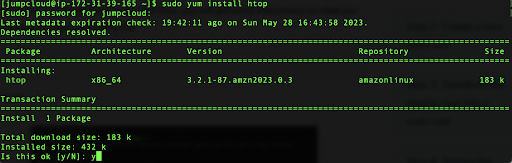
Type ‘y’ and press ‘Enter’ here to download and install the htop package:
Then, run the htop command:
htop
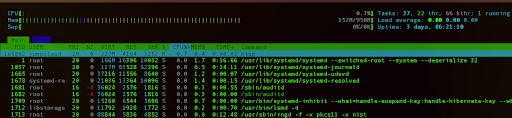
When you’re finished, exit htop by pressing ‘Ctrl + C.’
Step 5: Restrict sudo users to run specific commands
This step gives you a more granular approach to sudo permissions. If a sudo user tries to execute a restricted command, they will receive an error message indicating that the command is not allowed.
You’ll again use the ‘visudo’ command to edit the /etc/sudoers file.
sudo visudo
In sudoers file, find the line that you added initially:
jumpcloud ALL=(ALL:ALL) ALL
Change the line so that the user is not able to use the yum command and also su which would give the ability to change the user directly to root:
jumpcloud ALL=(ALL) /usr/bin/yum list, /usr/bin/yum install

Since your user “jumpcloud” belongs to the wheel group that can execute all commands, comment out the line:
##%wheel ALL=(ALL) ALL
Press ‘Ctrl + O’ to write the changes and hit ‘Enter’. Press ‘Ctrl + X’ to exit the document.
Now, if the user tries to run either yum update or su commands, in the output, the error will be shown.

Also, when you switch back to the default ec-2 user, you can run the following command:
sudo -l -U jumpcloud
Here, you’ll see the output and commands the user “jumpcloud” is able to run:

Secure Your Amazon Linux Instance with Sudo
When creating sudo users, many admins prefer using negative commands to the whitelisting process we described above, because it’s often a quicker process. However, offering sudo users full access except for what you specifically disallow can present risks, since the onus is on the admin to know and remember every single command that may be dangerous for a sudo account to have access to. The downside to whitelisting, however, is the time it takes to achieve (and maintain) the level of customization necessary.
For example, you could create generic sudo accounts for multiple users via a negative command that keeps them from doing any serious damage to your system. But, since whitelisting operates on least privilege, you’ll likely have to specify different allowed commands list for each user based on their job description and needs. While this is the more secure approach, it’s also considerably more time consuming.
This kind of work is important, but can also be challenging to do at scale without an open directory platform like JumpCloud. JumpCloud helps you easily manage and provision all Linux user accounts in a single pane of glass to easily oversee provisioning and deprovisioning and help you to further oversee and secure your privileged accounts.