Connect


JumpCloud delivers single sign-on (SSO) to everything, including RADIUS authentication and authorization for network devices. Multi-factor authentication (MFA) is environment wide, delivering Push MFA for RADIUS. RADIUS is a core network protocol that’s widely used for Wi-Fi authentication, and it provides authentication, authorization, and accounting (AAA).
JumpCloud Cloud RADIUS simplifies and secures privileged administrative access for network admins. It’s also an option to configure access to LANs for all of your SSL VPN users. JumpCloud eliminates the need to use Fortinet’s FortiTokens for MFA.
This two-part blog series explores two use cases with FortiGate next-generation firewall:
- Option 1: Use existing local FortiGate groups that contain FortiGate remote users. This approach is ideal for existing appliances that already have settings and users.
- Option 2: Use remote groups (JumpCloud) and attribute mapping to set up access control on a new Fortinet device. This approach spares admins the work of having to establish local groups using ACLs on the Fortinet appliance.
This article focuses on Option 1.
We’ll demonstrate how to bind the local user to the JumpCloud RADIUS server that is configured inside your FortiGate so that JumpCloud becomes the authentication authority without changing anything in the way the appliance is configured for network posture.
Note: It’s also possible to accomplish this using a different brand of network appliance.
Configuring JumpCloud RADIUS and Groups
Follow this guide to get started with JumpCloud groups. You may also refer back to this previous tutorial on how to configure SAML access for Fortinet devices if it better suits your requirements. However, RADIUS has the advantage of also mapping groups and authorizations/permissions.
Establishing Groups and MFA
You may have MFA required for individual users or leverage groups with conditional access. Skip this step if you’ve already configured your access control policies.
To require MFA factors for the User Portal on an individual user account:
- Edit a user or create a new user in the Admin Portal. See Getting Started: Users.
- In the User Security Settings and Permissions section, select Require Multi-Factor Authentication for User Portal option. Note: The enrollment period only affects TOTP MFA. See Considerations.
- Click save user.
To require MFA factors for the User Portal on existing users from the more actions menu:
- Select any users you want to require MFA for.
- Click more actions, then select Require MFA on User Portal.
- Specify the number of days the user has to enroll in MFA before they are required to have MFA at login. You can specify a number of days between 1 and 365. The default value is 7 days.
- Click require to add this requirement to the selected users.
To require MFA factors with a Conditional Access Policy:
- Log in to the Admin Portal: https://console.jumpcloud.com/.
- Go to SECURITY MANAGEMENT > Conditional Policies.
- Click (+).
- Enter a unique Policy Name.
- Optionally, enter a description for the policy.
- If you don’t want the policy to take effect right away, toggle the Policy Status to OFF and finish the rest of the configuration. When you’re ready to apply the policy, you can toggle the Policy Status to ON.
- For users, choose one of the following options:
- Select All Users if you want the policy to apply to all users.
- Select Selected User Groups if you want the policy to apply to specific user groups, then search for those user groups and select them. If you need to create user groups, see Getting Started: Groups.
- If there are User Groups you want to exclude from the policy, search for the user groups and select them in the search bar under Excluded User Groups.
- Optionally, set the conditions a user needs to meet. Note: Conditions is a premium feature available in the Platform Plus plan. Learn more about conditions in Getting Started: Conditional Access Policies.
- In Action, select Allow authentication into selected resources, then select the Require MFA option.
- Click create policy.
Two JumpCloud groups were created for the purpose of this tutorial:
- RADIUS-FortiGate_VPN_Users
- RADIUS-FortiGate_Admins
![]()
When creating the rely attribute, the attribute name must be: Fortinet-Group-Name
The attribute value is the group name and must exactly match the group name in Fortigate.
Setting Up RADIUS
Create a RADIUS server in JumpCloud:
- Log in to the JumpCloud Admin Portal: https://console.jumpcloud.com/login.
- Go to RADIUS.
- Click (+). The new RADIUS server panel appears.
- Configure the RADIUS server:
- Enter a name for the server. This value is arbitrary.
- Enter a public IP address from which your organization’s traffic will originate.
- Provide a shared secret. This value is shared with the device or service endpoint you’re pairing with the RADIUS server.
- Select an identity provider.
Now select an authentication method:
- To use certificate authentication, select Passwordless.
- Once Passwordless has been selected, the Save button will be disabled until a certificate has been successfully uploaded (or the authentication method has been changed back to Password).
- If desired, select Allow password authentication as an alternative method.
- If this checkbox is selected, admins can enable certificates for some users while allowing others to continue validating by username and password. Users will continue to have the option to validate by username and password, but once they choose to validate with certificates and a valid certificate is found, the password option will no longer be presented.
- The MFA Configuration section will be available if using JumpCloud as the identity provider, and Passwordless is selected as the Authentication Method, and the Allow password authentication as an alternative method checkbox is selected.
- Configuring multi-factor authentication (MFA).
- Toggle the MFA Requirement option to “enabled” for this server. This option is disabled by default.
- Select Require MFA on all users or Only require MFA on users enrolled in MFA.
- If selecting Require MFA on all users, a sub-bullet allows for excluding users in a TOTP enrollment period, but this does not apply to JumpCloud Protect™ (users in a TOTP enrollment period who are successfully enrolled in Protect will still be required to complete MFA).
- If JumpCloud Protect is not yet enabled, users can select the Enable Now link.
- Uploading a Certificate Authority (CA).
- To upload your certificate, click on the Choose a File button, navigate to the file location, and select it for uploading.
- Once the file has uploaded successfully the file name will display on the screen and options will change to replacing or deleting the file. There is also an option to view the full CA chain.
- Clicking Save will return the user to the main RADIUS screen, where the Certificate badge will display in the Primary Authentication column.
Note: For more information about where and how to find trusted certificates outside of JumpCloud, see RADIUS-CBA Tools for BYO Certificates.
Select Users for Access to the RADIUS Server (User Groups tab):
- To grant access to the RADIUS server, click the User Groups tab then select the appropriate groups of users you want to connect to the server.
- Every user who is active in that group will be granted access.
- Click save.
Note: Users who are being granted access to a RADIUS server and leveraging delegated authentication (with Azure AD as their identity provider) must be imported into JumpCloud and assigned to a User Group.
FortiGate Settings
Follow these instructions to configure the RADIUS server(s) in your FortiGate appliance. Next, we’ll make it possible for your existing users to use JumpCloud’s identity and access management (IAM).
Local Groups with Remote Users
You may enter more than one JumpCloud RADIUS server IP for redundancy. The next section uses the FortiGate command line interface (CLI) to convert your existing local users into RADIUS users. Then, you’ll match the usernames with the respective JumpCloud usernames. Significantly, there will be no changes made from an access control list (ACL) perspective. Yet, you’ll increase your network security and easily meet compliance requirements. The steps are simple, and will spare a small and medium-sized enterprise (SME) the time and expense of allocating/billing blocks of hours with a network technician or MSP partner.
Converting Local Users Into RADIUS Users
The first step is to launch your CLI to convert users that already exist in FortiGate.
This may be scripted to streamline the process for a group of users. The steps include:
# config user local(local # edit “USER NAME”# show# set type radius# set radius-server YOUR SERVER# end
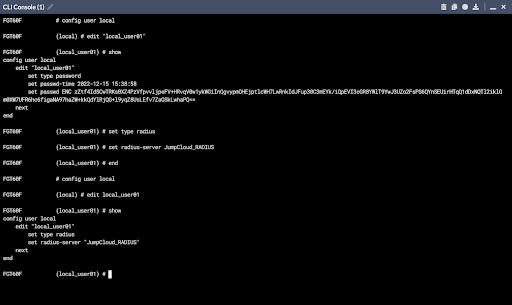
Checking Your Work
You may verify these settings by entering:
# config user local(local) # edit USER NAME# show# end

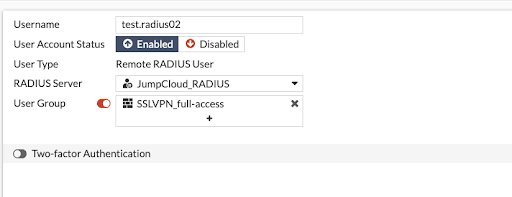
Ensure that the user is a member of the corresponding RADIUS group in JumpCloud with the exact same user name as on your appliance. JumpCloud now controls authentication, including enabling MFA without having to engage with FortiTokens or a third-party MFA solution.
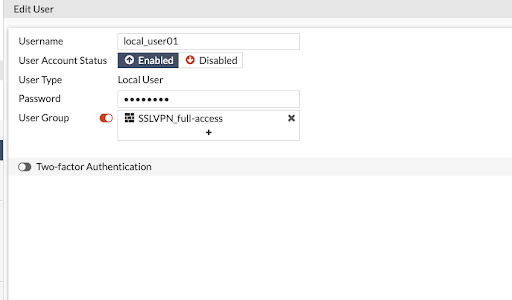
This is an example of an existing FortiGate user:
Reporting
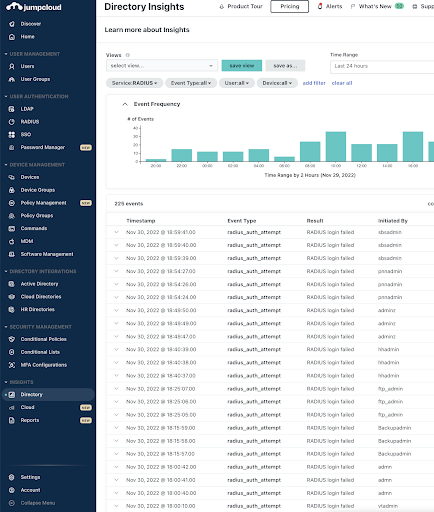
JumpCloud’s Directory Insights captures and logs RADIUS authentications. It makes it possible to determine which user is attempting to access your resources and whether it was successful. Directory Insights is useful for debugging and testing your RADIUS configuration deployments.
Try JumpCloud RADIUS
JumpCloud’s open directory platform provides SSO to everything:
- SAML
- OIDC/OAUTH
- LDAP
- RADIUS
Attribute-based group access control, mobile device management (MDM), commands, and GPO-like policies are included in the platform for advanced identity lifecycle management. JumpCloud also features integrated remote assistance, reporting, and an optional password manager and cross-OS patch management. The directory platform works across Android (soon), Apple, Linux, and Windows devices, managing identities wherever the user is.
Need a Helping Hand? Reach out to [email protected] for assistance to determine which Professional Service option might be right for you.