


 Subscribe to Help Center RSS Feed
Public Key Infrastructure as a Service (PKIaaS) is JumpCloud’s certificate management service. Use it to move JumpCloud Remote Authentication Dial-In User Service (RADIUS) from password-based Wi-Fi authentication to certificate-based authentication (CBA), also called passwordless authentication.
With PKIaaS, you create a Certificate Authority (CA) in the Admin Portal, issue certificates through a Simple Certificate Enrollment Protocol (SCEP) endpoint or the User Portal, then upload the CA to a RADIUS server set to Passwordless. Certificate-based authentication is the most secure RADIUS method and the least disruptive for end users. A device presents a certificate instead of a username and password on every connection.
Prerequisites
- Admin Portal access with permission to manage Certificate Authority resources.
- A wireless access point (WAP) or router that supports Extensible Authentication Protocol Transport Layer Security (EAP-TLS), for example WPA2-Enterprise or WPA3-Enterprise Wi-Fi.
- An existing JumpCloud RADIUS server, or one you create as part of this setup. See Get Started: RADIUS.
Considerations
- Multi-Factor Authentication (MFA) works with password-based RADIUS only, not with certificates.
- Certificates and passwords can coexist. Some Users can authenticate with certificates while others still use a password.
- The SCEP challenge password is shown once, at endpoint creation. Copy it immediately.
- The SCEP endpoint hostname is region specific: scep.jumpcloud.com for US, scep.eu.jumpcloud.com for EU, and scep.in.jumpcloud.com for IN.
- Self-service certificate generation is limited to two certificates per User per hour.
Note: Revoking a certificate does not currently block that certificate from authenticating to RADIUS, since RADIUS does not check the certificate’s revocation status.
Certificate Authority Page
- Log in to the JumpCloud Admin portal.
- Go to Security > Certificate Authority to manage CAs, certificates, and SCEP endpoints.

See Certificate Authority Management to learn more.
Managing User and Device Certificates
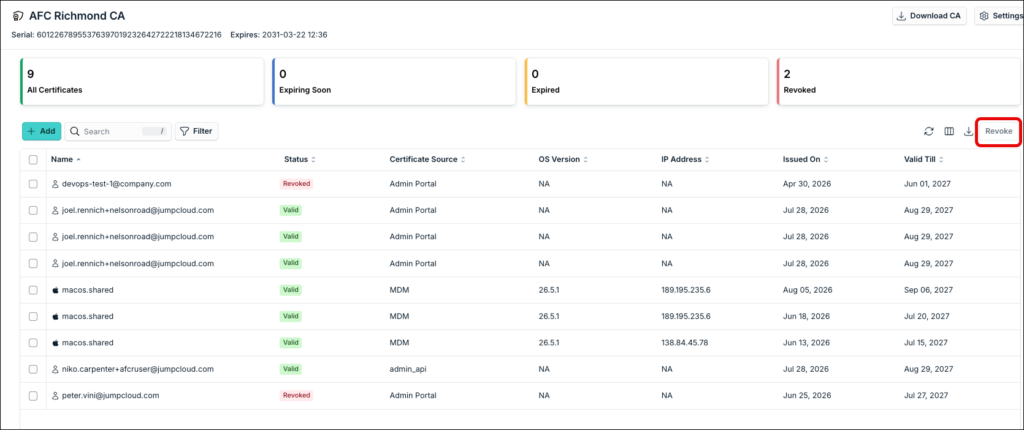
From the Certificate Authority page, admins can issue and revoke certificates directly, without MDM.
Generating a Certificate for a User
- On the Certificate Authority page, search and select an organization name.
- Click + Add.
- Select the Users.

Revoking a Certificate
- Select the Users with issued certificates.
- Click Revoke.
- Enter a reason.
Self-Service Certificate Generation
Let end Users generate their own certificates from the User Portal instead of distributing them manually.
Turning On Self-Service Certificate Generation
- Open Settings on the organization’s certificate list.
- Select the Allow Self-Service Portal Certification checkbox (cleared by default).
- Click Save.
Generating a Certificate from the User Portal
- Log in to the JumpCloud User Portal.
- Go to Security > Certificate Authority.
- Click Generate Certificate.
- Enter a password.
- Click Generate to download the resulting .pfx file.
Users are limited to two certificates per hour.
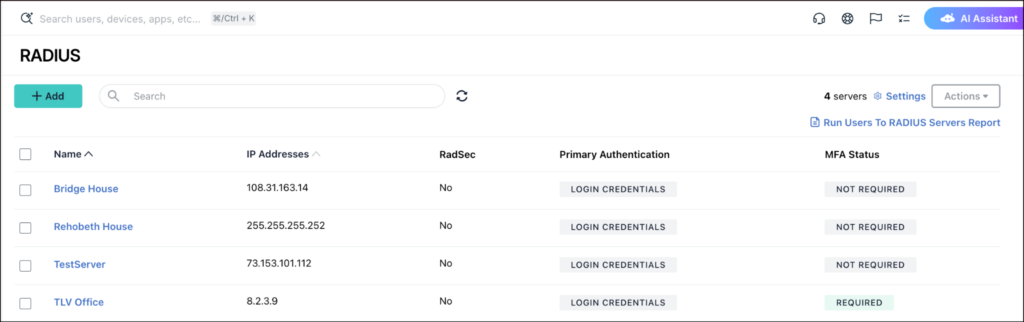
Accessing RADIUS Server Configuration
- Log in to the JumpCloud Admin portal.
- Go to Access > RADIUS to configure RADIUS authentication. See Get Started: RADIUS to learn more.
Configuring RADIUS for Certificate-Based Authentication
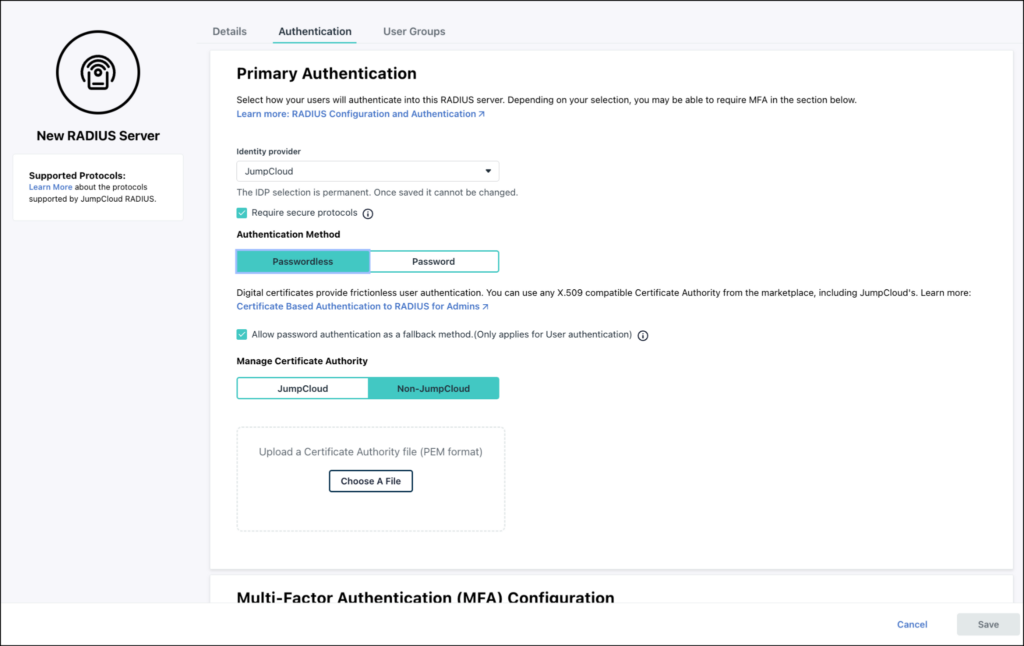
- On the RADIUS server’s Authentication tab, set the identity provider to JumpCloud and the method to Passwordless.
- Upload your CA certificate. The server can’t save without one, unless you switch back to Password.
- Optional: select the Allow password authentication checkbox to keep passwords as a fallback.
- Click Save. A Certificate badge appears in Primary Authentication.
Automating Certificate and WiFi Delivery with MDM Policies
You can now follow the below mentioned steps to configure your JumpCloud MDM enrolled devices pair a SCEP Profiles policy with a WiFi Configuration policy, assigned to the same Users or user groups, so certificates and Wi-Fi deploy silently, with no manual install. JumpCloud calls this zero-touch network access.
macOS
For macOS devices, you need to create and configure the following policies:
| Policy Name | Description | Policy Level |
|---|---|---|
| Install Certificate | Create an Install Certificate policy for JumpCloud CA. | Install the policy at User level. |
| Install Certificate | Create an Install Certificate policy for Root CA that owns the RADIUS server certificate. | Install the policy at User level. |
| SCEP Profile | Configure the secure profile using the details generated during the SCEP endpoint setup. | Install the policy at User level. |
| WiFi Configuration | Finalize the connection settings, including the SSID and enterprise authentication protocols. | Install the policy at User level. |

- macOS, user level policies work only on newly enrolled devices. If a customer want to make it work on their existing enrolled device, it wouldn't work.
- User scope policies on mac works only with MDM enrolled user who has user channel created. Binding policies to other users on mac fails and will be reported as UNSUPPORTED_USER. See Apple MDM Enrollment and Binding Rules for macOS User Level Policies to learn more.
Creating a macOS Install a JumpCloud CA Certificate Policy
To create this policy, see Create a User Level macOS Install Certificate Policy and learn more.
While configuring this policy, do the following:
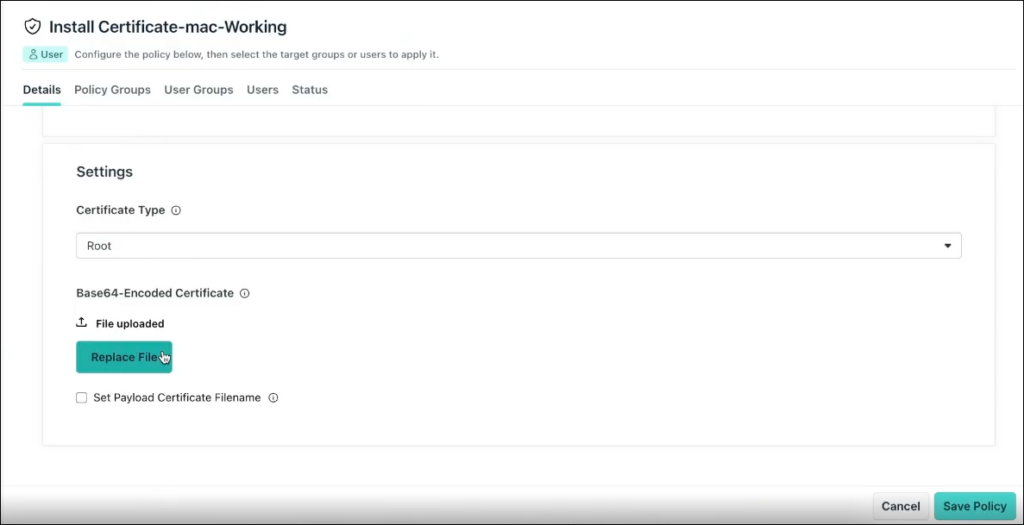
- Certificate Type - Select Root as Certificate Type
- Base64-Encoded Certificate - Upload the recently downloaded root CA certificate
Once all the above steps are done, bind this policy to a user or user group and click Save Policy to save the configuration.
After completing these steps, bind the policy to a user or user group and click Save Policy. You can then verify its status by navigating to the Status tab.
Creating a macOS Install a Root Server Certificate Policy
To create this policy, first you need to download the root certificate by the following:
- Log in to the JumpCloud Admin portal.
- Go to Access > RADIUS. Select the RADIUS server configuration from the list.
- On the Details tab, click Download Certificate under Global Certificate
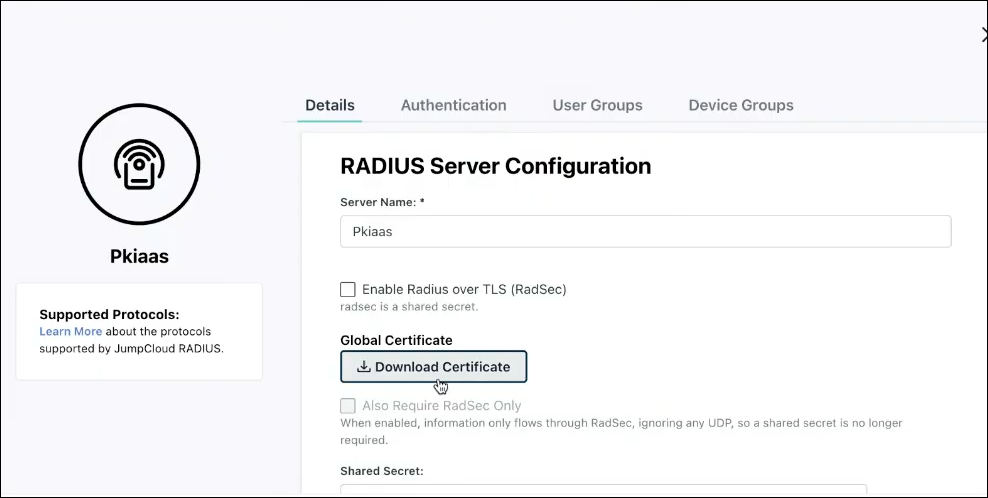
Once the root certificate is downloaded, see Create a User Level macOS Install Certificate Policy for login steps.
While configuring this policy, do the following:
- Certificate Type - Select Root as Certificate Type
- Base64-Encoded Certificate - Upload the recently downloaded global certificate
After completing these steps, bind the policy to a user or user group and click Save Policy. You can then verify its status by navigating to the Status tab.
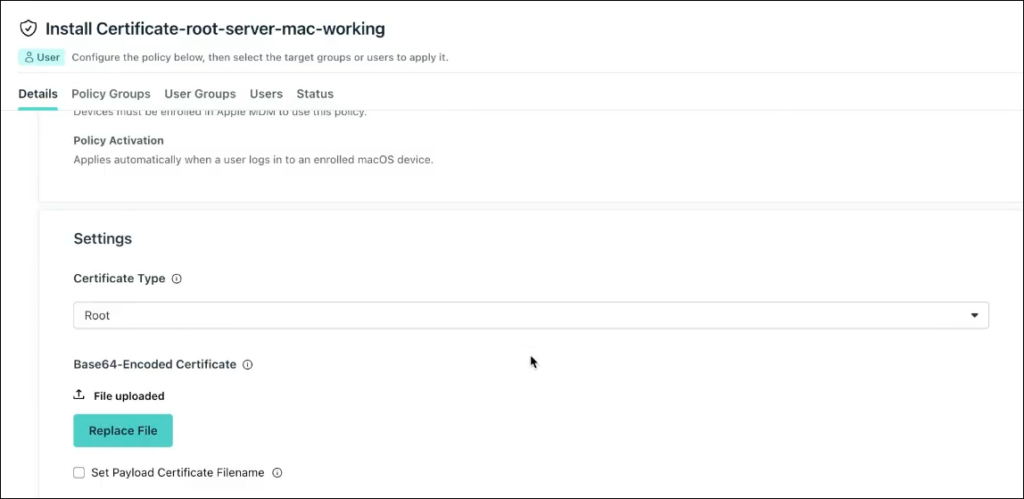
Creating a macOS SCEP Profiles Policy
To create this policy, see Create a User Level macOS SCEP Profiles Policy.
While configuring this policy, do the following:
- Fingerprint - Provide the fingerprint of the JumpCloud CA certificate on which the SCEP endpoint has been created on the Certificate Authority page.

Copy the CA Fingerprint from the Certificate Authority page and paste it in the Fingerprint section under Settings in the format (without colons or spaces) as depicted in the image below.
- Challenge - Insert the Challenge Password
- Key Size - This is set to 2048 by default
- Subject - Enter the variable in the Subject field in the below format. No spaces are allowed in the variable.

- Retries - This field is set to 3 by default.
- Key Usage must be kept to Signing.
- Retry Delay is set to 3 by default

- URL - Enter the SCEP endpoint in the URL field. You can find this URL on the Certificate Authority page under the Unique Endpoint column.

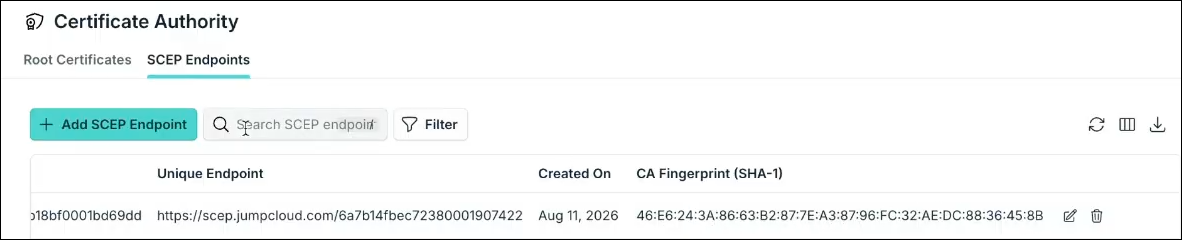


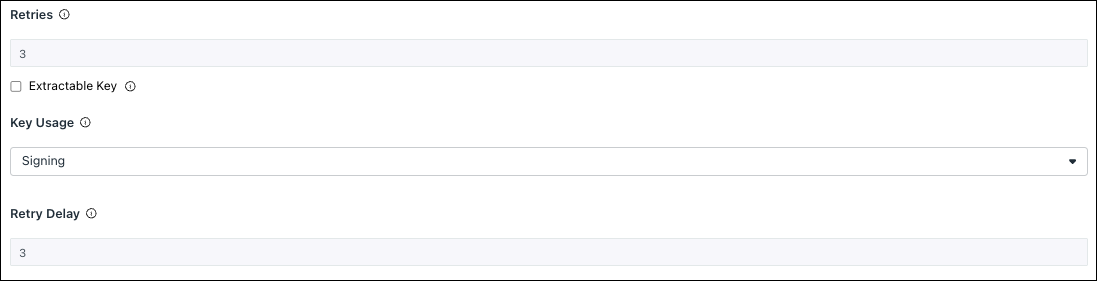
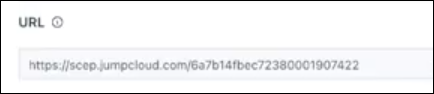
If you have created different SCEP Endpoints for users and devices, then copy the respective endpoint and paste it accordingly.
After completing these steps, bind the policy to a user or user group and click Save Policy. You can then verify its status by navigating to the Status tab.
Creating a macOS WiFi Configuration Policy
To create this policy, see Create a User Level macOS WiFi Configuration Policy.
While configuring this policy, do the following:
General Settings
- SSID - Enter the name of the WiFi which you want to connect.
- Auto Join - Select this to enable auto join
- Encryption Type - Select WPA2 Enterprise as the security type.
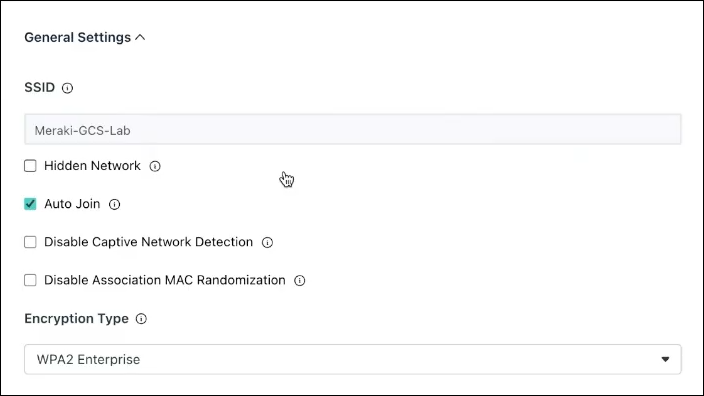
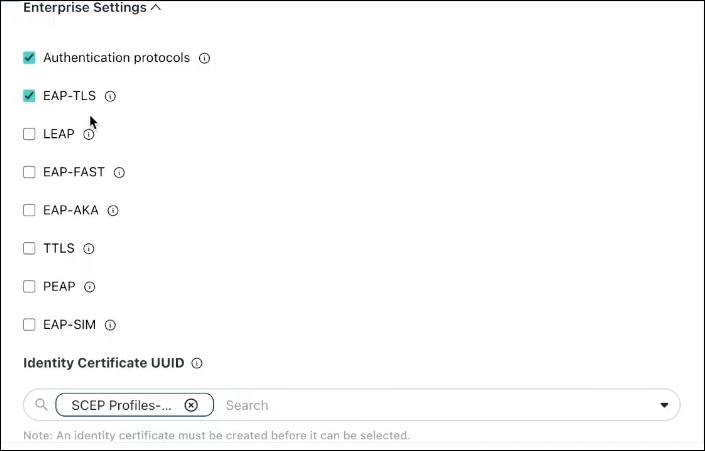
Enterprise Settings
- Authentication Protocol - Select this option to display the available protocols.
- EAP-TLS - Select this option to enable the Certificate-based authentication using Transport Layer Security (TLS) protocol.
- Identity Certificate UUID - In this menu, search and select a previously saved SCEP policy by name. JumpCloud links the certificate from that policy to this WiFi configuration automatically. The certificate policy must be saved before it appears in this search field.

- TLS Minimum Version - This is by default set to 1.0
- TLS Maximum Version - This is by default set to 1.2
- TLS Certificate Required - This is selected by default.
- Server Trust - This is selected by default.
- TLS Trusted Certificates - Search and select the policy created to install the root certificate. For example, in this case, search for Install Certificate Root Server Mac Working policy and select it.
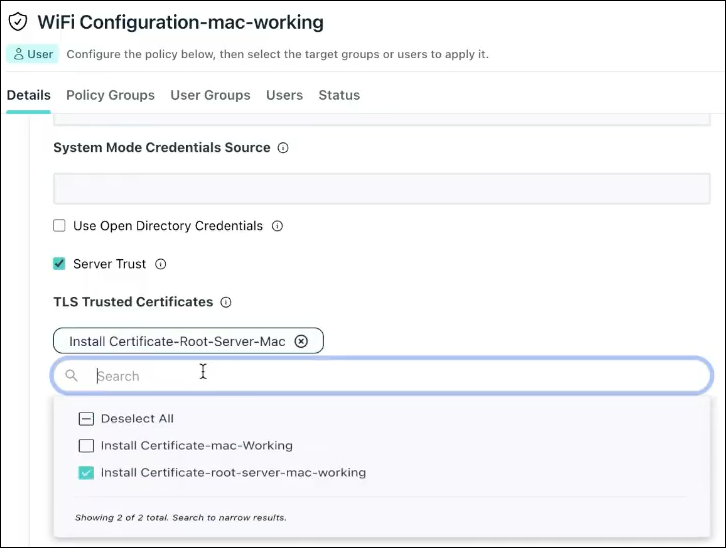
- Add Server Name - Add your server name for example: radius.jumpcloud.com.
After completing these steps, bind the policy to a user or user group and click Save Policy. You can then verify its status by navigating to the Status tab.
Windows
For Windows OS, you need to create and configure the following policies:
| Policy Name | Description | Policy Level |
|---|---|---|
| Install Certificate | Create an Install Certificate policy for JumpCloud CA. | Install the policy at Device level. |
| Install Certificate | Create an Install Certificate policy for Root CA that owns the RADIUS server. | Install the policy at Device level. |
| SCEP Profile | Configure the secure profile using the details generated during the SCEP endpoint setup. | Install the policy at User level. |
| WiFi Configuration | Finalize the connection settings, including the SSID and enterprise authentication protocols. | Install the policy at Device level. |
Creating a Windows Install a CA Certificate Policy
To create this policy, see Create a Device Level Windows Install Certificate Policy and learn more.
While configuring this policy, do the following:
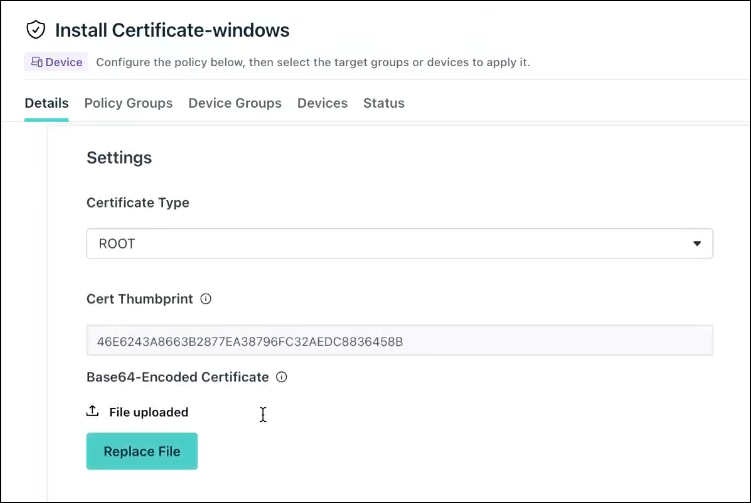
- Certificate Type - Select Root as Certificate Type
- Cert Thumbprint - Provide the fingerprint of the JumpCloud CA certificate on which the SCEP endpoint has been created in the Certificate Authority page. Remove any extra spaces or hidden characters while entering it.
- Base64-Encoded Certificate - Upload the recently downloaded root CA certificate
After completing these steps, bind the policy to a device or device group and click Save Policy. You can then verify its status by navigating to the Status tab.
Creating a Windows Install a Root Server Certificate Policy
To create this policy, first you need to download the root certificate by the following:
- Log in to the JumpCloud Admin portal.
- Go to Access > RADIUS. Select the RADIUS server configuration from the list.
- On the Details tab, click Download Certificate under Global Certificate
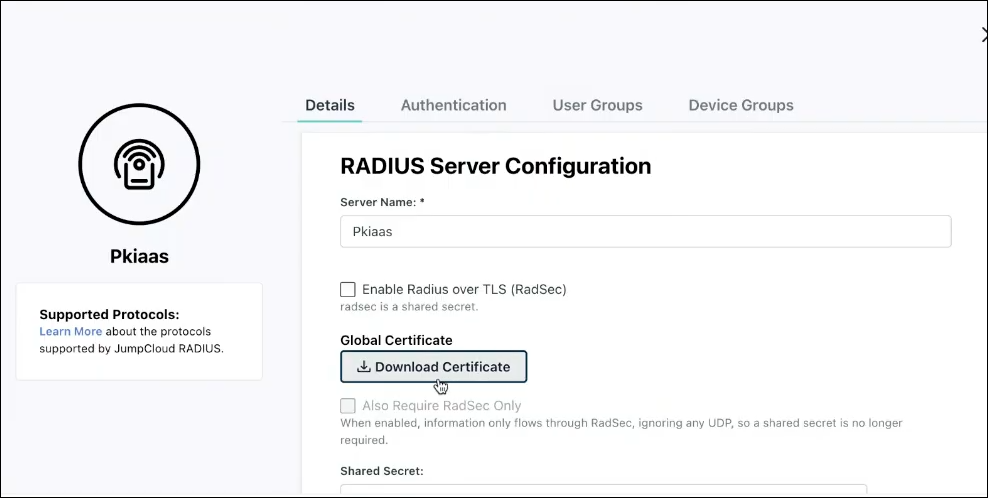
Once the root certificate is downloaded, see Create a Device Level Windows Install Certificate Policy for login steps.
While configuring this policy, do the following:
- Certificate Type - Select Root as Certificate Type
- Cert Thumbprint - Enter the unique ID (Thumbprint) of Root server certificate found in Certificate Properties. Remove any extra spaces or hidden characters while entering it.
- Base64-Encoded Certificate - Upload the recently downloaded global certificate
After completing these steps, bind the policy to a device or device group and click Save Policy. You can then verify its status by navigating to the Status tab.
Creating a Windows SCEP Profiles Policy
To create this policy, see Create a User Level Windows SCEP Profile Policy.
While configuring this policy, do the following:
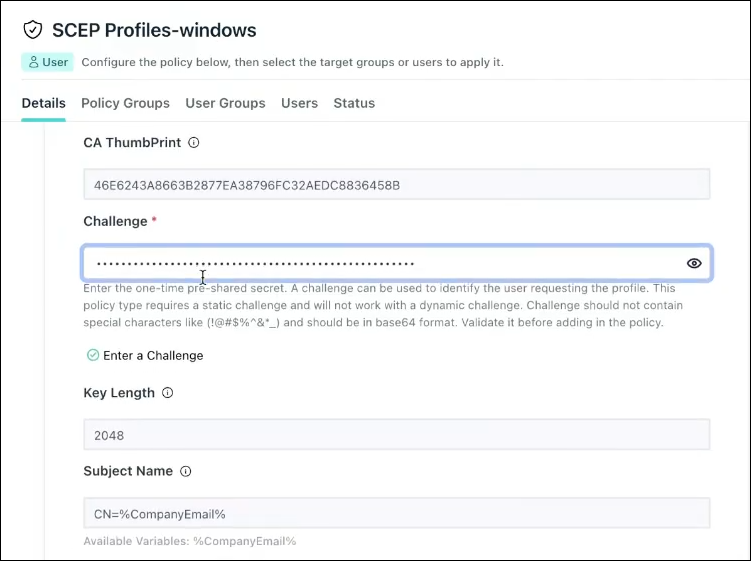
- CA Thumbprint - Provide the fingerprint of the JumpCloud CA certificate on which the SCEP endpoint has been created on the Certificate Authority page.
Copy the CA Fingerprint from the Certificate Authority page and paste it in the CA Thumbprint section under Settings in the format (without colons or spaces). - Challenge - This password is auto-generated during the creation of a new SCEP endpoint in the SCEP Endpoints tab present under Certificate Authority.
- Key Size - This is set to 2048 by default
- Subject Name - Enter the variable in the Subject field in the below format. No spaces are allowed in the variable.
- Retry Count - This field is set to 3 by default.
- Retry Delay - This is set to 3 by default.
- Server URL - Enter the SCEP endpoint in the URL field. You can find this URL on the Certificate Authority page under the Unique Endpoint column.
- Renew Period - Duration of the renewal term in days. Recommended value is 365 days.
- Include Client Authentication EKU - Select this to enable.

After completing these steps, bind the policy to a device or device group and click Save Policy. You can then verify its status by navigating to the Status tab.
Creating a Windows WiFi Configuration Policy
To create this policy, see Create a Device Level Windows WiFi Configuration Policy.
While configuring this policy, do the following:
General Settings
- SSID - Enter the name of the WiFi which you want to connect.
- Auto Join - Select this to enable auto join
- Security Type - Select WPA2 Enterprise as the security type.
- AuthenticationMode - Select User from this dropdown menu to designate the policy as user level.
- If your SCEP Policy is user level, then select User.
- If your SCEP Policy is device level, then select Device.
- If you have configured the SCEP Policy for both the endpoints, then select Machine or User.
- CA Thumbprints - Enter the certificate thumbprints of Root Server and JumpCloud CA in the format (with spaces) as depicted in the image below.

- Trusted Servers - Add your server name for example: radius.jumpcloud.com.
- Certificate Issuer - Enable this option to enter the root CA thumbprints for the certificates you want to allow on a client for authentication.
- Certificate Issuer CA Thumbprints - Provide the Issuer CA Thumbprint, which is the root certification authority that allows client authentication

After completing these steps, bind the policy to a device or device group and click Save Policy. You can then verify its status by navigating to the Status tab.
Connecting Devices Manually for the First Time
For devices not enrolled in MDM, or using the manual or self-service paths above:
- The first time, the User selects Connect using a certificate on the device.
- On macOS, the user enters their device password to allow Certificate Trust Settings changes, then selects Always Allow.
- On later connections, authentication happens automatically, with no prompt.
For full OS-specific install steps for Windows, macOS, Linux, Android, and iOS, see User-Initiated Certificate Generation.
 In this Article
 Learn More