Create a User Level macOS WiFi Configuration Policy
You can configure a WiFi policy for macOS to deploy wireless network settings to Users on managed macOS devices.
This is a user level policy that applies to a user's profile across managed devices. You can bind this policy to individual users or user groups. For policies that apply system-wide to a device and all of its users, see Get Started: Policies and Learn More section of this article.
Prerequisites
- Apple Mobile Device Management (MDM) must be configured for your organization and macOS devices must be enrolled in JumpCloud MDM. See Set up Apple MDM.
- This policy is supported on macOS devices running macOS 10.7 and later.
- Target macOS devices must have an active network connection for this policy to take effect.
- For certificate-based enterprise WiFi, deploy identity and trusted certificates on the macOS first using a user-level Install Certificate or SCEP Profiles policy. Create and save those policies before you configure this WiFi Configuration policy. See See Create a User Level macOS Install Certificate Policy and Create a User Level macOS SCEP Profiles Policy to learn more.
Considerations
- Policy settings are applied automatically and do not require a system restart.
- Pair user-level SCEPProfiles and WiFiConfiguration policies when you use JumpCloud Remote Authentication Dial-In User Service (RADIUS) for certificate-based WiFi. See Implement PKIaaS with RADIUS for Certificate-Based Wi-Fi.
- Enterprise WiFi with certificate sign-in does not work until identity and trusted certificates are installed on the macOS through InstallCertificate or SCEPProfiles policies assigned to the same Users or user groups.
Creating the Policy
To create a WiFi Configuration policy for macOS devices, do the following:
Selecting the Policy Template
- Log in to the JumpCloud Admin portal.
If your data is stored outside of the US, check which login URL you should be using depending on your region. If your organization uses LDAP, RADIUS, or requires firewall allow list configuration, the Fully Qualified Domain Names (FQDNs) will also be region specific. See JumpCloud Data Centers for the URLs, FQDNs, and IP addresses.
- Go to Device Management > Policy Management. The Policy Management page is displayed.
- On the Policy Management page, click +Add New.
- Select User Policy to assign the policy to users and users groups. On the New User Policy page:
- Select the macOS tab.
- Search and select the required policy and click Configure. The Details tab of the policy is displayed.
- On the Details tab, configure the required policy configuration settings.
- (Optional) In the Policy Name field, enter a new name for the policy or keep the default. Policy names must be unique.
- (Optional) In the Policy Notes field, enter details such as creation date of the policy, and information on testing and deployment of the policy.
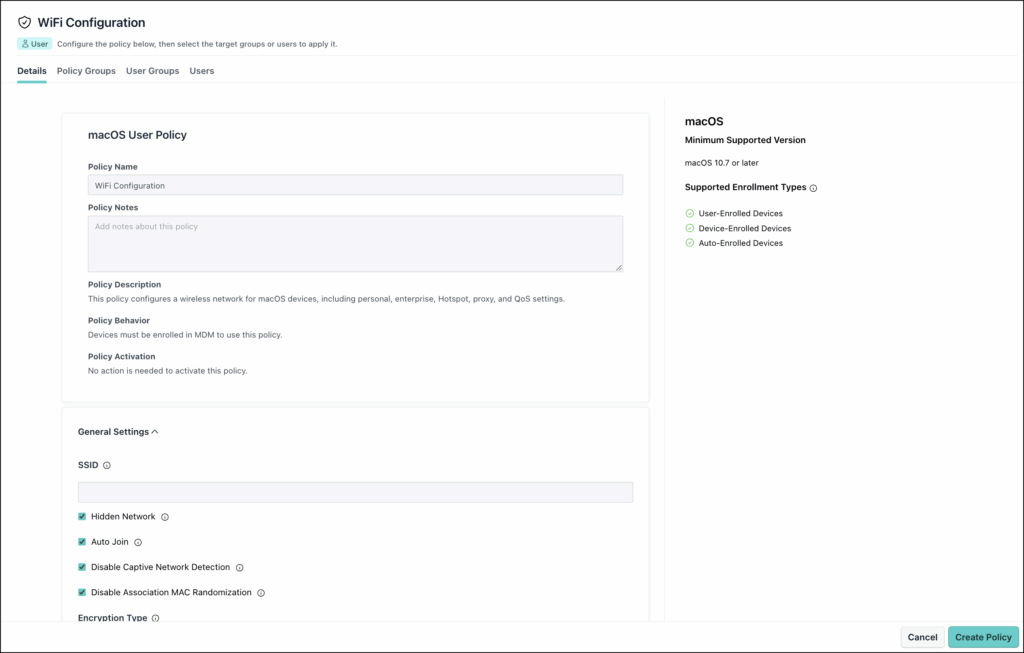
Configuring the Policy
Configure the following settings:
Configure General Settings
| Field | Description |
|---|---|
| SSID | The Service Set Identifier (SSID) of the wireless network. Enter the network name your Users should join. |
| Hidden Network | Select this checkbox when the wireless network does not broadcast its SSID. |
| Auto Join | Select this checkbox to have the macOS join this network automatically when it is in range. Clear the checkbox to require the User to select the network manually. |
| Disable Captive Network Detection | Select this checkbox to bypass captive portal detection when the macOS connects to this network. |
| Disable Association macOS Randomization | Select this checkbox to disable Media Access Control (macOS) address randomization while the macOS is connected to this network. The macOS shows a privacy warning in System Settings when this option is enabled. |
| Encryption Type | The security type for the network. Choose WPA Enterprise for enterprise sign-in, or a personal type such as WPA3 Personal for a pre-shared key (PSK) network. |
| Password | Shown when Encryption Type is a personal type. Enter the pre-shared key (PSK) for the wireless network. Click the eye icon to show or hide the password. |
| Enable IPv6 | Select this checkbox to enable Internet Protocol version 6 (IPv6) on this WiFi connection. |
| Configure Setup Modes | Select this checkbox to choose when the WiFi profile is available on the macOS. When selected, System Mode and Login Window Mode are displayed. |
| System Mode | Select this checkbox to apply the WiFi profile at the system level before a User logs in. |
| Login Window Mode | Select this checkbox to make the WiFi profile available at the macOS login window. |
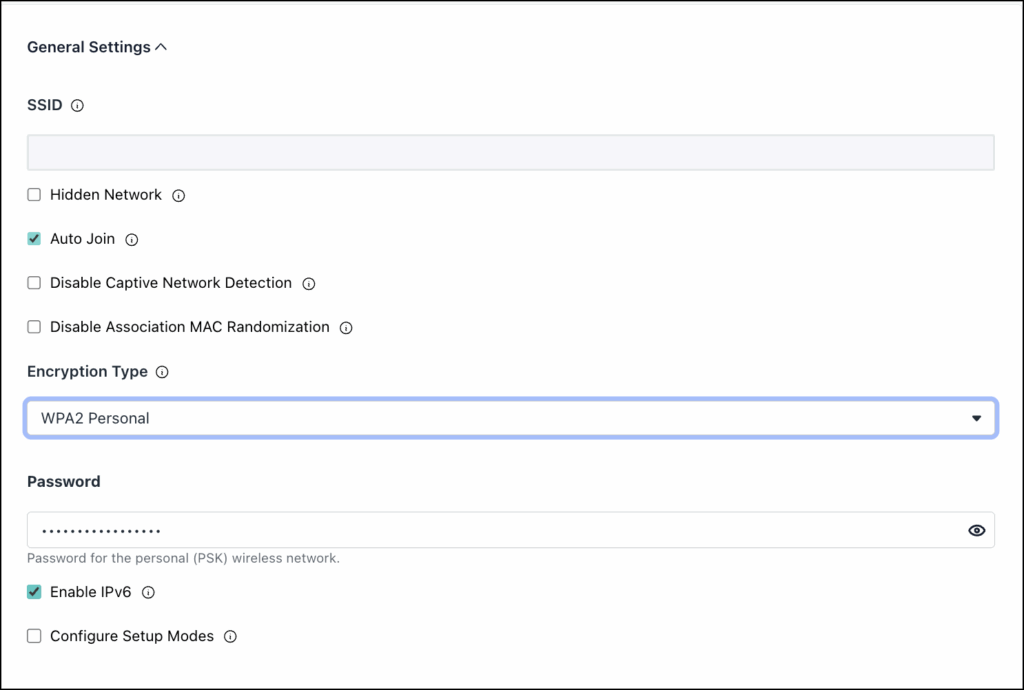
Configuring Personal WiFi
When you select a personal Encryption Type such as WPA3 Personal, the Password field is displayed in the General Settings. Enter the pre-shared key your wireless network uses. The macOS joins the network with that password.
You do not have to configure Enterprise Settings for personal networks.
- Under SSID, enter the network name.
- Configure join behavior using Hidden Network, Auto Join, and the other checkboxes as needed.
- From Encryption Type, select a personal option. For example: WPA3 Personal.
- Under Password, enter the pre-shared key for the network.
- Continue with Enable IPv6, Configure Setup Modes, and the remaining sections as needed.
Configure Enterprise Settings
When Encryption Type is WPA Enterprise, expand Enterprise Settings to configure enterprise sign-in.
Skip this section when Encryption Type is a personal type such as WPA3 Personal. Use the Password field in General Settings instead.
Authentication Protocols
Under Authentication protocols, select one or more protocols the macOS accepts for this network:
Authentication Protocols
| Protocol | Description |
|---|---|
| EAP-TLS | Certificate-based authentication using Transport Layer Security (TLS). |
| LEAP | Lightweight Extensible Authentication Protocol. |
| EAP-FAST | Flexible Authentication via Secure Tunneling (EAP-FAST). |
| EAP-AKA | Authentication and Key Agreement. |
| TTLS | Tunneled Transport Layer Security. |
| PEAP | Protected Extensible Authentication Protocol. |
| EAP-SIM | Subscriber Identity Module authentication. |
Select the Authentication protocols checkbox to enable the group, then select each protocol your RADIUS or authentication server supports.
For certificate-based WiFi with JumpCloud RADIUS, select EAP-TLS and select the identity certificate policy by name in Identity Certificate UUID. Deploy Install Certificate or SCEP Profiles policies first and assign them to the same Users or user groups.
| Field | Description |
|---|---|
| Identity Certificate UUID | Search for and select a previously deployed certificate policy by name. JumpCloud links the certificate from that policy to this WiFi configuration automatically. Use this field when EAP-TLS or another selected protocol requires a user certificate. The certificate policy must exist and be assigned before it appears in this search field. |
| TLS Minimum Version | The minimum Transport Layer Security version for EAP authentication. For example: 1.0. |
| TLS Maximum Version | The maximum Transport Layer Security version for EAP authentication. For example: 1.2. |
| TLS Certificate Required | Select this checkbox when the network requires a user certificate for two-factor authentication with TTLS, PEAP, or EAP-FAST. Clear the checkbox for certificate-only EAP-TLS sign-in. |
| EAP Username | The user name for enterprise authentication. If you leave this field empty, the User may be prompted during connection. |
| EAP Password | The password for enterprise authentication. If you leave this field empty, the User may be prompted. Applicable when LEAP, EAP-FAST, TTLS, or PEAP is selected. Click the eye icon to show or hide the password. |
| Prompt For Password Each Connection | Select this checkbox to prompt the User for a password on each connection attempt. |
| Outer Identity | An anonymous identity sent before the secure connection is established. Relevant for TTLS, PEAP, and EAP-FAST. Required when TLS Minimum Version is 1.3. |
| Use Open Directory Credentials | Select this checkbox to use Open Directory credentials. |
| Server Trust | Select this checkbox to enable server trust. When selected, TLS Trusted Certificates and TLS Trusted Server Names are displayed. |
| TLS Trusted Certificates | Search for and select trusted certificates. |
| TLS Trusted Server Names | Click Add Server Name, then enter a value in Attribute Value. Click the trash icon to remove a server name. |
Configure Proxy Settings
Expand Proxy Settings when the WiFi network requires a proxy.
Configure Proxy Settings
| Field | Description |
|---|---|
| Proxy Type | How the macOS connects through a proxy. The prototype shows Manual. |
| Proxy Server Address | The network address of the proxy server. Shown when Proxy Type is Manual. |
| Proxy Server Port | The port number of the proxy server. Shown when Proxy Type is Manual. |
| Proxy Username | The user name used to authenticate to the proxy server. |
| Proxy Password | The password used to authenticate to the proxy server. Click the eye icon to show or hide the password. |
When Proxy Type is Auto, the Proxy PAC URL and Proxy PAC Fallback Allowed fields are displayed.
Configure Hotspot 2.0 Settings
Expand Hotspot 2.0 Settings when you deploy a Passpoint (Hotspot 2.0) network profile.
Hotspot 2.0 Settings
| Field | Description |
|---|---|
| Is Hotspot 2.0 Network | Select this checkbox to treat this network as a Hotspot 2.0 (Passpoint) network. |
| Domain Name | The primary domain name for this Hotspot 2.0 network. |
| Displayed Operator Name | The operator name the macOS displays when connected to this Hotspot 2.0 network. |
| Enable Service Provider Roaming | Select this checkbox to allow connection to roaming service providers. |
| HESSID | The Homogeneous Extended Service Set Identifier for this Hotspot 2.0 network. |
| Roaming Consortium OIs | Click Add Roaming OI to add a Roaming Consortium Organization Identifier. |
| NAI Realm Names | Click Add Realm Name to add a Network Access Identifier realm name. |
| MCC/MNC Pairs | Click Add MCC/MNC to add a Mobile Country Code and Mobile Network Code pair. Each value must be exactly six digits. |
Configure QoS Marking Policy Settings
Expand QoS Marking Policy when the WiFi network supports Cisco QoS fast lane marking. Additional QoS fields such as QoS Allowlisted App Bundle IDs, QoS Mark Apple Audio/Video Calls, and QoS Marking Enabled appear when Enable QoS Marking Policy is selected.
Configure QoS Marking Policy Settings
| Field | Description |
|---|---|
| Enable QoS Marking Policy | Select this checkbox to enable QoS marking on this WiFi network. |
| QoS Allowlisted App Bundle IDs | Click Add Bundle ID to add an app bundle ID to the allow list. |
| QoS Mark Apple Audio/Video Calls | Select this checkbox to mark Apple audio and video calls for QoS. |
| QoS Marking Enabled | Select this checkbox to enable QoS marking. |
Using Identity Certificates with WiFi
Enterprise WiFi with certificate sign-in requires two certificate types on the macOS before the WiFi policy can work:
- An identity certificate for the User who signs in to the network
- Trusted certificates, such as a root certificate from your Certificate Authority (CA), so the macOS trusts the authentication server
Deploy both through user-level Install Certificate or SCEP Profiles policies before you create or assign the WiFi Configuration policy. The WiFi policy does not upload certificate files directly.
The Identity Certificate UUID field in Enterprise Settings links this WiFi policy to a certificate already installed on the macOS for the User. In the Admin Portal, search for and select the Policy Name of a certificate policy you deployed earlier. JumpCloud applies the link automatically. You do not enter a certificate identifier manually.
Deploying certificates before WiFi configuration
- Create and assign trusted certificate policies. Install a root CA with Install Certificate (certificate type root) or include the root in a SCEP Profiles policy through Include Root Certificate.
- Create and assign an identity certificate policy. Use SCEP Profiles for automatic enrollment, or Install Certificate to upload a user certificate file.
- Save each certificate policy and confirm it is assigned to the target Users or user groups.
- Create the WiFi Configuration policy, select EAP-TLS when your network requires certificate sign-in, and select the identity certificate policy by name in Identity Certificate UUID.
- Assign the WiFi policy to the same Users or user groups.
The certificate policies must be saved before their names appear in the Identity Certificate UUID search field. If no policies appear, confirm the certificate policies exist, are assigned, and use the Install Certificate or SCEP Profiles template.
Linking the WiFi policy to a certificate policy
- Create an Install Certificate or SCEP Profiles policy under Device Management > Policy Management > User Policy > macOS.
- Assign the certificate policy to the target Users or user groups.
- Create the WiFi Configuration policy, select EAP-TLS under Authentication protocols, and search for the certificate policy Policy Name in Identity Certificate UUID.
- Assign the WiFi policy to the same Users or user groups.
Applying the Policy
- (Optional) Select the Policy Groups tab. Select one or more policy groups where you want to add this policy.
- Select the User Groups tab. Select one or more user groups where you want to apply this policy. For user groups with multiple OS member types, the policy only applies when a user logs into a supported Windows device that is enrolled in MDM.
- Or, select the Users tab. Select one or more users to whom you want to assign this policy.
- Click Create Policy. A success message is displayed indicating the completion of policy creation.
Viewing Policy Status
- Select the Statustab.
- To see the last Result Log for a device where this policy is applied, click view.
- If any errors occur, they're listed inExit Status. If you have an Exit Status of 0, no errors occurred when applying or enforcing this policy.
Was this information helpful?