JumpCloud’s certificate management service provides IT Admins with a single point of visibility and control over all certificates, thereby effectively eliminating the current challenges associated with manual tracking and management. This centralized approach significantly enhances security and efficiency by automating the certificate lifecycle, reducing manual effort, ensuring timely revocation of any compromised certificates, and ultimately strengthening the organization's overall security posture. Furthermore, the system improves accessibility as both users, who can download their certificates from a dedicated portal, and administrators, who can generate and share certificates from an Admin portal, benefit from a streamlined process that allows the entire system to easily scale.
Creating a Certificate Authority
- Log in to the JumpCloud Admin Portal.
If your data is stored outside of the US, check which login URL you should be using depending on your region. If your organization uses LDAP, RADIUS, or requires firewall allow list configuration, the Fully Qualified Domain Names (FQDNs) will also be region specific. See JumpCloud Data Centers for the URLs, FQDNs, and IP addresses.
- Go to Security > Certificate Authority. The Certificate Authority page is displayed.
- Go to Root Certificates tab and click Add CA to create a root certificate.
- The newly created root certificate contains the following details:
- Common Name
- Serial Number
- Validity Period
- Expires
Generating a Certificate for a User
You can assign a certificate to a specific user by the following:
- On the Certificate Authority page, search and select an organization name.
- On this page, click +Add. A list of all available users is displayed.
- Select one or multiple users to whom you want to assign the certificate.

Revoking Certificates
You can revoke certificates for individual entities by the following:
- On the Certificate Authority page, search and select an organization name.
- On this page, click +Add. A list of all available users is displayed.
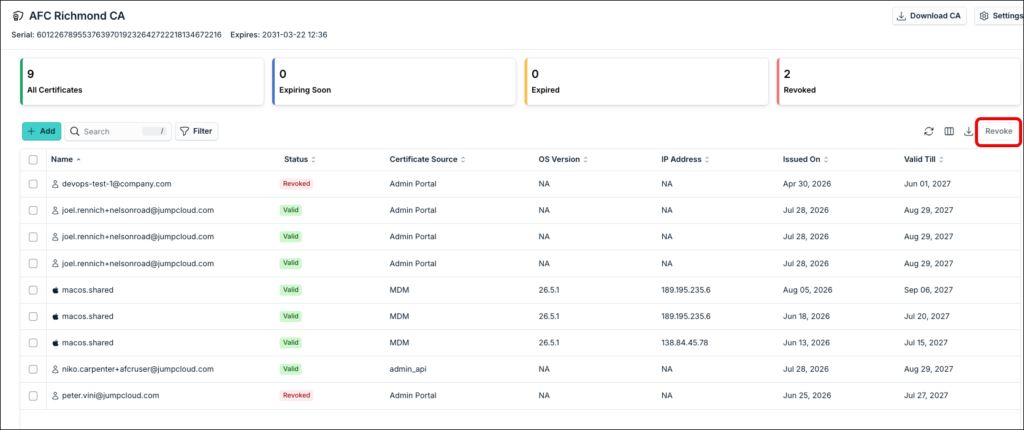
- Select one or more users and click Revoke. A dialog box will appear, prompting you to provide a reason for the revocation.
- Click Revoke. A success message is displayed.
Revoked certificates still allow RADIUS authentication. This is a bug with RADIUS, not the PKI. This issue arises because RADIUS is not reading the Certificate Revocation List (CRL) distribution point value embedded in the certificate, which means RADIUS still allows the connection even if the certificate is revoked.
Enabling Self‑Service
- On the Certificate Authority page, select an organization name and click arrow icon. A list of all available users is displayed.
- On this page, click Settings. The Settings pop-up window is displayed.
- On the pop-up window, select the Allow Self-Service Portal Certification checkbox to grant all users access to the Self-Service Certification feature via their User Portal. This is unchecked by default.
- Click Save.
Was this information helpful?