


 Subscribe to Help Center RSS Feed
You can configure a Virtual Private Network (VPN) policy for macOS to give Users secure remote access to your organization’s network.

This is a user level policy that applies to a user's profile across managed devices. You can bind this policy to individual users or user groups. For policies that apply system-wide to a device and all of its users, see Get Started: Policies and Learn More section of this article.
The policy supports two route types. Full Device VPN routes all traffic on the Mac through the VPN connection. Per-App VPN defines a secure VPN connection and maps specific apps to that connection on a single configuration screen. Apple permits only one active Per-App VPN configuration per profile.
Prerequisites
- Apple Mobile Device Management (MDM) must be configured for your organization and Mac computers must be enrolled in JumpCloud MDM. See Set up Apple MDM.
- This policy is supported on Mac computers running macOS 10.7 and later.
- Target Mac computers must have an active network connection for this policy to take effect.
- For Per-App VPN, the third-party VPN provider app must be installed on target Mac computers before the mapped apps can connect through the tunnel.
- For Full Device VPN with Certificate authentication, create a user channel Install Certificate or SCEP Profiles policy first, then select that policy in the Identity Certificate UUID field on the VPN policy. See Install Certificate and macOS SCEP Profiles Policy to learn more.
Considerations
- Per-App VPN combines connection settings and app mapping in one view. You do not select an existing VPN connection from a drop-down. JumpCloud generates a hidden VPNUUID on save and applies the same identifier to both the App Layer VPN payload and the App-to-App Layer VPN Mapping payload.
- You cannot route an app through Per-App VPN unless the VPN connection is defined in the same policy configuration.
- On macOS, each mapped app requires an App Bundle ID, a Designated Requirement string, and a Signing Identifier string.
- Policy configuration settings are applied automatically and do not require a system restart.
Creating the Policy
To create a VPN Policy policy for macOS devices, do the following:
Selecting the Policy Template
- Log in to the JumpCloud Admin portal.

If your data is stored outside of the US, check which login URL you should be using depending on your region. If your organization uses LDAP, RADIUS, or requires firewall allow list configuration, the Fully Qualified Domain Names (FQDNs) will also be region specific. See JumpCloud Data Centers for the URLs, FQDNs, and IP addresses.
- Go to Device Management > Policy Management. The Policy Management page is displayed.
- On the Policy Management page, click +Add New.
- Select User Policy to assign the policy to users and users groups. On the New User Policy page:
- Select the macOS tab.
- Search and select the required policy and click Configure. The Details tab of the policy is displayed.
- On the Details tab, configure the required policy configuration settings.
- (Optional) In the Policy Name field, enter a new name for the policy or keep the default. Policy names must be unique.
- (Optional) In the Policy Notes field, enter details such as creation date of the policy, and information on testing and deployment of the policy.
Configuring the Policy
To configure the policy, do the following:
Configuring Full Device VPN
On the Details tab, under Settings, use VPN Routing Mode to choose how the Mac connects to your network.
| VPN Routing Mode | What it does ? |
|---|---|
| Full Device VPN | Sends all network activity on the Mac through the VPN automatically. |
| Per-App VPN | Sets up a VPN connection and links one or more apps to it on one screen. Apple permits only one active Per-App VPN setup per profile. |
When you select Per-App VPN, the Admin Portal shows connection settings and app selection together. You do not pick a separate VPN from a VPN Routing Mode drop-down list.
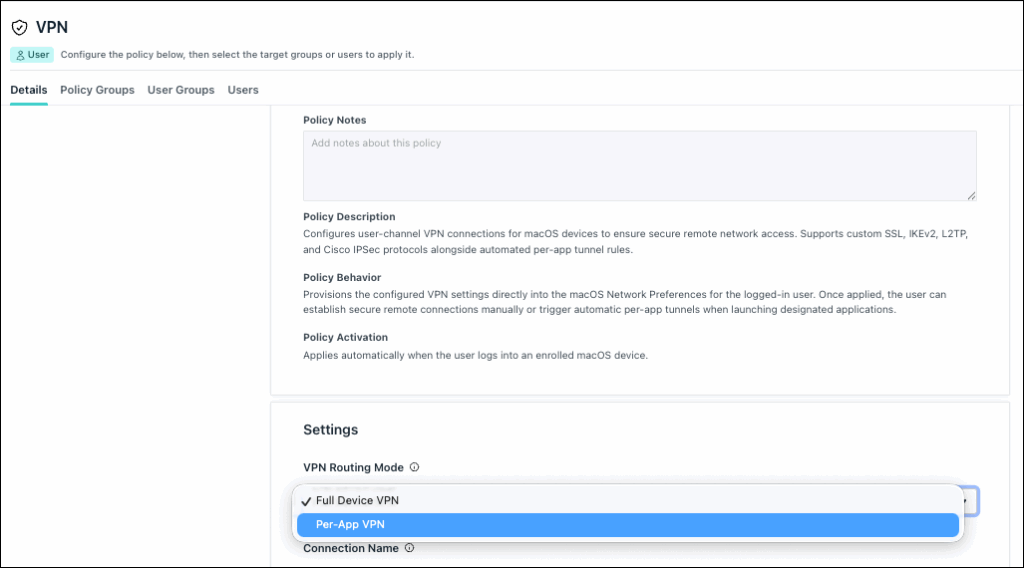
Set VPN Routing Mode to Full Device VPN when you want the entire Mac to use the VPN.
Under Settings, configure the connection details. When Connection Type is set to IKEv2, the following fields are displayed:
| Field | Description |
|---|---|
| Connection Name | A name for the VPN connection shown on the Mac. |
| Connection Type | The VPN type. For example: IKEv2. |
| Server | The address of the VPN server. |
| Local Identifier | The local ID for the IKEv2 connection. |
| Remote Identifier | The remote ID for the IKEv2 connection. |
| Authentication Type | How the User signs in to the VPN. For example: Certificate. |
| Identity Certificate UUID | Shown when Authentication Type is Certificate. Search for and select an existing user-level certificate policy that installs the certificate on the Mac for the User. |
When you select Certificate as the Authentication Type, the Identity Certificate UUID field appears. Click the field, search for an existing Install Certificate or SCEP Profiles policy, and select it. Username and password fields are not shown for certificate sign-in.
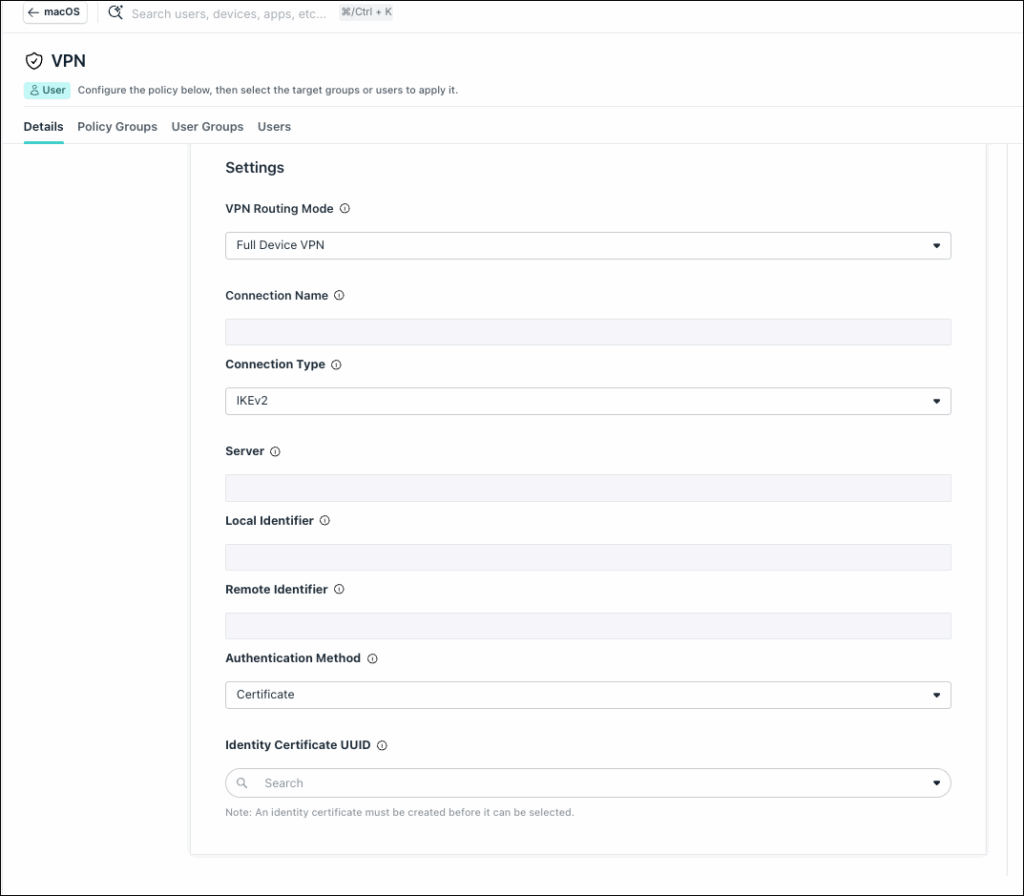
Create and save the Install Certificate or SCEP Profiles policy before you configure the VPN policy. The certificate policy must exist in Policy Management before it appears in the Certificate Policy search results. See Create a User Level macOS Install Certificate Policy and Create a User Level macOS SCEP Profiles Policy.
Configuring Per-App VPN
Set VPN Routing Mode to Per-App VPN when only specific apps should use the VPN. Under Settings, the Admin Portal shows connection fields and App Mappings on one screen.
Configuring Per-App VPN
| Field | Description |
| Connection Name | A name for the VPN connection shown on the Mac. For example: Acme Corporate VPN. |
| Connection Type | The VPN app and protocol. For example: Cisco AnyConnect. |
| Server | The address of the VPN server. For example: vpn.acmecorp.com. |
| Account | The User account for the VPN sign-in, if your VPN server requires one. For example: user@acmecorp.com. |
| Group | The VPN group name, if your VPN server requires one. Leave blank if your server does not use groups. |
| Authentication Type | How the User signs in to the VPN. For example: Certificate. |
| Identity Certificate UUID | Shown when Authentication Type is Certificate. Search for and select an existing user-level certificate policy that installs the certificate on the Mac for the User. For example: Acme User VPN Client Cert (SCEP). |
| Send all traffic through VPN | Optional checkbox. When selected, all network activity on the Mac goes through the VPN—not only the mapped apps. When cleared, only the apps listed under App Mappings use the VPN. |
Selecting Apps for the VPN
You can configure the Apps by the following:
| Field | Description |
|---|---|
| App Bundle ID | The app ID. For example: com.google.Chrome. |
| Designated Requirement | A required Apple security value for the app. For example: anchor apple generic... |
| Signing Identifier | A required Apple signing value for the app on macOS. |
- Click + Add Another App to add more apps to the same VPN connection.
- Click the trash icon to remove an app row.
Finding App Bundle ID, Designated Requirement, and Signing Identifier
App Bundle ID uses reverse-DNS format. For example: com.google.Chrome. For third-party apps, Signing Identifier usually follows the {TeamID}.{AppBundleID} format. For example: EQHXZ8M8AV.com.google.Chrome.
To get these values for an app such as Google Chrome, run the following commands in Terminal:
- Open Terminal on a Mac that already has the app installed.
- Run the following command to get the Designated Requirement:
codesign -d -r- "/Applications/Google Chrome.app"
- The following output is displayed:
designated => (identifier "com.google.Chrome" or identifier "com.google.Chrome.beta" or identifier "com.google.Chrome.dev" or identifier "com.google.Chrome.canary") and anchor apple generic and certificate 1[field.1.2.840.113635.100.6.2.6] /* exists */ and certificate leaf[field.1.2.840.113635.100.6.1.13] /* exists */ and certificate leaf[subject.OU] = EQHXZ8M8AV
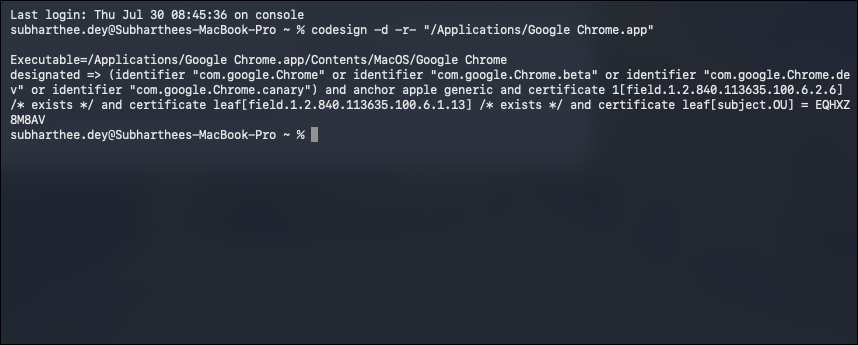
- Copy the full value after designated => and paste it in the Designated Requirement field.
- Run the following command on your Terminal to get the App Bundle ID and Signing Identifier:
codesign -dvv "/Applications/Google Chrome.app" 2>&1 | grep Identifier=
- The following output is displayed:
Identifier=com.google.Chrome
TeamIdentifier=EQHXZ8M8AV
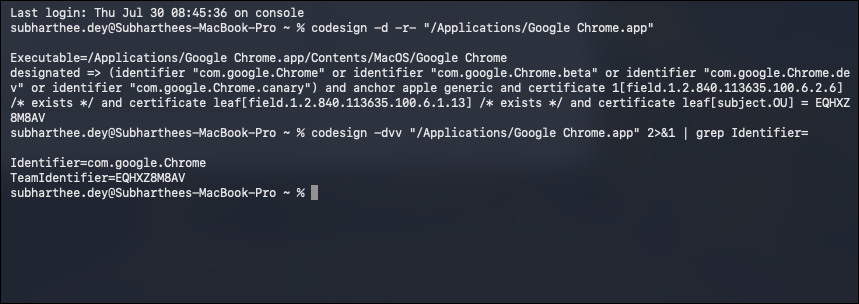
- Copy com.google.Chrome into App Bundle ID.
- For third-party apps, combine the team ID and bundle ID for Signing Identifier: EQHXZ8M8AV.com.google.Chrome.
- For Apple-built apps such as Safari, use the bundle ID alone. For example: com.apple.Safari.
Finding the File Path of an App
To get the file path using Terminal, do the following:
- Open Terminal on a Mac that already has the app installed.
- Run the following command, replacing Google Chrome with the app name:
mdfind "kMDItemKind == 'Application'" -name "Google Chrome" | head -1
- The following output is displayed:
/Applications/Google Chrome.app
- Use this path in the codesign commands above. If the app is installed in a different location, replace /Applications/Google Chrome.app with the path returned by the command.
Example Values
| Google Chrome | Slack | |
|---|---|---|
| App Bundle ID | com.google.Chrome | com.tinyspeck.slackmacgap |
| Designated Requirement | (identifier "com.google.Chrome" or identifier "com.google.Chrome.beta" or identifier "com.google.Chrome.dev" or identifier "com.google.Chrome.canary") and anchor apple generic and certificate 1[field.1.2.840.113635.100.6.2.6] /* exists */ and certificate leaf[field.1.2.840.113635.100.6.1.13] /* exists */ and certificate leaf[subject.OU] = EQHXZ8M8AV | (anchor apple generic and certificate leaf[field.1.2.840.113635.100.6.1.9] /* exists */ or anchor apple generic and certificate 1[field.1.2.840.113635.100.6.2.6] /* exists */ and certificate leaf[field.1.2.840.113635.100.6.1.13] /* exists */ and certificate leaf[subject.OU] = BQR82RBBHL) and identifier "com.tinyspeck.slackmacgap" |
| Signing Identifier | EQHXZ8M8AV.com.google.Chrome | BQR82RBBHL.com.tinyspeck.slackmacgap |
Apple permits only one active Per-App VPN setup per profile. Add every required app in this policy before you save. The VPN app selected in Connection Type—for example, Cisco AnyConnect—must be installed on the Mac before mapped apps can connect. App updates can change signing values. Re-run the commands after a major app update if Per-App VPN stops working for that app.
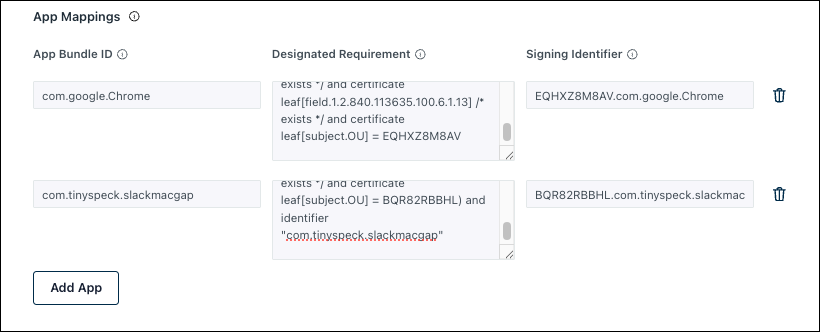
Apple permits only one active Per-App VPN setup per profile. Add every required app in this policy before you save.
Applying the Policy
- (Optional) Select the Policy Groups tab. Select one or more policy groups where you want to add this policy.
- Select the User Groups tab. Select one or more user groups where you want to apply this policy. For user groups with multiple OS member types, the policy only applies when a user logs into a supported Mac computer that is enrolled in Apple MDM.
- Or, select the Users tab. Select one or more users to whom you want to assign this policy to.
- Click Create Policy. A success message is displayed indicating the completion of policy creation.
Viewing Policy Status
- Select the Status tab.
- To see the last Result Log for a device where this policy is applied, click view.
- If any errors occur, they're listed in Exit Status. If you have an Exit Status of 0, no errors occurred when applying or enforcing this policy.
 In this Article
 Learn More