Create a User Level Windows VPN Policy
You can configure a VPN policy for your Windows devices to securely and remotely access your organization’s network. The device must be enrolled in JumpCloud MDM. This policy works on devices running Windows 10/11.
This is a user level policy that applies to a user's profile across managed devices. You can bind this policy to individual users or user groups. For policies that apply system-wide to a device and all of its users, see Get Started: Policies and Learn More section of this article.
Prerequisites
- Devices must be enrolled in Windows MDM (Mobile Device Management).
- Target devices must be running Windows 10 version 1511 (10.0.10586) or later. This policy is supported on the following Windows editions:
- Windows Pro
- Windows Enterprise
- Windows Education
- Windows SE
- IoT Enterprise
- IoT Enterprise LTSC
- For more information on device compatibility, see Agent Compatibility, System Requirements, and Impacts.
Considerations
- This policy applies automatically when the assigned user has an active, authenticated Windows MDM session.
Creating the Policy
To create a VPN policy for Windows devices, do the following:
Selecting the Policy Template
- Log in to the JumpCloud Admin portal.
If your data is stored outside of the US, check which login URL you should be using depending on your region. If your organization uses LDAP, RADIUS, or requires firewall allow list configuration, the Fully Qualified Domain Names (FQDNs) will also be region specific. See JumpCloud Data Centers for the URLs, FQDNs, and IP addresses.
- Go to Device Management > Policy Management. The Policy Management page is displayed.
- On the Policy Management page, click +Add New.
- Select User Policy to assign the policy to users and users groups. On the New User Policy page:
- Select the Windows tab.
- Search and select the required policy name and click Configure. The Details tab of the policy is displayed.
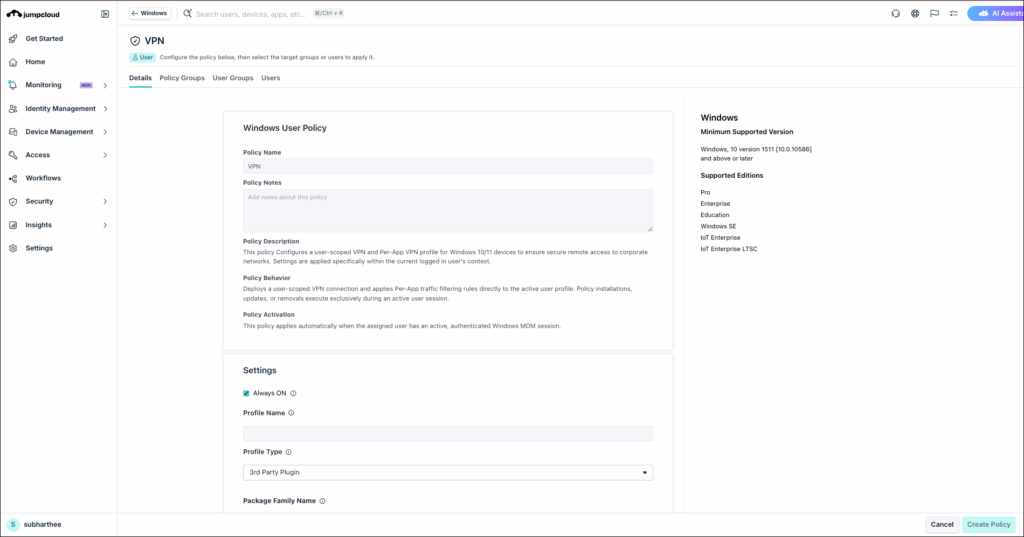
- On the Details tab, configure the required policy configuration settings.
- (Optional) In the Policy Name field, enter a new name for the policy or keep the default. Policy names must be unique.
- (Optional) In the Policy Notes field, enter details such as creation date of the policy, and information on testing and deployment of the policy.
Configuring the Policy
- In the Settingsfield, select the settings you want enabled for this policy.
| Field Name | Description |
|---|---|
| Always ON | Select this checkbox if you want to automatically connect to the VPN at sign-in. |
| Profile Name | Enter a name for the VPN profile. |
| Profile Type > Native | |
| Server name or address | Enter the VPN server details. |
| Connection Type | Select a connection type. |
| Proxy | Define the proxy settings for the VPN profile. |
| Profile Type > 3rd Party Plugin | |
| Package Family Name | Enter a name for the package family. |
| Server URL | Enter the server details. |
| Custom Configuration | Enter the configuration setting details. |
| Proxy | Select the desired proxy option (None, Automatic, or Manual) to apply when the profile is active and connected. |
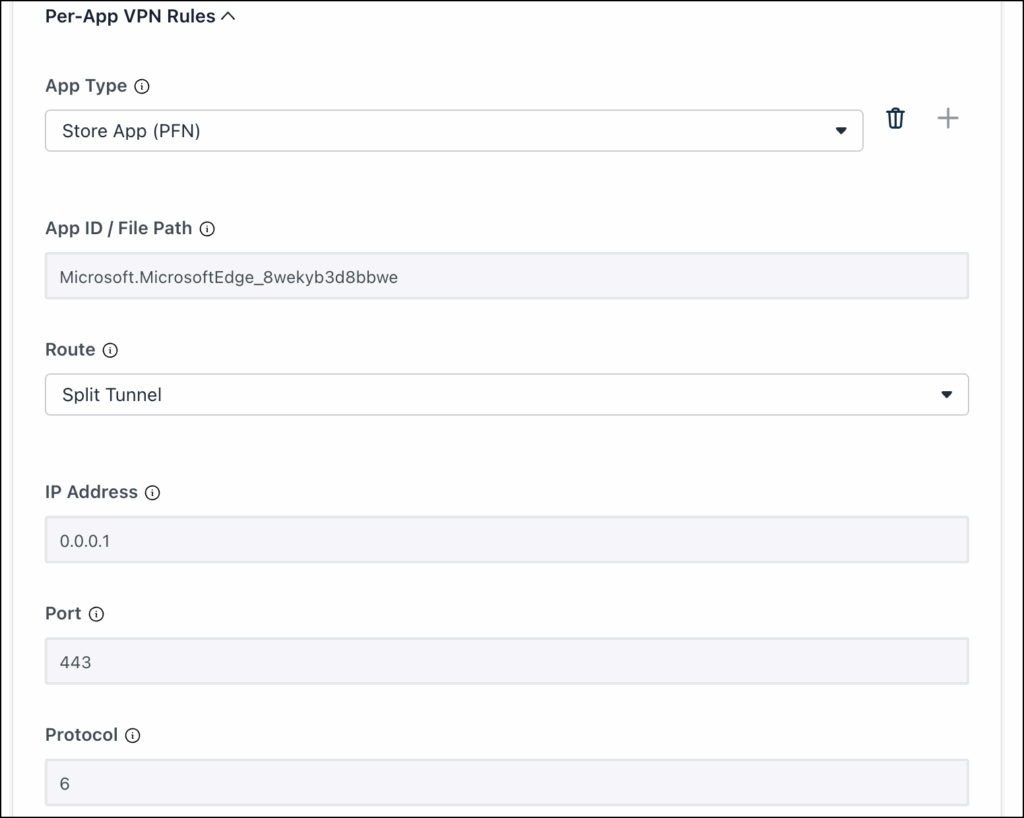
In the Per App VPN Rules section, configure the following:
| Field Name | Description |
|---|---|
| App Type | Specifies the architecture/type of the app being targeted. Select between "Store App" (PFN) or "Desktop App" (File Path). |
| App ID / File Path | The exact identifier for the program. Uses the Package Family Name for modern apps or the full local file path for traditional executable programs. |
| Route | Dictates the routing policy for the specific application and defining whether its traffic splits or is forced through the VPN tunnel. |
| IP Address | This is a comma-separated list of IP addresses and it acts as a network constraint, limiting the application's secure access to specified corporate IP addresses or subnet ranges only. |
| Port | This is a comma-separated list of ports or ranges (e.g., 80, 443, 5000-6000) and granular firewall constraint specifying exactly which local or remote ports (or port ranges) the application is allowed to communicate over. |
| Protocol | This is a decimal value for protocol (e.g., 6 for TCP, 17 for UDP) and it restricts the application's VPN connectivity to a specific transport layer protocol. |
| "+" icon | Click this icon to add VPN rules for another app. |
| trash icon | Click this icon to delete the VPN configurations for a specific app. |
Finding Package Family Name (PFN) or App ID
Package Family Name (PFN) always follows the[PublisherName].[AppName]_[Hash]format.
To get the App ID of an app such as Microsoft Edge app, run the following command in PowerShell:
- Open PowerShell on your Windows computer that already has the Microsoft Edge app installed.
- Run the command
Get-AppxPackage -Name Edge | Select-Object Name, PackageFamilyName - The following output is displayed:
Name : Microsoft.MicrosoftEdge PackageFamilyName : Microsoft.MicrosoftEdge_8wekyb3d8bbwe
- Copy the
PackageFamilyNamestring and paste it in the App ID/File ID field as shown in the image below.
Finding the File Path of an App
To get the file path using PowerShell, do the following:
- Open PowerShell on your Windows computer that already has the Microsoft Edge app installed.
- Run the command
Get-ItemPropertyValue -Path "HKLM:\SOFTWARE\Microsoft\Windows\CurrentVersion\App Paths\msedge.exe" -Name "(Default)". - The following output is displayed:
C:\Program Files (x86)\Microsoft\Edge\Application\msedge.exe.
Few more examples of app IDs of store apps:
| App Name | App ID |
|---|---|
| Microsoft Company Portal | Microsoft.CompanyPortal_8wekyb3d8bbwe |
| Power BI Desktop (Store version) | Microsoft.MicrosoftPowerBIDesktop_8wekyb3d8bbwe |
| WhatsApp Desktop | 5319275A.WhatsAppDesktop_cv1g1gvanyjgm |
- For IKEV2 connection type, use the Install Certificate policy to ensure that the certificate is already available on the device.
- For PPTP and L2TP connection types, the user will be prompted to enter a password.
- For L2TP + Shared Key connection types, the admin must enter the password in the input field.
Applying the Policy
- (Optional) Select the Policy Groups tab. Select one or more policy groups where you want to add this policy.
- Select the User Groups tab. Select one or more user groups where you want to apply this policy. For user groups with multiple OS member types, the policy only applies when a user logs into a supported Windows device that is enrolled in MDM.
- Or, select the Users tab. Select one or more users to whom you want to assign this policy.
- Click Create Policy. A success message is displayed indicating the completion of policy creation.
Viewing Policy Status
- Select the Statustab.
- To see the last Result Log for a device where this policy is applied, click view.
- If any errors occur, they're listed inExit Status. If you have an Exit Status of 0, no errors occurred when applying or enforcing this policy.
Was this information helpful?