


 Subscribe to Help Center RSS Feed
Admins can configure and deploy custom MDM policies to Windows devices to meet specific needs that are not covered by JumpCloud’s existing MDM policy library. Open Mobile Alliance Uniform Resource Identifier (OMA URI) is used in MDM to configure settings and manage devices through policies.

This is a device level policy that applies system-wide to the device and all of its users. You can bind this policy to individual devices or device groups. For policies that apply to a specific user's profile across devices, see Get Started: Policies and Learn More section of this article.
Creating the Policy
To create a Custom MDM (OMA URI) policy for Windows devices, do the following:
Selecting the Policy Template
- Log in to the JumpCloud Admin Portal.

If your data is stored outside of the US, check which login URL you should be using depending on your region. If your organization uses LDAP, RADIUS, or requires firewall allow list configuration, the Fully Qualified Domain Names (FQDNs) will also be region specific. See JumpCloud Data Centers for the URLs, FQDNs, and IP addresses.
- Go to Device Management > Policy Management.
- In the All tab, click (+).
- On the New Policy panel, select the Windows tab.
- Search and select Custom MDM (OMA URI) Policy from the list, then click configure.
- (Optional) In the Policy Name field, enter a new name for the policy or keep the default. Policy names must be unique.
- (Optional) In the Policy Notes field, enter details like when you created the policy, where you tested it, and where you deployed it.
Configuring the Policy
- In the Settings section, enter the details as required. For more information, see Group OMA-URI entires by AreaName.
- Enter the exact value in the OMA URI field. OMA URI is a unique path that targets a specific setting or configuration.
- Select the Format from the dropdown. The available formats are - integer, string, float, boolean, xml, and base64.
- In the Value field, enter the exact value.
- Use the + button to add more identifiers.
To find the exact the OMA-URI and the associated value details for a specific policy, see Microsoft’s support documentation for Configuration Service Provider (CSP).
Applying the Policy
- (Optional) Select the Policy Groups tab. Select one or more policy groups where you want to add this policy.
- Select the Device Groups tab. Select one or more device groups where you want to apply this policy to. For device groups with multiple OS member types, the policy only applies when a user logs into a supported Windows device that is enrolled in MDM.
- Or, select the Devices tab. Select one or more devices where you want to apply this policy.
- Click Create Policy. A success message is displayed indicating the completion of policy creation.
Viewing Policy Status
- Select the Status tab.
- To see the last Result Log for a device where this policy is applied, click view.
- If any errors occur, they're listed in Exit Status. If you have an Exit Status of 0, no errors occurred when applying or enforcing this policy.
- JumpCloud does not allow the creation of custom MDM policies for some configuration service providers (CSPs), such as DMClient among others.
- Unbinding the policy deletes the CSP URI.
Group OMA-URI entries by AreaName

Group the OMA-URI entries by their specific AreaName within a policy and name the policy accordingly to simplify tracking and troubleshooting.
Here are some examples:
To enable policies for education environment:
- OMA URI:
./Vendor/MSFT/SharedPC/SetEduPolicies - Format: boolean
- Value: true
To create a custom policy to update desktop Image:
- OMA URI:
./Vendor/MSFT/Personalization/DesktopImageUrl - Format: string
- Value:
file:///C:/Windows/desktopimage.png
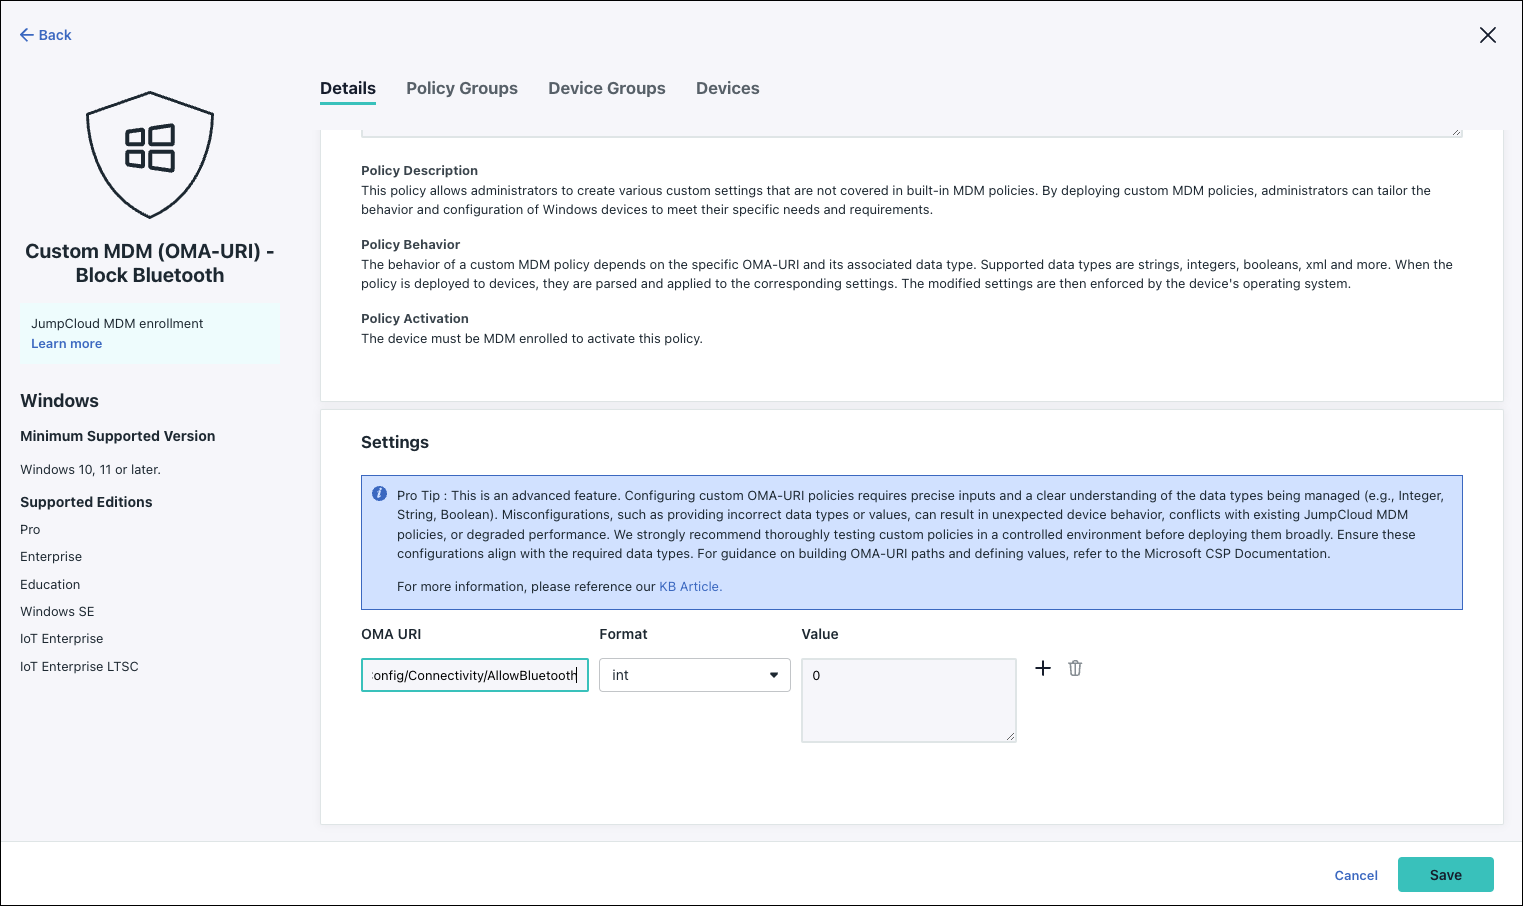
To create a policy to block bluetooth:
- OMA URI:
./Device/Vendor/MSFT/Policy/Config/Connectivity/AllowBluetooth - Format: int
- Value: 0

Using an ADMX Payload in a Policy
ADMX payloads are XML files that define Group Policy settings for Windows devices, deployed via Group Policy or MDM solutions. In MDM, ADMX-backed policies are used to structure and manage settings, with corresponding payloads specifying the values for each setting, often using OMA URI to configure the device.
To learn how to build an ADMX payload, see Microsoft's support documentation for Understanding ADMX Polices.
- The
<Data>section of SyncML should be entered as the Value. - URI that is
type=nodeis not supported.
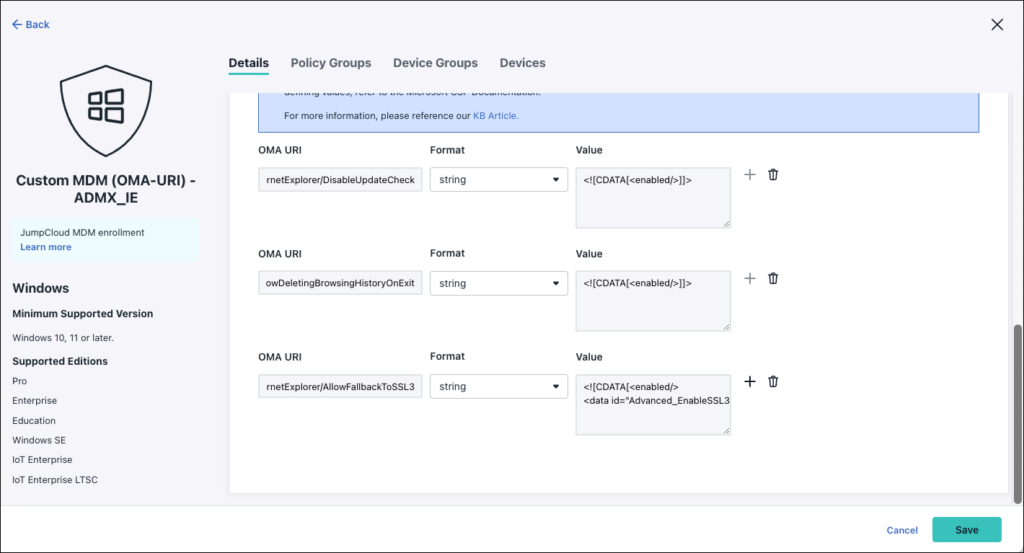
The format for ADMX payloads while configuring JumpCloud policies is usually string. Here's an example to create a custom Internet Explorer CSP policy using ADMX payloads.
- OMA URI:
./Device/Vendor/MSFT/Policy/Config/InternetExplorer/DisableUpdateCheck - Format: string
- Value:
<![CDATA[<enabled/>]]>
- OMA URI:
./Device/Vendor/MSFT/Policy/Config/InternetExplorer/AllowDeletingBrowsingHistoryOnExit - Format: string
- Value:
<![CDATA[<enabled/>]]>
- OMA URI:
./Device/Vendor/MSFT/Policy/Config/InternetExplorer/AllowFallbackToSSL3 - Format: string
- Value:
<![CDATA[<enabled/><data id="Advanced_EnableSSL3FallbackOptions" value="3"/>]]>
 In this Article
 Learn More