
The JumpCloud Active Directory Integration (ADI) enables the syncing of users, groups, and passwords between JumpCloud and on-premise or off-premise AD. As covered in Get Started with the Active Directory Integration, the ADI uses two agents: an import agent and a sync agent that can be installed in three (3) configurations. The configurations are determined by where you want to manage users, groups, and passwords.
- Manage users, groups, and passwords in AD
- Manage users and passwords in either system, or both
- Manage users, groups, and passwords in JumpCloud
This article covers how to leverage the ADI depending on your configuration and use case.
Prerequisites
- You’ve read and are familiar with the concepts in step 1 of this series, Get Started with the Active Directory Integration (ADI).
- The ADI agent(s) are installed and running on your AD servers. See Configure the Active Directory Integration.
Sync interval
The ADI import agents check for updates to users and security groups in the ADI security group (typically named JumpCloud or) in AD every 90 seconds, by default.
The ADI sync agent checks for updates to users and user groups connected to ADI in JumpCloud every 5 seconds.
Use cases and workflows
The table shows a summary of the most common use cases and the ADI configurations that support them. Reference Configure the Active Directory Integration for more information.
| ADI Configuration | Use case | User and Group Authority | Password authority | Data sync direction | Server type(s) on which agent(s) can be installed | Install Import Agent | Install Sync Agent |
|---|---|---|---|---|---|---|---|
| Manage users, groups and passwords in AD | Extend AD |
 |
|
 |
Domain Controllers |
 |
 |
| Manage users and passwords in either system, or both | Extend AD |
|
 |
 |
Domain Controllers, Member Servers |
|
|
| Minimize AD footprint |
|
|
|
Domain Controllers |
|
|
|
| Migrate away from AD |
 |
|
|
Domain Controllers, Member Servers (Sync agent only) |
|
|
|
| Manage users, groups, and passwords in JumpCloud | Minimize AD footprint |
|
|
 |
Domain Controllers, Member Servers |
|
|
| Migrate away from AD |
|
|
|
Domain Controllers, Member Servers |
|
|
Workflow for Managing Users, Groups, and Passwords in AD
When JumpCloud ADI is configured for AD Import only, the illustrations below show the user identity workflows for any user data changes or password updates in this configuration. This method allows Admins to extend their AD Users and Passwords to JumpCloud. JumpCloud can then extend these identities out to resources, such as RADIUS WiFi or VPN networks, SSO Applications, LDAP resources, and more.
If you’re only using AD Import, continue to the Using AD Import section of this article and disregard the Using AD Sync section.
AD Import Agent Only – Single Domain Workflow

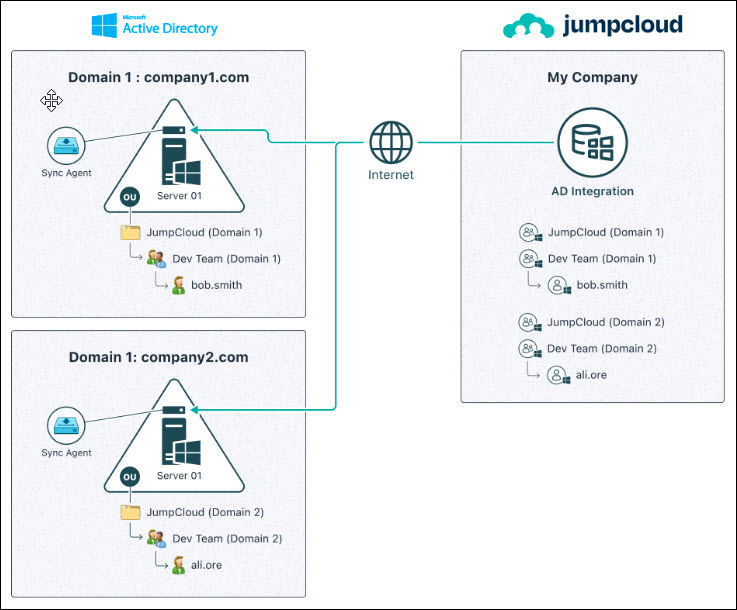
AD Import Agent Only – Multiple Domain Workflow

Workflow for Managing Users, Groups, and Passwords in AD, JumpCloud, or Both
When the JumpCloud ADI is configured for AD Import and AD Sync, the illustrations below show the user identity workflow for any changes or password updates in this configuration. This scenario allows Admins to not only extend their AD users and Passwords to JumpCloud but to also allow JumpCloud to manage identities and passwords within AD for synced users.
Two-way Sync – Single Domain Workflow

Two-way Sync – Multiple Domain Workflow

Workflow for Managing Users, Groups, and Passwords in JumpCloud
When the JumpCloud ADI is configured for AD Sync only, the illustrations below show the user identity workflow for any changes or password updates in this configuration. This scenario allows Admins to manage identities and passwords within AD solely from JumpCloud for synced users.
AD Sync Agent Only – Single Domain Workflow

AD Sync Agent Only – Multiple Domain Workflow
Considerations
User Sync Considerations
- The JumpCloud ADI import and sync agent services use TLS for all communication. If no network connectivity exists to JumpCloud, the ADI won’t work properly
- Due to the way the primary group information is stored by AD, the groups linked to JumpCloud shouldn't be a primary group for any user or group. Otherwise, users who are members won’t sync
User Sync from AD to JumpCloud
- We recommend that all users you plan to import from AD into JumpCloud live in a single OU or be nested underneath a chosen OU (Root user container) in AD. This can be the default CN=Users container in AD or an alternate custom OU in the directory.
- If you relocate users in AD outside of the Root User Container, you could disrupt password synchronization, or remove users and groups from your JumpCloud instance, along with any associated data and resource associations.
- To sync users from AD to JumpCloud, users must be members of the ADI specific Security Group (e.g., “JumpCloud” or "JumpCloud -Domain1") or of a Security Group nested under this Security Group
- Users who are imported from AD to JumpCloud will automatically have their Password Authority set to Active Directory by default and the attributes that sync will be read-only in both the Admin Portal and in User Portal. These fields become restrictedFields.
- You can manage users in 2 ways:
- Individually by adding them to the security group created for this integration, located in the designated OU
- Using groups located in or nested in the designated Root user container by adding those groups as a member of the JumpCloud Integration Security Group
- ADI Import Agent settings in the jcadimportagent.config.json file control the behaviors that occur in JumpCloud when certain actions are taken on the user in AD
- Removing users from the JumpCloud integration Security Group within AD will either delete those users in JumpCloud and deprovision them from all bound resources or disconnect them from the AD integration, leaving them active in JumpCloud and allowing them to be managed in JumpCloud directly. The behavior is controlled by the UserDissociationAction setting in AD Import Agent configuration file
- Removing users from the JumpCloud Integration Security Group within AD will either delete those users in JumpCloud and deprovision them from all bound resources or disconnect them from the AD integration, leaving them active in JumpCloud and allowing them to be managed in JumpCloud directly. The behavior is controlled by the UserDissociationAction setting in AD Import Agent configuration file
- Importing privileged user accounts, such as Domain Admins and accounts with “adminCount=1”, into JumpCloud from AD, isn’t supported.
- The Password Authority setting can be changed for a specific user from their user record directly or for multiple users from Users > Actions > Set External Password Authority.
Export and sync from JumpCloud to AD
- Users created in AD from JumpCloud are created in the AD root container unless a different root container is specified during installation.
Using the AD Import Agent
![]()
For older import agents (prior to v3.40.0), if the JumpCloud Administrator Account associated with the import is deleted or the API key is rotated, the import will stop working. All imports will fail until a valid API key is generated and updated in the registry on the AD servers. Newer agents do not use an API key.
The AD import agent allows you to do the following in JumpCloud from AD:
- Import, update, suspend, and delete users
- Create groups
- Manage group membership
- Delegate authentication (AD validates the user's credentials)
If the AD import agent is installed on a DC, it also allows you to:
- Sync the user’s password from AD to JumpCloud
![]()
When the import agent is installed on a member server, the password is not synced from AD to JumpCloud and is never stored in JumpCloud.
To import passwords only from AD to JumpCloud
When the SyncAttributesAction is set to PasswordAttributes and the import agent is installed on all DCs, only password information syncs from AD to JumpCloud. The password information that syncs is:
- password
- password expired status
- password expiration date
- password lockout status (if the SyncAccountLockedOutStatus is true)
To only sync password information from AD to JumpCloud
To sync password information a user must be connected to ADI for this domain in the JumpCloud admin portal. The import agent security group is not used in this deployment configuration.
- Log in to the JumpCloud Admin Portal.
![]()
If your data is stored outside of the US, check which login URL you should be using depending on your region. If your organization uses LDAP, RADIUS, or requires firewall allow list configuration, the Fully Qualified Domain Names (FQDNs) will also be region specific. See JumpCloud Data Centers for the URLs, FQDNs, and IP addresses.
- Go to Identity Management > Active Directories.
- Select the AD Domain to view its details.
- Select the User Groups tab and select the groups with the users whose password should sync fom AD
- Alternatively, select the Users tab and select a user to connect to the AD Domain.
- Click Save.
To import users from AD into JumpCloud
The AD Import Agent will only import users that you directly add as a memberOf the JumpCloud ADI Security Group within AD (i.e., the Security Group you created during the AD Import Agent installation).
There are two ways to specify which users to import from AD to JumpCloud:
- through a direct membership to the JumpCloud ADI Security Group
- through a Security Group that is a member of the JumpCloud ADI Security Group
![]()
The UserTakeoverAction setting in the AD import configuration file controls how passwords are handled for users who already exist in JumpCloud when they are synced from AD.
By default, the deactivate value sets user’s JumpCloud password to a pending status. This causes the user to temporarily lose access to JumpCloud-provisioned resources (e.g., (such as RADIUS, LDAP, SSO apps, etc.) until their password is reset in AD. For more information, see the Advanced Configurations for ADI article for more information about UserTakeoverAction.
To import a single user from AD to JumpCloud
- Open the Active Directory Users and Computers (ADUC) Menu by clicking the start button, typing “dsa” and clicking the Active Directory Users and Computers icon.
![]()
- Once ADUC is open, navigate to a user that you would like to import into JumpCloud.
- Right-click on the target user and click Properties.

- Navigate to the Member Of tab in the Properties menu.

- Click Add. Then add this user as a member of the JumpCloud ADI Security Group.

- Click Apply. Wait up to 90 seconds and then check to see if the user has been fully imported into JumpCloud. This validates that your AD Import Agent is working appropriately.
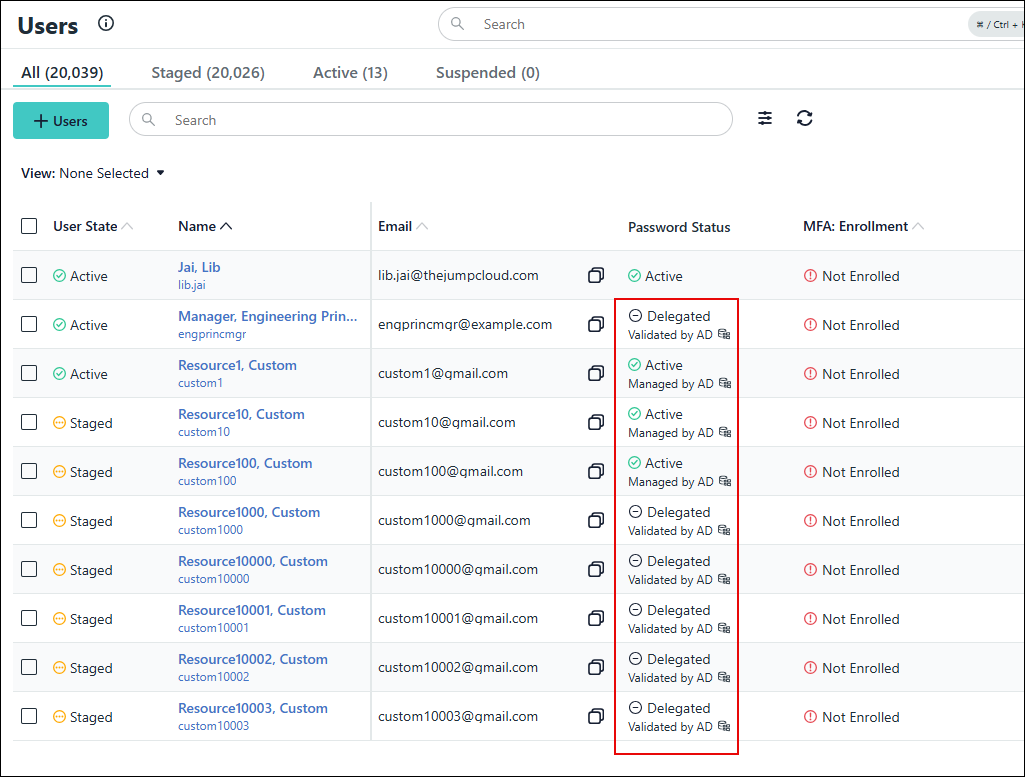
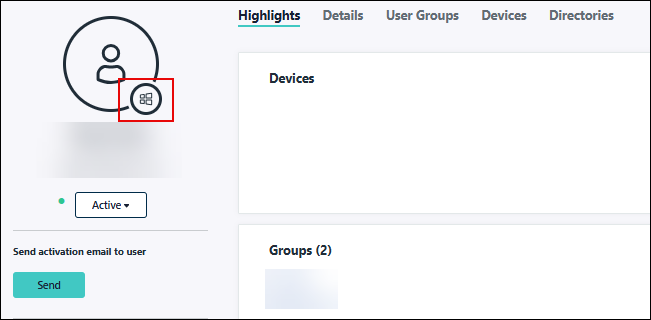
The user is created with a Password Status of Password Pending and will have an AD Integration badge below their email address. The user state is controlled by setting for Users>Settings>Default User State for User Creation> Manual/Single User API. See Manage User States for more information about this setting.
![]()
Users who existed in AD before the AD import agent was installed can log in to JumpCloud using their existing AD password. Their credentials will be validated by AD through delegated authentication.
If the import agent is installed on your DCs, user passwords will automatically be imported/updated in JumpCloud.
The Password Status for imported users will be Delegated by default unless you manually change the Delegated Authority setting on the user record.
To import multiple users from AD into JumpCloud:
This method allows you to import all users that are members of a specific Security Group. For example, if you want to export all AD users that are members of the Accounting Security Group, you would make the Accounting Security Group a memberOf the JumpCloud ADI Security Group. This will then import the Accounting Security Group and all users that are associated members.
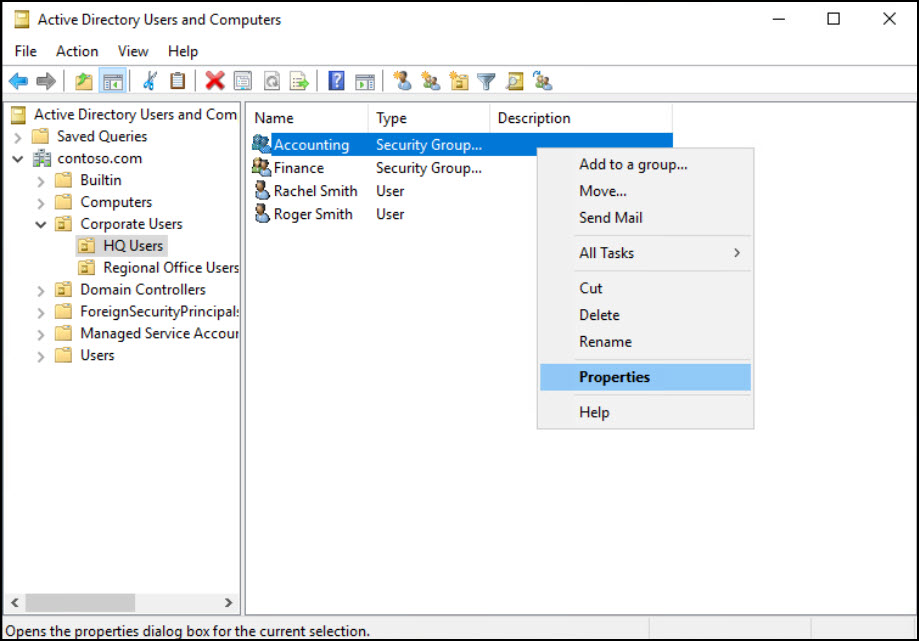
- Open the Active Directory Users and Computers (ADUC) Menu by clicking the start button, typing “dsa” and clicking the Active Directory Users and Computers icon.
![]()
- Once ADUC is open, navigate to a user that you would like to import into JumpCloud.
- Right-click on the target Security Group and click Properties.
- In the Security Group Properties Menu, click the Member Of tab and click Add.
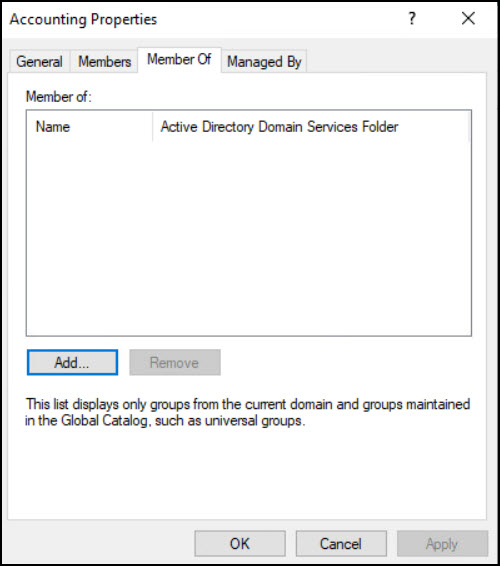
- Add this Security Group to the JumpCloud-named Security Group and click Apply.
- Wait 90 seconds for both the Security Group and the Users within that Security Group to be created in JumpCloud. You will see both the user accounts and user groups within JumpCloud’s Admin Portal marked by an AD Integration badge.

![]()
When the delegated authentication setting, Delegated Password Validation, is disabled, users who existed in AD before the AD import agent was installed must update their password in AD or an AD-managed resource for the Password Status to become active in JumpCloud and allow them to log in to the JumpCloud user portal and use JumpCloud SSO.
If the import agent is installed on your DCs, users created in AD after the AD import agent was installed will have their passwords automatically imported/updated in JumpCloud.
To manage passwords
Passwords will only sync from AD to JumpCloud if the import agent is installed on
![]()
When the delegated authentication setting, Delegated Password Validation, is enabled and Pending for the ADI configuration and the user's Delegated Authority is Active Directory, the user will not be able to log in. An AD import agent, version 3.0 or higher, must be installed and active for the Delegated Password Validation to change from Pending to Active.
Password Considerations
- Consistent Password Requirements: To prevent sync failures, ensure the password complexity requirements in both Active Directory and JumpCloud are as closely aligned as possible. This will help avoid passwords being rejected for not meeting the necessary criteria.
- Users imported from AD to JumpCloud will have their Password Authority set to None (JumpCloud). This setting can be changed from Users> Actions > Set External Password Authority or directly from the User Details page
- When the JumpCloud AD import agent is installed on member servers, the AD password does NOT sync to JumpCloud:
- This configuration is used when user passwords are managed in JumpCloud
- Users imported from AD will not have their AD password stored on their initial login to JumpCloud nor will the password sync from AD to JumpCloud
- When a user's Password Authority is set to None (JumpCloud) the password can set and managed in JumpCloud.
- When the JumpCloud AD import agent is installed on all DCs, the AD password does sync from AD to JumpCloud. This means that the password will be saved in both AD and JumpCloud.
- When a user's Password Authority is set to None (JumpCloud):
- Passwords can be managed in AD, JumpCloud, or both.
- Password expiration notifications are sent from JumpCloud.
- When a user's Password Authority is set to Active Directory:
- The password cannot be set or changed password in JumpCloud, with the exception of the link from the password expiration notification.
- Passwords must be managed in AD.
- Password expiration notifications are sent from JumpCloud.
- When a user's Password Authority is set to None (JumpCloud):
To manage passwords in a one-way sync from AD to JumpCloud (Managing Users, Groups, and Passwords in AD)
In this configuration, the delegated authentication setting, Delegated Password Validation, is enabled by default and cannot be disabled in the ADI configuration. This means whenever an AD imported user logs in to the JumpCloud user portal or performs a JumpCloud SSO login, their password is validated by AD and not JumpCloud.
New users
Users imported from AD into JumpCloud, can log in to JumpCloud immediately using their company email address and AD password.
When AD users are imported from AD into JumpCloud, there is no password associated with their account in JumpCloud. The Password Authority and Delegated Authority are automatically set to Active Directory on their user record. The Password Status will be Delegated and show as "Managed by AD".
If the import agent is installed on a member server:
- The user's password will never sync from AD to JumpCloud and will never be stored in JumpCloud.
If the import agent is installed on a DC:
- The user's AD password will be stored in JumpCloud the first time the user logs into the JumpCloud user portal and will sync from that point forward.
To manage passwords in a two-way sync from AD to JumpCloud (Managing Users, Groups, and Passwords in AD, JumpCloud, or Both)
In this configuration, the delegated authentication setting, Delegated Password Validation, is disabled by default and is editable. This means the user must have an active password in JumpCloud to log in to the JumpCloud user portal or performs a JumpCloud SSO login.
When AD users are imported from AD into JumpCloud, there is no password associated with their account in JumpCloud. The Password Authority is set to None (JumpCloud) and Delegated Authority is set to None on their user record by default.
Until the user sets a password in JumpCloud or changes their password in AD if the import agent is installed on a DC, You’ll see the newly imported users in JumpCloud marked with an AD badge and in an orange Password Pending password status within the user menu.
![]()
When ADI delegated authentication setting, Delegated Password Validation, is set to None, users who existed in AD before the AD import agent was installed must set a password in JumpCloud to match their AD password or, if the import agent is installed on DCs, update their password in AD or an AD-managed resource for the Password Status to become active in JumpCloud and enable them to access JumpCloud managed resources.
To sync a password from AD to JumpCloud
![]()
Syncing passwords from AD to JumpCloud is only applicable when the import agent is installed on DCs. When the import agent is installed on member servers, the password is not synced from AD to JumpCloud.
- When a user's Delegated Authority is set to Active Directory,
- The user's AD password will be stored in JumpCloud the first time the user logs into the JumpCloud user portal and will sync from that point forward.
- Password changes will sync within 90 seconds after the user changes their password in AD or on an AD-managed resource
- When a user's Delegated Authority is set to None,
- The user will need to change their password in AD or on an AD-managed resource before they can log in to the JumpCloud user portal or with JumpCloud SSO.
- Password changes will sync within 90 seconds after the user changes their password in AD or on an AD-managed resource. In the JumpCloud Admin Portal Users page, the user’s Password Status will be a green check-marked active statuswith the expiry date from AD.
![]()
The password expiry date for AD-managed users is the expiry date from AD as the expiry is managed by AD, not JumpCloud.
- All Password changes moving forward will need to be done within AD or on AD-bound resources.
![]()
If you’re planning on using AD Sync alongside AD Import, Passwords can be updated in JumpCloud after this required initial password change has taken place within the steps outlined above. This is a requirement for both AD Import only and AD Import & Sync use cases.
To create, update, and disable user accounts
![]()
These changes on a user or user group will be reflected within JumpCloud in approximately 90 seconds.
You will be able to manage JumpCloud user accounts and their synced attributes from AD for any CrUD actions (Create, Update, and Deactivate/Disable). The attributes that syncs from AD to JumpCloud are controlled by the SyncAttributesAction setting in the jcadimportagent.config.json file.
If the setting is Core User Information (BaseUserAttributes), the attributes that sync from AD to JumpCloud are:
- First Name
- Last Name
- Username
- Password (if import agent is installed on DCs)
If the setting is Full User Record (AllSupportedAttributes), the attributes that sync from AD to JumpCloud are:
- First Name
- Last Name
- Username
- Password (if import agent is installed on DCs)
- displayname
- description
- JobTitle
- department
- company
- location
- employeeType
- phoneNumbers
- addresses
- manager
Creating new users in JumpCloud from AD
Follow the same process outlined above for importing users from AD into JumpCloud.
To create new users in AD and JumpCloud:
- Create a new user account in AD
- Add the user to the JumpCloud ADI security group
- Wait 90 seconds
- Verify the user was created in JumpCloud.
To import an existing AD user in JumpCloud:
- Add an existing AD user to the JumpCloud ADI security group
- Wait 90 seconds
- Verify the user was created in JumpCloud.
Updating user attributes in JumpCloud from AD
When you change any attributes of an AD user which is currently synced via the AD Import Agent, this will reflect within your JumpCloud tenant in approximately 90 seconds. For example, if you change the First or Last Name of a user, this will reflect on the JumpCloud user’s First or Last Name attribute in 90 seconds.
Suspending or deleting users in JumpCloud from AD
When deleting, suspending, or deactivating users within AD, this will in turn either suspend or delete the users in JumpCloud thus removing access to any of the JumpCloud-managed resources he or she had access to such as RADIUS, LDAP, or SSO Applications. The specific behavior is determined by the settings in the jcadimportagent.config.json file.
Using the AD Sync Agent
This agent allows you to sync CrUD changes for synced users from JumpCloud to AD, specifically:
- Sync new users.
- Sync password changes.
- Sync updates to supported user attributes.
- Disable the user account in AD when you suspend or delete the user in JumpCloud.
AD Sync Agent Recommendations
- Create a security group named JumpCloud Admins. This group isn’t synced to the JumpCloud Administrator Portal, but is used to identify any accounts that you want to be Global Administrators or Sudo users in JumpCloud. Any user that is a member of this group and also a member of the JumpCloud group will be granted Admin/Sudo privileges on all device associations to which they are bound by default. This function doesn't support members of nested groups
- For full bidirectional synchronization, we recommend that all Users and Groups be synchronized with JumpCloud, live under a single OU (Root User Container) in Active Directory. This can be the default CN=Users container in AD or an alternate custom OU within the directory
- To manage users in different OUs, we recommend that these OUs be located underneath the primary Root User container. Users or groups located in these containers that are made members of the JumpCloud ADI security group allow AD Sync to properly synchronize passwords and attributes associated with those users
- We recommend that you align password complexity requirements between AD and JumpCloud as closely as possible. Otherwise passwords may not replicate if they’re rejected by the destination directory’s complexity requirements
- We recommend that you set the service account you use to authorize AD Sync's access to AD with a password that doesn't expire if your security requirements allow this. If this isn't permissible with your security compliance levels, then we recommend scheduling a maintenance window to reinstall the AD sync agent every time the service account password changes
AD Sync Agent Considerations
- Synced users must have values for <First Name> and <Last Name>, i.e., the first name and last name fields cannot be empty, otherwise the users will fail to sync.
- If you remove users or groups from the JumpCloud ADI security group in AD they’re removed from the JumpCloud Admin Portal per the default AD Sync configuration options
- Managing privileged user accounts such as Domain Admins in AD isn't supported, see AdminSDHolder, Protected Groups and Security Descriptor Propagator. Active Directory flags privileged accounts with “adminCount=1” in the directory, which results in any inherited permissions granted to the JumpCloud AD agent services to be removed. This prevents JumpCloud from being able to effectively manage those privileged accounts.
- When using both AD Sync and AD Import agents, if the user's password authority is Active Directory, password expiration notifications are not sent to the end user or administrator.
AD Sync Agent User Attribute Synchronization
JumpCloud AD Sync can manage the following data fields in AD:
- Password
- First Name
- Last Name
- Windows UserAccountControl flag for ACCOUNTDISABLE - this field is used for syncing the JumpCloud account status. Currently, JumpCloud only writes back a suspend status to AD. When a user is suspended in JumpCloud, JumpCloud disables the user in AD through the Sync agent. Learn more about Configure ADI.
- MemberOf - this field is used to track group membership in AD. For this field to be synced, you need to install Sync agent v 2.26.0 or later. Learn how to Configure ADI.
JumpCloud Users are associated with Active Directory Users based on the alignment of the Username and Email fields of users in JumpCloud and Active Directory. See Configure ADI for UserFieldMapping settings configured in the AD Import agent that define the username field of the AD User.
Group Attribute Synchronization
JumpCloud syncs the following data fields with AD Sync for groups:
- Group Name
User and Group Management
To provision users to AD
The JumpCloud ADI security group that’s created during AD Import installation is the primary management group for AD integration. This group is used to define the scope of Identity Management with AD and allows full bidirectional synchronization between AD and JumpCloud.
User Creation
You can create users in JumpCloud and connect them to an AD Domain using AD Sync. You can connect users to an AD Domain from the following places in the Admin Portal:
- User panel Directories tab
- Directories panel User tab
When you connect a user to an AD Domain, JumpCloud determines if a user with the same username exists on the domain. If a user with the same username doesn't exist, JumpCloud creates a user with the JumpCloud username on the AD Domain and generates a random password for the user. If a user with the same username exists on the domain, JumpCloud takes over the account, but doesn't generate a random password for the user.
To add a user to an AD Domain from the Users panel
- Go to Identity Management > Users.
- Select a user to view their details.
- Select the Directories tab.
- Select the AD Domain you want to connect the user to.
- Click save user.
To add a user to an AD Domain from the Directories panel
- Go to Identity Management > Active Directories.
- Select an AD Domain to view its details.
- Select the Users tab.
- Select a user to connect to the AD Domain.
- Click save.
To sync an existing user from JumpCloud to AD
This functionality allows JumpCloud users to be created in AD if they don’t exist or allows JumpCloud to either take over management of the user if you have configured a one-way sync from JumpCloud to AD (only the AD sync agent is running) or co-manage the user with AD in a 2-way sync configuration (both the AD import and AD sync agents are running).
Follow the steps below to sync users from JumpCloud to AD.
![]()
If you are managing users in both JumpCloud and AD (two-way sync), and you left the default setting for UserTakeoverAction, which is deactivate, when you sync user with passwords from JumpCloud to AD, the AD import agent will change the JumpCloud user passwords status from Active to Password Pending. This results in these users losing access to any resources assigned to them in JumpCloud. To prevent this, we recommend to see Advanced Configurations for ADI and change the UserTakeoverAction attribute to retain.
- Navigate to your user in JumpCloud and open up their Details.
- Click on the user groups tab on the user aside.
- Assign user to a JumpCloud group and click Save.
- Wait for Active Directory badge to appear.
- Bind this user to the user group which they need to be a memberOf in AD (that is also synced using the ADI).
- Click Save User. The user will then be created in the Root User Container within your AD domain. This can take up to 90 seconds.

![]()
Users who are created in AD from JumpCloud are automatically put into the Root User Container you configured during the installation of the AD Import & Sync Agents. If you need to move the user to the appropriate OU or sub OU, you’ll have to do this within AD on the DC.
To create, update and deactivate user accounts
The following section covers how to manage AD user accounts from JumpCloud. With the AD Sync in place, JumpCloud Admins are able to manage AD users from the JumpCloud Admin Portal. This makes user onboarding, off-boarding, and management much easier. Additionally, this may help with removing the need to remotely access the DC for simple tasks within the Identity Lifecycle for user accounts.
Creating Users in JumpCloud
JumpCloud Admins can create users in AD by binding any JumpCloud user to an AD Integrated User Group within JumpCloud. For example, if you’ve synced the Accounting group from AD to JumpCloud via the Import Agent, then any JumpCloud user bound to this synced user group will be created within AD under the Root User Container.
The user is created within AD, is a memberOf the associated user group (Security Group in AD), and their AD user account will use their JumpCloud Password.
Suspending or deleting users in JumpCloud
Suspending or deleting users within JumpCloud will Disable the user account within AD. JumpCloud in any form will never remove or delete user accounts in any of the 3rd party integrations. (This also includes SAML, LDAP, AD, GWS, and M365). These changes will reflect in 5 seconds.
Group Synchronization: Managing Groups from AD
- Groups added to the JumpCloud ADI security group in AD are replicated to the JumpCloud Admin Portal along with all of the users that are a member of that group. Because JumpCloud doesn’t support nested groups directly, any groups in AD that are nested in another group are traversed recursively and their structure is flattened. Users are made a member of their primary group in JumpCloud and a member of the group in which they’re nested in in AD. For example, in AD, Group1 is a member of the JumpCloud group with members User1, User2 and Group2. Group2 is a member of Group1 and contains members User3 and User4. In JumpCloud, Group2 is mirrored and User3 and User4 are bound. Group 1 is mirrored and User1, User2, User3 and User4 are bound
- To manage group membership from JumpCloud to AD, and assign the memberOf attribute to a user account in AD, the AD bound groups in JumpCloud are required to live under the configured Root User container as configured during AD Sync agent installation with the proper delegated controls and permissions
- Users that only exist in JumpCloud may also be bound to these groups in your JumpCloud Administrator Portal.
- For alternate authoritative scenarios or more details regarding synchronization use cases, see use cases in Get Started: ADI or contact JumpCloud for additional support
Service Details
The agent is registered as a service to start automatically.
- Display name: JumpCloud AD Sync Agent
- Service name: JCADSyncAgent
- Log located at C:\Program Files\JumpCloud\AD Sync\adsync.log
User Experience
Flow for Active Users
An active user is a user in an 'active' user state, has a password, and that password status is 'active'. After an administrator binds an active user to an external directory, the user receives an email telling them the directory they’ve been added to, and to sync their password by logging into their User Portal.
Users That are Bound to More Than One External Directory
They will receive a new email for each individual external directory that they are bound to. The flow for users bound to more than one external directory is the same as for active users.
Flow for New Users
A new user is a user in an 'active' user state with a password status of 'password pending'. After an administrator binds a new user without a password to an external directory, the user receives a Welcome to JumpCloud (activation) email that takes them through how to register their new account. After the user registers their account, creates an account password, and logs in to their User Portal, their password is sent to the directories they’re bound to, and JumpCloud will manage their password.
Managing ADI
To update agents
We recommend keeping your agents current to ensure you have the latest security updates, bug fixes, and functionality and to retain support.
- Log in to the JumpCloud Admin Portal.
![]()
If your data is stored outside of the US, check which login URL you should be using depending on your region. If your organization uses LDAP, RADIUS, or requires firewall allow list configuration, the Fully Qualified Domain Names (FQDNs) will also be region specific. See JumpCloud Data Centers for the URLs, FQDNs, and IP addresses.
- Go to Identity Management > Active Directories.
- Select your AD domain
- In the Downloads section, select
- Select a download location
- Upload the agent installation file to the server where the agent is already installed
- Run the installation wizard
- Only minimal installation screens are shown.
- Directory for where the installation should occur
- Finish screen
- Restart the service.
To manage agents in JumpCloud
- Log in to the JumpCloud Admin Portal.
![]()
If your data is stored outside of the US, check which login URL you should be using depending on your region. If your organization uses LDAP, RADIUS, or requires firewall allow list configuration, the Fully Qualified Domain Names (FQDNs) will also be region specific. See JumpCloud Data Centers for the URLs, FQDNs, and IP addresses.
- Go to Identity Management > Active Directories.
- Select your AD domain
- Click the pause to temporarily stop the agent.
![]()
This prevents information from flowing between JumpCloud and AD. For the AD sync agent, changes are still queued.
- Click delete to remove the agent from JumpCloud.
![]()
Deleting an agent in JumpCloud does not stop the service in AD nor uninstall it.
To change the Primary AD Import Agent Role to another Domain Controller
- Log in to the JumpCloud Admin Portal.
![]()
If your data is stored outside of the US, check which login URL you should be using depending on your region. If your organization uses LDAP, RADIUS, or requires firewall allow list configuration, the Fully Qualified Domain Names (FQDNs) will also be region specific. See JumpCloud Data Centers for the URLs, FQDNs, and IP addresses.
- Go to Identity Management > Active Directories.
- Select your AD domain.
- Pause all the running agents except for the the Domain Controller that you would like to designate as the Primary Import Agent.
- After a short time period, the currently running Import agent will become the Primary Import agent.
- Unpause the remaining agents.
To rotate ADI service account passwords in AD
The ADI import and sync service account passwords should be rotated on a regular basis for security purposes.
Rotating the ADI import service account (jcimport) password:
- Log in to a Domain Controller with an AD domain admin account
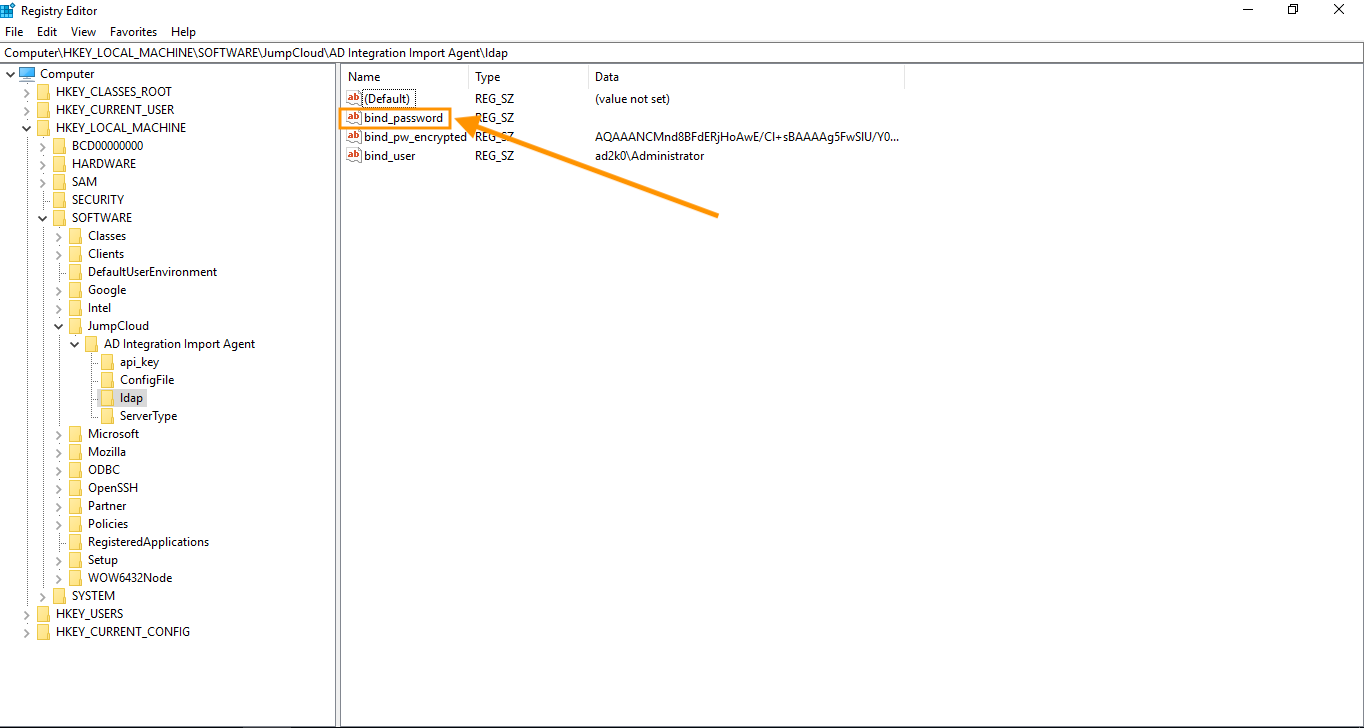
- Open the registry
- Navigate to HKLM\SOFTWARE\JumpCloud\AD Integration Import Agent\ldap
- Edit bind_password
- Enter the new password in the Value data field
- Click OK
- Open services.msc
- Restart the JumpCloud AD Integration Import Agent service.
Rotating the AD sync service account (jcsync) password:
- Log in to a Domain Controller with an AD domain admin account
- Open the registry
- Navigate to HKLM\SOFTWARE\JumpCloud\AD Integration Sync Agent\ldap
- Edit bind_password
- Enter the new password in the Value data field
- Click OK
- Open services.msc
- Restart the JumpCloud AD Integration Import Agent service.

To change ADI Use Case
For detailed instructions on changing your ADI deployment configuration, read ADI: Change Configuration.
- Log in to the JumpCloud Admin Portal.
![]()
If your data is stored outside of the US, check which login URL you should be using depending on your region. If your organization uses LDAP, RADIUS, or requires firewall allow list configuration, the Fully Qualified Domain Names (FQDNs) will also be region specific. See JumpCloud Data Centers for the URLs, FQDNs, and IP addresses.
- Go to Identity Management > Active Directories.
- Select your AD domain
- Click Update Configuration
- Select the new deployment configuration
- Click Next
- Follow the steps on each screen.
| Use case | New Use Case | Changes | ||
|---|---|---|---|---|
| Manage users, groups, and passwords in AD | Manage users and passwords in either system, or both | Manage users, groups, and passwords in JumpCloud | ||
| Manage users, groups, and passwords in JumpCloud | x | 1. Delete the sync agent from the Admin Portal 2. Uninstall sync agents on all servers 3. Follow the instructions in to download and install the import agent(s) | ||
| x | Follow the instructions in to download and install the import agent(s) | |||
| Manage users, groups, and passwords in AD | x | Follow the instructions in Download and install sync agent(s) on server(s) | ||
| x | 1. Delete the sync agent from the Admin Portal 2. Uninstall sync agents on all servers 3. Follow the instructions in to download and install the import agent(s) | |||
| Manage users and passwords in either system, or both | x | Follow the instructions in to download and install the import agent(s) | ||
| x | 1. Delete the import agent(s) from the Admin Portal 2. Uninstall import agents from all servers |
To manage ADI services in AD
- Open services.msc
- Select the AD service (JumpCloud AD integration Sync Agent or JumpCloud AD integration Import Agent)
- Select the desired action: start, stop, restart
To modify agent configuration
Modifying the AD Import Agent Configuration
![]()
The default configuration settings for the the AD import agent are:
- UserDissociateAction = remove
- UserTakeoverAction = deactivate
- UserDisableAction = suspend
- UserExpireAction = expire
- Review Advanced Configurations for ADI to understand the configuration settings available for the import agent.
- In AD, go to the JumpCloud folder where the AD Import agent is installed on a domain controller.
- Open the adint.config.json file using a text editor
- Edit the configurations in the “MainLoop” section of the file.
- Repeat this process for the configuration file on every AD server (DC controller on which AD Import is installed.
To modify the Root User container
If you decide to use a different Root user container for managing AD resources then you will want to modify or validate the configured Root User container location.
Verifying the full LDAP path for the chosen Root user container you have selected in ADUC
- From the ADUC panel’s View menu, enable Advanced Features.
- Right-click the container and select Properties.
- Select the Attribute Editor tab.
- Select the “distinguishedName” attribute, then click View.

Modifying the Root User container in AD sync configuration settings
Stop the JumpCloud AD Integration Sync service and make the required Sync Agent config changes:
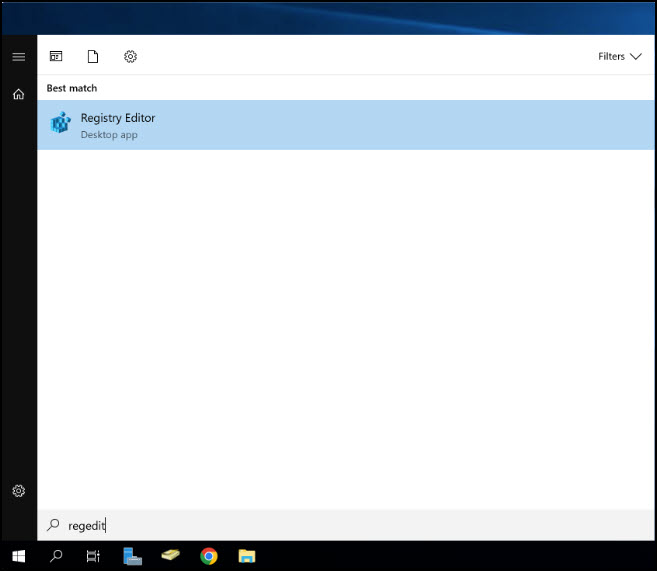
- Open Registry Editor by clicking the Start button and typing in regedit. Click on the Registry Editor icon.
- Navigate to the following Registry Folder: Computer\HKEY_LOCAL_MACHINE\SOFTWARE\JumpCloud\AD Sync.
- There should be a Key (looks like a folder) named ldap. If there is not, please create this Key in the registry and name it ldap.
- Open the ldap Key.
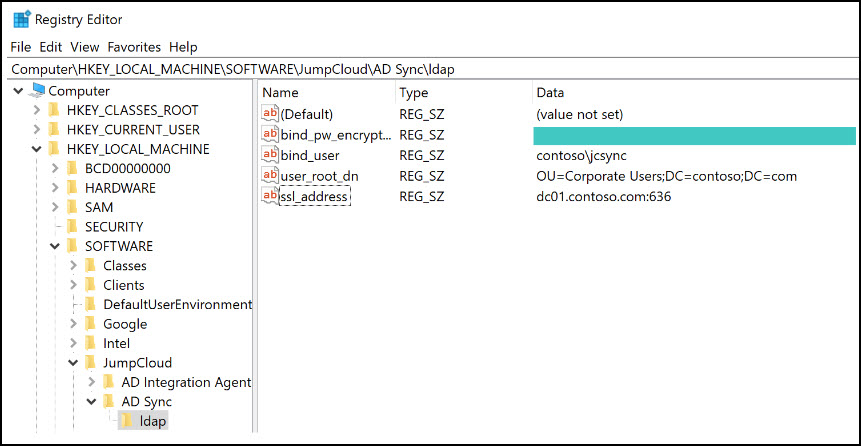
- You should see a Key labeled user_root_dn. You should also see the value with the targeted Root User Container you specified during install of the AD Sync Agent. If the user_root_dn value does not look correct, you can update it by double-clicking the key and updating the value to match your Root User Container.
- Once updated, you need to start the JumpCloud AD integration Sync Agent service within services.msc.
![]()
These changes should coincide with relocating the JumpCloud ADI security group in AD, as well as using the Delegation Wizard to set the associated agent service accounts.
To uninstall agents from AD servers
![]()
After deactivating the last agent, syncing will stop, but information is still queued if the agent is not uninstalled from every server. An email will be sent out when the last agent is deactivated.
- Open Program Files.
- Find the program associated with the agent you want to uninstall (JumpCloud AD Import or JumpCloud AD Sync)
- Uninstall
ADI DI Events
New and Updated ADI DI Events
| DI Event | Description | Notes |
|---|---|---|
| activedirectory_agent_inactive | Logged when an agent is marked as inactive. This occurs when the agent stops responding to the heartbeat check or the agent service being stopped on the server. | New event |
| activedirectory_agent_active | Logged when an agent successfully registers for the first time. | New event |
| activedirectory_primary_agent_switch | Logged when an agent is marked as the primary agent if a primary doesn’t exist or the agent that was primary becomes inactive. | Updated to include hostname, version, source_ip, host_type, host_os_version |
| activedirectory_agent_activate | Logged when an agent becomes active from an inactive state. | Updated to include hostname, version, source_ip, host_type, host_os_version |
ADI Delegated Auth DI Event Changes
| Event | Description | Change |
|---|---|---|
| user_login_attempt | Logs every time a user tries to log in to a JumpCloud managed resources | JSON includes a new field “password_delegated_authority” in the auth_context when the user’s login is delegated to AD for authentication |
|
"auth_context": { "auth_methods": { "password": { "success": true } }, "password_delegated_authority": "ActiveDirectory"
}, |
||
| association_change | Logs every time two resources are associated (bound) or disassociated (unbound). | Logged when a user is associated (bound) to or disassociated (unbound) from a delegation-enabled AD domain. |
| Logged when a user group is associated (bound) to or disassociated (unbound) from a delegation-enabled AD domain. | ||
| user_delegated_authority_update | Logs when a change is made to the Delegated Authority setting on the User record. | New DI event |
| activedirectory_domain_delegated_password_change | Logs when the delegated authentication setting Delegated Password Validation in the ADI configuration is changed | New DI event |
Integration with Entra Connect
When AD Sync and/or AD Import tools are installed on the Windows Server that also has Entra Connect or Entra Connect cloud sync installed, your JumpCloud tenant can NOT be bound to your Entra ID or Microsoft O365 tenant. If Entra ID Connect is the only AD tool installed on the Windows Server this too will NOT work with an Entra ID tenant bound to a JumpCloud tenant.
When JumpCloud is bound to an Entra ID tenant, password syncing will not correctly propagate from JumpCloud to Entra ID. Additionally, it will cause unintended interference with Microsoft’s Entra ID password policy, which will prevent Microsoft users from resetting their own passwords using Microsoft’s Self Service Password Reset (SSPR) portal. Lastly, there will be two password authorities, (on-prem) Active Directory & JumpCloud, constantly in conflict with one another—trying to write the same changes to Entra ID.
Bearing all of this in mind, you may have Microsoft and JumpCloud AD tools concurrently installed on a Windows Server on the premise JumpCloud is NOT bound to an Entra ID tenant.
![]()
If a Microsoft user and/or admin changes their Entra ID user password, the complexity of this password must match the password policy created in your JumpCloud Admin portal for the Entra ID or (on-prem) Active Directory initiated write back to be read and applied to your JumpCloud user’s password.
Lastly, we have confirmed that enabling both ‘Password writeback’ and ‘Sync password hashes’ in Entra Connect & Entra Connect Cloud Sync tools does not prevent our AD Integration tools from updating passwords for user identities managed both in your on-prem AD domain and JumpCloud tenant.
Want additional assistance from JumpCloud?
If you’re having issues with getting JumpCloud’s AD Integration working, see the Troubleshooting Guide.JumpCloud now offers a myriad professional services offerings to assist customers with implementing and configuring JumpCloud. If you’re looking for assistance with Migrating from AD, or to integrate AD with JumpCloud, we recommend you reach out to JumpCloud’s Professional Services team on the following page: Professional Services - JumpCloud.