
JumpCloud Access Requests lets admins configure approval flows for end users to submit access requests, while also providing the tools to manage and approve these requests directly within the JumpCloud platform.
When a user submits a resource request, admins receive an email notification. You can click Admin Portal Login in the email to login to the JumpCloud Admin Portal and review the request.
To manage requests queue:
- Login to the JumpCloud admin portal.
- Go to Security Management > Access Requests.
You can use the Requests Queue page to view details of the requests and grant or deny access as required.
- Administrator: All requests that require the admin’s approval are listed here. You can expand each request to view the
- Others: All requests that require action from assigned approvers are listed here.

Request Status
Each access request on the Requests page is assigned one of the following statuses:
- Approved: The request has been granted, and the user has been provisioned access to the requested resource.
- Canceled: The request was canceled due to the deletion of the associated approval flow.
- Denied: The request was rejected by an admin, and the user will not be granted access to the requested resource.
- Error: An error occurred during the processing of the request. The admin may attempt to retry approving or denying the request.
- Expired: The request expired due to inactivity. If no action is taken on a request within 30 days, it will automatically expire.
- Missing Data: Some required information (such as the requester's Manager details) is absent. The admin may approve or deny the request or update the missing data. Jump to Identifying Missing Data to learn more.
- Pending: The request is currently awaiting review and approval (or denial) by an admin.
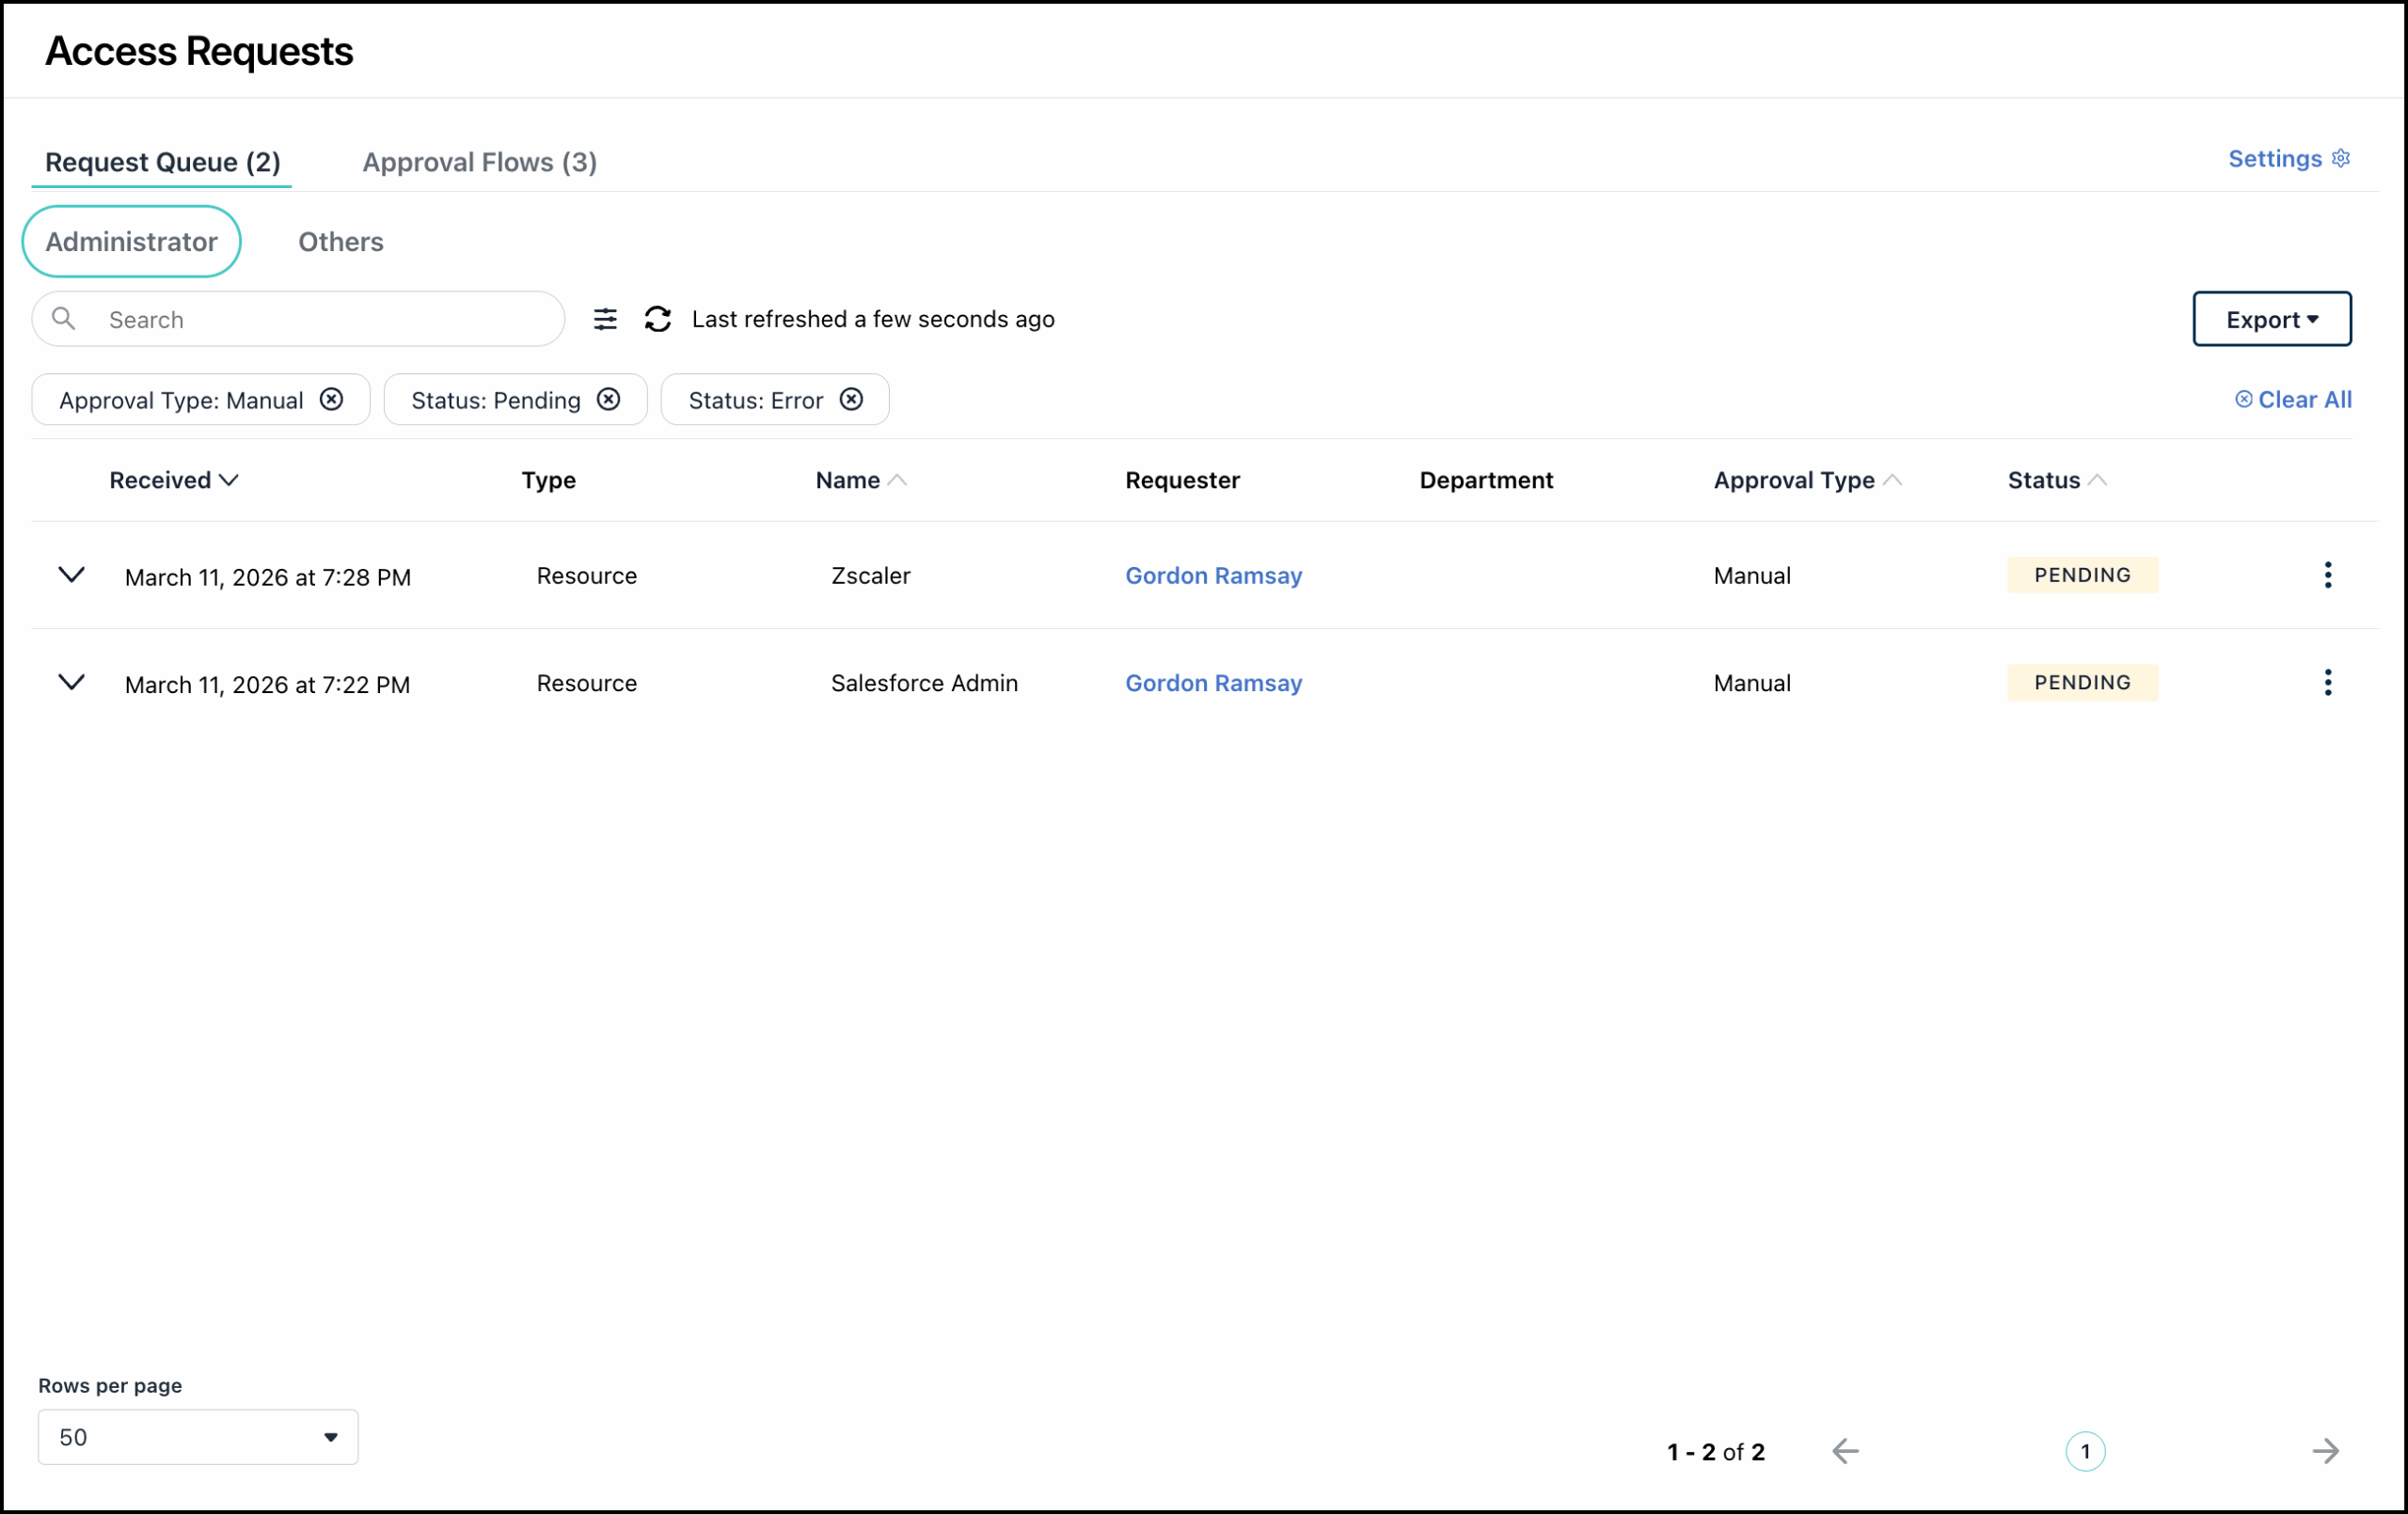
Search and Filter
Switch between the Administrator and Others tabs to view all requests submitted by users. Use the search bar to look for a specific request.
The data in each dashboard is filtered by Manual Approval type and Pending status by default. The applied filters are displayed below the search bar. Click the x next to each filter to remove it.
![]()
If an approval request needs to be approved by someone who isn't an admin, you'll find it in the Others tab on the Requests Queue page.
To modify the filter:
- On the Search bar, click the Filter dropdown.
- You can filter data by Date, Requester name, Approval Type and Status. Select your preferred filter and click Apply.
- The dashboard is updated accordingly.
- You can use the Clear All option to remove all filters.
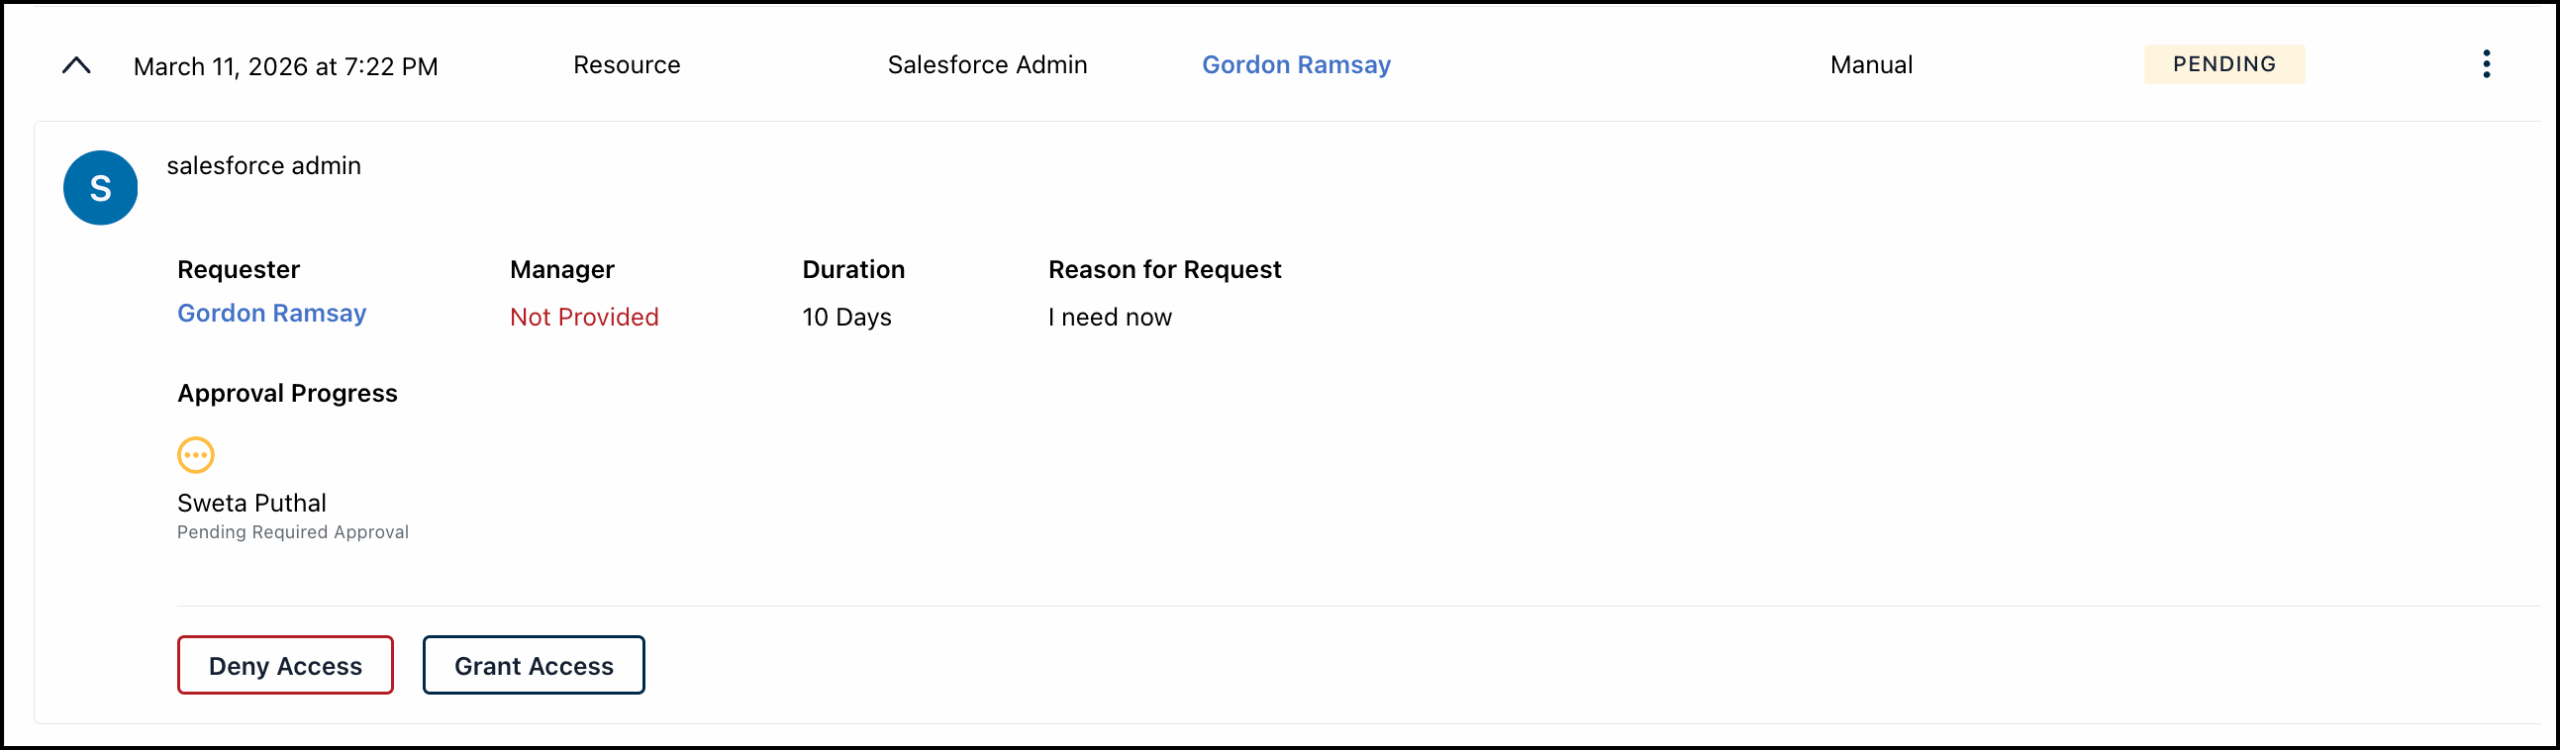
Viewing Access Request Details
- You can click the expand arrow next to a request to view its details such as Request Details, Requester and Requester’s Manager details, Approver, Reason for Request, and status.
- You can view the Approval Progress to monitor the actions of assigned approvers.
- You can grant or deny the request directly from here.
Exporting Requests Data
You can export the data as displayed in the dashboard based on currently applied filters using the Export button. To export data click Export and then select JSON or CSV.
Identifying Missing Data
When an approval flow is missing critical information—like the requester's Manager—the system will automatically assign the request a Missing Data status and display a banner on the Requests Queue page.
To quickly find and update these requests:
- Click View on the banner to see the specific requests with missing data or
- Go to the Requests Queue and expand each request in the Others tab to view details.
![]()
- All requests with assigned approvers are displayed in the Others tab.
- The default filters (Manual, Pending) may hide your missing data requests. You can either clear the existing filters or filter by Missing Data status to view the requests. Jump to Search and Filter to learn more about filters.
Requests with Missing Data status require admin action. You can either:
- Update the missing data: Under Approval Progress, click Add in Users.
- This will take you to the Users page.
- Go to Details > Employment Information and select the Manager from the dropdown. See Add Users to the Admin Portal to learn more.
- Approve or Deny the request.
Approving Requests
To approve an access request:
- In the Administrator tab of the Requests Queue page, you can either:
- Click the expand arrow next to a request and click Grant Access.
- Click the three dots next to each request and select Grant Access from the dropdown.
- On the next screen, click Grant Access to approve the request, or click Cancel if you wish to cancel.
The request status changes to Approved and the counter next to the dashboard name is updated.
![]()
Once the access request is granted, the user will be notified by email. The resource will be added to the Applications section of the User Portal.
Denying Requests
To deny an access request:
- In the Administrator tab of the Requests Queue page, you can either:
- Click the expand arrow next to a request and click Deny Access.
- Click the three dots next to each request and select Deny Access from the dropdown.
- On the next screen, provide a reason for denying the request. You can also add next steps if required.
- Click Deny Access to deny the request.
The request Status changes to Denied and the counter next to the dashboard name is updated.
![]()
Once the access request is denied, the user will be notified by email.
![]()
If you are an admin assigned as an approver (as a resource owner, requester’s manager, or part of a user group), approve or deny the request in the User Portal to maintain the approval flow progress. Actions taken in the Admin Portal will override the defined approval flow.
Overriding Assigned Approver Action
Admins can also override an assigned approver's action on a request.
To override an approver’s action:
- On the Resources Queue page, go to the Others tab to view all the requests that have assigned approvers.
- You can:
- Click the expand arrow next to a request.
- Click the three dots next to each request.
- Click Grant Access to approve or Deny Access to reject the request.
- If you’re denying the request, on the next screen, provide a reason. You can also add next steps if required.
- Optionally, you can add internal notes that will only be visible in DI events.
- Then click Deny Access.
The request will be approved or denied and the requester is notified by email.