
JumpCloud's new integration with Slack is a bi-directional capability that allows IT admins to not only receive instant notifications but also perform interactive actions - such as marking alerts as acknowledged or resolved - directly from the Slack channel.
You can add the JumpCloud Slack App to your Slack workspace to send real time alerts and access request notifications directly to your configured channels, thus accelerating response times.
Prerequisite
- Ensure you have the Slack app installed and have at least one workspace setup with the channels to which alerts and notifications will be sent.
- Create one workspace for each organization. Currently, we do not support multiple orgs within a workspace.
To configure Slack channels:
- Login to JumpCloud Admin portal.
![]()
If your data is stored outside of the US, check which login URL you should be using depending on your region. If your organization uses LDAP, RADIUS, or requires firewall allow list configuration, the Fully Qualified Domain Names (FQDNs) will also be region specific. See JumpCloud Data Centers for the URLs, FQDNs, and IP addresses.
- In the left navigation, click Settings.
- Go to Notification Channels.
- Click Slack.

- You must first add the JumpCloud Slack App to your configured Slack workspace. Click Connect To Slack.
- In the subsequent screen, select the Workspace that you want to connect to JumpCloud from the dropdown.
- Review the app permissions and click Allow. Your Slack workspace will be added.

![]()
The JumpCloud Slack App must be approved by a Slack Admin to be added to your workspace. If the app isn’t already approved, you’ll see an option to request a review. Provide the necessary justifications to get the app approved. You can add the App to your workspace once it is approved.
- Click the down icon to expand the workspace.
- Next, click Add Channel.
- On the Add Slack Channel dialog, click Select Channel, and then select the required channel from the dropdown.
- If you’re juggling too many channels, the dropdown might take a moment to load and turn into a scrolling marathon. To save yourself some time, just click the Use Channel ID/URL option, and then enter the channel ID or URL.
![]()
- Private channels will not be listed in the dropdown. If you wish to view and add private channels, add the JumpCloud Slack App to the channel first.
- To find your channel ID, right-click the channel name in the Slack app and click View Channel Details. Copy the Channel ID.
- To find your channel URL, right-click the channel name in the Slack app and then click Copy > Copy link.
- Click Add. The Channel will be added and enabled by default.
- If you wish to add more channels, click Add Channel and repeat the steps.
![]()
You can now also send direct messages to Slack. If you already have your Slack workspace configured, you will see a banner to reconnect your Slack. Click Reconnect Slack and follow the steps above, to connect your Slack workspace with the updated settings.
Testing a Channel
Once you’ve added the channel, you must test if the channel works properly.
- On the Slack page, expand your workspace to view all your channels.
- For each channel that you want to test, click the three dots under Actions.
- Select Test. A test message will be sent to the Slack channel. Go to your Slack app, open the channel and verify.
Disabling a Channel
If you no longer wish to send notifications to a specific channel, you can disable it.
- On the Slack page, expand your workspace to view all your channels.
- Find the channel that you want to disable and click the three dots under Actions.
- Select Disable.
The channel is be disabled and notifications are no longer sent to the channel. You can enable it back if needed.
Deleting a Channel
To delete a channel:
- On the Slack page, expand your workspace to view all your channels.
- Find the channel that you want to disable and click the three dots under Actions.
- Select Delete.
When you delete a channel, it will be removed from the workspace. The channel will also be removed from the rules that it was connected to.
Using Slack Channels
Once your Slack channels are set up, you must create a rule and add the Slack channel within the rule to generate alerts and notifications. See Configure Rules for JumpCloud Alerts to learn more.
Viewing Alert Notifications in Slack
Once you configure the rules and add the Slack channel, when an alert is triggered, you will receive a notification in your configured Slack channel. The notification includes details such as the Alert name, Priority, Status, Last Occurrence, Organisation. 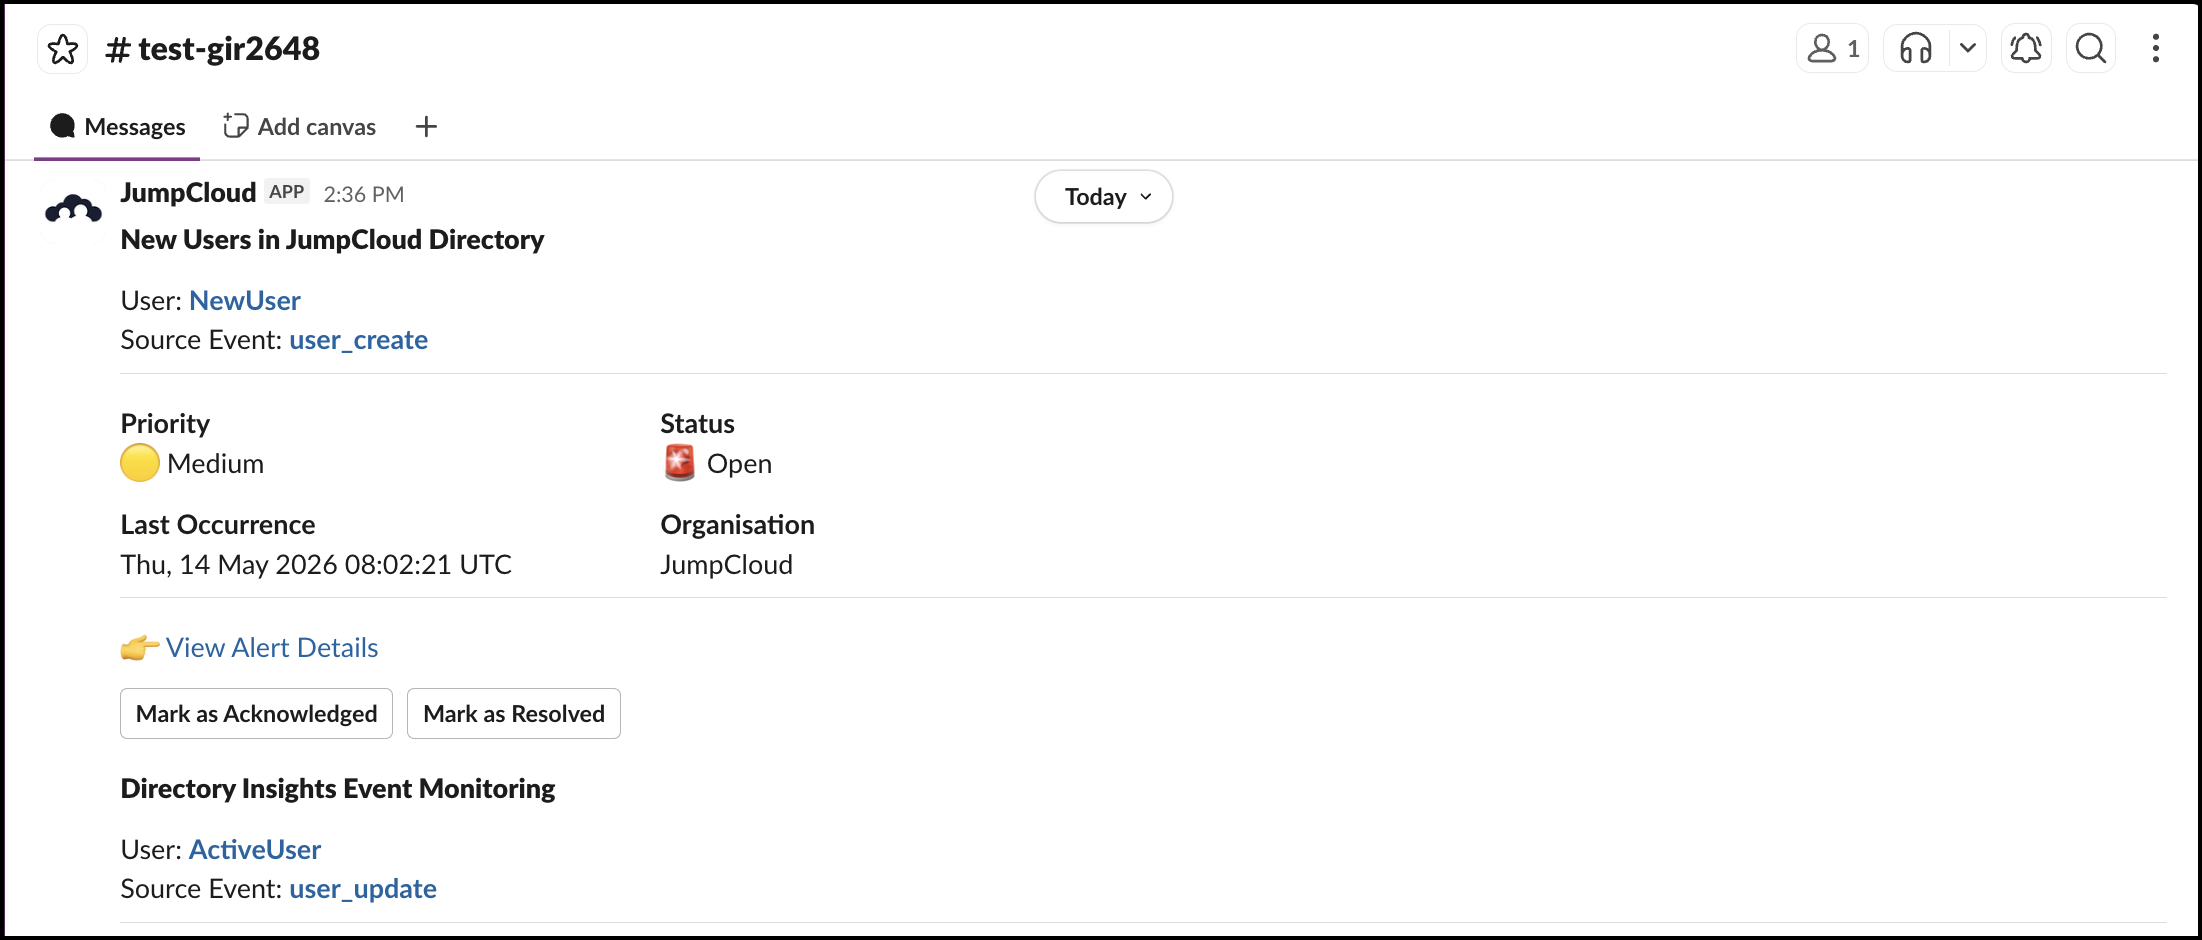
You can click View Alert Details to view more details about the alert. This will take you to the Alert Details page.
Click the Source Event link to go directly to the Directory Insights (DI) page for the specific event that triggered the alert.
![]()
The Source Event link appears in the notification only if DI event ID, DI Event Type, and timestamp are present in the alert payload.
When you click the link, the searchQuery and timestamp parameters will be automatically pre-filled, saving you from manual searching and filtering.
You can receive notifications into your configured channels, but to perform interactive actions, you must connect your JumpCloud profile to Slack. Jump to Connect JumpCloud Admin to Slack to learn more.
Performing Actions from Slack
By integrating the JumpCloud Slack App into your workspace, you can now perform actions such as acknowledge and resolve alerts directly from your slack channel inbox.
- Go to your Slack app, and open the message in the channel connected to JumpCloud.
- You can use the respective buttons to update the status of the alert.
- Mark as Acknowledged: This indicates that the alert is seen but not yet resolved.
- Mark as Resolved: This indicates you have found and resolved the alert.
The status is automatically updated. If other notifications (webhook and email) are enabled in the rule, respective channels are also notified.
You can also manage access requests directly from Slack. See Managing Approvals in Slack to learn more.
Connect JumpCloud Admin to Slack
The email that you use to login to Slack must be connected to your JumpCloud admin portal. If you haven’t connected your JumpCloud admin profile to Slack yet, you will not be able to perform any actions.
To connect your JumpCloud admin to Slack:
- In the JumpCloud admin portal, go to Settings > Administrators.
- Click the admin’s Name to open the Edit Administrator page.
- Click the Connect button next to Perform actions on Slack.
- In the subsequent page, click Accept & Continue.
- In the next screen, enter the copy and paste the slack confirmation code sent to your email.
Once the connection is complete, you will see your Workspace listed under Connected Workspaces.
You can now go back to Slack and perform actions directly from your Slack workspace.
FAQs
You can receive real-time alerts and notifications related to events such as security, directory insight events, and more.
No, currently we only support adding one workspace. You can add multiple channels within a workspace.
Yes, you can define specific granular rules to map specific types of critical events (e.g., Security, Directory, Device) to send notifications to the appropriate channels.
You can check the following:
- Ensure the app is correctly installed and authorized in the Slack workspace.
- Verify that the configuration settings in JumpCloud are correctly mapping the rules to the desired Slack channel.
- Confirm that there are active alerts or notifications being generated in the JumpCloud admin portal.
No. Currently, we only support creating one Slack workspace for each organization you wish to integrate. Multiple organizations within a single workspace are not supported.
You might see this error if your Slack workspace has restrictive App Management Settings or if you are not the Slack Workspace Owner. Even if the app is already installed, individual admins often need specific permissions enabled in Slack to authenticate their accounts.
To resolve this, ask your Slack Workspace Admin to:
- Navigate to App Management Settings in Slack.
- Go to the App Approval section.
- Enable the Sign in with Slack checkbox.
See Slack's documentation on Manage sign in with Slack permissions to learn more.
Additionally, ensure you are logged into the correct Slack workspace in your browser before clicking Connect, as being logged into a different workspace can trigger authentication failures.