Connect


Contents
Rocky Linux is an open source operating system that can be utilized as an app server. In this tutorial, we’ll walk you through the process of installing a Node.js application on Rocky Linux and configuring Nginx as a reverse proxy server to serve the application to the internet. We’ll also provide a sample Node.js application to deploy.
Node.js is an open source, cross-platform JavaScript runtime environment. It extends JavaScript’s capabilities by allowing it to run on servers, not just in your standard web browser. This means you can use JavaScript for both front-end and back-end development, providing a unified language for full-stack development.
Node.js can be used for a wide range of applications, including:
- Web servers: Node.js is commonly used to build high-performance web servers and APIs.
- Real-time applications: It’s great for building real-time chat applications, online gaming servers, and collaborative tools.
- Command-line tools: You can build command-line applications using Node.js for tasks like automation and scripting.
- Microservices: Node.js is good for creating lightweight and scalable microservices architecture.
- Internet of Things (IoT): Node.js is used to develop IoT applications due to its lightweight nature and support for event-driven programming.
The combination of Rocky Linux and Node.js provides a stable, and high-performance platform for hosting and deploying Node.js applications.
Step 1: Update Your Rocky Linux Server
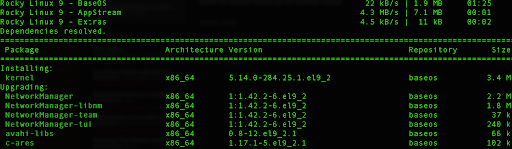
First, update your system packages to ensure you have the latest security updates and software. Once you are logged into your Rocky Linux system via SSH you can run the following command that requires root or sudo privileges:
sudo dnf update
This will download all the latest packages for your system, including new kernel packages.
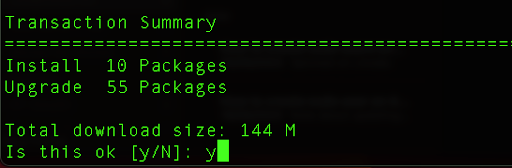
The prompt will ask you to confirm if you agree with the upgrades, and you can type “Yes” and press Enter.
Step 2: Create New User
We’ll install Node.js as a non-root user on our Rocky Linux since it is a security practice that helps protect both your application and the overall system. It minimizes the risk of security breaches, isolates potential issues, and aligns with security principles and industry standards. We always need to prioritize security when deploying applications, especially in production environments.
Create a new non-sudo user and assign the home path by running the following command:
sudo useradd -m -s /bin/bash nodejs
This command creates a new user named nodejs on the system, assigns it a home directory, and sets the default shell to /bin/bash.
After this, we will create a new password for our user.
sudo passwd nodejs
Once we do that, we can switch to our “nodejs” user.
su – nodejs
Next, follow these steps to add the user to the sudoers file.
A sudo user, or, superuser doer, is a user account in Linux-based operating systems that can execute commands with elevated administrator-level privileges.
Step 3: Install Node.js
Rocky Linux includes a version of Node.js in its repositories. It may not be the latest version, so consult the project’s documentation for the current release stream.
See the list of available steams:
dnf module list nodejs

In this case, version 20 is the latest release. Install it using DNF. The syntax to select a release stream is:
Sudo dnf module install nodejs:<stream>

Finally, we can verify our Node.js version by typing the following command:
node –version

An alternative approach is to install via NodeSource, which provides a cut-and-paste script.
sudo yum install
https://rpm.nodesource.com/pub_20.x/nodistro/repo/nodesource-release-nodistro-1.noarch.rpm -y
sudo yum install nsolid -y
Step 4: Create a Sample Node.js Application
Change the directory so you are in your home directory of the nodejs user.
cd /home/nodejs
Create a new file called app.js.
vi app.js
Press ‘i’ for the edit mode in your Vi editor and paste the following code:
const http = require(‘http’);
const server = http.createServer((req, res) => {
res.writeHead(200, { ‘Content-Type’: ‘text/plain’ });
res.end(‘Hello, Node.js Application!\n’);
});
const port = 3000;
server.listen(port, () => {
console.log(`Server running at http://localhost:${port}/`);
});
Press Escape, :wq and press Enter to save the file.
Next, we will install PM2 which is a process manager for Node.js applications.
npm install -g pm2
We will start our application by running the following command, while we are in our home path where we created the application:
pm2 start app.js
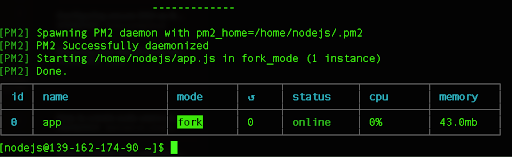
This will start our application in a detached mode which is better than running the node command directly, which would run in the foreground, and the process would terminate if you close the terminal or press Ctrl+C. Therefore, running the application through PM2 is a more efficient option.
If we check our current running processes we will notice that the app.js is running under the nodejs user.
ps aux | grep nodejs

Step 5 (Optional): Configure Nginx as a Reverse Proxy
Our application now works on port 3000, but adding Nginx as a reverse proxy in front of your Node.js application offers several advantages over directly exposing your Node.js application on port 3000. Install your Nginx server on a dedicated server and consult with your network and security advisors to determine where it fits within your network architecture and that it’s correctly configured, monitored, and maintained.
Some benefits of having Nginx as a reverse proxy are security, load balancing, SSL termination, routing as well as monitoring, and logging.
First, we will install Nginx.
sudo dnf install nginx
Next, we will make sure to start our Nginx server and verify that it is also starts every time we boot up the system.
sudo systemctl start nginx
sudo systemctl enable nginx
In order to customize the setup based on our needs for the Node.js application, we can create a new Nginx config:
sudo vi /etc/nginx/conf.d/nodejs-app.conf
Paste the following code in your configuration file. Under the server_name directive please change the value based on your configuration, and the IP or hostname of your server:
server {
listen 80;
server_name 139.162.174.90;
location / {
proxy_pass http://127.0.0.1:3000;
proxy_http_version 1.1;
proxy_set_header Upgrade $http_upgrade;
proxy_set_header Connection ‘upgrade’;
proxy_set_header Host $host;
proxy_cache_bypass $http_upgrade;
}
}
Save the file and exit.
This Nginx configuration block will now listen on port 80 for incoming HTTP requests to a specified domain or IP address. When it receives a request, it forwards the request to a Node.js application running on the same server at 127.0.0.1:3000. The various proxy_set_header directives ensure that headers are properly set for WebSocket and HTTP requests. This configuration is commonly used to proxy HTTP requests to a Node.js application, especially when dealing with applications that run on a different port or server.
Now, after our configuration changes, we need to make sure that the Nginx syntax is good, because just reloading the Nginx service without verifying our syntax could cause Nginx to fail.
We can do so by running the following command:
sudo nginx -t

Next, we will reload the Nginx service so that the new config is loaded properly.
sudo systemctl reload nginx
Now, we need to allow traffic on port 80 through our firewall. We can check whether our firewall is working properly by typing the following command:
sudo systemctl status firewalld
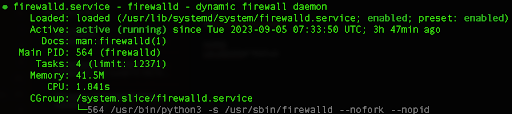
If the service is active, we can whitelist the port 80 for the incoming traffic.
sudo firewall-cmd –zone=public –add-service=http –permanent
This configuration will also persist after every server reboot.
Next, since SELinux works on Rocky Linux by default, in order to evade bad gateway errors on Nginx we need to add the following rule:
sudo setsebool httpd_can_network_connect 1 -P
This command should resolve any SELinux-related issues that might prevent Nginx from making network connections. After running this command, Nginx should be able to connect to external services or resources as needed.
Now if you run the curl command toward your server and port 80, you should get a proper response.
curl -i http://139.162.174.90
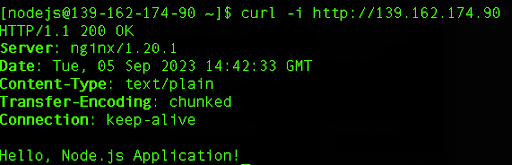
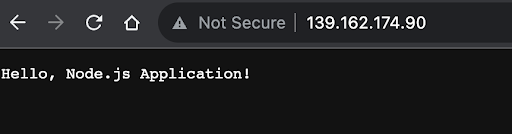
Finally, you can check your Node.js application in the browser to make sure that everything is working properly.
Conclusion
Congratulations! You’ve successfully installed Node.js, configured it to run as a non-root Sudo user, and deployed a Node.js application on Rocky Linux.
If you’d like to develop more Rocky Linux skills, check out the following tutorials: