Connect


Contents
Rocky Linux is a community-driven enterprise operating system designed to offer a stable and reliable platform for a wide range of applications. Managing software packages is one of the essential tasks when working with a Linux operating system. Packages include applications, libraries, and other components that collectively create a functional environment for your system.
Software package management involves tasks such as:
- Installing new software
- Updating existing packages to newer versions
- Handling dependencies between packages
- Removing unnecessary packages
Rocky Linux utilizes the DNF package manager (Dandified YUM) to simplify and streamline these tasks. DNF was designed with performance improvements in mind. It has a more efficient and optimized dependency resolution algorithm, which makes package installations, updates, and removals faster and more responsive when compared to Yum.
This tutorial will guide you through managing software packages using the DNF package manager in Rocky Linux. Whether you are a beginner or an experienced user, this tutorial will help you navigate the software package landscape efficiently.
Step 1: Log in to your Rocky Linux system
In order to log in to your server, make sure that you have a terminal or some SSH client installed on your local machine. If you’re using Linux or macOS, you can use the built-in terminal application or command line for this purpose. If you are using Windows, some popular options include PuTTY or Windows PowerShell with SSH.
Open the terminal or SSH client on your local machine and enter the username and IP address or hostname for your Rocky Linux server.
In the terminal or SSH client, initiate the SSH connection by using the following command:
ssh username@server_ip_address
If this is your first time connecting to the server, you will see a security warning about the authenticity of the host. You can verify that the displayed fingerprint matches the expected fingerprint by typing “yes” in the prompt.

Next, you will be prompted to enter your password and if both provided username and password are correct, you will be logged in to your Rocky Linux server.
Step 2: Updating package information
It’s essential to check which packages have pending updates or if there are obsolete packages before installing or updating packages.
For these types of operations, you would need a user with higher privileges, in an ideal scenario a sudo user instead of running commands as the root directly.
We can run the following command:
sudo dnf check-update
If we are sure that we can proceed with the updates, and we don’t see any custom packages that would break various functionalities on our system we can proceed by running the update.
sudo dnf update
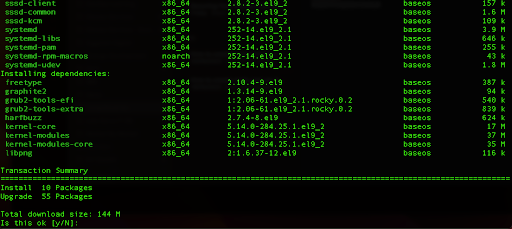
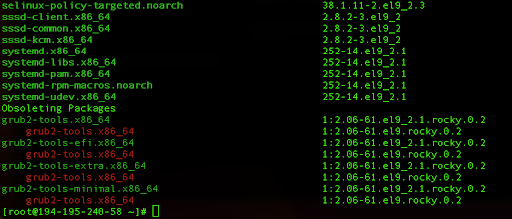
Here we can see the list of various dependencies and packages that will be upgraded.
Type y and enter to continue which will start the upgrade process.
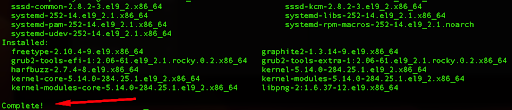
The output should contain the information that it is completed without any errors.
Let’s break down the update process:
- dnf starts by connecting to the configured software repositories which are defined in the repository configuration files located in /etc/yum.repos.d/. These repositories contain the package information, including the latest versions available for your Rocky Linux system.
- The package manager downloads metadata files from the repositories. These metadata files provide information about available packages, their versions, dependencies, and other essential data.
- dnf will compare the versions of the packages installed on your system with the latest versions available in the repositories and then proceed to check for dependencies between packages. It will ensure that updating one package won’t break others by resolving any conflicts and ensuring that all dependencies are met.
- If there are updates available, dnf starts to download the new package versions from the repositories to a temporary location on your system and then unpacks and installs the latest versions, updating the existing packages.
- After installing the updated packages, dnf cleans up temporary files and updates its local package database. This database is used to keep track of the installed packages, versions, and dependencies.
- Finally, it provides a summary of the transaction. It displays the list of packages that were updated and any other changes that occurred during the process.
Step 3: Install a package
Often there are packages that are not installed on our Rocky Linux by default, so in that case, we would need to install it additionally.
We can easily do so by running the following command:
sudo dnf install package-name
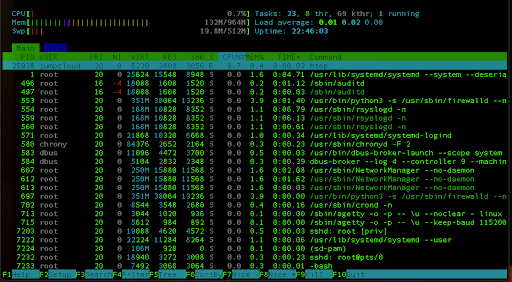
In our case, we can install htop which is not available by default on Rocky Linux. htop represents a more interactive and advanced version of the standard top command, and htop provides real-time monitoring of system resources and processes in a more user-friendly manner.
First, we would need to install the EPEL repository. The EPEL (Extra Packages for Enterprise Linux) repository provides additional software packages that are not included in the default repositories of Red Hat Enterprise Linux (RHEL) and its derivatives. EPEL is particularly useful for expanding the range of available software for Rocky Linux, CentOS, Fedora, and other compatible distributions.
We can install the EPEL repository by running the following command:
sudo dnf install epel-release

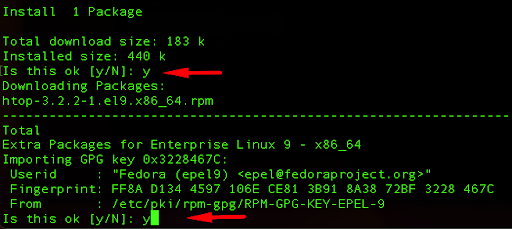
Now we are able to install htop, by simply running:
sudo dnf install htop
Type y, then press Enter to download the package and also to confirm the GPG key:
You can run htop by simply running:
htop
It will give you a great overview of the current CPU, memory, and process utilization and enable you to sort them, change their priorities, or terminate particular processes.
Step 4: Remove a package
Similarly, we can remove any package from our system if we determine that we don’t need it anymore.
We can simply do so by running the following command:
sudo dnf remove package_name
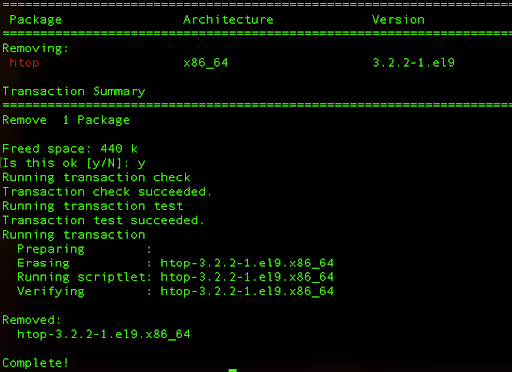
If we want to remove the htop that we installed previously, we can do so by running the command:
sudo dnf remove htop
Step 5: Proceed to advanced package management tasks
There are additional tasks we can perform with our packages, here is a summary of the most important ones.
We can search packages on our system by running the following command:
sudo dnf search search-term
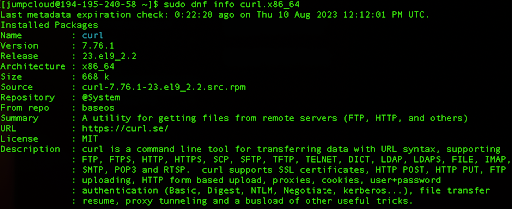
As an example, we can search for the curl package:
sudo dnf search curl

In the output, we can see the main package as well as various dependencies related to other packages.
We can also check the information about that particular package:
sudo dnf info curl.x86_64
Next, we can list already installed packages on our system by running:
sudo dnf list installed
We can proceed by checking package groups. Package groups are a powerful feature of the dnf package manager in Rocky Linux. They allow you to efficiently install and manage sets of related software packages, streamlining the process of setting up systems for specific tasks or roles. By using the package groups, you can ensure that your Rocky Linux has all the necessary software components for a given purpose while maintaining consistency and ease of management.
We can list all available groups by running the following command:
sudo dnf grouplist
You can also install Container Management packages by running:
sudo dnf group install “Container Management”
This package group will be very useful if we plan to run containers on our Rocky Linux.
Step 6: Use RPM for package management
RPM (RPM Package Manager) is a lower-level package management utility that deals directly with individual package files. It provides a way to manage individual package files, but you would need to take care of dependencies whether you are installing or removing them.
We can list installed packages by running the following command:
rpm -qa
We can also see the metadata for each installed package:
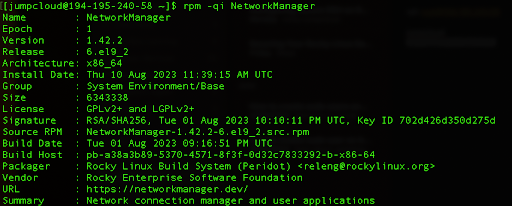
rpm -qi NetworkManager
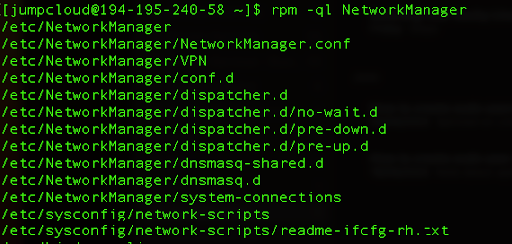
Next, we can use the -ql flag to show us particular files that come with that package:
rpm -ql NetworkManager
Finally, it is possible to install and remove packages with rpm as well but using the dnf package manager for installing and removing packages is generally preferable over using the rpm command directly due to several key advantages. The dnf provides a higher-level and more user-friendly approach to package management that simplifies various aspects of the process.
One of the most significant benefits is automatic dependency resolution, where dnf manages the installation and removal of required and unnecessary packages, ensuring a stable and functional system. This automated dependency handling reduces the risk of breaking the system due to missing dependencies. Additionally, dnf simplifies the installation process by automatically fetching packages from repositories and performing essential post-installation tasks, such as updating configuration files and restarting services when needed. It will also maintain a consistent database of installed packages and their versions, allowing for seamless updates and rollbacks.
The rpm offers more direct control over individual packages, but using dnf offers a safer, more efficient, and user-friendly approach to package management for most users. Since each method manages different caches, configurations, and history databases, it is best practice to stick to only one method.
Learn More About Rocky Linux Management
If you found this tutorial helpful and would like to expand your Rocky Linux management skills, check out one of our other how-to articles: