
Connect


Contents
Securing your Rocky Linux server is of paramount importance in today’s digital landscape, where cyber threats and attacks are becoming increasingly sophisticated.
Whether you are running a blog or hosting critical business applications, ensuring the security of your server is essential to protect sensitive data, maintain privacy, and prevent unauthorized access.
Servers often store valuable information that could be detrimental if compromised, including personal information, financial records, or confidential business data. A security breach can lead to data theft, identity theft, financial losses, and reputational damage for both individuals and organizations.
Securing Rocky Linux is also essential for ensuring the smooth and uninterrupted functioning of critical applications and services. A compromised server may experience downtime, leading to disruptions in services, loss of productivity, and customer dissatisfaction. By implementing robust security measures, server administrators can decrease the risk of downtime and maintain a reliable and secure environment for their users.
Next, a compromised server can be utilized for malicious purposes for further attacks, such as distributed denial-of-service (DDoS) attacks or spreading malware to other connected systems and acting as bot machines centrally managed by bad actors. By securing Rocky Linux, administrators not only protect their own infrastructure but also contribute to overall internet safety by preventing the server from being exploited in cybercriminal activities.
In this tutorial, we will walk you through the best practices and essential security steps to secure your Rocky Linux server.
We must note that the steps covered here are not exhaustive, and you should always stay updated with the latest security recommendations and patches to maintain a robust security posture.
Step 1: Log in to your Rocky Linux server via SSH
For this step, you need to make sure that you have a terminal or SSH (Secure Shell) client installed on your local machine. If you’re using Linux or macOS, you can use the built-in terminal application. For Windows users, you will most likely use the PuTTY SSH client.
Open the terminal and type the following command replacing username and server_ip_address with your own.
ssh username@server_ip_address
After you enter your password you will be logged into to your server.

Step 2: Update the server packages and set automatic security updates
It is very important to keep your server up to date, especially since there are often security updates that minimize the risk of breach or potential system crash.
We have the option to manually update packages in Rocky Linux and that allows you to carefully review and test updates before applying them to your system, ensuring compatibility and stability. Also, it is always a good idea to update your system manually when you boot a new server that you will use.
In order to check available updates on your system, you can run the following command:
sudo dnf check-update
You will get a similar output:
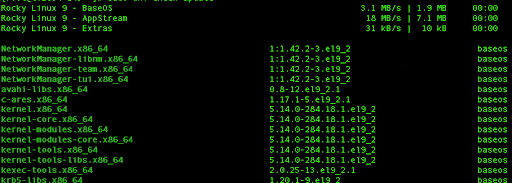
If you are on a new system, you can proceed with updating all listed packages by running the following command:
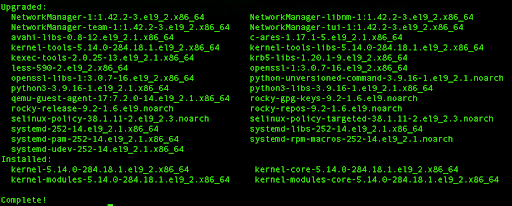
sudo dnf update
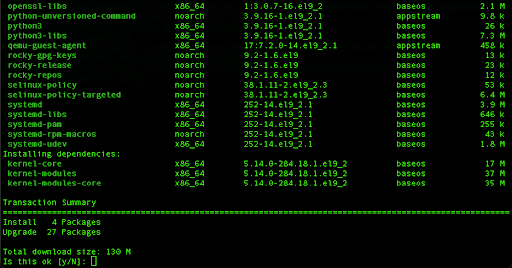
Press y and hit Enter to continue.
This process will download all the necessary packages from the designated repositories, upgrade to new versions, remove old packages, and perform cleanup for the package cache.
If you have a system where you already have various packages installed, specific versions that could potentially have issues if upgraded to the latest version, or that may conflict with your other packages, the better solution is to perform the minimal upgrade by running the following command:
sudo dnf upgrade-minimal
You can use this command only if you want to perform updates for packages that have essential bug fixes and various security patches, without the risk of breaking changes.
Next, we can enable automatic updates and use the special package designed to automate the installation of security patches and other crucial upgrades for your Rocky Linux server.
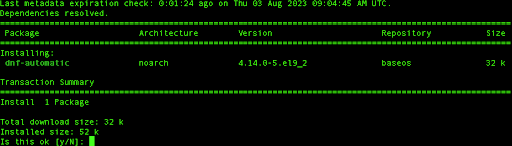
To set up the automatic update process, we need to install the dnf-automatic package which is not available by default on your Rocky Linux server.
This command requires higher permissions so make sure you execute it with your sudo or root user:
sudo dnf install dnf-automatic
Once the installation is complete, we need to edit the config file related to it:
sudo vi /etc/dnf/automatic.conf
In your configuration file under /etc/dnf/automatic.conf, find the line that starts with upgrade_type, and press the i key in order to enter the edit mode in your Vi editor and replace the value from default to security.

Since it is recommended to modify the default behavior to only include security upgrades, this will ensure automatic updates will not introduce breaking changes for your packages.
In order to write the changes and exit the file using Vi, press Shift and : then type wq and press Enter.
Finally, we need to make sure that dnf-automatic service is enabled by default the next time we start or reboot our system.
We can do that by running the following command:
sudo systemctl enable dnf-automatic-install.timer

The dnf-automatic-install.timer is a systemd timer unit that runs our dnf-automatic-install service. By default, it is scheduled to activate every day at 6 a.m., with a randomized delay of up to one hour.
Step 3: Add sudo users
When you boot the system for the first time, by default the root user has full control and unrestricted access to all system resources. Running daily tasks with the root user is not ideal as there is a high probability that any mistake or malicious command executed by the root user can have drastic consequences for your system. In order to minimize these risks, the concept of sudo users was introduced which gives more granular control over access potential actions that a user can run on Linux servers.
You can start by adding a new user to your Rocky Linux server:
adduser jumpcloud
Next, we will run the command so we can create a strong password for our newly created user:
passwd jumpcloud
After that, you can make sure that your user exists and has its own group if you run the id command:
id jumpcloud
You can see a similar output:

The next step consists of elevating the permissions of our jumpcloud user so it can execute sudo commands.
sudo usermod -aG wheel jumpcloud
In this case, the user “jumpcloud” will be added to the “wheel” group, providing it administrative privileges on the system.
If you’d like more details on creating sudo users and managing sudo access on Rocky Linux, check out the following tutorial: How to Create Sudo Users for Rocky Linux.
Step 4: Secure SSH
SSH (Secure Shell) provides remote access to your server and is often targeted by attackers. To enhance SSH security we can implement certain security measures.
First, we can change the default port for our SSH server by changing the config file related to it.
We advise you to create a backup of your configuration file if it gets corrupted, so you can run the following command:
sudo cp /etc/ssh/sshd_config /etc/ssh/sshd_config_backup
Next, we will edit the configuration file.
sudo vi /etc/ssh/sshd_config
SSH typically operates on the well-known port 22, making it a prime target for attackers, mainly due to the rise of highly automated attacks in recent times. To enhance security, consider changing the default SSH port. This simple step adds an extra layer of obscurity, making it harder for attackers to find and target your SSH service. By choosing an unused port between 1024 and 65535, you can significantly reduce the number of automated attacks directed at your server.
Alternatively, you could opt to set up a hardened jump box, also known as a jump host. Additional hardening and security can be layered onto the jump box instead of directly opening up ports on your server to the web.
In our case we will use port 2222, so you can scroll down and find Port 22 line:

Press i for edit, uncomment that line, and instead of 22, replace with 2222.

Press Escape and type :wq to write the changes and exit the file.
Just above the port number configuration, note that changing the SSH port requires updating the SELinux configuration. SELinux, which originates from Red Hat, is enabled by default on Rocky Linux. Its main purpose is to restrict actions that Linux processes and users can perform on the system, as that will minimize the impact of security breaches or unauthorized access. SELinux follows the principle of least privilege, granting processes and users only the essential permissions required for their intended tasks.
However, it is worth noting that the semanage command might not be readily available on Rocky Linux. To verify the necessary dependencies, we can run a check:
yum provides /usr/sbin/semanage

From here we can see that we need to install additional Python libraries, and we can do so by running the following command:
sudo yum install policycoreutils-python-utils
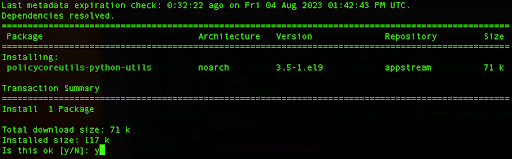
Type y, and hit Enter which will install the package.
Next, you can use this command which tells SELinux that the SSH service is now running on the new port 2222.
sudo semanage port -a -t ssh_port_t -p tcp 2222
Now, we need to add an exception to our firewall so we don’t get a connection refused error.
Rocky Linux uses firewalld, so we can add the rule:
sudo firewall-cmd –zone=public –add-port=2222/tcp –permanent
Next, we should reload the firewall so it starts using the new rule we added:
firewall-cmd –reload
Now, let’s give our SSH server a restart to implement the updated configuration and initiate SSH logging via port 2222. It’s time to apply the changes and get started with enhanced security.
sudo systemctl restart sshd
Now you can try and log in to your Rocky Linux server by adding the -p option and adding our new port number.
ssh -p 2222 username@server_ip_address
We can use SSH key authorization in order to secure our server further. We will also disable logging with the password in our SSH configuration.
By following this method, the possibility of brute force attacks on passwords is completely eradicated, guaranteeing that only users that possess the matching private keys gain access to the system.
In case you don’t already have an SSH key pair on your local machine, you can create one.
To start, open a terminal on your local machine and enter the following command:
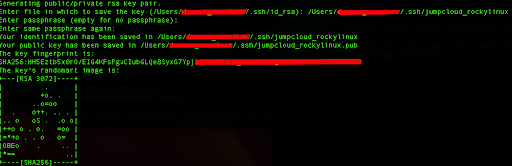
ssh-keygen -t rsa
This command will ask you to select a location to save the keys and set an optional passphrase for added security. The passphrase is also recommended.
Once you have generated your SSH key pair, you need to copy the public key to your Rocky Linux server. You can use the ssh-copy-id command to do this.
In our case we will run the following command:
ssh-copy-id -p 2222 -i ~/.ssh/jumpcloud_rockylinux.pub [email protected]
You will get a similar output:

Next, this command will prompt you to enter your user password on the remote server. Once you provide the password, the public key will be copied to the ~/.ssh/authorized_keys file on the server.
Before we can log into the server, we need to change the permissions to our key file and assign them permissions with the value 400.
We can do so by running the following command in our local terminal:
chmod 400 ~/.ssh/jumpcloud_rockylinux
Next, we will connect with our server:
ssh -i ~/.ssh/jumpcloud_rockylinux -p 2222 [email protected]
This command will load the private key through the specified path on the local machine and also use the custom port that we set.
You should be able to log in without entering a password because the server is now configured to use SSH keys for authentication.

We can disable password logging and use only SSH keys by editing the configuration file again:
sudo vi /etc/ssh/sshd_config
We need to uncomment the part related to the PubkeyAuthentication and set it to yes:

Next, we need to change the PasswordAuthentication to no:

We can also disable SSH logging with the root username:
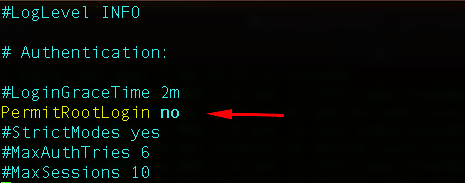
This will also enhance the security of your SSH, but keep in mind that you need to have at least one sudo user already so you don’t get locked out or become unable to perform higher privilege tasks.
Save the file, and then restart the SSH service so it loads the new configuration.
sudo systemctl restart sshd
With key-based authentication now enforced, the need to enter a password during login should be eliminated. This security enhancement ensures that only users with the appropriate SSH keys can access the server.
Step 5: Install and configure Fail2Ban
Fail2Ban is a very useful tool for protecting your Rocky Linux server from brute force attacks and unauthorized access attempts. By monitoring log files and automatically banning suspicious IP addresses, Fail2Ban adds an extra layer of security to your system.
Fail2Ban is not included in the default software repositories of Rocky Linux. Nevertheless, you can easily access it through the Enhanced Packages for Enterprise Linux (EPEL) repository, a source for third-party packages on Red Hat and Rocky Linux. If you haven’t yet added the EPEL repository to your system’s package sources, you can easily incorporate the repository using dnf, similar to installing any other package.
sudo dnf install epel-release -y
After this step, we need to install the Fail2Ban service. We can do so by running the following command:
sudo dnf install fail2ban
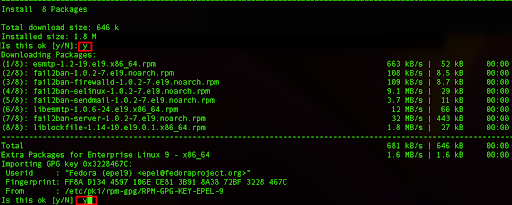
This will install various dependencies also related to modules that work together with SELinux, Sendmail, or the firewalld service.
Next, we can create a new file called “jail.local” where we will store our custom configuration:
sudo vi /etc/fail2ban/jail.local
Here we can build our custom config where we will override default values:
[DEFAULT]
# here you can overwrite some defaults:
[sshd]
enabled = true
port = ssh,2222
filter = sshd
bantime = 30m
findtime = 5m
maxretry = 3
We will change the default values from the original jail.conf file.
The bantime parameter defines the duration that an IP address will be banned after multiple failed login attempts. By default, it is set to 10 minutes. We can adjust this value to 30 minutes.
bantime = 30m
The findtime parameter specifies the time window during which repeated failed login attempts will be counted. The default value is 10 minutes. Setting findtime to more than 10 minutes (600 seconds) can be beneficial in scenarios where you want to be less sensitive to temporary spikes in failed login attempts. For instance, if you have legitimate users who sometimes mistype their passwords, a longer findtime allows them more time to reattempt without getting banned.
On the other hand, setting findtime to less than 10 minutes can make Fail2Ban more responsive to potential attacks. If there’s a rapid and sustained increase in failed login attempts within a short time, a shorter findtime can trigger the ban sooner, reducing the attack surface and blocking the malicious attempts more promptly.
In our case, we will reduce the time to five minutes.
findtime = 5m
The maxretry parameter defines the number of consecutive failed login attempts allowed before banning an IP address. By default, it is set to 5. We can adjust it so that it is limited to three attempts.
maxretry = 3
After editing and saving the configuration file, we can enable the service so that it starts every time we boot the system:
sudo systemctl enable fail2ban

We can start the service by running the following command:
sudo systemctl start fail2ban
While we are logged in to our SSH session, we can use another terminal and try to log in with some non-existent username and without an SSH key:
ssh -p 2222 [email protected]
After three bad attempts, our IP address will be banned temporarily for further login attempts:
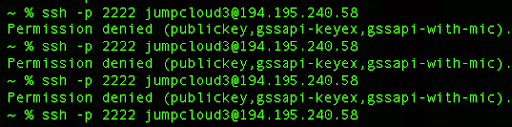

For the last attempt, we get the “Connection refused” error, which is clearly the ban action of our service that honors our configuration parameters.
By default, the log file related to the Fail2Ban service is stored in /var/log/fail2ban.log and we can check the latest Fail2Ban events:
sudo tail /var/log/fail2ban.log
We can see logged events about our IP address and the exact timestamp when the Fail2Ban service banned our IP address from further attempts.

The ban applies to subsequent connection attempts from that IP address. For test purposes, if you are still logged into the server from your initial SSH session, it will not be affected by the ban. However, if you log out and try to establish a new SSH connection, the new connection attempt might be blocked by the ban.
Conclusion
In this tutorial we covered multiple ways to enhance the security of your Rocky Linux server, from patch management to user privilege and access management, to securing SSH and event logging. You should also learn how to enable full-disk encryption as well.
If you’re an IT admin or MSP provider managing multiple Linux instances, putting these best practices into place can quickly become an overly time-consuming, manual process. That’s where a truly unified endpoint management solution like JumpCloud can help.
With JumpCloud’s open directory platform in place, you can apply key security configurations and policies to various groups of users and devices all at once, regardless of whether your fleet consists of Linux, macOS, Windows, iOS, or Android systems.
Check out JumpCloud’s cloud device management capabilities — including support for Rocky Linux 8 and 9 — today.