Connect


Contents
In the world of modern computing and networking, accessing servers and systems is of paramount importance. One technology that plays a very important role in enabling secure remote access is SSH (Secure Shell).
SSH is a cryptographic network protocol that allows users to securely communicate and access remote systems over an unsecured network. It provides a far more secure alternative to traditional remote access methods like Telnet and FTP, which transmit data in plaintext and are vulnerable to eavesdropping and unauthorized access.
SSH offers several significant advantages over traditional remote access methods:
- Security: The primary advantage of SSH is its strong security model. By using encryption and cryptographic authentication, SSH protects sensitive data from interception and unauthorized access.
- Authentication flexibility: SSH supports various authentication methods, allowing users to choose the most secure method for their needs. Public key authentication, in particular, is highly recommended as a good security practice.
- Data integrity: SSH works so that the data transmitted between the client and server remains intact and unaltered during transit. Any tampering or corruption of data would be detected.
- Cross-platform support: SSH is platform-independent and can be used to connect to systems running different operating systems, including Linux, macOS, Windows, and more.
- Port forwarding: SSH allows port forwarding, which enables users to securely access services on remote systems as if they were running on their local machine.
How SSH works
SSH uses public-key cryptography to establish a secure connection between a client and a server. The process involves the following steps:
- Connection initialization: The client establishes a connection with the SSH server. The server listens on a specified port (default port 22) for incoming connection requests.
- Key exchange: During the initial connection, the client and server perform a key exchange. This process involves negotiating the encryption algorithms, integrity algorithms, and other cryptographic parameters that will be used for securing the communication.
- User authentication: Once the key exchange is successful, the client must prove its identity to the server. SSH supports various authentication methods, including password-based authentication, public key authentication, and host-based authentication.
- Password authentication: The client sends its username and password to the server, which then verifies the credentials. However, this method is less secure than public key authentication and is often discouraged.
- Public key authentication: This method involves generating a key pair on the client side — a public key and a private key. The public key is uploaded to the server, while the client retains the private key. During authentication, the client proves its identity by signing a challenge from the server using its private key. The server verifies the signature with the corresponding public key stored on the server.
- Host-based authentication: In this method, the client’s identity is based on the hostname of the client machine. While this method is still used in some cases, it is less common due to its inherent security limitations.
- Session establishment: After successful authentication, a secure channel (SSH session) is established between the client and server. From that moment all the communication between the two parties is encrypted using the agreed-upon encryption algorithms.
- Remote access: With the SSH session in place, the client can now securely execute commands, transfer files, and perform any other remote operations on the server.
Configuring a secure SSH server on Rocky Linux is essential to protect your system from unauthorized access and potential security threats. The following tutorial will guide you through the steps to set up a secure SSH server on Rocky Linux.
Step 1: Log in to your server via SSH
OpenSSH server is installed on your Rocky Linux server even if you go with the minimal install, so you can log in via SSH to your server.
To do so, you need to have a terminal or SSH client installed on your local machine. If you’re using Linux or macOS, you can use the built-in terminal application. As a Windows user, you will most likely use the PuTTy SSH client.
Open your terminal and enter the following command to replace username and server_ip_address with your own.
ssh username@server_ip_address
If you are logging in for the first time to your Rocky Linux server, you will see a security warning about the authenticity of the host.

You can verify authenticity by typing yes in the terminal.
Step 2: Change the default port
In order to change any configuration for your SSH server you need to edit the related config file. But before that, it is always a good idea to create a backup of your configuration file if it gets corrupted for some reason.
sudo cp /etc/ssh/sshd_config /etc/ssh/sshd_config_backup
Next, we will edit the configuration file.
sudo vi /etc/ssh/sshd_config
By default, SSH operates on port 22, which is well known and often targeted by attackers, and nowadays these attacks are highly automated. Changing the SSH port adds a layer of obscurity and can reduce the number of automated attacks. Choose any unused port, preferably a number between 1024 and 65535.
In our case we will use port 2222, so you can scroll down and find the Port 22 line:

Press i for edit, uncomment that line, and instead of 22, replace with 2222.

Press Escape and type :wq for writing the changes and exiting the config file.
Now, as you can see just above our setting for the port number, there is information provided if we want to change the SSH port number to any other port, we would need to update our SELinux configuration.
SELinux is originally from Red Hat and it is enabled by default on your Rocky Linux. The primary purpose of SELinux is to restrict the actions that processes and users can perform on a Linux system, and minimize the potential damage that could result from security breaches or unauthorized access. It enforces the principle of least privilege, which means that processes and users are only granted the minimum necessary permissions to perform their intended tasks.
Often, the semanage command is not found on Rocky Linux so we can check dependencies that are needed by running:
yum provides /usr/sbin/semanage

From here you can see that we need to install additional Python libraries, and we can do so by running the following command:
sudo yum install policycoreutils-python-utils
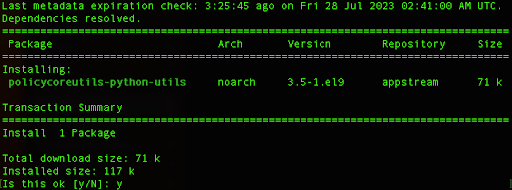
Type y, and hit Enter to install the package.
After that action, you can use this command to tell SELinux that the SSH service is now running on the new port 2222:
sudo semanage port -a -t ssh_port_t -p tcp 2222
Now, we need to take care of our firewall and add the port there as well, otherwise, we will get a connection refused error.
Rocky Linux uses firewalls, so we can add the rule:
sudo firewall-cmd –zone=public –add-port=2222/tcp –permanent
Next, we should reload the firewall so it starts using the new rule we have added:
firewall-cmd –reload
Finally, we can restart our SSH server so we can apply the new configuration and start logging via SSH with port 2222.
sudo systemctl restart sshd
Now you can try and log in to your Rocky Linux server by adding the -p option and adding our new port number:
ssh -p 2222 username@server_ip_address
Optionally, consider installing and configuring knockd to implement port knocking. This will make it more difficult for attackers to identify SSH ports.
$ sudo apt-get install knockd
Next, we will edit the configuration file.
$ sudo vi / /etc/knockd.conf
More details on this port knocking step are available here. You may also want to consider leveraging iptable’s ability to whitelist IPs or use rate-limit connections to mitigate DDoS threats.
Step 3: Disable root login and limit user authentication
This step involves disabling root login via SSH, which is an important security measure to protect your system from unauthorized access. Instead of allowing direct root login, users should log in with a regular user account and then use sudo to perform administrative tasks. Also, we can define users that are only able to log in to the system.
We need to change our configuration file again:
sudo vi /etc/ssh/sshd_config
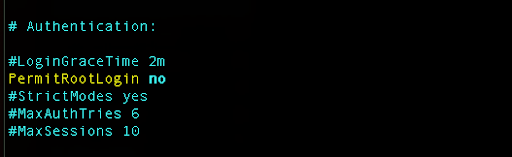
We need to find the line where the PermitRootLogin is and change it to no:
Next, we would like to allow only certain users to log in to our server via SSH:
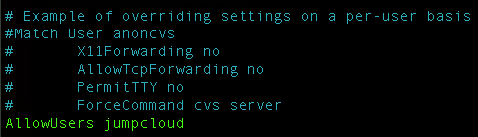
Make sure that you already have real users that will be allowed with appropriate permissions so you don’t get locked out.
Save the configuration file and restart the SSH service:
sudo systemctl restart sshd
Now, you should be able to log in with your user only. Here is an example where we try to log in with our second user jumpcloud2:

We can see that permission is denied even when we enter the correct password.
Step 4: Set up SSH keys and disable password login
In order to enhance the security further we can disable login with a password and use the SSH key.
This method eliminates the risk of brute force attacks on passwords and ensures that only users with the corresponding private keys can access the system. Let’s go through the steps to achieve this.
If you don’t have an SSH key pair on your local machine, you need to generate one.
Open a terminal on your local machine and use the following command:
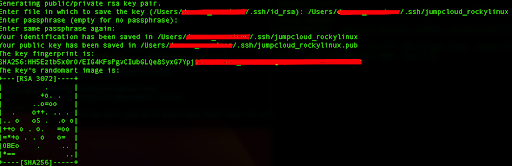
ssh-keygen -t rsa
This command will prompt you to choose a location to save the keys (usually ~/.ssh/id_rsa and ~/.ssh/id_rsa.pub) and set an optional passphrase for added security.
Once you generate your SSH key pair, you need to copy the public key (jumpcloud_rockylinux.pub) to the remote server. You can use the ssh-copy-id command to do this.
In our case we will run the following command:
ssh-copy-id -p 2222 -i ~/.ssh/jumpcloud_rockylinux.pub jumpcloud@194.195.240.58
You will get a similar output:

Also, this command will prompt you to enter your user password on the remote server. Once you provide the password, the public key will be copied to the ~/.ssh/authorized_keys file on the server.
Before logging into the server, we would need to change the permissions to our key file so they don’t have 644 by default, and we will assign them permissions with the value 400.
We can do so by running the following command in our local terminal:
chmod 400 ~/.ssh/jumpcloud_rockylinux
Next, we will connect with our server:
ssh -i ~/.ssh/jumpcloud_rockylinux -p 2222 jumpcloud@194.195.240.58
Let’s break down the commands:
- The -i option will load and use the private key that we’ve generated and give the exact path where it is stored.
- The -p option defines that we are trying to connect to our server via non-default 2222 port. If we don’t use this option we will get a connection refused error.
- The last part, jumpcloud@194.195.240.58, defines the username and IP address of our server.
You should be able to log in without entering a password because the server is now configured to use SSH keys for authentication.

In order for us to disable password logging and use only SSH keys we need to edit our configuration file again:
sudo vi /etc/ssh/sshd_config
Uncomment the part related to the PubkeyAuthentication and set it to yes:

Next, change the PasswordAuthentication to no,

and then save the file and exit.
Now, we need to restart the SSH service so it loads the new configuration changes.
sudo systemctl restart sshd
You should be able to log in without entering a password, as key-based authentication is now enforced. If everything is working correctly, you have successfully configured SSH to only allow login with SSH keys, significantly enhancing the security of your remote server.
If we try to log in to our server without supplying the SSH key, and run the following command:
ssh -p 2222 jumpcloud@194.195.240.58
We will get the permission denied output:

So, the correct way of logging in to our server from now on is to use the supplied key:
ssh -i ~/.ssh/jumpcloud_rockylinux -p 2222 jumpcloud@194.195.240.58
After this command we have logged in successfully to our server by using the SSH key.
Step 5: Enhance security with multi-factor authentication
JumpCloud admins can add multi-factor authentication (MFA) for additional security. If you are not using JumpCloud yet to manage Windows, Mac, and Linux systems across your fleet, get started today for free.
To enable MFA for SSH on a Linux system:
- Log in to the JumpCloud Admin Portal: https://console.jumpcloud.com/login.
- Go to DEVICE MANAGEMENT > Devices.
- Select a Linux device.
- If MFA Login is disabled, deselect Allow SSH Password Login or Enable Public Key Authentication. If both options are selected, MFA can’t be enabled.
- Click MFA Login Disabled and choose Enable MFA Login.
- Click ok to confirm.
- Click save device.
To understand more about this process, check out the following support documentation: