
The JumpCloud Directory Platform centralizes user management for virtually all of the resources at play in your organization — via a single set of credentials. You can manage and view information about your organization’s end users from the Admin Portal Users list. Read this article to learn more about how you can use the Users list.
Finding the Users List
You can find the Users list from the Admin Portal’s left menu.
To find the Users List:
- Log in to the JumpCloud Admin Portal.
![]()
If your data is stored outside of the US, check which login URL you should be using depending on your region. If your organization uses LDAP, RADIUS, or requires firewall allow list configuration, the Fully Qualified Domain Names (FQDNs) will also be region specific. See JumpCloud Data Centers for the URLs, FQDNs, and IP addresses.
- Go to Identity Management > Users.
Searching for a User
Use search or a filter to find the users you’re looking for.
Search
If there’s a specific user you’re interested in viewing, use the Search field.
To find a user using Search:
- From the JumpCloud Admin Portal, go to Identity Management > Users.
- In the Search field, enter any information about the user.
- When you’re done with your search, click ( x ) to clear it.

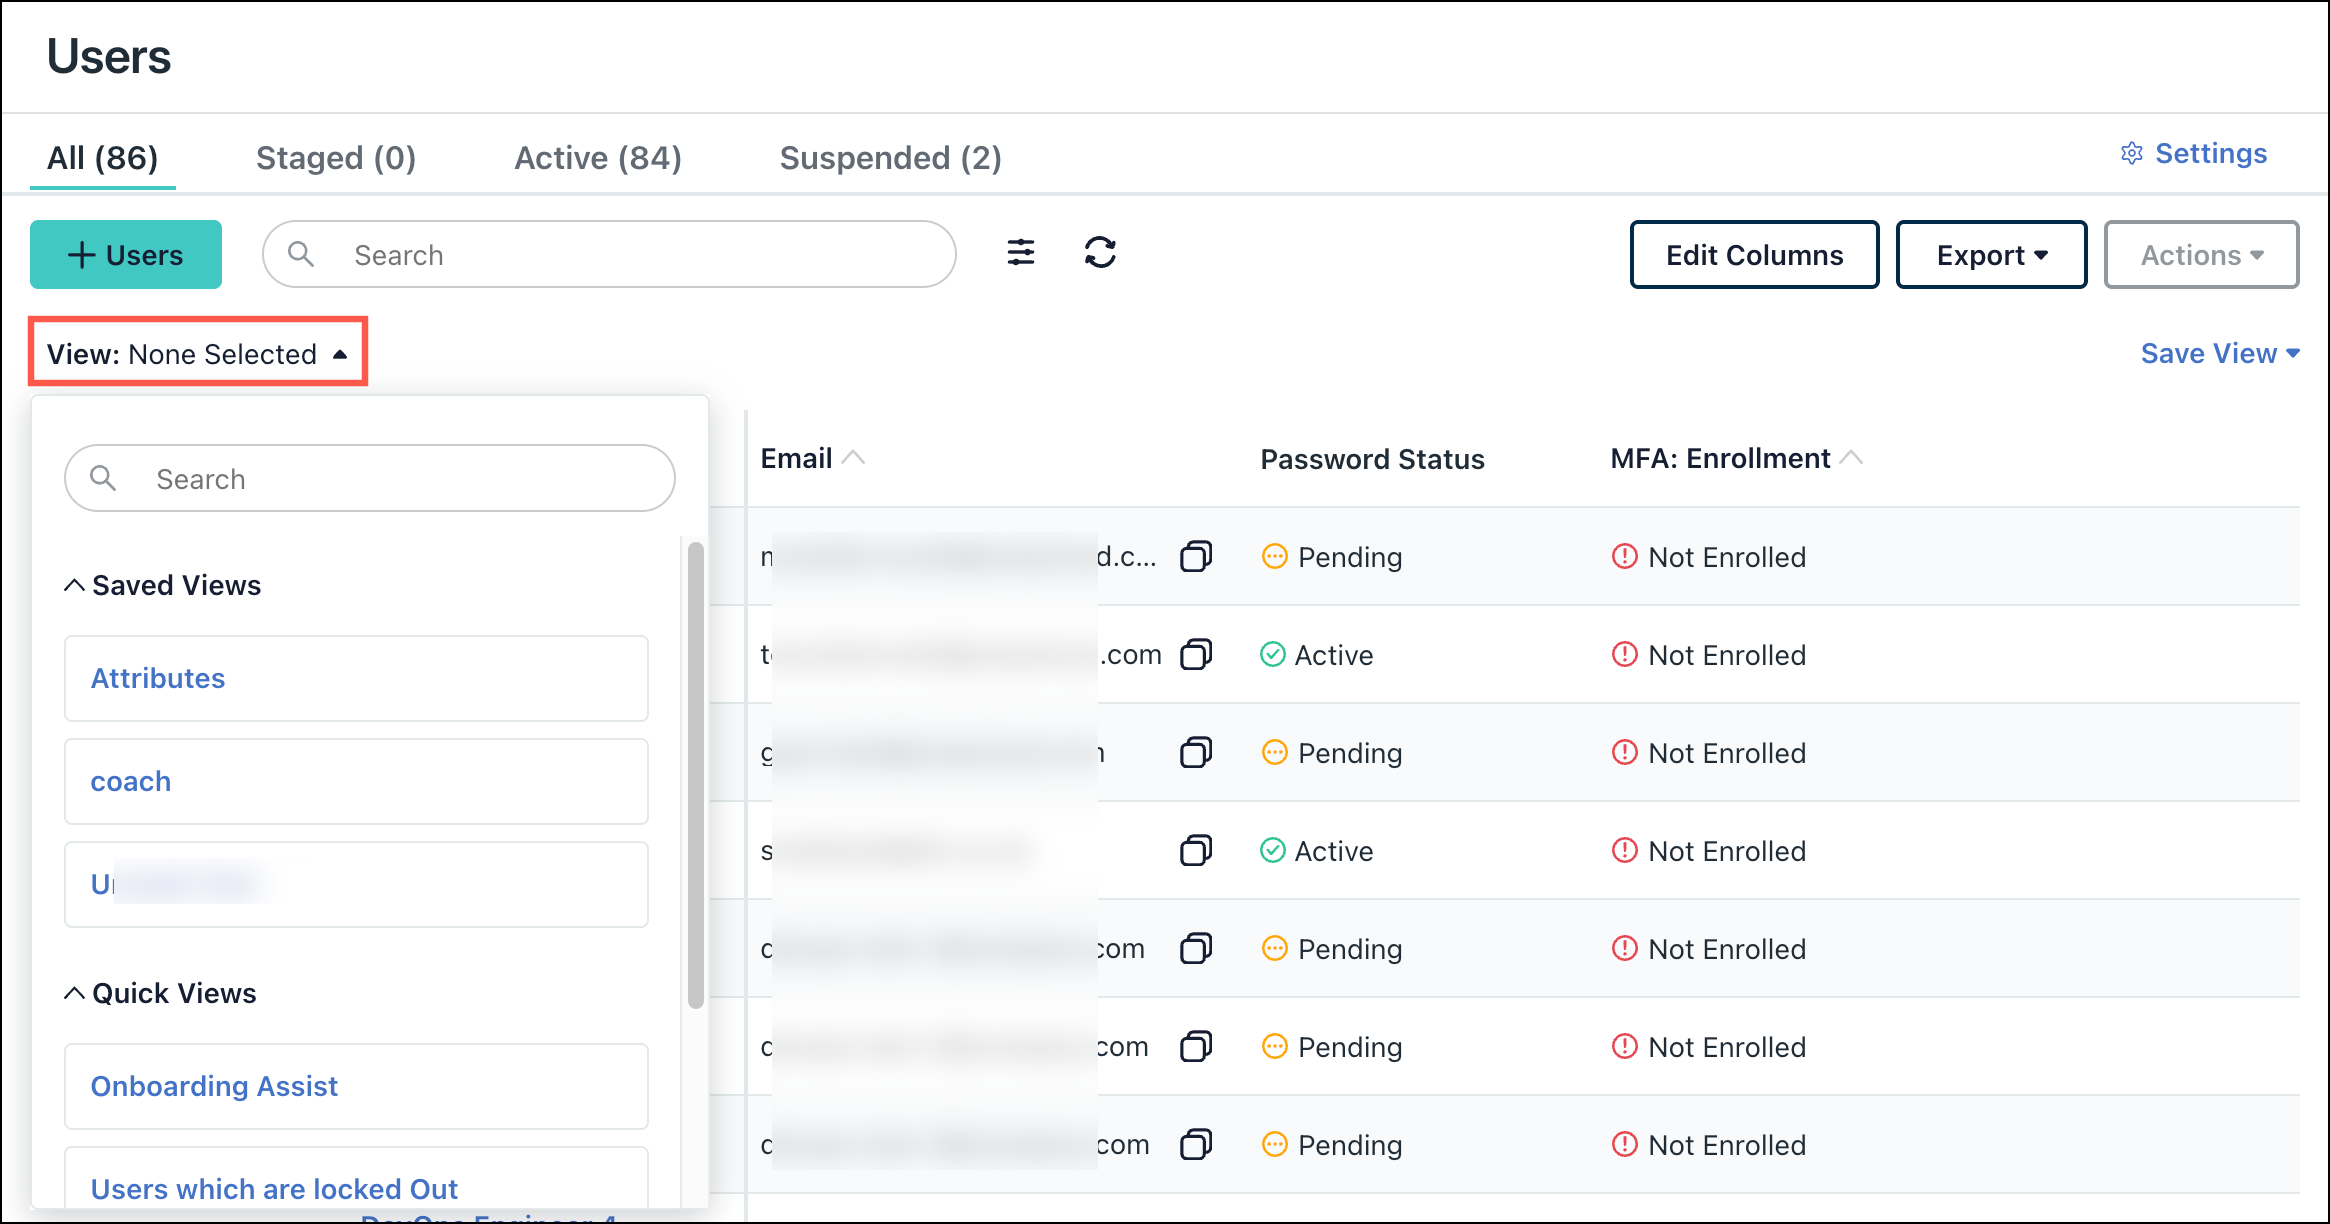
Customizing your Users List
Pagination
Change the number of Rows per Page to 10, 20, 50 or 100.
- From the JumpCloud Admin Portal, go to Identity Management > Users
- In the bottom left, select a number in the Rows per page dropdown.
- Your Users List will refresh immediately with the new row count.
Column Management
You can add an unlimited amount of columns to your users list - up to 3 fixed columns and an unlimited number of scrolling columns. By default, two of the fixed columns are User State and Name.
To edit columns:
- From the JumpCloud Admin Portal, go to Identity Management > Users.
- In the top right, click Edit Columns.
- By default, the two fixed columns are User State and Name (First, Last).
- If you would like to change the format of your Name column, Name (First Last) to Name (Last, First) and vice versa, click
 .
.
- If you would like to change the format of your Name column, Name (First Last) to Name (Last, First) and vice versa, click
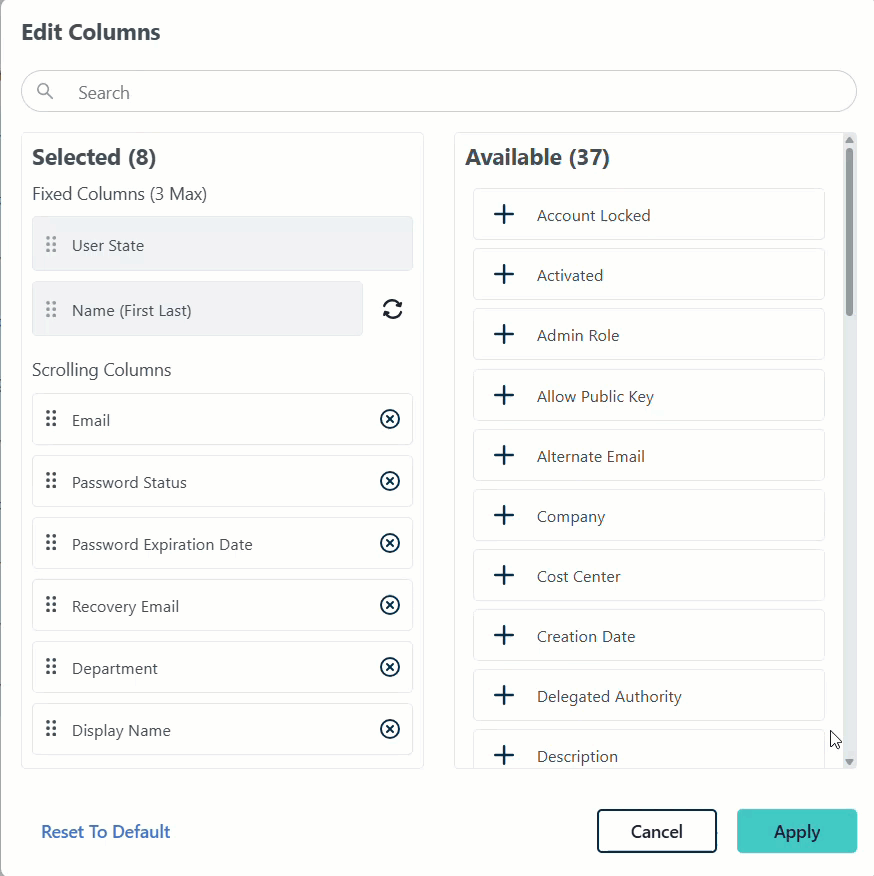
- Your Selected and Available columns will be displayed. You can add 1 additional fixed column and an unlimited amount of scrolling columns.
- Click (+) to add a column to your view
- Click (x) to remove a column from your view
- Use Search to find any desired columns and drag-and-drop to reorder your scrolling columns.
- When finished, click Apply.
- If you ever want to go back to the default Users List view, click Reset to Default.
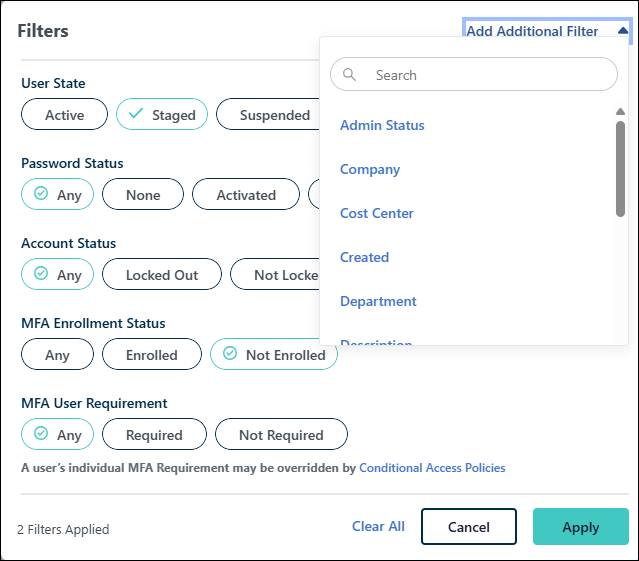
Filters
Need to see whose password is about to expire or which users aren’t required to use multi-factor authentication? Use a filter to see every user who has a status you’re interested in.
To add a filter to your Users List:
- From the JumpCloud Admin Portal, go to Identity Management > Users and click Filters
 .
. - A list of frequently used filters will appear.
- Select any desired filters.
- To see and add more filters, select Add Additional Filter.
![]()
You can select an unlimited amount of filters.
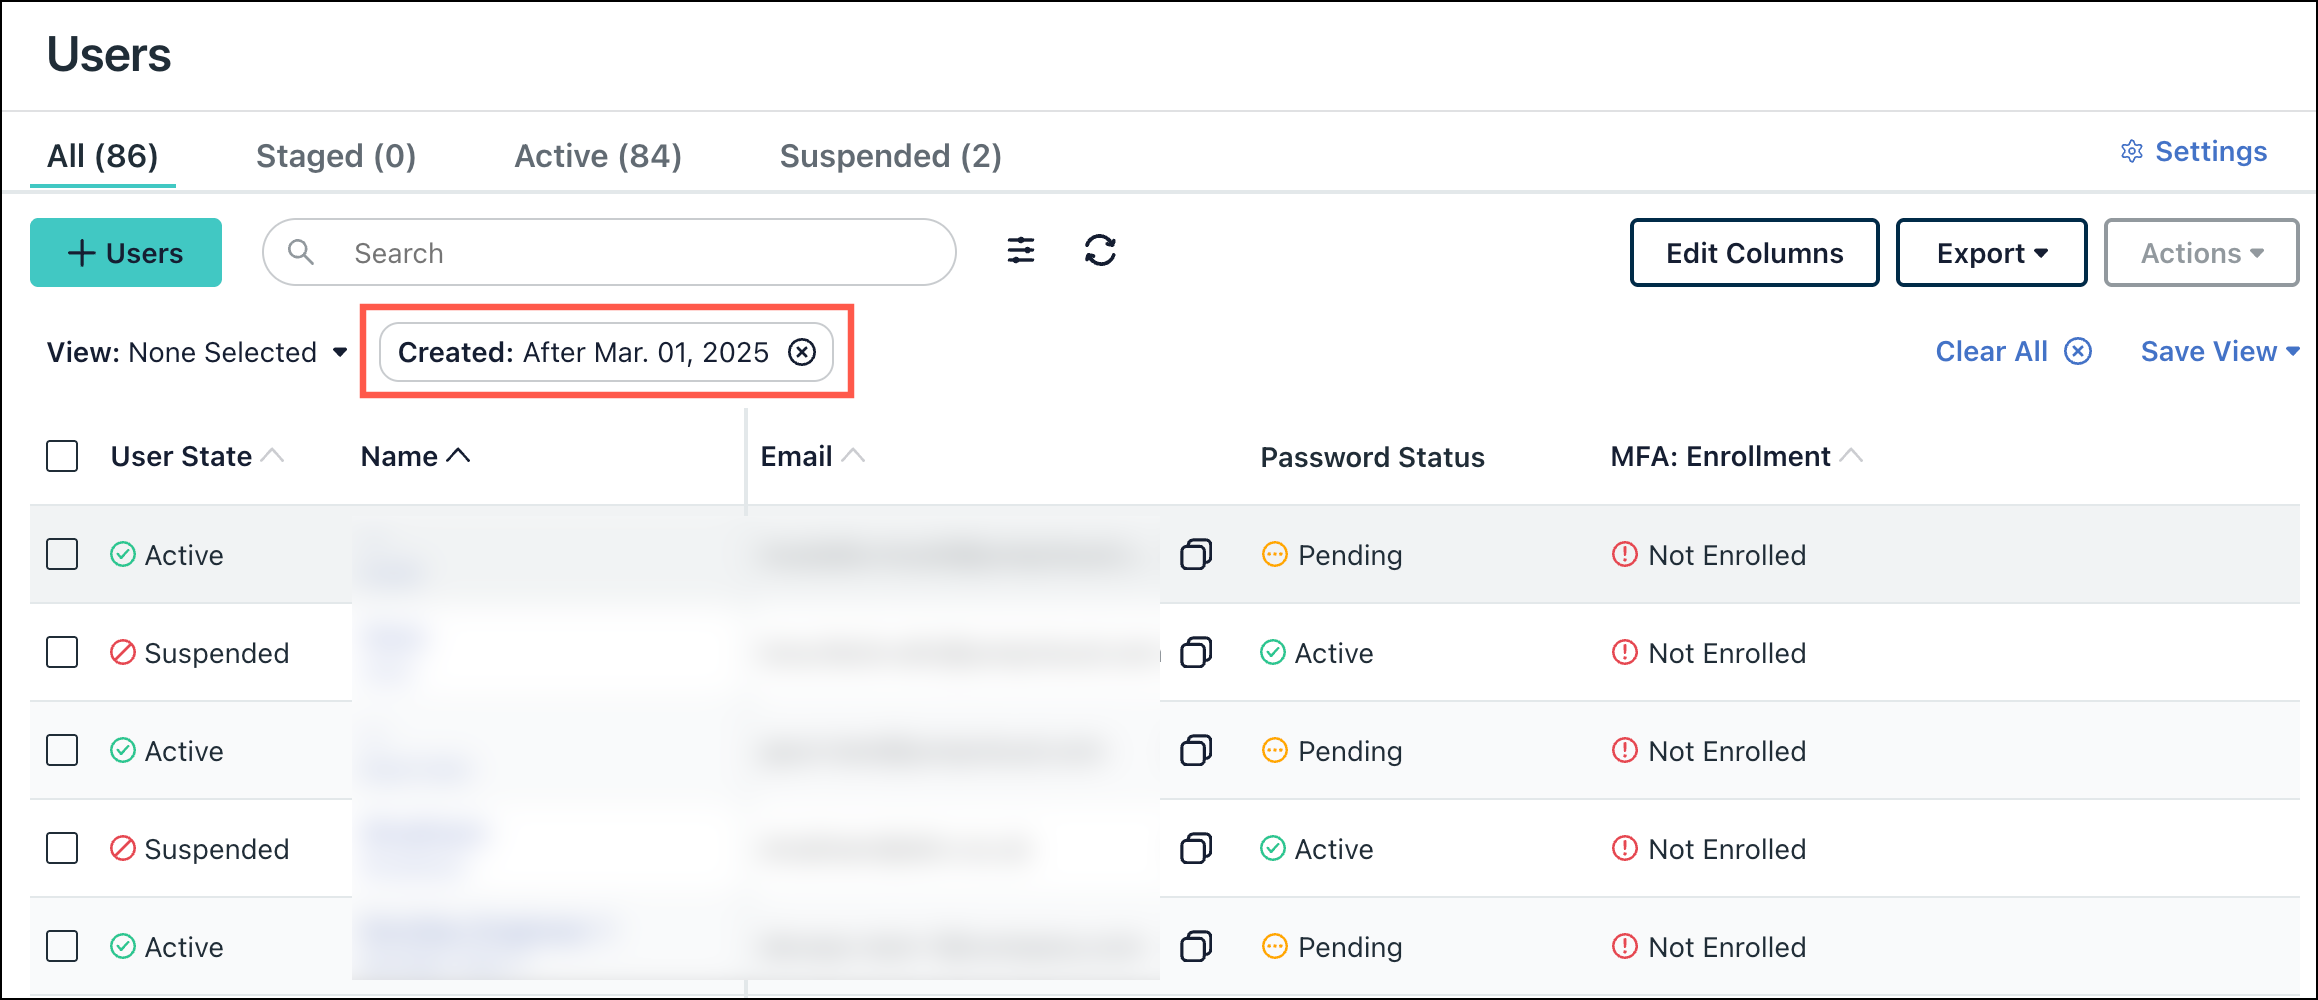
- After adding your filters, click Apply.
- The active filter(s) will show above your users list.

![]()
Password Status Filters and Expected Behavior
All users have an underlying Activated password (a set password from the admin or the user) or a Pending password (no password has been set). Users can also have an additional password status, such as Expired, Delegated, or Federated, on top of this underlying state.
If you’re filtering your password status for Activated or Pending and also see Expired password users, this is due to the user having an additional Expired password status.
If you’re filtering your password status for Activated or Pending and see Delegated or Federated password users, this is due to the user having an additional Delegated Authority or Federated password status.
To remove a filter from your Users List:
- At the top of your users list, you can click 'x' to remove the current filter.
- If you have multiple filters, click Filters and select Clear All.
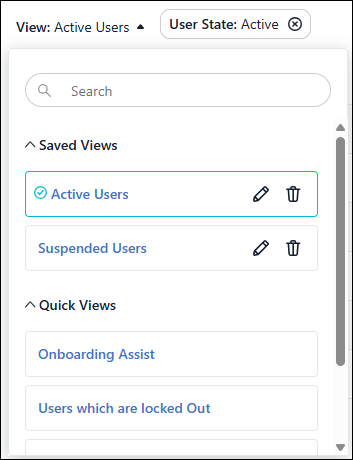
Views
Use the Save View functionality to create different private or public views of your Users List. Any combination of column selections and filters can be saved as a 'View'.
To create a new view:
- From the JumpCloud Admin Portal, go to Identity Management > Users and choose any combination of columns and filters.
- Select Save View > Save As New View.
- Enter a Name for your new view.
- Any active filters will be shown in green in the Save View window.
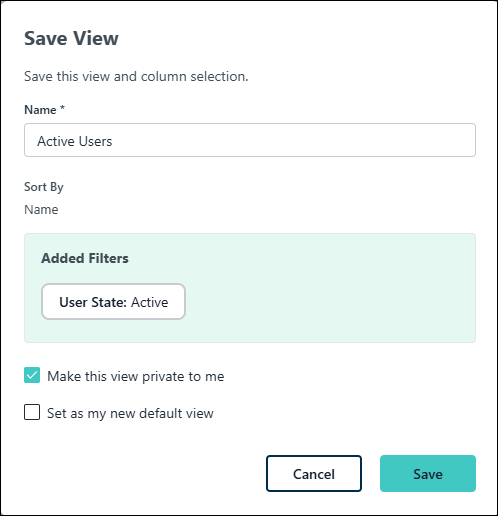
- Optionally, choose to Make this view private to me and Set as my new default view.
- Click Save.
To select a different view:
- The View field will show the name of the current view.

- To change your view, select the View dropdown. Saved views, both private and public, will be displayed along with JumpCloud-created Quick Views.
- Use the Search to find other views.
- Select the desired view.
- The Users List will refresh automatically.
To edit a view:
![]()
While you can use other admin's public views, you cannot edit them unless you save your changes as a new view.
- Select your view from the View dropdown.
- Make any changes to the view's columns and filters.
- Click Save View > Apply changes To This View.
- The Edit View window will display.
- Optionally, you can change the name of the view, its privacy settings or make the new view your default.
- Click Save.
![]()
If you only want to change the name, privacy settings, or make a view your new default, use the View dropdown and click Edit ![]() next to your view. Click Save after making your changes.
next to your view. Click Save after making your changes.
To delete a view:
- From the View dropdown, views that can be modified will have and Edit and Delete buttons.
- Click Delete
 next to the view you would like to delete.
 - When the Delete View window displays, click Delete.
- You will receive a notification that your View was successfully deleted.
Actions
The Actions dropdown menu lets you apply actions on single or multiple users from the Users list at once. The Actions menu will be inactive (greyed out) until one or more users are selected from the Users list.

The Users list view allows for the following bulk actions:
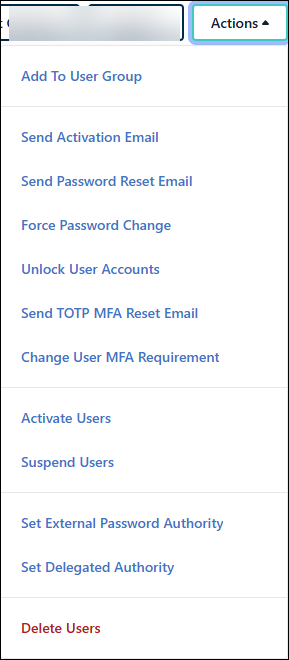
- Add To User Group: Add multiple users to a user group.
- Send Activation Email: Password Pending users will receive an activation email. Password Active users will receive a password reset request. Staged users will not receive emails.
- Send Password Reset Email: Users will receive an email to reset their JumpCloud password. Only Active users will receive this email.
- Force Password Change: Password will expire, and users are logged out of all JumpCloud managed resources immediately. Users will be prompted to change their password upon next login.
- Unlock User Accounts: Unlock accounts that have been locked due to repeated failed password attempts.
- Send TOTP MFA Reset Email: User TOTP keys will be reset and users will be required to set up TOTP MFA.
- Change User MFA Requirement: Require or remove MFA for selected users.
- Activate Users: User(s) state will change to Active.
- Suspend Users: User(s) state will change to Suspended. Suspending an account immediately revokes access to all JumpCloud-provided resources.
- Set External Password Authority: Password will be managed by AD or a SCIM integration.
- Set Delegated Authority: Password will be managed by an Active Directory Integration.
- Delete Users: This action will permanently remove the user from the Admin Portal.
Export
Use the Export feature to export selected users for audits, compliance, or troubleshooting reports, Views and All Data. The Export feature lets you export to either a CSV or JSON file that will be downloaded to your local Downloads folder.
To export Selected Users:
- From the JumpCloud Admin Portal, go to Identity Management > Users.
- Select the desired users.
- In the top right, click Export, then select either Selected User JSON or Selected Users CSV. Your list of users is exported into the format of your choice and is saved as jcuserlist_yyyymmdd.<filetype>.
To export Current View:
- From the JumpCloud Admin Portal, go to Identity Management > Users.
- In the top right, click Export, then select either Current JSON or Current View CSV. Your Views are exported into the format of your choice and is saved as jcuserlist_yyyymmdd.<filetype>.
To export All Data:
- From the JumpCloud Admin Portal, go to Identity Management > Users.
- In the top right, click Export, then select either All Data JSON or All Data CSV. Your Views are exported into the format of your choice and is saved as jcuserlist_yyyymmdd.<filetype>.
User Highlights Tab
The User Highlights tab offers a summary of the resources a user is connected to and their directory activity log.
To find the Highlights tab:
- From the JumpCloud Admin Portal, go to Identity Management > Users.
- Select an existing user or see Get Started: Users, to learn how to create a new user. Then you’ll see the Highlights tab.
![]()
The SaaS Management card appears if it is enabled. See Viewing SaaS Management User Details to learn more.
Using the Highlights Tab with a New User
When you create a new user, the Highlights tab will be empty. To get started with adding a device, user group, or application, click add device, add user group, or add application.
See Connect Users to Resources to learn more.
Exploring the Highlights Tab with an Existing User
After you’ve created a user and connected them to resources, the User panel Highlights tab gives you a summary of the most important directory activity logs and the devices, user groups, and applications associated with a user.
Devices
The Devices widget lists up to three devices per user. Click all devices to go to the Devices tab where you can see all devices connected to a user if there are more than three. From the Devices tab, you can also bind more devices to a user or remove their access to a device.
User Groups
The User Groups widget lists up to five User Groups. Click all groups to go to the User Groups tab where you can see all User Groups associated with a user if there are more than five. From the User Groups tab, you can also add a user to more User Groups or remove them.
Applications
The Applications widget lists up to five applications. Click all applications to view a list that shows the following information:
- Names of all the applications a user has access to.
- User Groups that are providing the user access to the applications.
Applications are associated to users through User Groups. You can update a user’s association to an application when you update the User Group’s access to an application or when you update a user’s association with a User Group. You can initiate either of these updates from the Highlights tab.
To update a User Group’s access to an application from the Highlights tab:
- In the Applications widget, click all applications.
- Click on a User Group. You’re taken to the Applications tab on the User Group panel where you can update the User Group’s access to applications.
- When you’ve made your changes, click save.
To update a user’s association to a User Group from the Highlights tab:
- In the User Groups widget, click all groups. You’re taken to the User Group tab in the Users tab where you can update the user’s associations with User Groups.
- When you’ve made your changes, click save.
Directory Activity
The Directory Activity widget shows the top events from Directory Insights that are specific to that user. The Directory Activity shows events for features that are enabled for the org. If your org isn’t using RADIUS, for example, there aren’t any RADIUS events listed.
Depending on the features you’ve enabled, here are the available Directory Insights events and criteria:
- Last Device Authentication
- login_attempt
- Last Known Location
- login_attempt
- Last LDAP Authentication
- ldap_bind
- Last Password Change
- user_password_change
- Last RADIUS Authentication
- radius_auth_attempt
- Last SSO Authentication
- sso_auth
- Last Status Change
- user_lockout, user_password_expired, user_activated, user_unlocked, user_suspended, user_unsuspended, user_deactivated
Organizations on all pricing plans see the Directory Activity widget in the Highlights tab. If you want to see more Directory Activity detail in the context of the Activity Log, you can click activity log. Directory Insights customers are directed to the Directory Insights activity log with the “User” filter applied for the user they’re viewing.
Customers without Directory Insights can add this feature by contacting their Technical Account Manager.