


 Subscribe to Help Center RSS Feed
SAML 2.0 authentication streamlines enterprise access by enabling seamless Single Sign-On (SSO) between Vault and your primary Identity Provider (IdP). By integrating Vault with a compliant IdP—such as JumpCloud, Okta, or Microsoft Entra ID—users can authenticate directly through their existing corporate dashboard, eliminating the need for separate login screens or disparate credentials. While the following configuration steps utilize JumpCloud as a primary example, the workflow is standardized for any SAML 2.0-compliant provider to ensure a consistent deployment across diverse enterprise environments.
Prerequisites
- Access to the Vault Admin Console with admin-level permissions.
- An Identity Provider that supports SAML 2.0 (e.g., JumpCloud, Okta, Azure AD).
- The IdP metadata (XML file or metadata URL) available.
Configuration Process
To configure SAML Authentication, follow the process mentioned below:
Create a Custom SAML Application in JumpCloud
- Log in to the JumpCloud Admin Portal.

If your data is stored outside of the US, check which login URL you should be using depending on your region. If your organization uses LDAP, RADIUS, or requires firewall allow list configuration, the Fully Qualified Domain Names (FQDNs) will also be region specific. See JumpCloud Data Centers for the URLs, FQDNs, and IP addresses.
- Go to Access > SSO Applications.
- Click + Add New Application.
- Choose Custom Application and click Next.
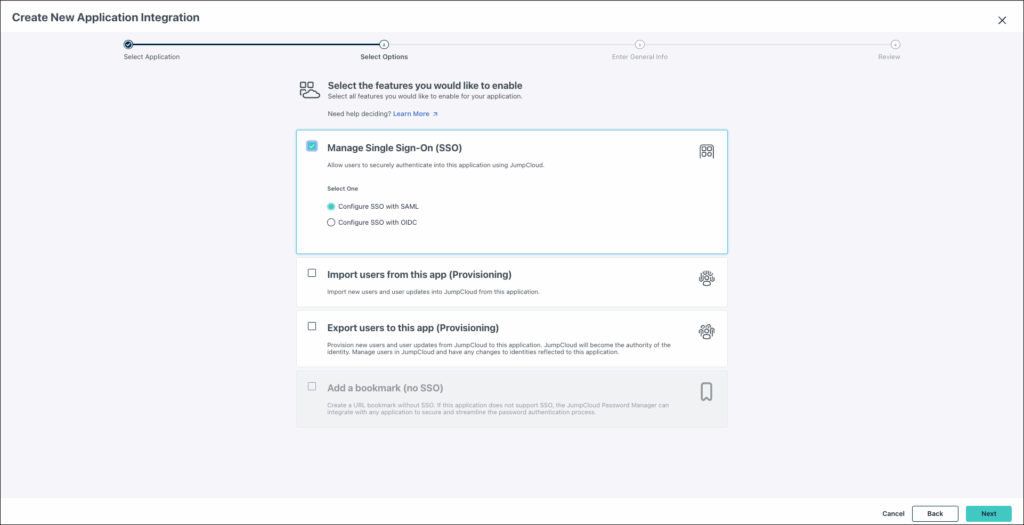
- Select Manage Single Sign-On (SSO) > Configure SSO with SAML.
- Click Next.
- On Enter general info page, set the following values:
- Display Label: Enter a name such as Vault SAML.
- Description (Optional): Enter a short description such as SAML Authentication if required.
- User Portal Image (Optional): Upload the Vault logo if required.
- Clear the Show this application in User Portal checkbox. Since this app is only for provisioning, it must not appear to end users.
- Keep the Advanced Settings at their defaults.
- Click Save Application.
- Once the application is created, search for the application and go to the SSO tab.
- On the SSO tab, copy the ID from the IdP Entity ID field.
Configuring a SAML Identity Provider
- Log in to Vault with an Administrator account.
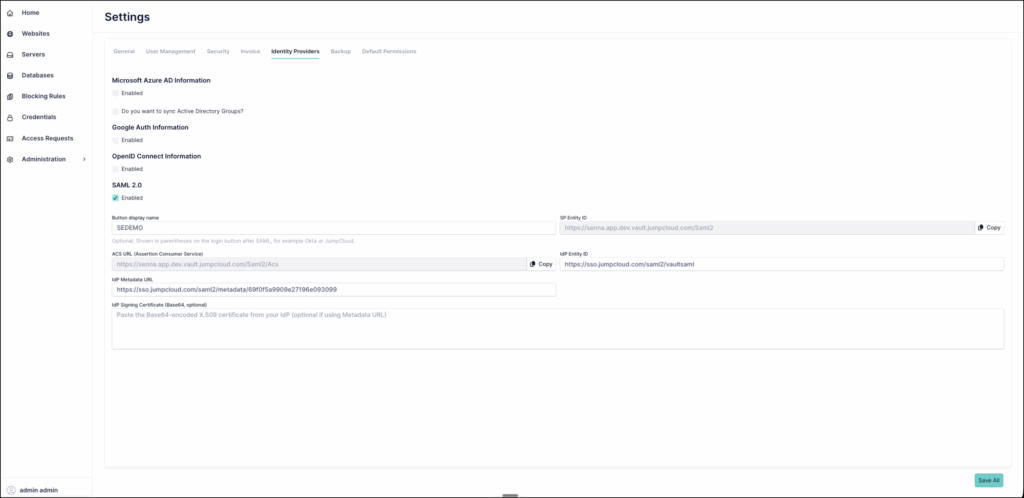
- Go to Administration > Settings. The Settings page is displayed.
- On the Settings page, go to the Identity Providers tab.
- On the Identity Providers tab, paste the IdP Entity ID you copied in the previous section into the IdP Entity ID field.
- Copy the SP Entity ID, go to the JumpCloud Admin Portal > Access > SSO Applications.
- Search for the newly created custom application, go to the SSO tab and paste the copied SP Entity ID in the SP Entity ID field.
- You have to again log in to the Vault platform and then go to Administration > Settings > Identity Providers.
- Copy the URL from the ACS URL (Assertion Consumer Service) field.
- Log in to the JumpCloud Admin Portal and then go to Access > SSO Applications. Search for the newly created custom application.
- Go to the SSO tab and paste the copied URL in the Default URL field present under ACS URL.
- Click Save All.
 In this Article