
Previously, API access was tied to individual Admin accounts, requiring either the creation of dedicated Admin accounts for integrations or the use of Admins’ personal API keys.
This approach presented several issues like increased number of Admin accounts and single points of failure. For example, if an Admin left the org or if their account was disabled, all the dependent integrations would fail and be disruptive.
JumpCloud lets you create Service Accounts that are not tied to individual Admin accounts. Any authorized Admin can generate and manage keys for specific use cases without creating more Admin accounts which significantly improves security, maintenance, and reliability of our integrations.
![]()
Service accounts are exempt from licensing restrictions. Only standard user accounts contribute to your billing threshold.
Why Use a Service Account?
Service Accounts are the digital IDs for your applications, letting you automate workflows securely and at scale. They replace risky, hardcoded credentials with a manageable, auditable, and least-privilege approach to access control, drastically reducing your attack surface.
Here are a few reasons why you should use a Service Account instead of an Admin Account linked with API keys.
Non-Human Identity
A Service Account is a non-human identity used by automated systems (scripts, services, or CI/CD pipelines) to authenticate and interact with APIs or systems without user intervention.
Token-Based Access (Client ID + Client Secret)
The Service Account uses client credentials (Client ID and Client Secret) to request an access token via an OAuth 2.0 token endpoint. This token is then used to make authenticated API calls as part of a workflow.
Role-Based Access Control (RBAC)
The Service Account is granted specific permissions or scopes to perform only certain actions (for example: creating users, triggering provisioning, or fetching device data). These roles ensure the Service Account has just enough access needed by the workflow.
Trigger Points for Automation
Workflow automation tools (like Zapier, Jenkins, GitHub Actions, or internal schedulers) use the Service Account credentials to:
- Trigger actions on schedule
- Respond to events (webhooks, cron jobs)
- Poll APIs regularly
- Handle error retries or escalations
Adding a Service Account
To add a Service Account:
- Log in to the JumpCloud Admin Portal.
- Go to Settings> Service Accounts.
- Click + New to add a new Service Account.

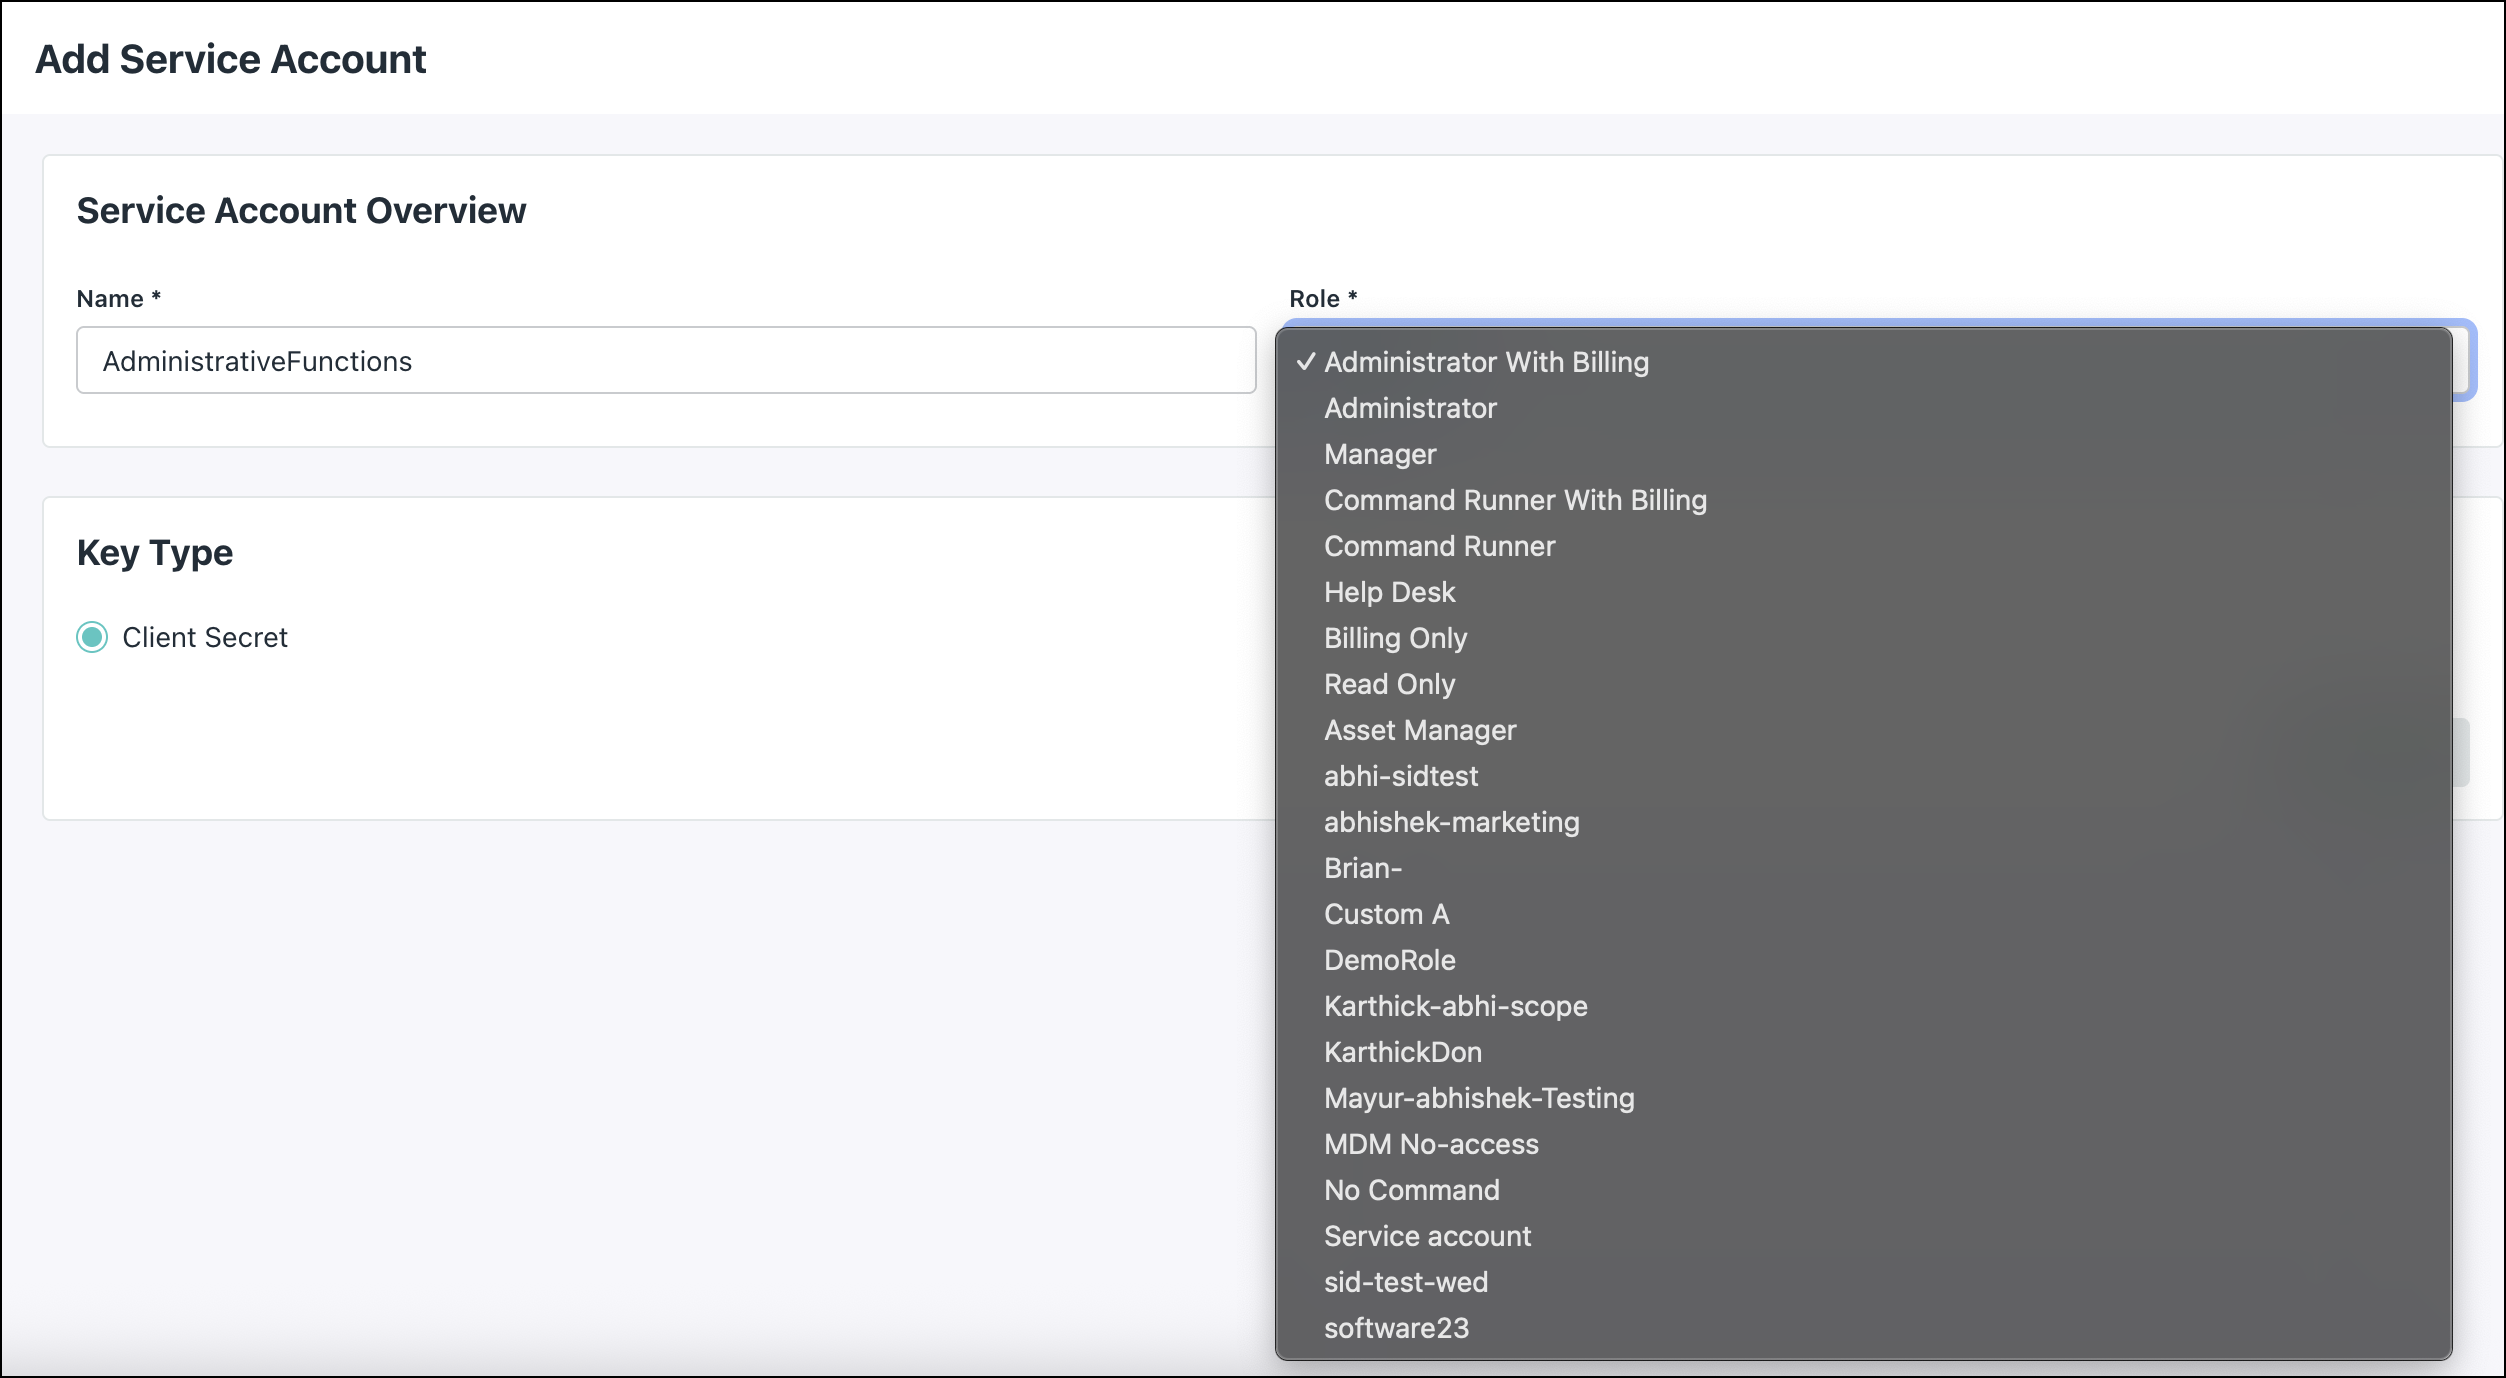
- Enter the Name of the account, then select a Role from the dropdown menu.
Admins can also link custom admin roles to a service account.

- Under Key Type, select the Client Secret radio button. A pop-up for setting the expiration date appears.


![]()
We have introduced a Service Accounts scope in custom admin roles. See Custom Admin Roles Permission Categories to learn more.
- Set an expiration date for the Service Account by selecting a date from the Secret Lifetime dropdown menu.
- Click Activate.
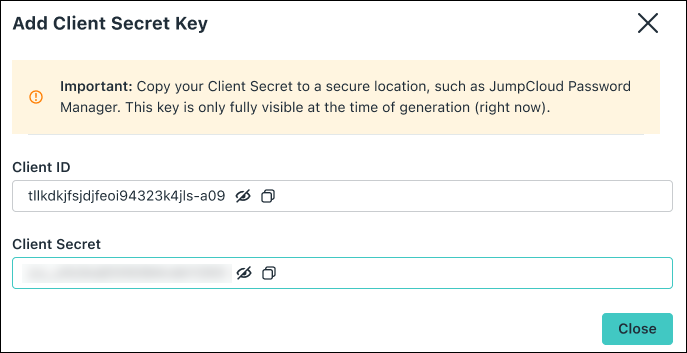
- The Client ID and Client Secret are displayed. These are only displayed at the time they’re created. Make sure to store it in a secure place, like JumpCloud’s Password Manager so you can access it when you need it. Click Close.

The new Service Account will appear under the Service Accounts tab in Settings.
An Admin with billing role can create multiple Service Accounts. Each Service Account will have 2 Client Secrets. In case one Client Secret is about to expire, the organization can leverage the other one. The Admin will receive an email 7 days prior to the expiration date.
Click the Add item button on right to add one more client secret as required.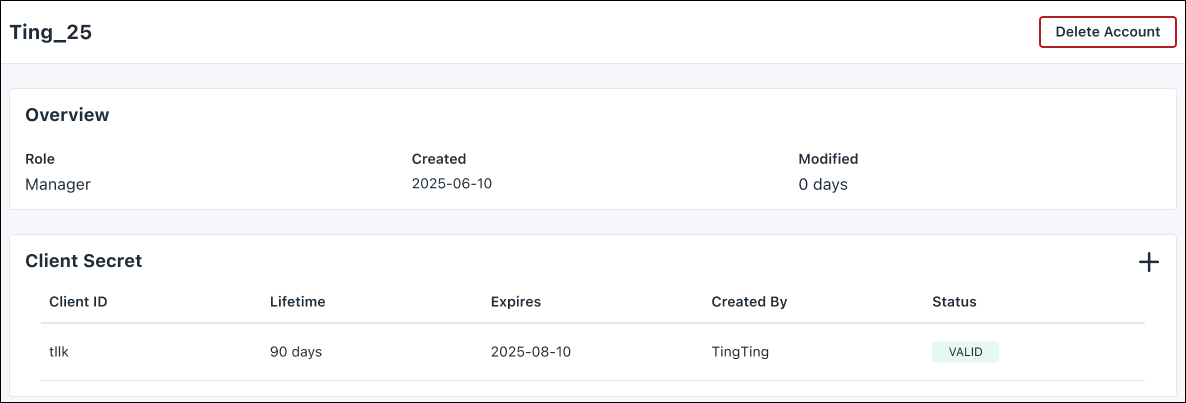
Deleting Client Secrets
To delete a client secret:
- Click the Delete button next to the client secret. A pop-up appears prompting you to confirm the deletion.
- Click Delete.
The Client Secret should no longer be listed.
![]()
If you delete a Client Secret, you’ll no longer be able to interact with JumpCloud APIs using that Client Secret.
Deleting a Service Account
To delete a Service Account:
- Select the Service Account you want to delete.
- Click the Delete Account button in the upper right corner. A pop-up appears prompting you to confirm the deletion.
- Enter the Service Account name and click Delete.
The Service Account should no longer be listed.
Example: Using JumpCloud Service Account for Interacting with JumpCloud APIs
Storing the Client ID and Secret
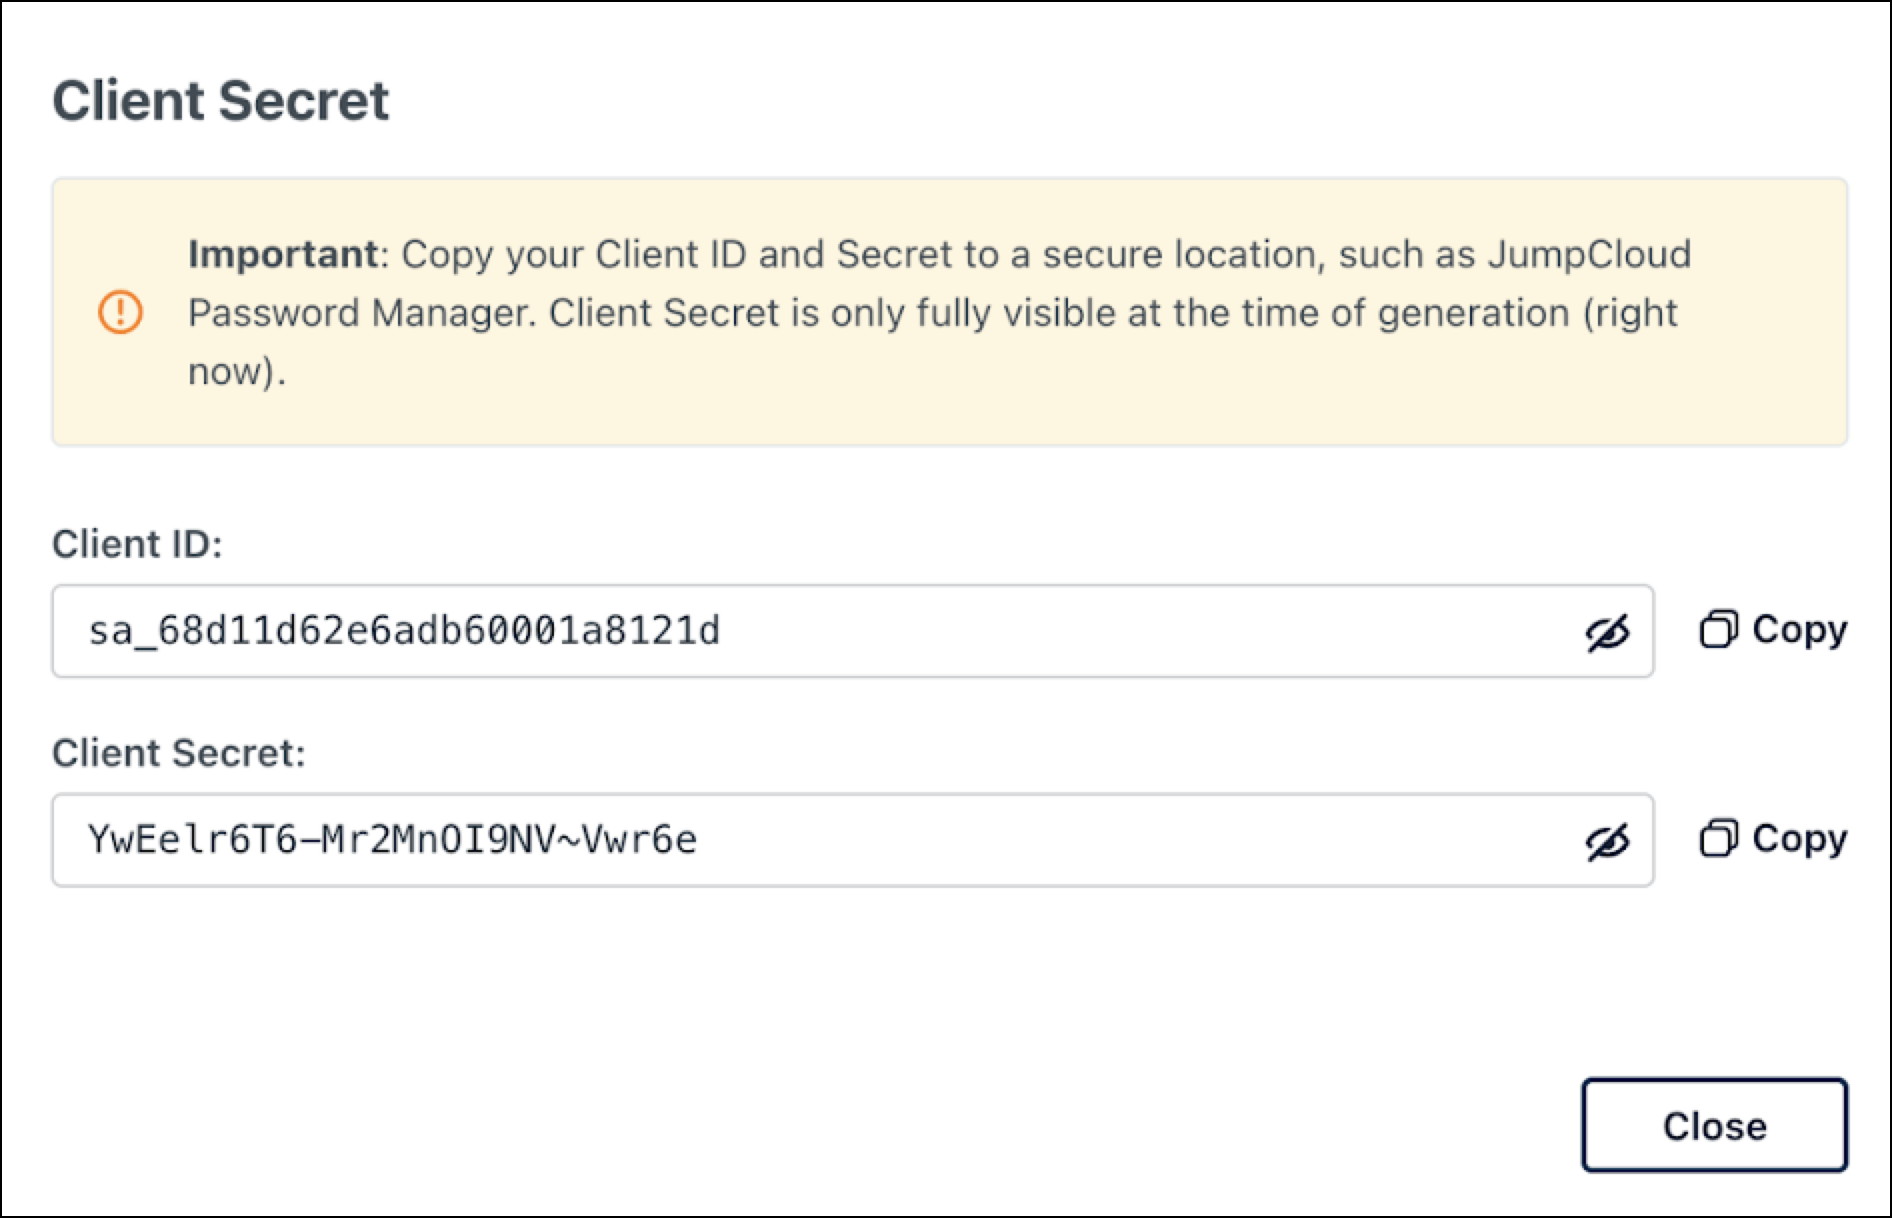
Add a new Service Account. The Client Secret is only visible at the time of creation. It is sensitive information that must be stored securely. Make sure to store it in a secure place, like JumpCloud’s Password Manager so you can access it when you need it.
For example:
- Client ID:
sa_68d11d62e6adb60001a8121d - Client Secret:
YwEelr6T6-Mr2MnOI9NV~Vwr6e
Encode Client ID and Client Secret
- Encode ClientID and Client Secret with Base64 encoding. The following example shows the command to perform base 64 encoding of Client ID and Client Secret using shell in mac OS:
% echo -n sa_68d11d62e6adb60001a8121d:YwEelr6T6-Mr2MnOI9NV~Vwr6e | base64
The output would look like the following string:c2FfNjhkMTFkNjJlNmFkYjYwMDAxYTgxMjFkOll3RWVscjZUNi1NcjJNbk9JOU5WflZ3cjZl - Get OAuth2 Access Token for the Client
Use the value encoded in the previous step to obtain the access token from the token endpoint. Ensure to pass thescopeandgrant_typevalues in the payload as mentioned below. The following example shows the token endpoint call using CURL command on shell in mac OS. The same can be done in any programming language of your choice.
curl -XPOST -H "Authorization: Basic c2FfNjhkMTFkNjJlNmFkYjYwMDAxYTgxMjFkOll3RWVscjZUNi1NcjJNbk9JOU5WflZ3cjZl" https://admin-oauth.id.jumpcloud.com/oauth2/token -d "scope=api&grant_type=client_credentials"
The response will look something like this:
{"access_token":"eyJhbGciOiJSUzI1NiIsInR5cCI6IkpXVCJ9.eyJhdWQiOltdLCJjbGllbnRfaWQiOiJzYV82OGQxMWQ2MmU2YWRiNjAwMDFhODEyMWQiLCJleHAiOjE3NTgxMjI5NjIsImlhdCI6MTc1ODExOTM2MiwiaXNzIjoiaHR0cHM6Ly9hZG1pbi1vYXV0aC5pZC5qdW1wY2xvdWQuY29tLyIsImp0aSI6ImIxN2ViMTUyLWEyZGUtNGFjZS04NTFhLWE3ODkzODU0ZjEwNyIsIm5iZiI6MTc1ODExOTM2Miwic2NwIjpbImFwaSJdLCJzdWIiOiJzYV82OGQxMWQ2MmU2YWRiNjAwMDFhODEyMWQifQ.VRkUfXInCqvoVEjUgWyvIg4X0KKlK4ztRbjrM4NHNJm_LoczYas295th2_A6bWI4yBTh6-SUTN5xeCDctb-j-zvlQEAzy0xCPptOvxsiU3t6iv-4JkmmTHk3dFzZrwTrQflqn4BHHdWiBy8hRu4YzzsOXVfHKm-g4qw8W2EX8s0ndccl3NoQnQAAVOb0iZtW_Cf8Cqy5KjOrQN_9mdYOT6zhd6MgKtltkZxuHm_Dk56SZHGC5cn2YMX4C8vX5VjiKecnByclKB4Eaa8voA7-TQ-svD_goS-iIYWhcoSy8Zv-2U4mg5VcqdE0gsUbfuzdnDmYp0m3ctEAjAp144q14Q","expires_in":3599,"scope":"api","token_type":"bearer"}
Upon successful authentication, the response would contain access_token as highlighted above. The expires_in field contains the lifetime of the token, e.g., 3599 second or about an hour in the example above.
Call JumpCloud API by Sending Access Token in Authorization Header
Using the access token obtained in the previous step, JumpCloud API can be called. It must be passed in the Authorization header with the text “Bearer” prefixed before it as shown below.
curl -XGET -v -H "Authorization: Bearer eyJhbGciOiJSUzI1NiIsInR5cCI6IkpXVCJ9.eyJhdWQiOltdLCJjbGllbnRfaWQiOiJzYV82OGQxMWQ2MmU2YWRiNjAwMDFhODEyMWQiLCJleHAiOjE3NTgxMjI5NjIsImlhdCI6MTc1ODExOTM2MiwiaXNzIjoiaHR0cHM6Ly9hZG1pbi1vYXV0aC5pZC5qdW1wY2xvdWQuY29tLyIsImp0aSI6ImIxN2ViMTUyLWEyZGUtNGFjZS04NTFhLWE3ODkzODU0ZjEwNyIsIm5iZiI6MTc1ODExOTM2Miwic2NwIjpbImFwaSJdLCJzdWIiOiJzYV82OGQxMWQ2MmU2YWRiNjAwMDFhODEyMWQifQ.VRkUfXInCqvoVEjUgWyvIg4X0KKlK4ztRbjrM4NHNJm_LoczYas295th2_A6bWI4yBTh6-SUTN5xeCDctb-j-zvlQEAzy0xCPptOvxsiU3t6iv-4JkmmTHk3dFzZrwTrQflqn4BHHdWiBy8hRu4YzzsOXVfHKm-g4qw8W2EX8s0ndccl3NoQnQAAVOb0iZtW_Cf8Cqy5KjOrQN_9mdYOT6zhd6MgKtltkZxuHm_Dk56SZHGC5cn2YMX4C8vX5VjiKecnByclKB4Eaa8voA7-TQ-svD_goS-iIYWhcoSy8Zv-2U4mg5VcqdE0gsUbfuzdnDmYp0m3ctEAjAp144q14Q" \
-H 'x-org-id: 68c8ed66808686eb6b0ae556' \
https://console.jumpcloud.com/api/systemusers
![]()
Service account authentication is currently not supported for the following JumpCloud API endpoints:
- All MSP endpoints
- All bulk user endpoints
- Custom emails endpoints
Support for these endpoints will be added soon.
FAQ: Service Account with API
The Service Account is designed for a non-human identity that is linked to the organization instead of an individual user. Only Administrators with Billing role are able to manage them.
The Client Secret is only displayed once, when you add a new key. The Client Secret cannot be accessed again. The Client ID is not sensitive information but the Client Secret is. We recommend using secured methods like vaults/encryption, to store and retrieve it in the application.
In principle, yes. We refer to it as an Access Token instead of a Code.
The Service Account is linked to one of the roles available in JumpCloud like Administrator, Manager, Read Only, etc. You should be able to perform all actions that role is capable of. See Admin Portal Roles to learn more.
The maximum limit for service accounts is 40 per Org.
You can use the secondary Client Secret as a placeholder when your primary Client Secret is about to expire, this should help you perform Secret rotations without having any downtime.
Client Secrets are valid for up to365 days (one year). The expiration is customizable, with a configurable range between a minimum of 30 days and a maximum of 365 days.
You can't delete a Client Secret if it’s the only one in a Service Account because a Service Account requires at least one active Client Secret to work. To delete the existing Client Secret, you have to add a new one first.
No, we’re working on this and will update accordingly.
Yes, all Admins with Admin with billing role will receive an email 7 days before the Client ID expires.
As of now, you can search for a Service Account by its name.
Service Accounts with Public Keys is under development and will be rolled out soon.