
JumpCloud Vault uses a role-based permission system to control what each user can see and do within the platform. A role is a named collection of granular permissions that can be assigned to one or more users. Instead of configuring access settings user by user, you define a role once and apply it wherever needed.
Permissions in Vault are additive. When a user has multiple roles assigned, the platform combines all permissions from all roles. Example:
- If one role does not include access to Audit Logs but another role does, the user will have access to Audit Logs. The more permissive setting always applies when roles overlap.
![]()
Beyond roles, Vault also supports special permissions: individual permission overrides applied directly to a user, outside of any role. This allows administrators to handle exceptions without creating a new role for every edge case. The platform evaluates both role-based permissions and special permissions together to determine what a user can do.
Default Roles
When your Vault instance is created, three Static roles are automatically available. These roles cannot be deleted.
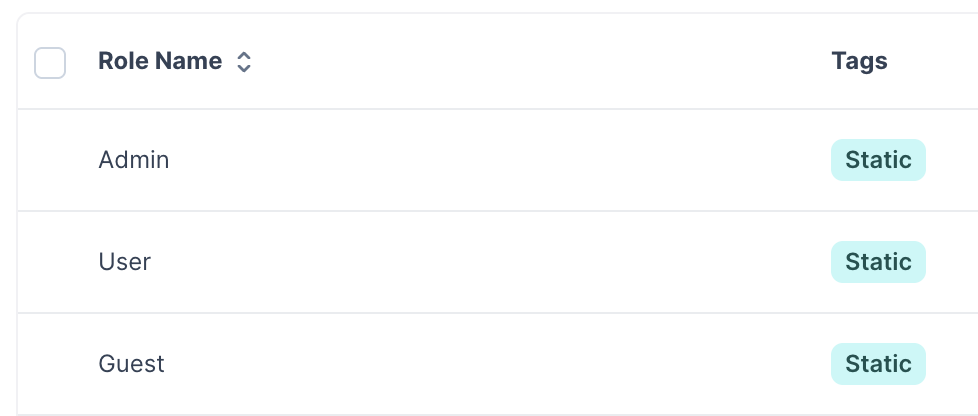
- Admin: The Admin role grants broad administrative access across the platform, including user management, group management, role configuration, audit logs, connectors, settings, and resource administration.
- This role is permanently linked to the user with the username "admin" (the first user created when the tenant is activated).
- The Admin role name and its permissions cannot be edited.
- The user "admin" cannot have this role removed.
![]()
The Admin role can be assigned to other users in addition to the default "admin" user. It can also be removed from those users later. The restriction applies only to the "admin" username itself.
- Guest: The Guest role is designed for users who need read-only or connection-only access. It is intended for scenarios such as third-party contractors who should be able to connect to specific resources but should not be able to create or manage them.
- This role is Static but its permissions can be edited to fit your organization's needs.
- User: The User role provides access to the main resource pages: Credentials, Databases, Servers, and Websites. Users with this role can view and create resources within those areas. They do not have access to Administration functions by default.
- This role is Static but its permissions can be edited to fit your organization's needs.
![]()
The User role is marked as Default out of the box, meaning it is automatically assigned to every new user added to the platform unless a different Default role is configured.
See the Default Role section below for more information.
Creating Custom Roles
Beyond the three Static roles, you can create custom roles to match your organization's structure.
Custom roles are useful when your access requirements do not fit neatly into Admin, User, or Guest.
For example, you might create an Engineering role that allows server and database access but restricts credential management, or a Manager role that includes audit log visibility without full administrative control.
To create a custom role:
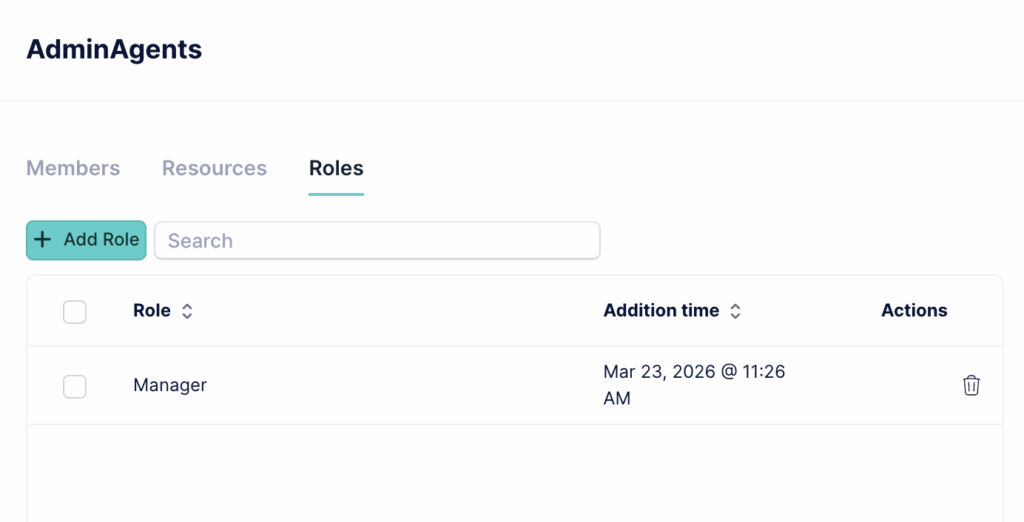
- Go to Administration > Roles.
- Click +Add Role.
- On the Role Name tab, enter a name for the role.
- Optionally, check Default if you want this role assigned to new users automatically.
- Click the Permissions tab.
- Expand each category folder and select the specific permissions this role should include.
- After selecting all the desired permissions, click Save to apply your changes.
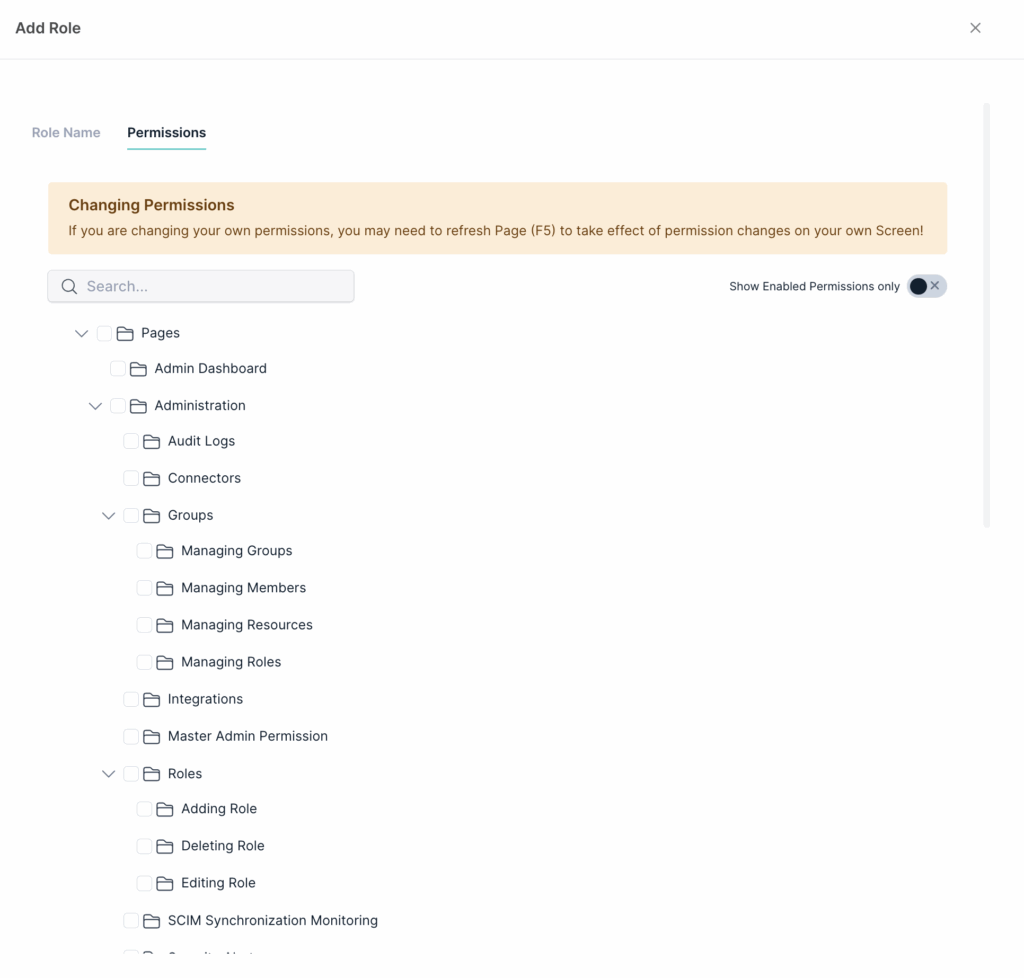
Permissions are organized hierarchically. Each top-level category (such as Pages or Administration) contains subcategories with specific actions. You can enable or disable permissions at any level. Use the Show Enabled Permissions only toggle to review what a role currently grants without scrolling through the full tree.
![]()
If you are editing a role that is assigned to your own account, permission changes may not be reflected immediately in your current session.
Refresh the page (F5) after saving to apply the changes to your own screen.
Assigning Roles to Users
When creating a user manually
When you add a user manually, you can assign one or more roles during the creation flow.
- Go to Administration > Users.
- Click + Add User.
- Fill in the user details on the Details tab.
- Go to the Roles tab and select the roles this user should have.
- Click Save.
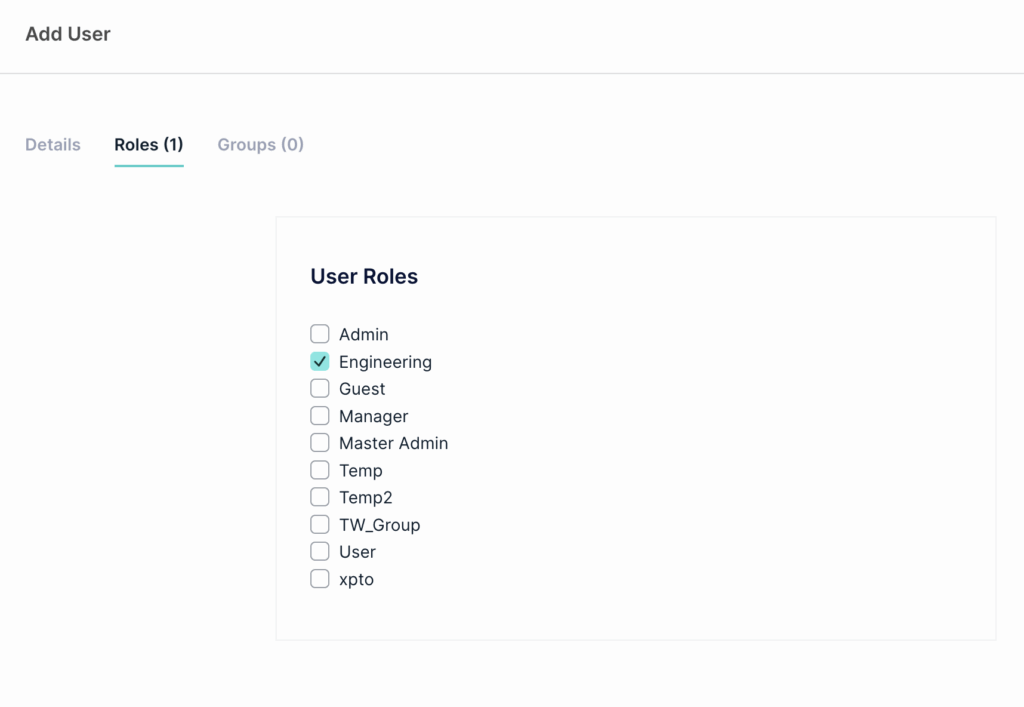
A user can hold multiple roles simultaneously. Their effective permissions will be the combination of all assigned roles.
Default roles and automated provisioning
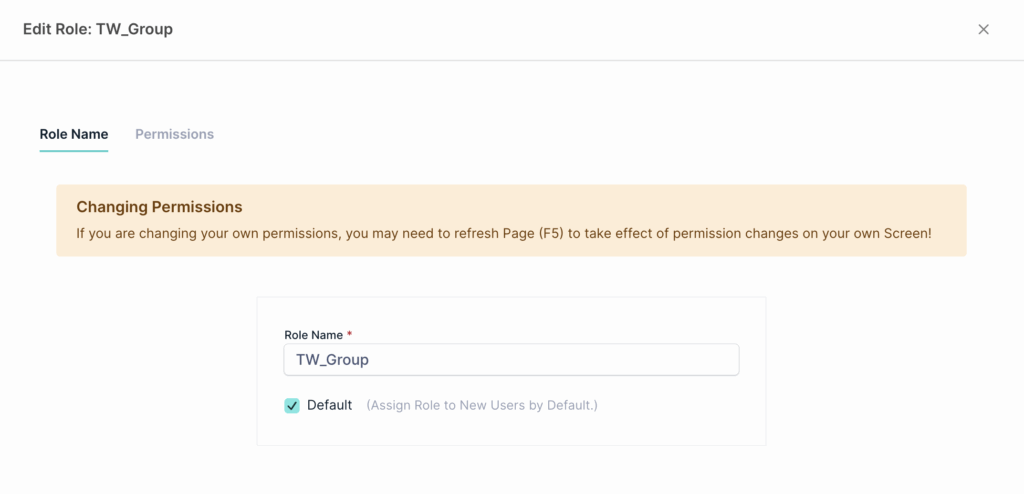
When users are provisioned automatically through an identity provider via SCIM or SSO, they are assigned whichever role is marked as Default in your Roles list.
You can mark any role as Default by editing it and checking the Default checkbox on the Role Name tab. Multiple roles can be set as Default simultaneously, in which case all of them are applied to newly provisioned users.
A common pattern is to configure a low-privilege Default role (such as User or Guest) so that all provisioned users start with a baseline level of access. Administrators can then elevate specific users manually after provisioning.
If no role is marked as Default, users provisioned through an identity provider will be created without any role assigned.
Assigning roles through groups
Roles can also be assigned at the group level instead of per user. When a role is assigned to a group, all members of that group automatically inherit it. This is the recommended approach when managing access for large teams or when users are provisioned via SCIM.
To assign a role to a group, go to Administration > Groups, select a group, and open the Roles tab on the right panel.
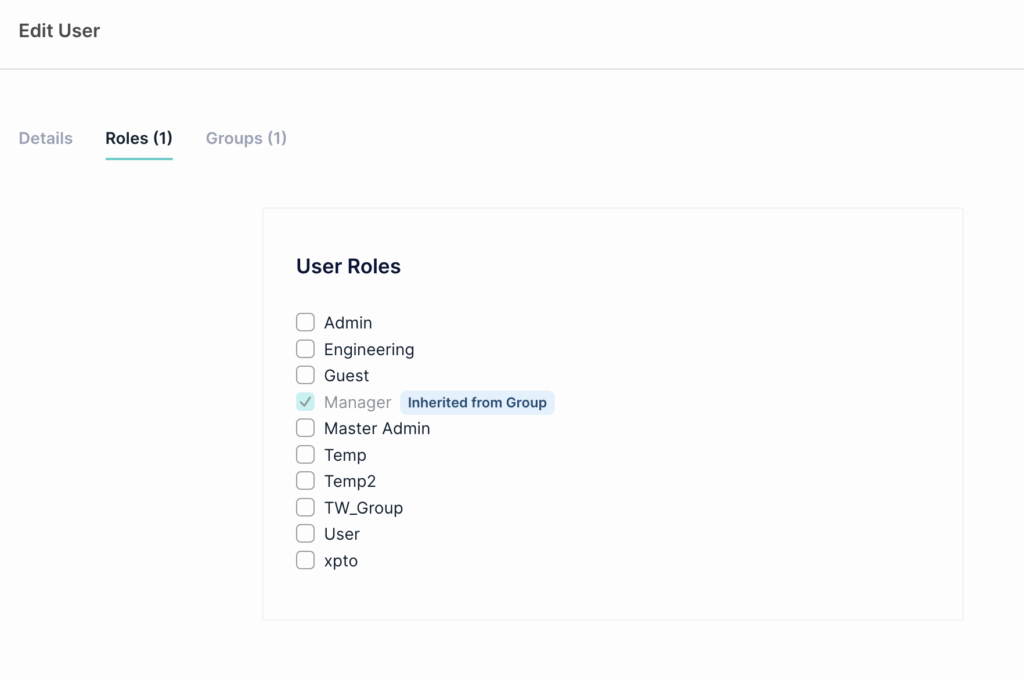
When you view a user who has inherited a role from a group, the role is displayed with an Inherited from Group label in the user's Roles tab.
For detailed steps on assigning roles to groups, see Vault: Assigning a Role to Groups.
Managing Special Permissions
In addition to roles, Vault allows administrators to set special permissions directly on individual users. These are permission overrides that apply on top of whatever roles the user has assigned. Special permissions are useful for exceptions where a specific user needs access that does not justify creating an entirely new role.
To manage special permissions for a user:
- Go to Administration > Users.
- Find the user in the list.
- Click the … (actions menu) next to the user.
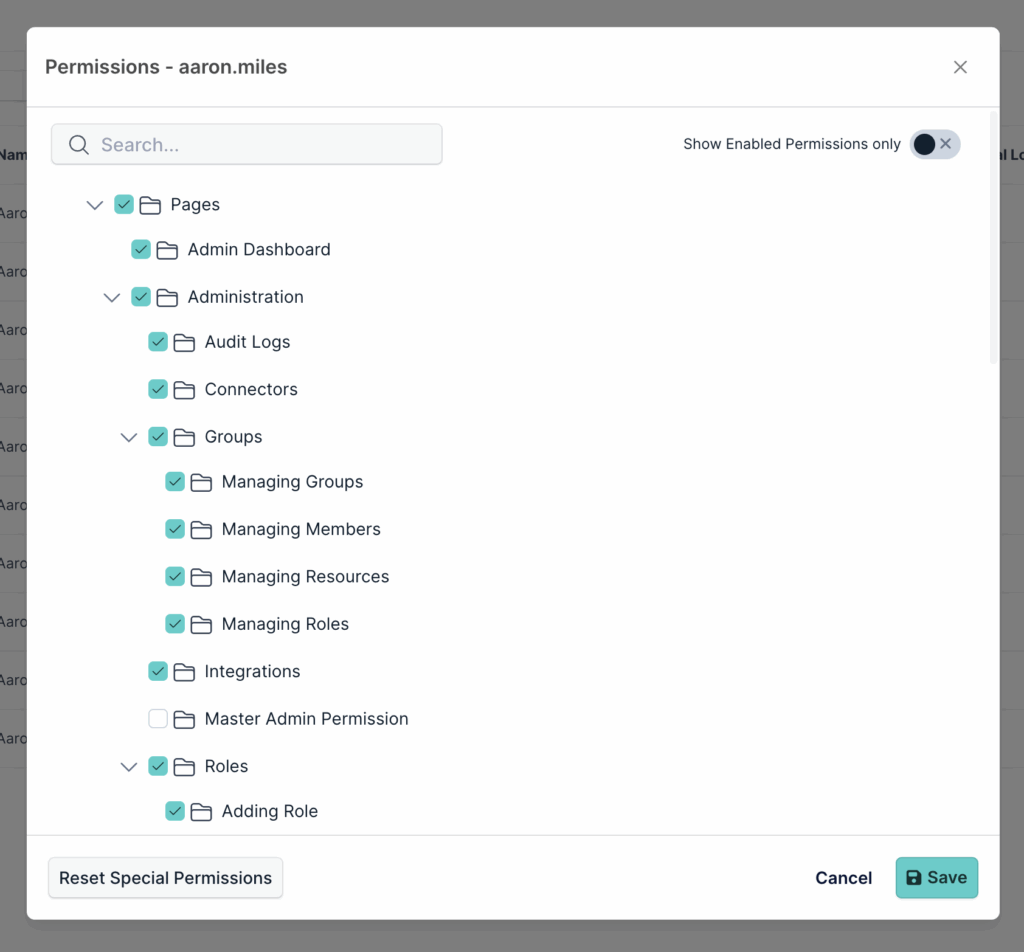
- Click Permissions.
- The permissions panel shows the full permission tree. Permissions already granted through the user's roles appear checked. You can enable or disable individual permissions here as overrides.
- Click Save.
Resetting special permissions
If a user's special permissions were changed and you want to revert to what their roles define, click Reset Special Permissions at the bottom of the permissions panel. This clears all individual overrides and restores the user's permissions to exactly what their assigned roles grant.
This is particularly useful when a role is updated and you want to ensure a specific user reflects the new role definition without carrying forward any manual overrides.
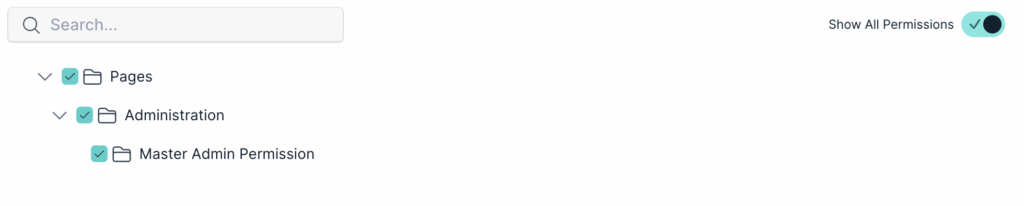
Master Admin Permission
Master Admin Permission is a special permission within the permission tree, found under Administration. It is not a role. It can be granted to any user through their individual permissions panel.
A user with Master Admin Permission gains two capabilities that go beyond standard roles:
- Access to all resources without explicit sharing Normally, a user can only see and connect to resources that have been explicitly shared with them. A user with Master Admin Permission can view all resources on the platform, even those where they are not listed in the sharing preferences. An Add me as Administrator button appears next to those resources, allowing the user to add themselves directly.

- Move Permissions The Master Admin Permission also enables the Move Permissions option in the user actions menu. This allows the administrator to transfer all resource access from one user to another in a guided three-step flow: select the resources to transfer, select the destination user, and review before confirming.
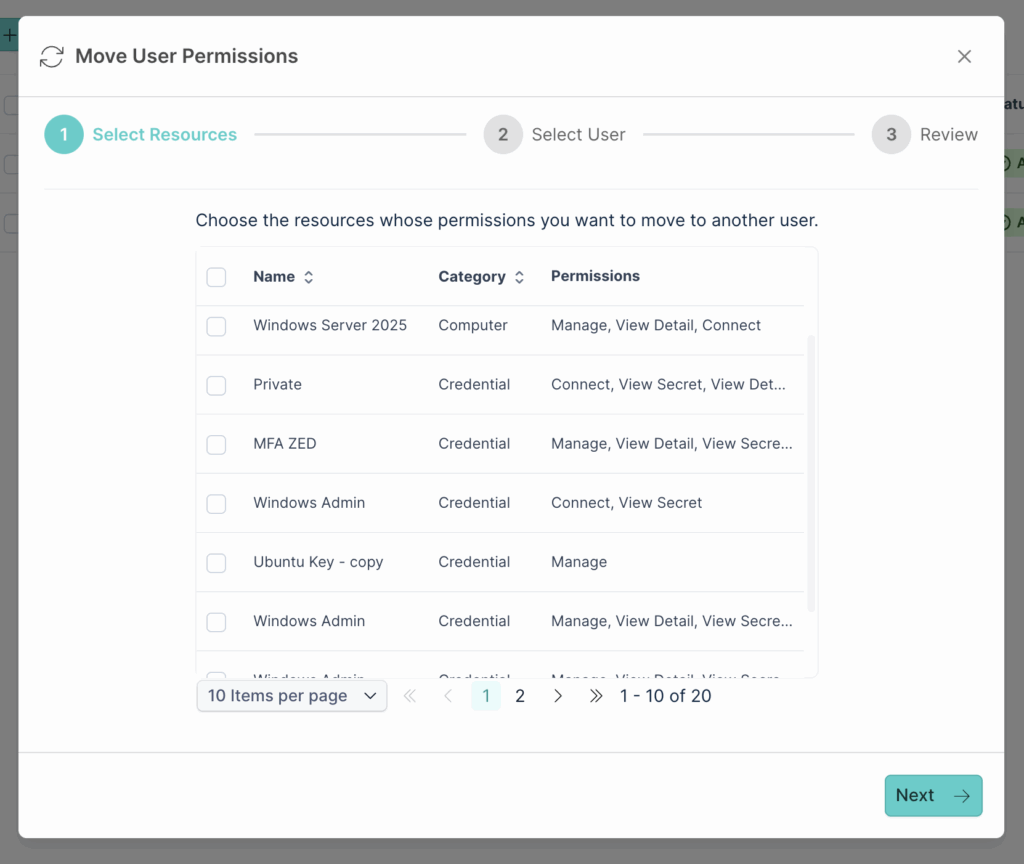
This feature is particularly useful during offboarding, when a departing user's access to servers, credentials, websites, and databases needs to be transferred to a colleague.
![]()
Master Admin Permission grants significant access across the entire platform. Assign it carefully and only to users who genuinely require it. Not every administrator needs Master Admin Permission.