
This article details how to use the Get-JCSystemApp function from the JumpCloud PowerShell Module to identify software installed on, or missing from, your org’s managed devices. It covers the function’s parameters, with practical examples for filtering and reporting on these software applications. It also covers creating device groups for further management actions like software deployment.
Prerequisites:
- A JumpCloud Admin account.
- The JumpCloud PowerShell Module is installed on your device. See Install the JumpCloud PowerShell Module to learn more.
Understanding Function Parameters
The Get-JCSystemApp function filters macOS, Windows, and Linux devices in your org to find installed software. Without providing any additional parameters, it returns all installed software for each device in its given org.
You can filter the function with the following parameters:
- Operating system (OS) type
-systemOS - Individual devices
-SystemID - Software names
-name(this is case sensitive) - Software versions
-version - Broad search, when the case-sensitive app name is not known
-Search
Use the corresponding function parameters to limit the results. See the JumpCloud PowerShell Module Wiki for detailed function parameters.
Using Get-JCSystemApp Command Examples
Use the Get-JCSystemApp command to return software details from the System Insights (SI) table. For example, to search for all macOS devices that have Google Chrome installed, specify the app name and the target OS:
Get-JCSystemApp -Name "Google Chrome" -SystemOS "macOS"
![]()
If the case-sensitive app name or its record name is not known, you can use the -search parameter to identify matching apps. This query takes significantly more time to complete. See Fetching Application Name to learn more.
Finding Devices with Specific Apps Installed
Use the following search to return devices with Google Chrome installed:
Get-JCSystemApp -Name "Google Chrome"
For example, filtering for 'Google Chrome' without specifying an OS, returns a list of matches from macOS and Windows devices. The records of Windows and macOS devices will differ, and this is expected. To get results for only one OS, specify the -SystemOS parameter.
Finding macOS Devices with Specific Apps Installed
Run the following to return macOS devices with Slack installed:
Get-JCSystemApp -Name "Slack" -SystemOS "macOS"
Finding Windows Devices with Specific App Versions Installed
Run the following to return Windows devices with Microsoft Edge version 109.0.1518.69 installed:
Get-JCSystemApp -name "Microsoft Edge" -SystemOS "Windows" -version "109.0.1518.69"
![]()
When you use the Get-JCSystemApp function to query software versions, it automatically filters results using two different properties in the API:
- For Windows and Linux devices, the function uses the version property.
- For macOS devices, it uses the BundleShortVersion property.
Fetching the Application Name
If the case-sensitive app name or its record name is not known, use the -search parameter to return matching results. (This is an inefficient search and takes significantly more time than specifying the app by name).
To identify an app using the search parameter:
Approach 1: Identify a device that has the specific app installed and search the device -systemID with the relevant keyword. The SystemID is an Object ID, a unique identifier for the system. See Locating the Device's SystemID to learn more.
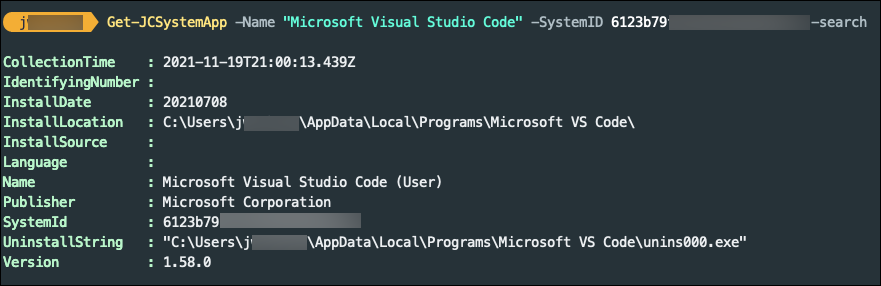
For example, run the following query to identify the app Microsoft Visual Studio Code:
Get-JCSystemApp -Name "microsoft vs code" -SystemID "INSERT-SYSTEM-ID" -Search
This query should return the case-sensitive recorded name of the app as stored in the database for that particular OS.
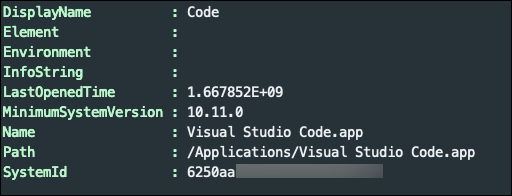
Approach 2: If there is no known device that has the specific app installed, search across a particular OS group with the relevant keyword. This query always takes longer than searching an individual system.
Get-JCSystemApp -Name "Code" -SystemOS "macOS" -Search
The above query returns many results because the keyword is a common word, but the list includes the required record name of the app.
Finding All Apps on macOS Devices
Run the following to return all macOS apps and their details:
Get-JCSystemApp -SystemOS "macOS"
Returning All Apps on a Device
Run the following to return all apps and their details from a device:
Get-JCSystemApp -SystemID "INSERT-SYSTEM-ID"
This query automatically determines the device OS and returns all relevant app data.
Creating Device Groups for Missing Applications or Updates
When devices are missing a specific app or version, you can create a device group and install them using Software Management. See Get Started: Software Management to learn more.
To scope devices for installation, first retrieve a list of all relevant OS devices, then a list of devices that currently have the app installed. You then use these two lists to identify the devices requiring installation.
Use Case: Deploy Slack to macOS Devices Missing the App
1. First, run the following to obtain a list of all macOS devices:
$systems = Get-JCSystem -os "Mac OS X"
The $systems variable now holds the retrieved macOS device list.
2. Next, run the following to obtain a list of all macOS devices with Slack installed:
$slack = Get-JCSystemApp -SystemOS macOS -Name "Slack"
The $slack variable now holds a list of all macOS devices with Slack installed, including the versions and app information. Run the following to create a list of devices without Slack installed:
$missing = $systems | Where-Object { $_._id -notin $slack.systemID }
The $missing variable will now contain the list of macOS devices that do not have Slack installed.
3. Run the following to create a group of these macOS devices for software deployment:
New-JCSystemGroup -GroupName "macOS-Missing-Slack" $missing | ForEach-Object { Add-JCSystemGroupMember -GroupName "macOS-Missing-Slack" -SystemID $_._id }
This will create a new device group titled macOS-Missing-Slack and populate the group with the list of devices that don't have Slack installed. This device group can then be used to assign commands or software management apps for deploying the missing Slack app.
Creating CSV Reports
Generate CSV reports from your Get-JCSystemApp results, using the ConvertTo-CSV and Out-File cmdlets. See Microsoft’s support documentation for ConvertTo-CSV and Out-File to learn more.
Generating a CSV Report from Stored Data: Run the following to get a list of macOS devices with Firefox installed and save it as a CSV file:
$apps = Get-JCSystemApp -SystemOS "macOS" -Name "Firefox" $apps | ConvertTo-CSV | Out-File ~/firefoxReport.CSV
This code snippet returns macOS devices with Firefox installed, converts the output to CSV, and saves it as firefoxReport.CSV in your home directory.
You can customize the Get-JCSystemApp output to create various reports for analysis and record-keeping.
For example, run the following to get a complete list of all macOS apps in a CSV file:
$apps = Get-JCSystemApp -SystemOS "macOS" $apps | ConvertTo-CSV | Out-File ~/macOSApplicationReport.CSV
![]()
- Queries spanning an entire org or a specific OS may take longer in larger orgs.
- It’s recommended to create CSV reports for each type of OS separately as properties between Windows, Linux and macOS devices differ, and sometimes so do the app record names.
Quickly Exporting a CSV Report: Run the following command to export the list of installed applications on all Windows devices:
Get-JCSystemApp -SystemOS windows | Export-Csv windowsPrograms.csv
Creating Org-Wide Reports: Even if the app's record name is consistent across Windows and macOS devices, org-wide searches are not recommended due to property differences. When a Get-JCSystemApp query returns results from multiple OS types, PowerShell uses the default properties of the first object to create headers for the entire CSV. This means the report will only contain headers relevant to that first OS type, resulting in missing data for others.
As a solution, when running a query across multiple OS types you can see Microsoft’s support documentation for Select-Object cmdlet to learn how to select specific properties from the output as the headers for the CSV report. If a selected property doesn't exist for an OS, that column will appear blank for those entries.
Run the following query to look up devices with Google Chrome across your org and create a single CSV report including System ID and version:
$apps = Get-JCSystemApp -name "Google Chrome" $list | Select -Property Name, SystemID, version, bundleShortVersion $list | ConvertTo-CSV | Out-File ~/chromeReport.CSV
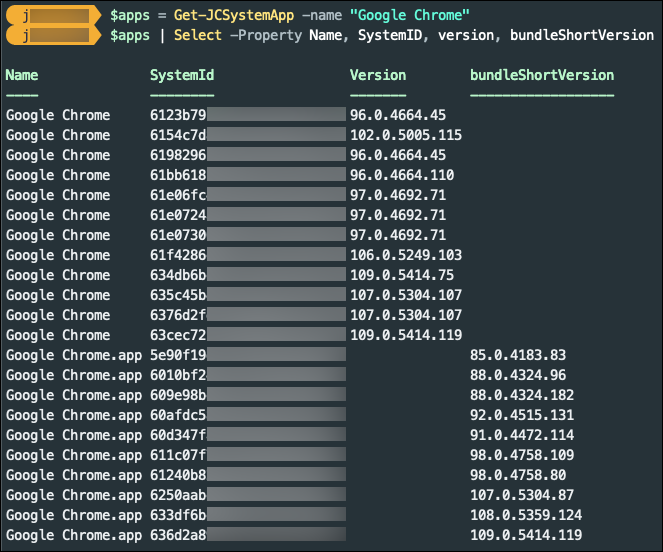
By selecting only the Name, SystemID, version, and bundleShortVersion properties from the results, you effectively create new objects whose properties directly define the CSV headers for export. In the example above, macOS entries will show a blank 'version' property, and Windows devices will show a blank 'bundleShortVersion' property.
Generating Comprehensive Reports with System Details: Run the following script to create a full, detailed report that includes system information like the hostname/display name and system ID.
Specify your Operating System and Software Name
$os = "Windows"
$software = "Slack"
$version = "4.0.0"
$osversion = "10.0.18362"
Get the list of systems with the specified OS
$systems = Get-JCSystem -os $os #optional: -version $osversion
Get the list of systems with the specified software installed
$softwareinstalls = Get-JCSystemApp -SystemOS Windows -Name $software #optional: -version $version
Get the list of systems that have both the specified OS and software installed
$installed = $systems | Where-Object { $_._id -in $softwareinstalls.SystemID }
Export the list of systems that have both the specified OS and software installed
$installed | ConvertTo-Csv -NoTypeInformation | Out-File -FilePath "./installed-software.csv"