
JumpCloud uses roles to define access control and assign specific permissions to users, both within the Admin Portal, and across systems and resources (like users, groups, policies, and devices). This enables granular control, allowing Admins to tailor roles based on specific responsibilities and requirements. You can create custom Admin roles with specific view and edit access.
![]()
This feature is available for direct organizations only. In the Multi-tenant portal, it is available for all the managed organizations. It is not available on the MTP homepage. We are working on making it available.
Prerequisite:
- Super Admin (Admin with Billing or equivalent) role is required for creating custom Admin roles.
Creating a Custom Role
To create a custom role:
- Log in to the JumpCloud Admin Portal.
![]()
If your data is stored outside of the US, check which login URL you should be using depending on your region. If your organization uses LDAP, RADIUS, or requires firewall allow list configuration, the Fully Qualified Domain Names (FQDNs) will also be region specific. See JumpCloud Data Centers for the URLs, FQDNs, and IP addresses.
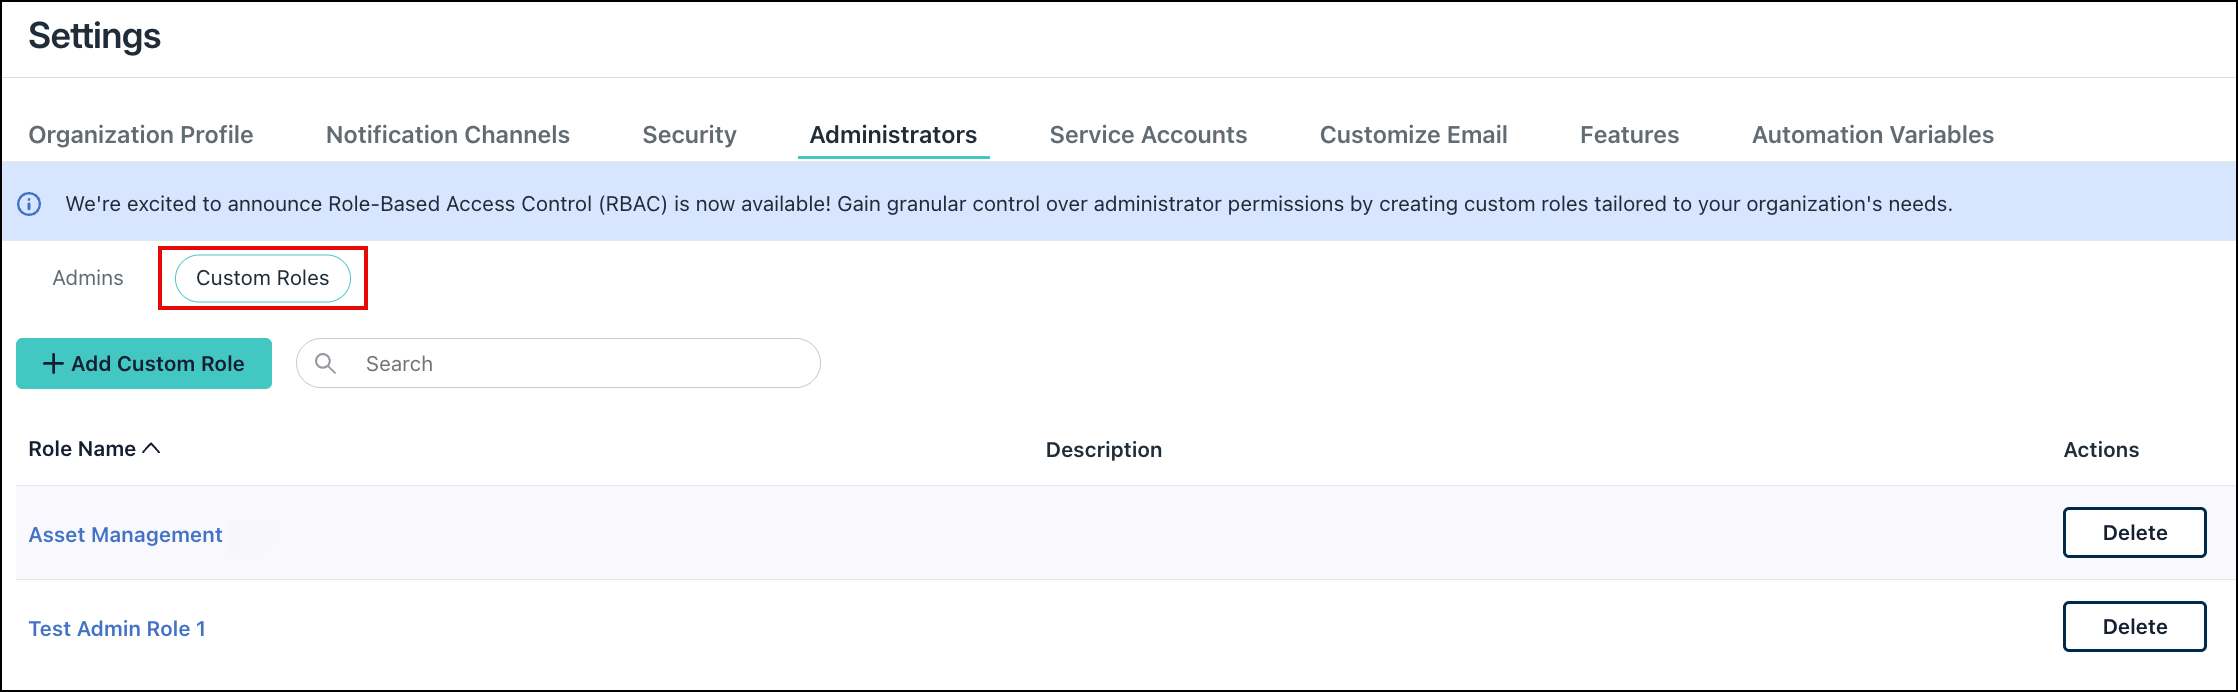
- Go to Settings > Administrators. All Admins are listed here.
- Go to the Custom Roles tab.
- Click +Add Custom Role.

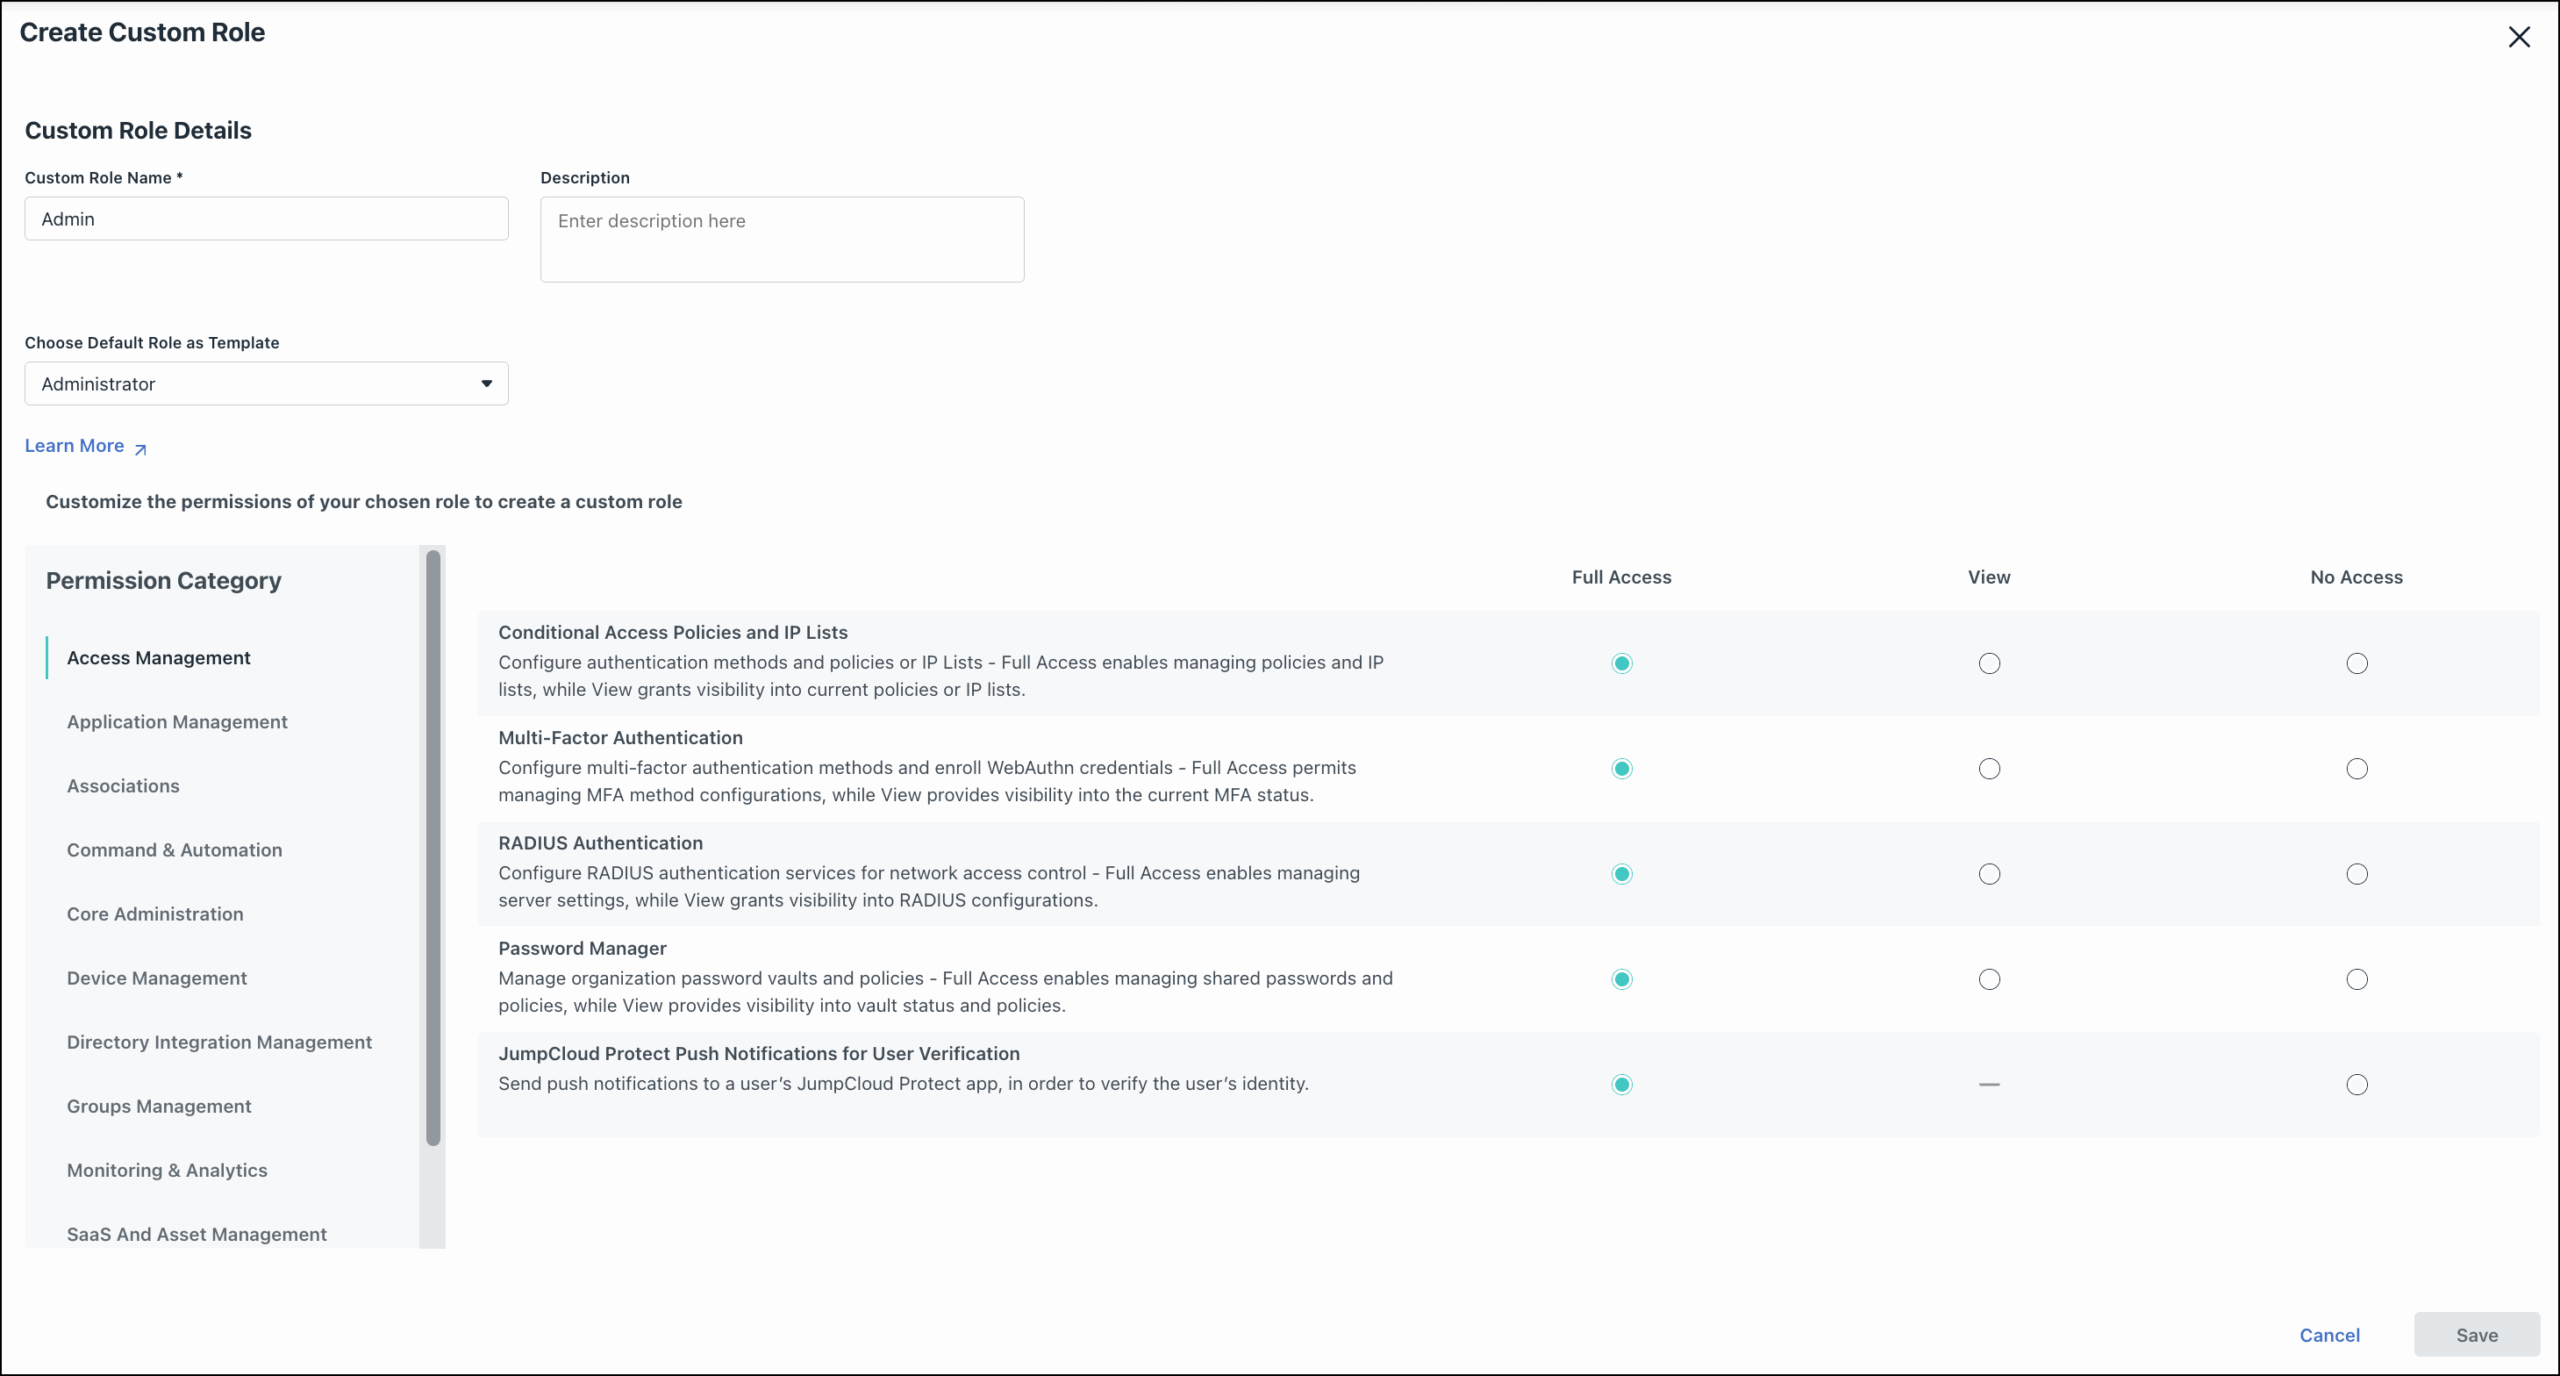
- Enter a Custom Role Name and Description (optional).
- Click Choose Default Role as Template, and select an option from the drop-down menu. For the selected role, the permissions appear.

- Edit the permissions as required and click Save.
![]()
Only an Admin with Billing can edit the permissions.
You’ll see a success message stating that a custom role has been created.
Currently, we support a maximum of 20 custom roles. The Admin can assign a custom role to an existing or newly created Admin.
Custom Admin Roles Permission Categories
Admin with Billing role (Super Admin) can allow specific combinations of granular permissions in permission categories to the admins. Here is a table that describes the permission categories and the respective permissions:
Access Management
These permissions govern advanced security and authentication settings within the Admin portal.
| Permission Category | Sub-categories | Permission Type | ||
| Access Management | Conditional Access Policies and IP Lists | Full Access | View | No Access |
| Multi Factor Authentication | Full Access | View | No Access | |
| Radius Authentication | Full Access | View | No Access | |
| Password Manager | Full Access | View | No Access | |
Application Management
Allow Admins to manage applications including user management integrations.
| Permission Category | Sub-categories | Permission Type | |||
| Application Management | Applications | Create | Update | Delete | View |
![]()
For Application Management, the super admin can give CRUD and view permissions to the admins. Enable the Full Access toggle button to provide all permissions at once.
Associations
Create and manage associations between resources.
| Permission Category | Sub-categories | Permission Type | ||
| Associations | Associations | Full Access | View | N/A |
![]()
In a small number of scenarios, users with full-access to Associations category may encounter denials. We are working on resolving this.
Command & Automation
Manage and execute remote commands on systems. Additionally, Admins can create and manage reusable command templates.
| Permission Category | Sub-categories | Permission Type | ||
| Command & Automation | Commands | Full Access | View | No Access |
| Command Templates | ||||
| Run Command | Checkbox Selection | |||
Core Administration
Manage core administration tasks including notification channels and service accounts.
| Permission Category | Sub-categories | Permission Type | ||
| Core Administration | Administrator Management | Full Access | View | No Access |
| Notification Channels | Full Access | View | No Access | |
| Support Access | Full Access | View | No Access | |
| Role Management | Full Access | View | No Access | |
| Organization Management | Full Access | N/A | Full Access | |
| PKI CA Management | Full Access | View | No Access | |
| PKI certificate Management | Full Access | View | No Access | |
| Billing Management | Full Access | N/A | No Access | |
| Subscription Information | N/A | View | No Access | |
| Service Accounts | Full Access | View | No Access | |
Device Management
Manage devices, volume purchase program, and remote assist permissions.
| Permission Category | Sub-categories | Permission Type | ||
| Device Management | Mobile Device Management | Full Access | View | No Access |
| Volume Purchase Program | Full Access | View | No Access | |
| Remote Assist | Full Access | N/A | No Access | |
| Remote Assist Sessions | Full Access | N/A | No Access | |
| Devices | Full Access | View | No Access | |
| Device Support | Checkbox Selection | |||
Directory Integration Management
Create and manage directories and directory integrations.
| Permission Category | Sub-categories | Permission Type | ||
| Directory Integration Management | Directory Management | Full Access | View | No Access |
Groups Management
Create and manage user, device, and policy groups.
| Permission Category | Sub-categories | Permission Type | ||
| Groups Management | Group Management | Full Access | View | No Access |
Monitoring & Analytics
Manage monitoring and analytics tools.
| Permission Category | Sub-categories | Permission Type | ||
| Monitoring & Analytics | Directory Insights | N/A | View | No Access |
| Reports | Full Access | View | No Access | |
| Search API | N/A | View | No Access | |
| System Insights | N/A | View | No Access | |
| AI Search | Full Access | View | No Access | |
| Health Monitoring Rules | Full Access | View | No Access | |
| Health Monitoring Alerts | Full Access | View | No Access | |
| Add-ons Information | N/A | View | No Access | |
SaaS and Asset Management
Manage SaaS applications. Also, track and manage organizational IT assets.
| Permission Category | Sub-categories | Permission Type | ||
| SaaS and Asset Management | SaaS Applications | Full access | View | No Access |
| Asset Management | ||||
User Management
Manage users and set various user settings.
| Permission Category | Sub-categories | Permission Type | |||
| User Management | User Management | Create | Update | Delete | View |
| Unlock User Accounts | Checkbox Selection | ||||
| Set password for Users | Checkbox Selection | ||||
| Expire User Password | Checkbox Selection | ||||
| Activate / Suspend Users | Checkbox Selection | ||||
| Manage User MFA | Checkbox Selection | ||||
| Send Activation or Password Reset Mail | Checkbox Selection | ||||
![]()
For User Management, the super admin can give CRUD and view permissions to the admins. Enable the Full Access toggle button to provide all permissions at once.
Editing and Updating a Custom Role
To edit and update a custom role:
- From the JumpCloud Admin Portal, go to Settings> Administrators.
- Go to the Custom Roles tab.
- Click the Role Name that you want to edit the details for.
- Make changes and click Save.
Deleting a Custom Role
To delete a custom role:
- From the JumpCloud Admin Portal, go to Settings> Administrators. Go to the Custom Roles tab.

- Click Delete next to the role you want to delete. A pop-up will appear.
- Select an alternate role for the respective users who have been assigned the custom role. Then click Delete.
![]()
If a custom role hasn’t been assigned to any users, it can be deleted directly.