
This policy controls the size, position, and appearance of the dock on your Mac computers, including frequently accessed apps, documents, and folders it displays.
Prerequisites:
- Apple Mobile Device Management (MDM) must be configured for your organization and Mac computers must be enrolled in JumpCloud MDM. See Set up Apple MDM.
- See Agent Compatibility, System Requirements, and Impacts to learn more about device compatibility.
Creating the Policy
To create the Mac Dock Settings and Items Policy:
![]()
Important:
If your data is stored outside of the US, check which login URL you should be using depending on your region. If your organization uses LDAP, RADIUS, or requires firewall allow list configuration, the Fully Qualified Domain Names (FQDNs) will also be region specific. See JumpCloud Data Centers for the URLs, FQDNs, and IP addresses.
- Log in to the JumpCloud Admin Portal.
- Go to Device Management > Policy Management.
- In the All tab, click (+).
- On the New Policy panel, select the Mac tab.
- Search and select Dock Settings and Items from the list, then click configure.
- (Optional) In the Policy Name field, enter a new name for the policy or keep the default. Policy names must be unique.
- (Optional) In the Policy Notes field, enter details such as creation date of the policy, and information on testing and deployment of the policy.
Configuring Policy Settings
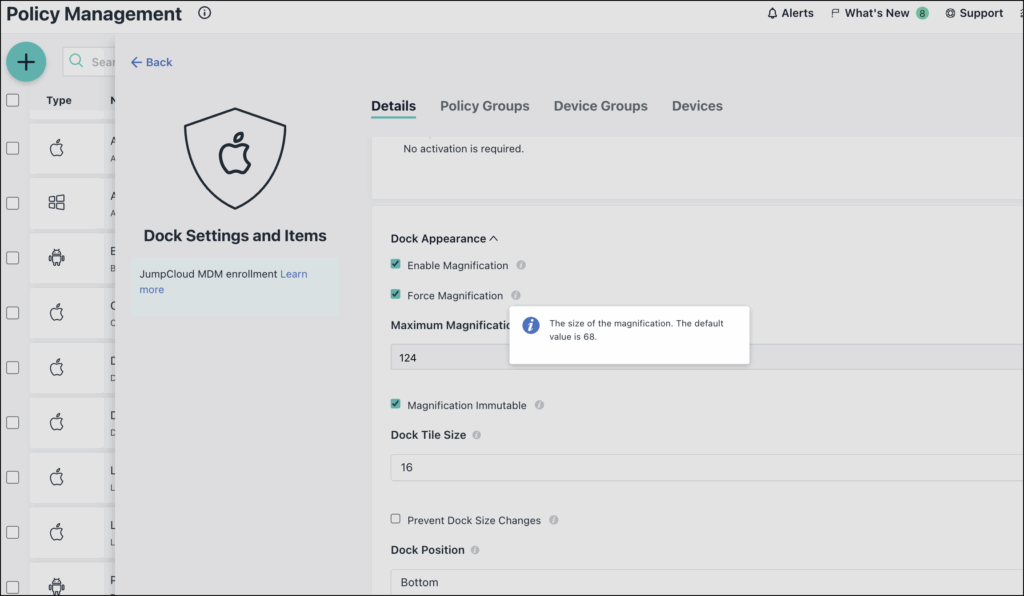
To configure the Dock Appearance settings:
- Enable Magnification: Allow dock items to be enlarged, reduced, or restrict the user from changing the settings.
- Force Magnification: Locks the magnification setting, preventing users from modifying it.
- Maximum Magnification: Sets the size of the largest magnification. The value must be between 16 and 128 (the default value is 68).
- Magnification Immutable: This setting restricts the user from modifying dock magnification settings.
- Dock Tile Size: Choose the size of the items that appear in the dock. Values must range from 16 to 128.
- Prevent Dock Size Changes: Locks the size slider.
- Dock Position: Choose where the dock appears and set it. (Bottom/Left/Right)
- Force Dock Position: Lock the position of the dock so that it can not be altered.
- Select Minimization Effect:
- Genie: Choose Genie to cause a window to swoop into the dock.
- Scale: Choose Scale to minimize the window and have it keep the same shape without the flourish of the Genie effect. The Scale effect is faster than Genie.
- Force Minimization Effect: To lock the Minimization affect
- Add Application to Dock: This will allow you to add the desired application to the dock provided the location for the application is correct.
- Location: Enter the application’s file type and location. For example, /Applications/Mail.app or /system/Applications/Mail.app. Then click Add Item to add this item to the Applications side of the dock.
- Label: Enter a description to add a new item to the Applications side of the dock.
- Add Folders, Files, or URLs to Dock: This option will allow you to Add Files, Folders or URLs to the dock provided the location or URL is correct.
- File Type: Choose a file type (URL, File, or Folder) to add a new item to the Documents side of the dock.
- Location: Enter the web URL or file location for the new document, then click Add Item to add this item to the Documents side of the dock.
- Label: Enter a description for the new document.
- Dock Special Folders: Select system folders to be automatically added to the Dock upon user login.
- Allow Dock Fixup Override: Enables the use of the
dockfixup.plistfile for new or migrated users to standardize Dock configurations (macOS 10.12+).
To configure Dock Behaviour:
- Make Dock Unchangeable: Prevents users from making any changes to the dock on their Mac computers.
- Enable Dock Auto-Hide: Hide the dock and show it when the mouse hovers over it. This sets this behavior once on application, and the user can change the behavior later.
- Enable Dock Launch Animation: Allow animations to occur when opening apps, which make icons bounce in the Dock. This sets this behavior once on application, and the user can change the behavior later.
- Minimize App Window into Icon: Allow a window to minimize into an icon on the dock. This sets this behaviour once on application, and the user may change the behavior later.
- Show Progress Indicators: Display the progress of opening an app. This sets this behavior once on application, and the user may change the behavior later.
- Show Recently Used Applications: Display recently-used apps. This sets this behavior once on application, and the user can change the behavior.
- Double-Click Behavior: Choose whether double-clicking a window’s title bar will minimize the window, maximize (zoom) it, or perform no action.
- Lock Double-Click Behavior: Prevents users from modifying the double-click title bar preference.
- Prefer Tabs When Opening Documents: Sets whether documents open in new tabs always, only in full screen, or manually in separate windows.
- Lock Window Tabbing Preference: Disables the user's ability to change the "Prefer tabs" setting in System Settings.
![]()
Note:
After applying this policy, users can still change this setting.
Applying and Assigning the Policy
To apply and save the policy:
- (Optional) Select the Device Groups tab. Select one or more device groups where you want to apply this policy. For device groups with multiple OS member types, the policy is applied only to the supported OS.
- (Optional) Select the Devices tab. Select one or more devices where you want to apply this policy.
- Click Save. If prompted, click Save again.
- Users must log out and back in to all devices where this policy was applied for it to take effect.
Back to Top