Connect


Contents
Amazon Web Services (AWS) provides a wide array of cloud computing solutions. Mastering the AWS Command Line Interface (CLI) is an essential skill for developers, system administrators, and cloud engineers working within its ecosystem.
Amazon Linux, an open source Linux distribution provided by AWS, is optimized for running on AWS infrastructure, making it a popular choice for cloud-based applications. It’s an example of how mastering the CLI will provide better control over the system and increase efficiency. This tutorial offers a detailed guide on how to use the AWS CLI on an Amazon Linux instance, covering installation, configuration, and various use cases.
The AWS CLI is a powerful tool that enables users to interact with AWS services directly from the command line. It provides a consistent interface for controlling and automating AWS resources, streamlining the process of managing cloud infrastructure.
For this tutorial, we need an active AWS account, at least one AWS EC2 instance, and basic knowledge of Linux command line operations.
Step 1: Connect to Your EC2 Instance
![]()
AWS Identity and Access Management (IAM) has multi-factor authentication (MFA) features. It’s advisable to enable MFA for your account.
This step assumes that you’ve already provisioned at least one EC2 instance so you can use the terminal or a SSH client to connect to it.
First, go to the Instance section in your AWS account.
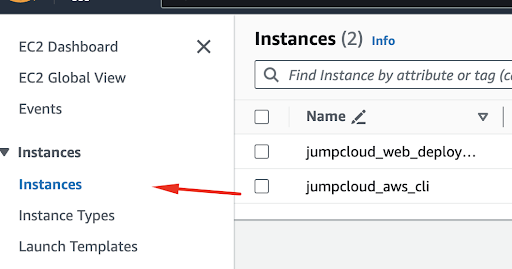
Select the instance you want to connect to and select the Connect option from the menu.

Select the SSH client menu item and follow the instructions.
![]()
AWS Systems Manager Session Manager should be used whenever possible to avoid exposing a direct IP to the open web. There are oo open inbound ports and no need to manage bastion hosts or SSH keys.
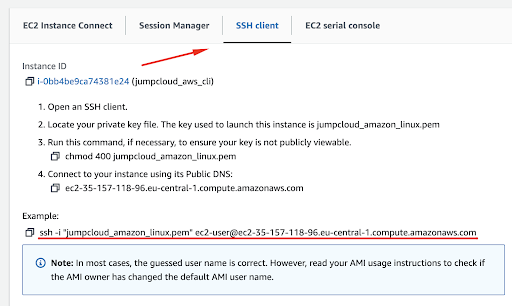
When copying the ssh command, make sure you are in the correct directory so you can load your private key and log in to the server.
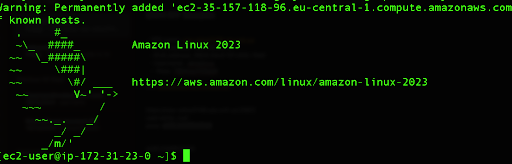
If this is your first time logging in to the server, then you will receive a notice that the authenticity of the host can’t be established, so you need to type yes to proceed forward.

After this step, you are successfully logged into the instance.
Step 2: Configure Your Instance for CLI
It is a good idea to check for updates for your Amazon Linux instance.
We can do so by running the following command:
sudo dnf update

In our case, since we provisioned our instance recently there are no pending updates, but it is always good to check for security patches for your packages.
Next, we need to check if AWS CLI is installed correctly. It’s pre-installed on Amazon Linux so you can check its version by running the following command:
aws –version

Next, we need to make sure we meet these prerequisites:
- AWS Access Key ID
- AWS Secret Access Key
- Default region name
- Default output format (JSON, text, or table)
Configure an Instance Profile
Once the AWS CLI is installed and configured you may created an AWS Instance Profiles. Instance profiles are a container for an IAM role and provide temporary credentials with auto-rotation.
First, create an IAM role. Log into AWS and go to Access management | Roles, and then select Create role. Choose the option AWS EC2 Use Case and click on Next: Permissions. Attach the AdministratorAccess policy to the role. Review and create the policy; attach the policy to the role and click on Create Role. Save it as “admin-role”.
Next, create an Instance Profile by entering the command:
Add the role with the following command:
You can associate an IAM instance profile with an instance with the following command:
aws ec2 associate-iam-instance-profile –instance-id i-123456789abcde123 –iam-instance-profile Name=admin-role
Detach an instance profile that has a role attached from a stopped or active EC2 instance: aws ec2 disassociate-iam-instance-profile
To get information about profiles that are attached to a running EC2 instance:aws ec2 describe-iam-instance-profile-associations
An instance profile can contain only one IAM role, but the same role may be used across different profiles. The AWS SDK can detect these temporary credentials automatically, and no configuration of metadata is required. You can list the associated credentials if you run the aws-cli with the –debug flag. Dedicated IAM roles can be attached to the container runtime.
See here for more detail about managing Instance Profiles.
![]()
The section immediately below is deprecated and should be considered as an anti-pattern that should be avoided by security reasons. IAM Users and their static credentials should be avoided for accessing EC2 instances to reduce risks.
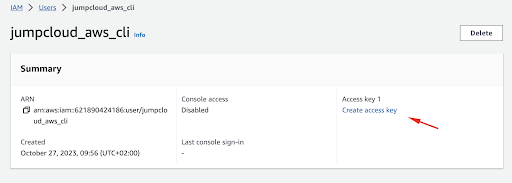
For the sake of security, we will create a new set of access keys.
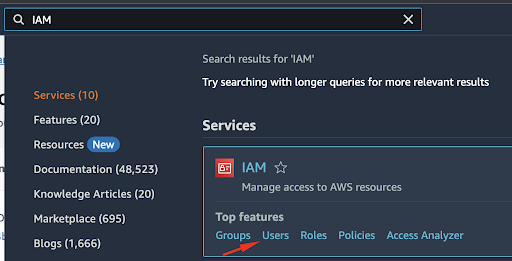
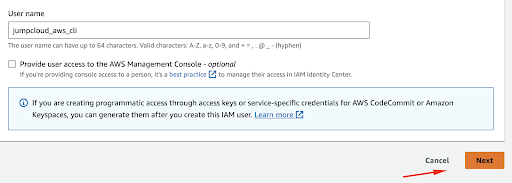
First, in the search bar in your AWS account, search for IAM and select Users.
Select the Create User option in the menu.

Here you can name your User, and it is a good practice to leave the AWS Console option unchecked for security reasons. Once you are done you can click on Next.
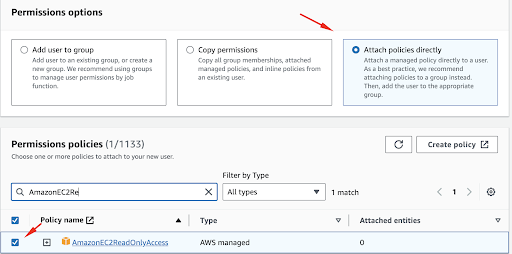
Next, whenever we create a new user, we need to select the permissions we will assign to it. In this example, we will give read-only access for EC2 instances, so that the user can list out instances and also AWS S3 full access, so we can create, view, and modify storage buckets.
First, we will select the option Attach policies directly and search for AmazonEC2ReadOnlyAccess in the search bar. Once found, select it.
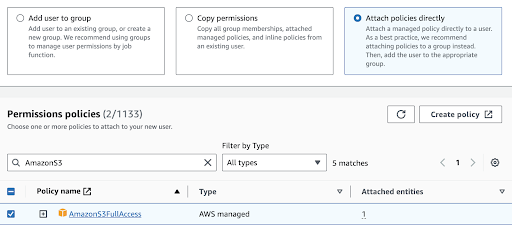
As mentioned above, we need to allow full access for AWS S3 so we can perform all operations.
Once done, click Next, and in the final step, you can review the settings and click Create User.
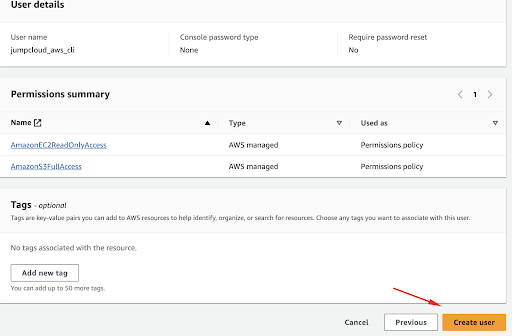
You can view the user’s data once it is created.

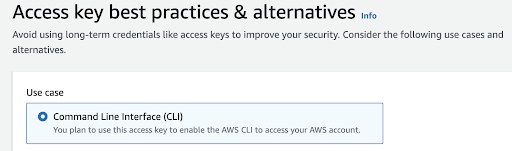
We can continue with the process by creating a new access key for our user.
The use case we will select in the menu is CLI.
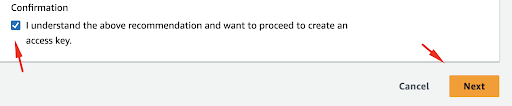
Finally, we need to accept the notice and click on Next.
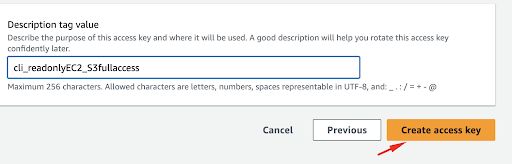
In this step, you can add the description for this user and proceed with the Create access key option.
You will get all the information needed including access key ID and also the secret key.
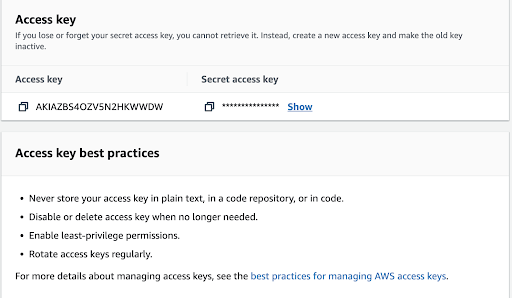
Make sure to follow security recommendations from AWS in order to increase the level of security for your AWS account.
Now that we have a proper access key we will enter the following command:
aws configure
Here we can enter our Access Key ID, Secret Key, Default region name, and Default output format.

If you typically provision your instances in us-south-1, you can place that value. In this example, we are using eu-central-1 as our region.
After the configuration, we can verify the status, and should be able to see our access key in the list.
aws configure list

Step 2: Basic AWS CLI Commands
We can do multiple tasks with our CLI; for example, if we want to list out our instances, we can do so by running the following command:
aws ec2 describe-instances
We can see the following output:

Next, we can create a new S3 bucket in our AWS account:
aws s3 mb s3://jumpcloud-test-1

From here, we can create a simple html file and upload it into our newly created S3 bucket:
nano test.html
In the file, we can place any text with HTML tags:
<h1>This is a simple html file.</h1>
Press Ctrl and O to write and Control and X to exit this file.
Now, we can upload our file to the bucket:
aws s3 cp test.html s3://jumpcloud-test-1

We can list our objects in S3 bucket with CLI by running the following command:
aws s3 ls s3://jumpcloud-test-1 –recursive
The –recursive option is used to list all objects in the bucket, not just the top-level directories.

Step 3: Advanced CLI Usage
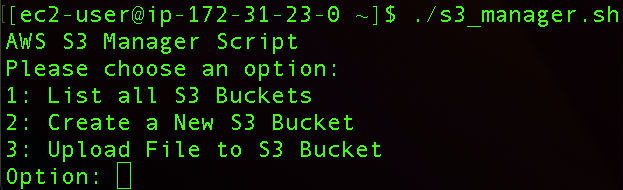
We will further explore AWS CLI usage on our Amazon Linux instance by creating a script. This script will provide the functionality to list all S3 buckets in your AWS account, create a new S3 bucket, and upload a file to a specified bucket.
In the same directory create a new file for our script:
nano s3_manager.sh
Here, paste the following code:
#!/bin/bash
echo “AWS S3 Manager Script”
echo “Please choose an option:”
echo “1: List all S3 Buckets”
echo “2: Create a New S3 Bucket”
echo “3: Upload File to S3 Bucket”
read -p “Option: ” option
case $option in
1)
echo “Listing all S3 Buckets…”
aws s3 ls
;;
2)
read -p “Enter the new bucket name: ” bucket_name
aws s3 mb s3://$bucket_name
echo “Bucket created successfully.”
;;
3)
read -p “Enter the bucket name: ” bucket_name
read -p “Enter the file path to upload: ” file_path
aws s3 cp $file_path s3://$bucket_name/
echo “File uploaded successfully.”
;;
*)
echo “Invalid option, please enter a number between 1 and 3.”
;;
esac
Save the file, then make it executable:
chmod +x s3_manager.sh
Run the script and follow the instructions from the output:
./s3_manager.sh
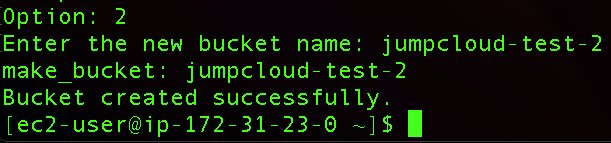
We can create a new S3 bucket directly through the menu by selecting the second option.
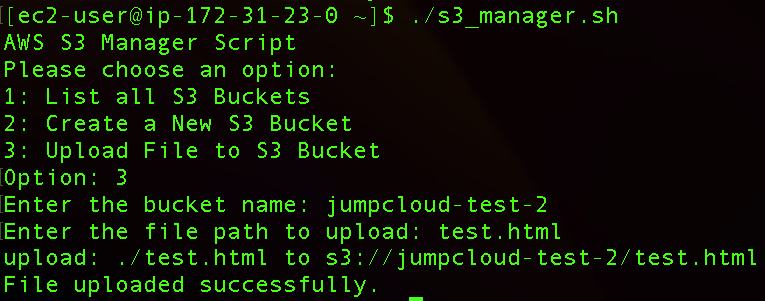
Here we can also upload our same test.html file to the new bucket, so we will run the script again but now we will select option 3 and specify the file we want to upload.
Step 4: Troubleshooting AWS CLI
There are times when you might run into some errors when working with AWS CLI. That can be due to syntax, permissions, or some limitations that may come up.
For example, let’s assume you are trying to upload a file to an S3 bucket, but the command is failing. We will go through the steps to identify and resolve the issue.
Run the command to upload your file to a bucket:
aws s3 cp myfile.txt s3://jumpcloud-test-2/
Here we will get the output that this user-provided path doesn’t exist:

If we want to upload our existing file into an S3 bucket that doesn’t exist we will get a similar error:

We can also try to list out any AWS RDS, which stands for Relational Database Service on AWS, but if we didn’t create any users for it, and the existing user only has permissions and full access to S3 services, we will again experience an error here.
aws rds describe-db-instances

Since the AWS list of services is long and there can be various scenarios in the troubleshooting process, it is a good idea to consult CLI help by running the following command:
aws help
Also, you can check their website for the latest updates regarding AWS CLI.
Conclusion
We went through how to install, set up, and use AWS CLI on Amazon Linux, covering the basics, how to give the right permissions, and how to fix common problems. Your next step is to start using AWS CLI regularly to better manage your AWS resources and quickly solve any issues that come up.
To learn more useful skills for Amazon Linux management, check out one of the following tutorials: