
Use JumpCloud OpenID Connect (OIDC) Single Sign On (SSO) to give users secure and convenient access to web applications with a single set of credentials. You can use the Custom OIDC App connector with any app that supports OIDC-based SSO.
Prerequisites
In-depth knowledge of the Relying Party’s (RP) OIDC capabilities and requirements is needed to configure the OIDC connector.
- Verify the app supports a grant type of authorization code
- The Redirect URI for the app
- The Login URL that the RP uses to start the login flow
- Determine if the app you’re configuring can protect a client secret or if it uses a public client
- Determine which claims/attributes the RP requires
Important Considerations
- Authentication Methods References (AMR) is automatically included in the OIDC ID tokens whenever a user performs an MFA login. The claim includes all factors used (e.g., password + OTP), allowing apps to verify that MFA was successfully completed
- OIDC integrations follow an RP-initiated login. If you launch the app from the JumpCloud User Portal, you will be prompted to re-authenticate on the application's login screen
Configuring the Custom OIDC Connector in JumpCloud
To create the OIDC connector
- Log in to the JumpCloud Admin Portal.
![]()
If your data is stored outside of the US, check which login URL you should be using depending on your region. If your organization uses LDAP, RADIUS, or requires firewall allow list configuration, the Fully Qualified Domain Names (FQDNs) will also be region specific. See JumpCloud Data Centers for the URLs, FQDNs, and IP addresses.
- Go to Access > SSO Applications.
- Click the (+ Add New Application) button. There are two options:
- Type OIDC in the search box and select it from the dropdown.
- Click Next
OR
- Click Next
- Select Custom Application.
- Click Next
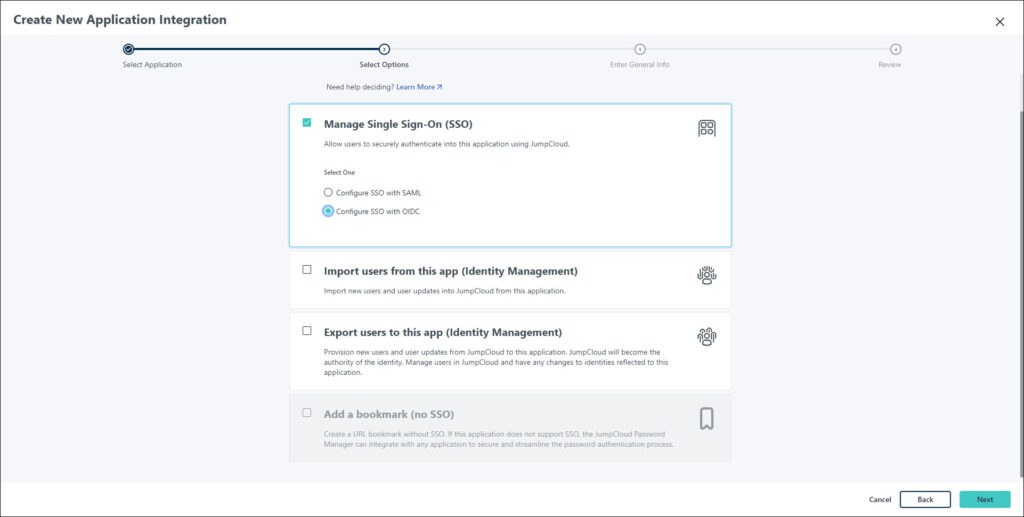
- Select Manage Single Sign-On and then select Configure SSO with OIDC.
- Click Next
- Type OIDC in the search box and select it from the dropdown.
- In the Display Label, type your name for the application. Optionally, you can enter:
- Description - add a description that users will see in their user portal
- User Portal Image - choose Logo or Color Indicator
- Show this application in User Portal - enable to show this application in your organization's user portal
![]()
- If using the Custom Application workflow, the default color indicator will be displayed in the Admin Portal.
- To change this, go under the General Info tab > Display option, then select the Logo.
- If using the OIDC template from the dropdown, the default custom OIDC app logo will be displayed in the Admin Portal.
- Click Next and then Configure Application.
- In the SSO tab, the following window appears.
To configure the OIDC Connector
Configuration Settings
- Grant Types:
- Authorization Code is checked by default and cannot be deselected
- Refresh Token can be checked at a later time if you wish to refresh your connector's token
![]()
After saving the configuration, the Authorization Code option will disappear. This is expected behavior and the Grant Type will remain active even though it's not visible.
- Redirect URIs:
- Enter the value(s) supplied by the RP
- Click (+Add URI) button to add more than one URI
- Client Authentication Type:
- Client Secret POST - the client authorizes itself providing the secret in the HTTP request body as a form parameter
- Client Secret Basic - the simplest method of client authentication using client secrets. It’s a method where an app uses the HTTP Basic AuthenticationScheme to authenticate with the authorization server
- Public (None PKCE) - Client authentication set to ‘none’ and with the use of Proof Key of Code Exchange (PKCE) was created as a secure substitute for the OAuth implicit flow, where the client receives access tokens as the result of authorization
![]()
The client authentication type will depend on what is supported by the RP.
- Login URL:
- Enter the value supplied by the RP
Advanced Settings (optional)
You can customize token expiration, choose between JWT or Opaque token formats, and define multiple audiences with these settings.
- Access Token Format:
- Opaque [Default]: A secure, non-readable string
- JWT (JSON Web Token): A structured, signed token for local validation
- Token Lifetime Settings:
| Token Type | Minimum Value | Maximum Value | Default Value | Time Unit |
|---|---|---|---|---|
| ID Token | 10 | 60 | 60 | Minutes |
| Access Token | 10 | 1,440 (24 hrs) | 60 | Minutes |
| Refresh Token | 10 | 129,600 (90 days) | 43,200 (30 days) | Minutes |
- Audience Configuration: Add up to 5 additional audiences to support integrations with microservices or to specify the target API to receive the access token as part of the audience claim.
- Click + Add Audience and enter the audience value
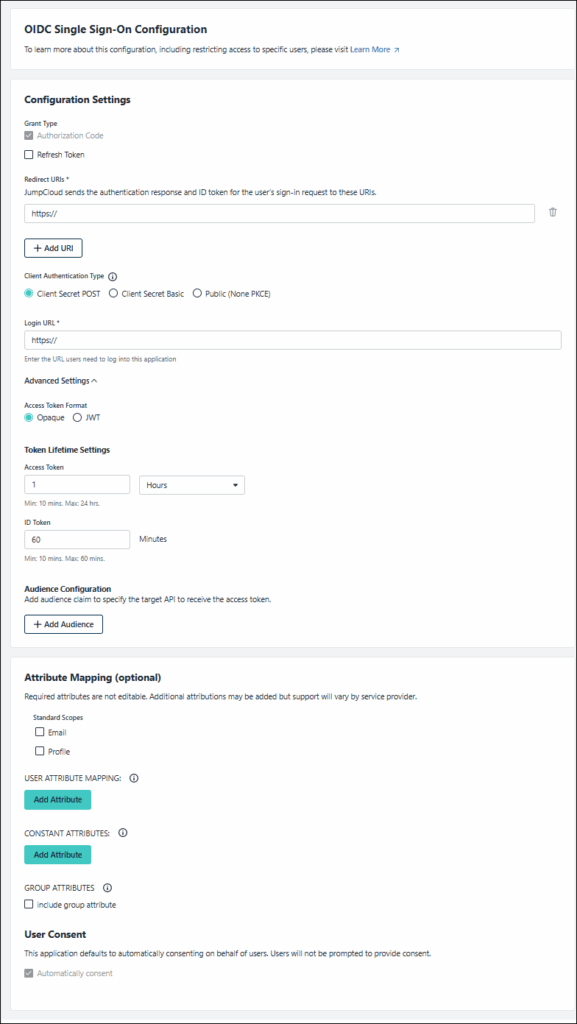
Attribute Mapping (optional)
You can add scopes and claims/attributes for more granular access management, see OIDC Attributes (Claims).
- Add a standard scope by selecting Email, Profile, or both.
- Add dynamic attributes that will be populated from attributes on the user record or the user group by clicking Add Attribute in the USER ATTRIBUTE MAPPING section.
- Add constant attributes, which are specific, unchanging values sent for all users, by clicking Add Attribute in the CONSTANT ATTRIBUTES section.
- Select include group attribute and enter the groups-name:
- This option includes the groups that connect the user to the application in the OIDC claim
![]()
If the RP supports it, you can add more than what is required.
- Under User Consent, Automatically consent is selected by default and cannot be deselected.
- Click Activate.
- If the client is not a public client, then a window will display the client secret.
![]()
The Client ID and Secret (token) may only be shown once. Copy them to a secure location, like the JumpCloud Password Manager, for future reference.
- Click Got It.
![]()
You can regenerate your client secret at any time.
Configuring the RP
Enter the following information in the configuration in the RP console:
- The app’s OIDC client ID
- If the client is not public, the app’s OIDC client secret
- JumpCloud’s OIDC well-known config - https://oauth.id.jumpcloud.com/.well-known/openid-configuration
JumpCloud Well-Known OpenID Configuration
US
- https://oauth.id.jumpcloud.com/.well-known/openid-configuration
- https://oauth.id.jumpcloud.com/.well-known/jwks.json
EU
- https://oauth.id.eu.jumpcloud.com/.well-known/openid-configuration
- https://oauth.id.eu.jumpcloud.com/.well-known/jwks.json
IN
- https://oauth.id.in.jumpcloud.com/.well-known/openid-configuration
- https://oauth.id.in.jumpcloud.com/.well-known/jwks.json
JumpCloud OpenID Auth Endpoint
US
- https://oauth.id.jumpcloud.com/oauth2/auth
EU
- https://oauth.id.eu.jumpcloud.com/oauth2/auth
IN
- https://oauth.id.in.jumpcloud.com/oauth2/auth
JumpCloud OpenID Issuer Endpoint
US
- https://oauth.id.jumpcloud.com/
EU
- https://oauth.id.eu.jumpcloud.com/
IN
- https://oauth.id.in.jumpcloud.com/
JumpCloud OpenID Token Endpoint
US
- https://oauth.id.jumpcloud.com/oauth2/token
EU
- https://oauth.id.eu.jumpcloud.com/oauth2/token
IN
- https://oauth.id.in.jumpcloud.com/oauth2/token
JumpCloud OpenID User Info Endpoint
US
- https://oauth.id.jumpcloud.com/userinfo
EU
- https://oauth.id.eu.jumpcloud.com/userinfo
IN
- https://oauth.id.in.jumpcloud.com/userinfo
Troubleshooting
OIDC SSO is working as expected but users have started getting frequent reauthentication prompts.
Cause: The SP is sending the “Prompt=login” parameter in the request to JumpCloud which is now supported for OIDC SSO apps.
Resolution: Ask the user to reproduce the issue and capture the HAR file. In the HAR file, verify if the SP is sending the prompt. The request should look like below:
“https://oauth.id.jumpcloud.com/oauth2/auth?scope=openid+email+profile&state=%2Fprofile&redirect_uri=https%3A%2F%2Ftest.my.salesforce.com%2Fapex%2FCompSuite__VF_GoogleSignature&response_type=code&client_id=93174d9c-0df2-47ac-9804-c25bd4c68548&prompt=login”
This is not controlled by JumpCloud if the SP is sending “Prompt=login” to force users to re-authenticate again. We cannot change it on our side.
Symptoms:
Users are redirected to a URL like:
[https://console.jumpcloud.com/oidc/error?error=invalid_client&error_description=Client+authentication+failed](https://console.jumpcloud.com/oidc/error?error=invalid_client&error_description=Client+authentication+failed)...
Error message:
"Client authentication failed (e.g., unknown client, no client authentication included, or unsupported authentication method). The requested OAuth 2.0 Client does not exist."
The error persists even though the administrator verifies that the client_id and client_secret configured in the secondary system exactly match the OIDC application details generated inside the JumpCloud Admin Console.
Resolution: The "OAuth 2.0 Client does not exist" error occurs because the authorisation request is being directed to the global JumpCloud endpoint instead of the dedicated regional infrastructure endpoint.
To resolve this issue, update the authorisation endpoint URL configuration inside your client application or custom script to use the correct regional subdomain.
Regional Endpoint Configuration Update
- Incorrect Standard Endpoint: [https://oauth.id.jumpcloud.com/oauth2/auth](https://oauth.id.jumpcloud.com/oauth2/auth)
- Correct India Region Endpoint: [https://oauth.id.in.jumpcloud.com/oauth2/auth](https://oauth.id.in.jumpcloud.com/oauth2/auth)
Verification Steps
- Log into your application's SSO/IdP configuration console.
- Locate the field for the Authorisation Endpoint URL (or the target URL used to construct your initial OIDC login curl/browser request).
- Insert the regional string .in. directly between id and jumpcloud so it reflects the correct region: [https://oauth.id.in.jumpcloud.com/oauth2/auth](https://oauth.id.in.jumpcloud.com/oauth2/auth).
- Save the configuration and attempt the login sequence again. The endpoint will now successfully locate the corresponding client_id and present the expected JumpCloud login prompt.