
![]()
If your data is stored outside of the US, check which login URL you should be using depending on your region. If your organization uses LDAP, RADIUS, or requires firewall allow list configuration, the Fully Qualified Domain Names (FQDNs) will also be region specific. See JumpCloud Data Centers for the URLs, FQDNs, and IP addresses.
![]()
The following are recommended actions for all JumpCloud organizations using SSO applications:
Regenerate SAML SSO Application Certificates
All SAML SSO integrations require a certificate and private key pair. This certificate and private key pair can be auto-generated by JumpCloud, or you can upload your own. In addition, some Service Providers require a Service Provider Certificate.
![]()
Admins should review your Service Provider requirements prior to taking these steps to limit downtime and prevent lockouts.
![]()
To rotate the cert for M365, please refer to the specific steps in the SSO with M365 article.
To regenerate a JumpCloud-created certificate and private key pair
Complete the following steps for each SAML SSO app integration you have configured for which you would like to use a JumpCloud-created certificate and private key pair.
- Log in to the JumpCloud Admin Portal.
- Go to Access > SSO Applications.
- Select your SSO application from the Configured Applications list.
- Go to Actions > Regenerate Certificate.
- Click continue.
- After you regenerate the certificate, the private key is also regenerated.
- Click Save.
![]()
When you upload a new certificate, your private key is wiped. You need to upload a new private key after you upload a certificate.
To update the IdP certificate in the Service Provider
Depending on how the Service Provider accepts certificates, do one of the following to upload the new certificate in Service Provider’s application.
To update the IdP certificate in the Service Provider using a metadata URL
If the Service Provider supports updating the configuration and certificate from a metadata file URL:
- Log in to the JumpCloud Admin Portal.
- Go to Access > SSO Applications.
- Select an SSO application from the list.
- Click the SSO tab.
- Click Copy Metadata URL.
- From the Service Provider’s application admin console, paste the metadata URL in the designated place in their SAML SSO configuration page or section.
- Save the changes.
To update the IdP certificate in the Service Provider using a metadata file
If the Service Provider supports extracting the certificate from the metadata file:
- Export the metadata file from Configured Applications page
- Log in to the JumpCloud Admin Portal.
- Go to Access > SSO Applications.
- Click the checkbox next to the SSO application in the list.
- Click Export Metadata.
- Alternatively, you can export the metadata file from the application’s configuration details page.
- Log in to the JumpCloud Admin Portal.
- Go to Access > SSO Applications.
- Select an SSO application from the list.
- Click the SSO tab.
- Click Export Metadata.
- From the Service Provider’s application admin console, upload the metadata file in the designated place in their SAML SSO configuration page or section.
- Save the changes.
To update the IdP certificate in the Service Provider by uploading the certificate
If the Service Provider supports uploading the IdP certificate file (.pem):
- If you just saved the application, from the notification in the upper-right corner of the screen click Download Certificate.
- Otherwise, download the certificate from the application’s General Info tab.
- Select your SSO application from the Configured Applications list.
- Go to Actions > Download Certificate.
- From the Service Provider’s application admin console, upload the certificate file in the designated place in their SAML SSO configuration page or section.
- Save the changes.
To update the IdP certificate in the Service Provider by copying and pasting the contents of the certificate file
If the Service Provider supports copying and pasting the contents of the certificate file (.pem):
- If you just saved the application, from the notification in the upper-right corner of the screen click Download Certificate.
- Otherwise, download the certificate from the application’s configuration details page.
- Select your SSO application from the Configured Applications list.
- Go to Actions > Download Certificate.
- From the Service Provider's application admin console, navigate to the SAML SSO configuration page or section.
- Open the certificate file (.pem) you downloaded from JumpCloud.
- Copy the contents of the certificate file
- Paste the contents of the certificate file in the designated place in the SAML SSO configuration page or section.
![]()
Refer to the Service Provider documentation to determine if “-----BEGIN CERTIFICATE-----” and -----END CERTIFICATE----- should or should not be included when pasting the certificate contents.
- Save the changes.
To update the Service Provider certificate in JumpCloud
Some Service Providers require a Service Provider certificate. After you have updated the new JumpCloud IdP certificate, complete the following steps for each SAML SSO app integration you have configured that requires a Service Provider certificate.
To update the Service Provider certificate in JumpCloud by uploading the Service Provider metadata file
- From the Service Provider's application admin console, navigate to the SAML SSO configuration page or section.
- Select the option to download the Service Provider metadata file.
- Log in to the JumpCloud Admin Portal.
- Go to Access > SSO Applications.
- Select an SSO application from the list.
- Click the SSO tab.
- Click Upload Metadata in the Service Provider Metadata section.
- Browse to the metadata file.
- Click Open.
- Click Save.
To update the Service Provider certificate in JumpCloud by uploading the certificate file
- From the Service Provider's application admin console, navigate to the SAML SSO configuration page or section.
- Select the option to download the Service Provider certificate.
- Log in to the JumpCloud Admin Portal.
- Go to Access > SSO Applications.
- Select your SSO application from the Configured Applications list.
- Go to Actions > Upload New Certificate.
![]()
For a pre-built SSO integration, if there is no section or button, a Service Provider certificate is not required.
- Browse to the certificate file.
- Click Open.
- Click Save.
Rotate SCIM Token Keys
Prerequisites
- Admin login credentials are required for each Service Provider’s application for which a SCIM integration is configured
Steps to take in Service Provider:
- Disable existing token, if possible.
- Generate a new token.
Steps to take in JumpCloud:
- Log in to the JumpCloud Admin Portal.
- Go to Access > SSO Applications.
- Search for the application in the Configured Applications list and open it.
- Select the Identity Management tab and expand the Configuration Settings section.
- Paste the new token and then click Update.
Learn More:
- Custom SCIM integration
- From the JumpCloud Support Center, search for the application name of the application for which you configured a SCIM integration in JumpCloud.
Regenerate OIDC Secrets
Prerequisites
- Admin login credentials for each service provider’s application for which an SSO OIDC integration is configured.
Steps to take in JumpCloud:
- Log in to the JumpCloud Admin Portal.
- Go to Access > SSO Applications and open the OIDC application.
- Go to Actions > Regenerate Secret, and then click Regenerate.
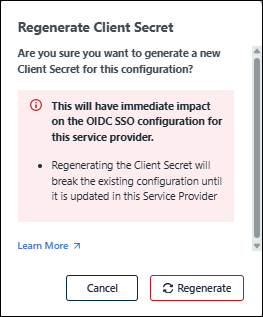
![]()
The Client ID and Secret (token) may only be shown once. Copy them to a secure location, like the JumpCloud Password Manager, for future reference.
- Click Got It.
Steps to take in Service Provider:
- Update the Service Provider configuration with the regenerated Client Secret.
Learn More:
Additional Resources
- Enable MFA for all JumpCloud administrators and end users. To ensure MFA is set up for all accounts, see:
- Ensure you are enforcing rigorous password complexity requirements.