
With JumpCloud's Software Management Private Repository, you can upload and install Windows and Apple software application files through an intuitive and frictionless interface. With this feature, you don't have to host custom applications yourself or depend on third-party solutions.
Benefits of the JumpCloud Private Repository include:
- Control the files you deploy to your endpoints
- Eliminate the time and expense involved in setting up and maintaining your own hosting solution
- Control which applications gets installed where, without having to rely on public application repositories
Considerations:
- The following file types are supported:
- MSI, EXE (Windows)
- PKG, DMG (Apple macOS)
- IPA (iOS and iPadOS)
- Storage (total across entire repository) is limited to 25GB.
- Egress (data consumed from the repository) is limited to 10GB per licensed user per month.
- Maximum allowable application size is 5GB.
- If the application uploaded to Software Management is already present on bound devices, the custom application automatically installs the version you uploaded based on its bundle ID.
Prerequisites:
- Requires Windows MDM for MSI deployments.
- Requires Apple MDM for PKG and IPA deployments.
- Packages must include valid, signed certifications.
Known Issues:
- Windows:
- When unbinding a device from within the application's Devices tab, the status reverts to Install Pending. For the time being, we don't recommend unbinding to remove a custom app from a device. Workaround: Manually uninstall the application from the device.
- When adding a command line to an existing application's configuration, the save button is disabled. Workaround: Change the name of the application to enable the save button.
- All OSes - Depending on your screen size, the application page's Devices tab may not paginate correctly. Workaround: Resize your screen or use search/filter to find specific devices.
Uploading and Validating Application Files
Windows Custom Application
These steps walk you through uploading and validating an application file for Windows devices. You can also configure Windows applications with command line options before installing them.
- In the JumpCloud Admin Portal, go to Device Management > Software Management > Windows.
![]()
If your data is stored outside of the US, check which login URL you should be using depending on your region. If your organization uses LDAP, RADIUS, or requires firewall allow list configuration, the Fully Qualified Domain Names (FQDNs) will also be region specific. See JumpCloud Data Centers for the URLs, FQDNs, and IP addresses.
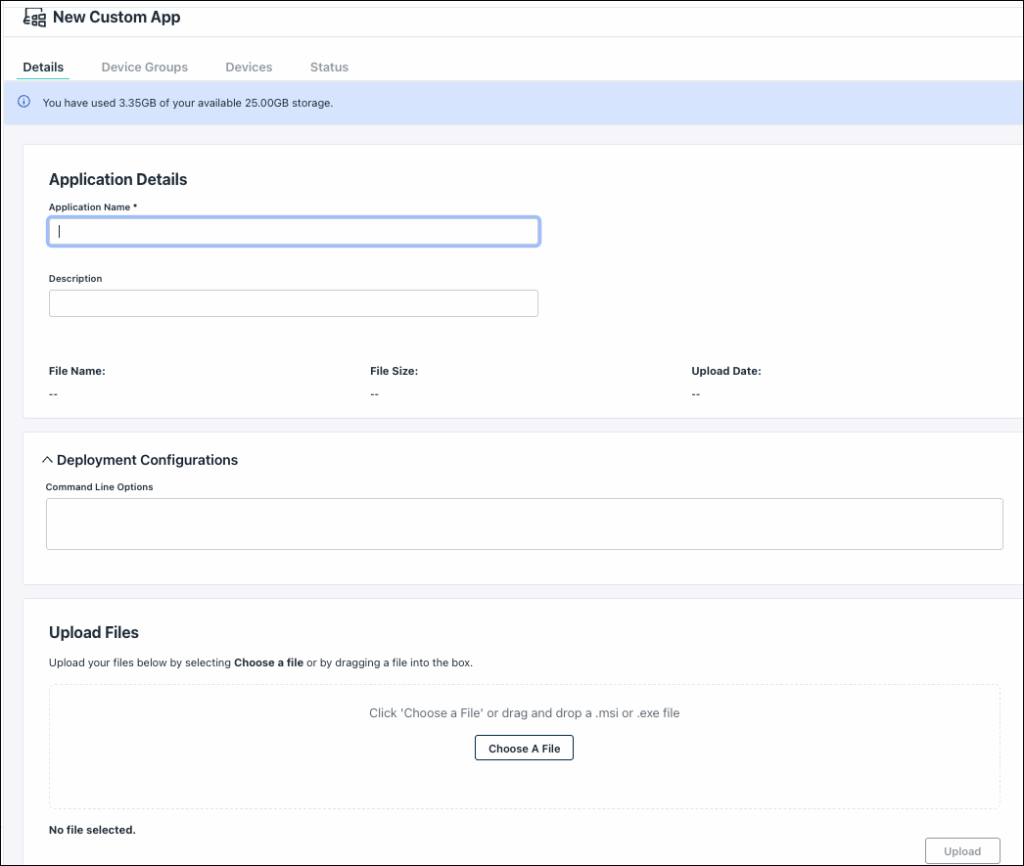
- Click (+Add New).
- Select JumpCloud Private Repo. A New Custom App panel opens.
![]()
To learn about other ways to manage Windows software, see Get Started: Software Management.
- Under Application Details, enter the Application Name.
- (Optional) Under Deployment Configurations, enter any desired installer flags, such as /quiet or others.
![]()
With all inputs, the msiexec /i command is implied and not needed.
- Under Upload File, drag and drop a file to the upload area or click Choose a File to browse for a file. Only MSI file types are supported for Windows devices.
- Click Upload. An upload progress bar appears and you will see a File uploaded successfully message.
- As the file is being processed, you will see a message: Your application request is still processing. Once the processing is complete, you will be able to associate devices.

- When this message disappears, you can bind and install the applications on specific devices or device groups. See Binding and Installing Applications on Devices or Device Groups.

Uploading EXE (Windows) Files
Windows EXE management requires more granular control. As these files are not standardized, you must define Installation Detection Rules and Silent Flags. This ensures the JumpCloud agent can successfully install software in the background and accurately report whether the installation succeeded.
Test-to-Production Approach
You must follow the Test-to-Production approach:
- Research & Identify Silent Flags
- Public Apps: Consult vendor docs or official websites to find the flags needed for a "Silent" install.
- Internal Apps: Reach out to your internal development team for the correct switches.
- Local Terminal Testing
Before configuring the app in JumpCloud, open a terminal on a test Windows device and attempt to install the EXE using your identified flags. For Example: setup.exe /S /v /qn. The app installs correctly in the background without any user prompts or pop-up windows.
- Capture Detection Data
Once the app is successfully installed on your test device, run one of the following scripts to get the exact values needed for the JumpCloud UI:
Script A: Getting the Exact Display Name
SearchTerm = "*AppPrefix*" # Replace with your app name
Get-ItemProperty HKLM:\Software\Microsoft\Windows\CurrentVersion\Uninstall\*, HKLM:\SOFTWARE\WOW6432Node\Microsoft\Windows\CurrentVersion\Uninstall\*, HKCU:\Software\Microsoft\Windows\CurrentVersion\Uninstall\* | Where-Object { $_.DisplayName -like $SearchTerm } | Select-Object DisplayName
Script B: Getting the 3 Registry Values (Direct UI Mapping)
$SearchTerm = "*AppPrefix*" # Replace with your app name
$Paths = @("HKLM:\SOFTWARE\Microsoft\Windows\CurrentVersion\Uninstall\*", "HKLM:\SOFTWARE\WOW6432Node\Microsoft\Windows\CurrentVersion\Uninstall\*", "HKCU:\Software\Microsoft\Windows\CurrentVersion\Uninstall\*")
Get-ItemProperty -Path $Paths -ErrorAction SilentlyContinue | Where-Object { $_.DisplayName -like $SearchTerm } | ForEach-Object { [PSCustomObject]@{ "Registry Key Path" = $_.PSParentPath -replace "Microsoft.PowerShell.Core\\Registry::", "" -replace "HKEY_LOCAL_MACHINE", "HKLM" -replace "HKEY_CURRENT_USER", "HKCU" "Value Name" = "DisplayName" "Expected Value" = $_.DisplayName } } | Format-List
- Configure & Deploy
Upload the EXE to JumpCloud. Verify or overwrite the suggested Silent Flags with the ones you tested in Step 2. Paste your Script results into the Detection Rules, then bind the app to your Device Groups.
Configuring EXE Files
For configuring EXE files on Windows devices, do the following:
- On the New Custom App page, enter the relevant details and select an EXE file to upload.
- In the JumpCloud Admin Portal, go to Device Management > Software Management > Windows.
- Click + Add New and select Jumpcloud Private Repo. The New Custom App page is displayed.
Configuring EXE File Deployment
You can configure the EXE file deployment process under Deployment Configurations settings.
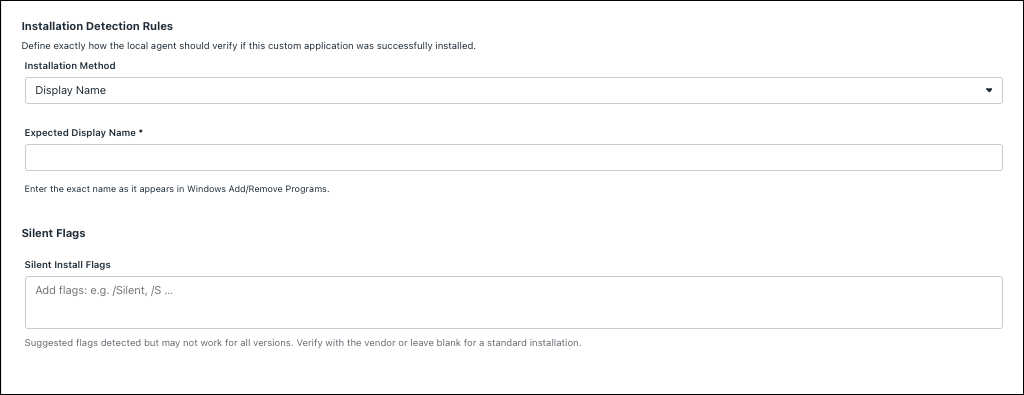
- Installation Detection Rules - You can define the process of verifying the success of installation by the following methods available under Installation Method dropdown menu:
- Display Name - The agent searches the Windows installed programs list for an exact string match.
- Registry - The most robust method. The agent checks for a specific registry key path. This is highly recommended for applications where the display name changes frequently due to automatic updates.
- Custom Script - Designed for complex scenarios. Administrators can provide a custom PowerShell script; the agent will report the application as Installed if the script returns an exit code of 0.
- Silent Flags - This section automatically populates common silent installation flags, such as /S and /quiet. Because these are server-provided suggestions, they are not guaranteed to work for every executable. You should always verify these flags using the Local Terminal Testing mentioned under Test-to-Approach section of this article before deploying to production devices.
Apple Custom Application
![]()
Apple custom application deployment supports both PKG and IPA files, but compatibility depends on the device type:
- PKG files are supported on macOS devices only.
- IPA files are supported on iOS and iPadOS devices only.
These steps walk you through uploading and validating an application file on Apple devices.
- In the Admin Portal, go to Device Management > Software Management > Apple.
- Click (+Add New) to add a new managed software app.
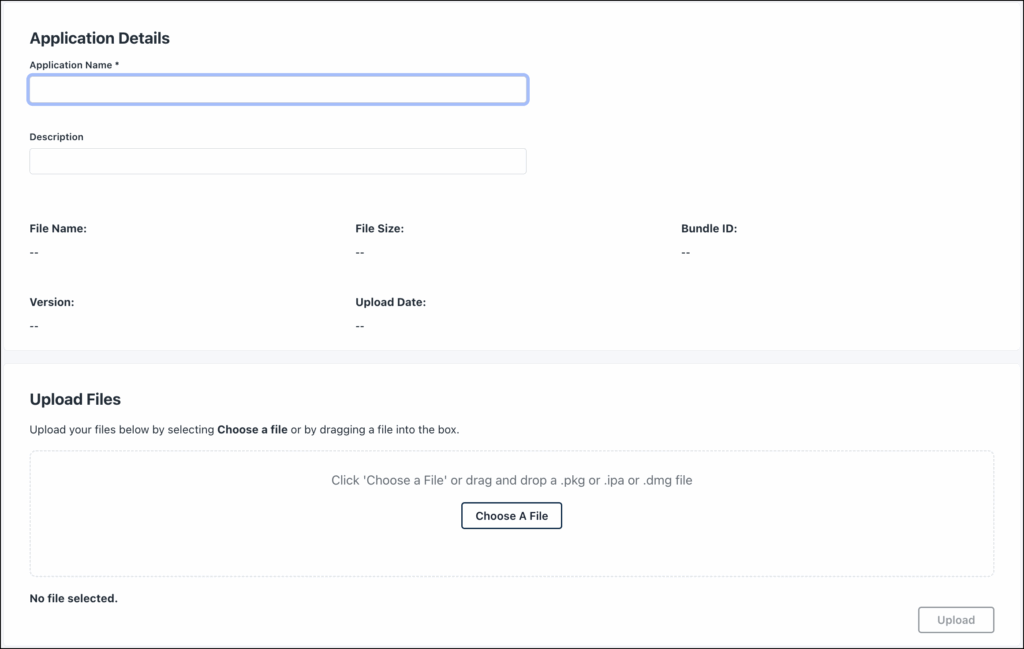
- Select JumpCloud Private Repo. A New Custom App panel opens.
![]()
To learn about other ways to manage software on Apple devices, see Get Started: Software Management.
- Under Application Details, enter the Application Name.
- Under Upload File, drag and drop a file to the upload area or click Choose a File to browse for a file. Only PKG and IPA file types are supported for Apple devices.
- Click Upload. An upload progress bar appears and you will see a File uploaded successfully message.
- As the file is being processed, you will see a message: Your application request is still processing. Once the processing is complete, you will be able to associate devices.
- When this message disappears, you can bind and install the application on specific devices or device groups. See Binding and Installing Applications on Devices or Device Groups.
![]()
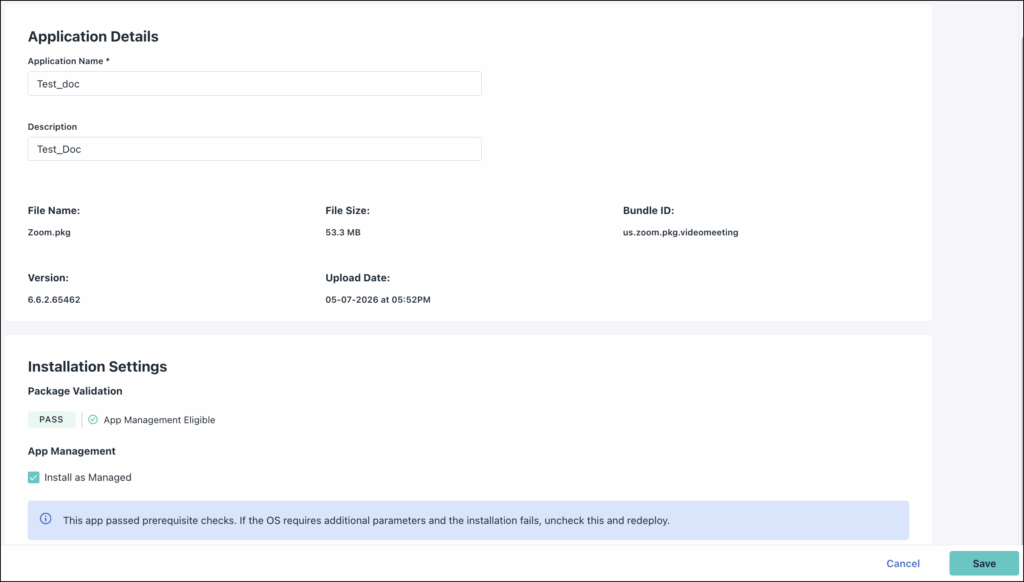
While uploading PKG files, the Installation Settings section is displayed after the file is processed. This section allows JumpCloud to take control of the custom application. If the uploaded PKG file meets validation requirements, the Install as Managed checkbox is selected by default and the status is displayed as PASS. This means that the installed app can be now managed by JumpCloud. And when the MDM profile is removed, the app is automatically deleted.
If validation requirements are not met, the status is displayed as FAIL and the Install as Managed checkbox is deselected by default.
For existing PKG files, the status is displayed as UNKNOWN, requiring you to manually select the Install as Managed checkbox.
If you want to run package validation for existing applications, you can create a new software application in JumpCloud and re-upload the file. Package validation only runs on upload so existing applications require this step.
Resolving Upload or Validation Failures
Upload Failures
When a software upload fails, a message appears on the Details tab: "The file upload failed. Please delete this instance and try again." To proceed, click Delete to remove the application instance and follow the upload process again.
Validation Failures
![]()
Failed validation is only displayed by clicking in to the application details from the Software Management list.
When a package upload can't be validated, a message appears in the Details tab of the newly created application. To proceed, click Delete to remove the application instance and start the upload process again.
This error may indicate that the file has not been digitally signed by the vendor of the application. Contact the vendor for a digitally signed file.
To check the digital signature:
- Right-click on the .msi file, then click Properties > Digital Signatures. If the file is signed, you should see the name of the signer. Click Details to view more information about the certificate:
- Check the certificate details to ensure that it was issued by a trusted Certificate Authority (CA).
- Verify that the certificate has not expired. If the certificate has expired, it may indicate that the .msi package is not trustworthy.
- Ensure that the publisher information matches the expected publisher of the .msi package. If the publisher information is unfamiliar or does not match, the package may not be valid.
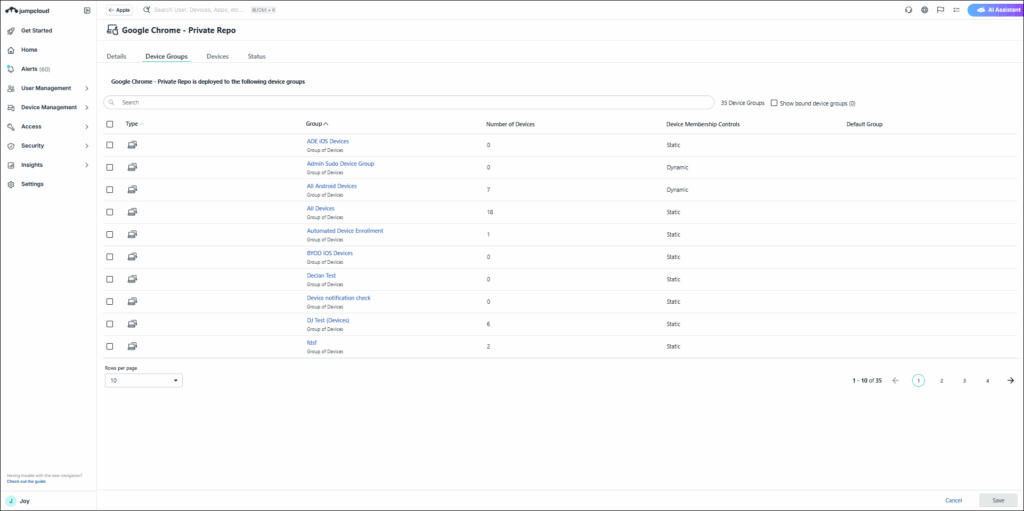
Binding and Installing Applications on Devices or Device Groups
![]()
If you are adding a new managed software application, you have the option to bind and install the application directly after uploading it.
- In the JumpCloud Admin Portal, go to Device Management > Software Management.
- Choose the appropriate OS tab and find the application you want to bind or unbind.
- Click to open the managed application details.
- To install on individual devices, go to the Devices tab, select the devices where you want to install the software.
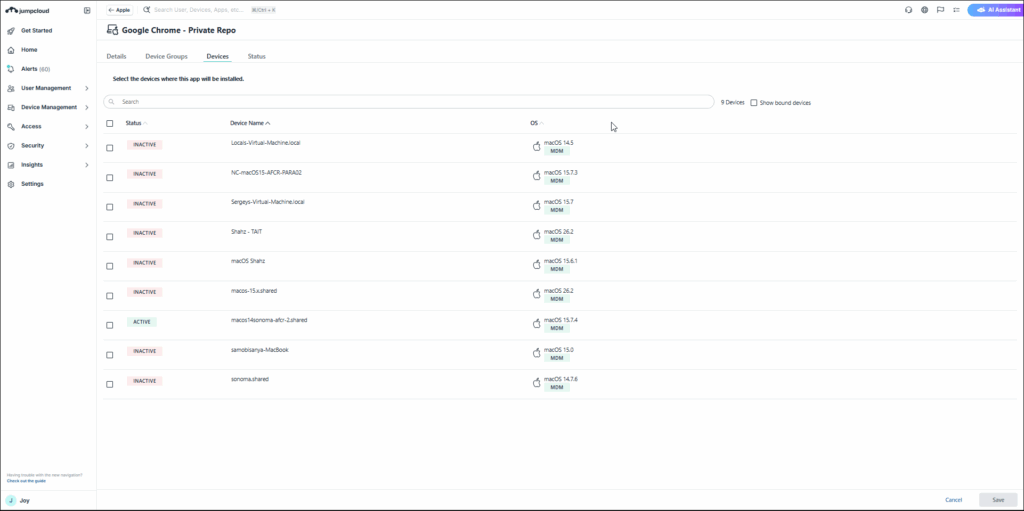
- To install for groups of devices, click the Device Groups tab and select the device groups where you want to install the application. The application will be installed on all devices within the group with an eligible OS for that application type.
- To unbind device groups, select Show bound device groups to see the groups where the application is currently bound, then clear the selection next to groups you want to unbind. Unbinding software from a device group will remove bindings for all devices within the group.
- Unbinding a managed software instance from devices and/or device groups does not uninstall the application from those devices.
![]()
If the device group has dynamic membership controls, be aware that devices will be added and/or removed in the future based on the rule-based attributes of the group. See Configure Dynamic Device Groups for more information. Further, it is not possible to remove individual bound device(s) from a dynamic group within Software Management, as the device will be re-enrolled into the device group if it still meets the rule-based attributes associated with the group. You will need to unbind the device from the dynamic group under Device Groups first.
- When you are finished selecting the devices and device groups where you want the application to be installed, click Save.
- A Manage software associations confirmation appears. Select I understand this can't be undone and then click Install.
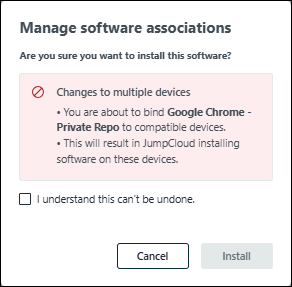
- A success message indicates whether the installation was successful.
- MSI packages are downloaded to C:\Windows\System32\config\systemprofile\AppData\Local\mdm and installed on the device at C:\Program Files\.
Viewing the Status of Managed Software
- From the managed application details screen, click the Status tab to see the status of the application, including all devices where the application is bound, and the installation status.
- For Windows devices:
- Install Failed: Installation failed on the device. Action is required.
- Click Retry to initiate a retry installation on a single device.
- Install Success: Installation succeeded and the application is now managed by JumpCloud on the device. No action is required.
- Install Pending: Installation is in progress on the device. No action is currently required.
- Install Failed: Installation failed on the device. Action is required.
- For Apple devices:
- Command Failed: Installation failed on the device. Action is required.
- Click Retry to initiate a retry installation on a single device.
- Command Sent: The install command was sent successfully, but we cannot confirm the device has installed the application.
- Install Pending: Installation is in progress on the device. No action is currently required.
- Command Failed: Installation failed on the device. Action is required.
- For Windows devices:
- Click View to see installation results specific to the individual device, including versioning information for the application and expanded status details.
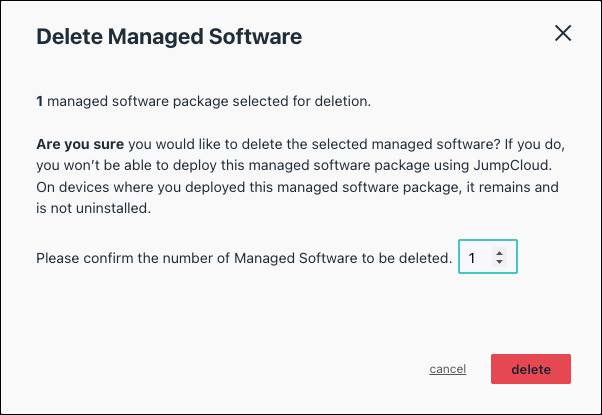
Deleting Managed Software Configurations
![]()
Deleting a managed software instance from devices and/or device groups does not uninstall the application from those devices.
To delete managed software:
- In the Admin Portal, go to Device Management > Software Management.
- Choose the appropriate OS tab and select the application you want to delete.
- Go to Actions > Delete. A confirmation modal appears.
- For managed Apple software packages, if you’re removing more than one app, enter the total number of app packages to be deleted.
- Click Delete App(s).

- For managed Windows software packages, click delete.

- The application is no longer managed by JumpCloud. Note this does not uninstall the application from any bound devices.

Troubleshooting
Cause:
The install could fail for many reasons, such as:
- Installer is not compatible with Windows version
- Application is already installed at a greater version and a downgrade is not allowed
- Another application install is in progress or stuck
- Network connectivity issue
Resolution:
Some failures can recover with a retry, but some will not. Microsoft MDM cannot distinguish between the failures by the status Windows sends, so it continues to retry. Windows will try to install apps three times before sending a failure status to Microsoft MDM. After this status is sent, Microsoft MDM will send a failed status to the relevant devices and schedule the application install to retry in 24 hours.
A hosted Windows application may appear to install successfully in the Admin Portal, but the application isn't present on the user's device. This can occur with applications that install directly to a user's local profile, as MDM commands run as the System user account.
When the installation runs, the application is installed to the System user's profile:
C:\Windows\System32\config\systemprofile\AppData
The application's final location can vary, but most will install to the AppData\Local folder within the relevant user profile.
Symptoms
A software application assigned to a device receives a successful installation message, but after inspecting the device, the application is not present in the user's profile or installed programs list.
Resolution
Since MDM commands do not currently support installation in the user context, a workaround is to use a JumpCloud command to install the application:
- Use the Run as User command template to install the application in the end user's context.
- See Creating a Command from a Template to learn how to create the command.
- The end user may need temporary elevated privileges (e.g., local administrator rights) to install the software.