
![]()
JumpCloud Protect® is designed to operate on Android 8 and iOS 13 and higher. It may operate on older versions, but they aren't supported by JumpCloud.
Users on iOS 14 and iOS 15 can continue to use the JumpCloud Protect app without interruption. While the app remains functional, users with these OS versions will no longer receive new updates, security patches, or feature enhancements. We recommend upgrading to iOS 16 or later to ensure you have the latest capabilities and security.
JumpCloud Protect is a mobile app for iOS and Android that can be used for Multi-Factor Authentication (MFA) or 2-step verification. Once the app is downloaded, and the device is enrolled, the app can be used for push notifications or as an authenticator (TOTP).
The app can be downloaded from the iOS App Store or the Google Play Store. After you've downloaded the app and successfully enrolled your device, you can authenticate using Push MFA or Verification (TOTP) Code MFA, see MFA Guide for Admins to learn more.
JumpCloud Protect sends a push notification to your enrolled mobile device after you’ve attempted to access a resource with your username and password.
Prerequisite:
- Your Admin has to enable JumpCloud Protect in order for you to download it.
Considerations:
- The JumpCloud Protect app supports iOS version 13 and above, Android 8.0 and above.
- The JumpCloud Protect app may run on a tablet, but isn’t optimized for tablets at this time.
- A user can only be enrolled in JumpCloud Protect on one device.
- Mobile Push is supported for authentication into the User Portal, SAML SSO apps, device logins, and for Password Reset.
- JumpCloud Protect will collect certain diagnostic data for troubleshooting issues and continuous app improvements. No user info is collected. These options are toggled On by default, users can turn off the data collection on the app.
- To do this, tap More > Settings to display options for toggling off Share Diagnostic Data.
![]()
This help article provides info for JumpCloud users. For Admins looking to set up the JumpCloud Protect app for their users, see JumpCloud Protect Admin Guide to learn more.
Workflow:
- You'll receive the login request on the lock screen of your device, and can approve/deny with a long press (iOS) or by expanding the notification (Android).
- If your Admin requires biometric authentication, the login request won't complete without it (Face ID, fingerprint, or passcode).
- When you approve the login request, you gain access to your resource. If you tap deny, the login request is declined, which prevents bad actors from accessing your account.
![]()
A push notification is valid for 60 seconds before the User Portal gets timed out in which case the user needs to initiate the push notification process again. If the user responds to an expired push notification on the device, an error appears.
You can use JumpCloud to log into the Admin Portal, User Portal, or into your Windows, Mac, or Linux devices.
Protecting Against Push Bombing and MFA Fatigue Attacks
Push Bombing is a hacking method of triggering multiple 2FA attempts using push notifications until the user may accept the request accidentally. MFA fatigue is the term for when, due to the multiple 2FA requests, a user accepts the fraudulent request out of frustration.
To protect yourself against these types of attacks:
- Make sure you're following a strong password policy.
- Enable biometric authentication on your device and ask your Admin to enable it for JumpCloud Protect.
- Verify the app and location info before approving a push request.
![]()
JumpCloud protects against fraudulent push attempts by blocking more than one notification per resource within a 60 second timeout period (the number of maximum concurrent attempts can be changed by an Admin). You can try again after the timeout or after you've approved or denied the initial request.

Setting Up JumpCloud Protect
If your org is using JumpCloud Protect for their MFA, you’ll need to complete the initial setup for it.
![]()
Guide Me: JumpCloud Protect User Enrollment

To set up the JumpCloud Protect app:
- Log in to your JumpCloud User Portal.
- Go to Security > MFA Configurations > JumpCloud Protect Mobile Push > Enroll Device.
![]()
When you log in to your User Portal, you may be prompted to activate MFA without going to the Security screen.
- Download the JumpCloud Protect App from the iOS App Store or the Google Play Store. You can do this in one of three ways:
- Search for "JumpCloud Protect" in the Google Play Store on Android devices or the App Store on iOS devices.
- Use the links provided on the notification screen to remotely download the app to your device.
- Click View QR Code to Launch Google Play Store or App Store to display a QR code that your phone’s camera can scan to display the link for downloading the app.
- Once the JumpCloud Protect app is downloaded, open it on your device.
- If introductory info displays, tap Next and then tap Get Started (or skip the messages).
- Click Allow for the app to send notifications to your device.
- Tap + Add Account.
![]()
JumpCloud Protect supports both Push MFA and TOTP MFA. However, you have to enroll in each form separately.
- You're prompted to give the app permission to use your phone’s camera, click Allow.
- You're directed to scan a QR code in your JumpCloud User Portal. Back in the User Portal, click I Have the App.
- Alternatively, you can click Enter Code Instead to view the account details and manually enter them in the JumpCloud Protect app.
- Scan the QR code in the JumpCloud Protect app.
- A green checkmark displays, indicating that the device has been verified. Click Done in both the JumpCloud Protect app and the User Portal.
![]()
If JumpCloud Protect isn't in the foreground when you complete this process, you'll receive a push notification. You have to click Approve for the process to complete.
![]()
Guide Me: JumpCloud Protect: User Enrollment and JumpCloud Protect: User Login
Transitioning to JumpCloud Protect from a Previous Authenticator
You can transition to JumpCloud Protect if you're already using a different authenticator to verify your identity through Verification Code (TOTP) MFA.
To transition to JumpCloud Protect from a different authenticator:
- Log in to your JumpCloud User Portal.
- Go to Security.
- Click Reset Authenticator App.
- On the next screen, enter the verification code from your current authenticator and click Clear Authenticator App Settings.
- A QR code is displayed. In the JumpCloud Protect app, tap the ( + ) button.
- Scan the QR Code.
- Enter the code, and click Submit.
Authenticating with JumpCloud Protect
If your org has enabled JumpCloud Protect for your account, and if you've enrolled your device, you'll receive a push notification on your device when you attempt to log in to a resource secured by your JumpCloud Admin. If Biometric User Verification is set to Required, the login request doesn't complete without it (Face ID, fingerprint, or passcode). Select Approve on your device to log in to the resource. Select Deny on your device if you're not the one who requested the notification.
![]()
It's a good security practice to check the app and location info before approving a push request, in case the request is fraudulent. Location info doesn't have 100% accuracy, especially at the city level. If you suspect a request is fraudulent, deny the request and notify your Admin.
Accepting Push Notifications on Smartwatches
You can also receive and respond to the JumpCloud Protect MFA push notifications on your Android, Apple, and other smartwatches.
The watch must be paired with a smartphone running the JumpCloud Protect app. The phone must be unlocked, and notifications must be enabled on the smartwatch.
![]()
If biometric verification is enabled by your Admin, the notification on the watch will prompt you to open the app on your phone. See Enabling JumpCloud Protect to learn more.
Resetting Your Password with JumpCloud Protect Push
To reset your password from the User Portal login screen:
- Go to the JumpCloud User Portal.
- Click Reset User Password.
- Enter your company email address and click Send Reset Request.
- Click the secure link that's been sent to the email address you entered.
- Enter your new password in both password fields and click Reset Password.
- Optional: If you only have one form of MFA enabled for your account, you'll proceed to the next step. If you have multiple, select JumpCloud Protect Mobile Push.
- Click Send Password Reset Request to Mobile Device.
- On your device, approve the request.
After you complete the authentication, your password is reset and you can log in.
Step-Up Authentication with JumpCloud Protect
You can use JumpCloud Protect as your Step-Up Authenticator as well. Step-Up Authentication is required when you’ve logged in to your User Portal and you need to access an app that requires an additional layer of security through a second authentication factor.
To log in to an application that requires Step-Up Authentication:
- Log in to your JumpCloud User Portal.
- Click the app you need to access.
- Select JumpCloud Protect from the list of available MFA options.
- When the request pushes to your mobile device, approve the request.
![]()
Denying the request logs you out of your JumpCloud User Portal. This is to keep bad actors from accessing your app and data.
After you approve your request, you have access to the app.
Using JumpCloud Protect’s TOTP for Other Applications
![]()
JumpCloud Protect supports both Push MFA and TOTP MFA. However, you have to enroll in each form separately.
When you open the JumpCloud Protect app, you see a list of the accounts you have set up for MFA. This list either shows the Verification Code for the account with a timer indicating when the code will expire, or that the account is registered for Push MFA.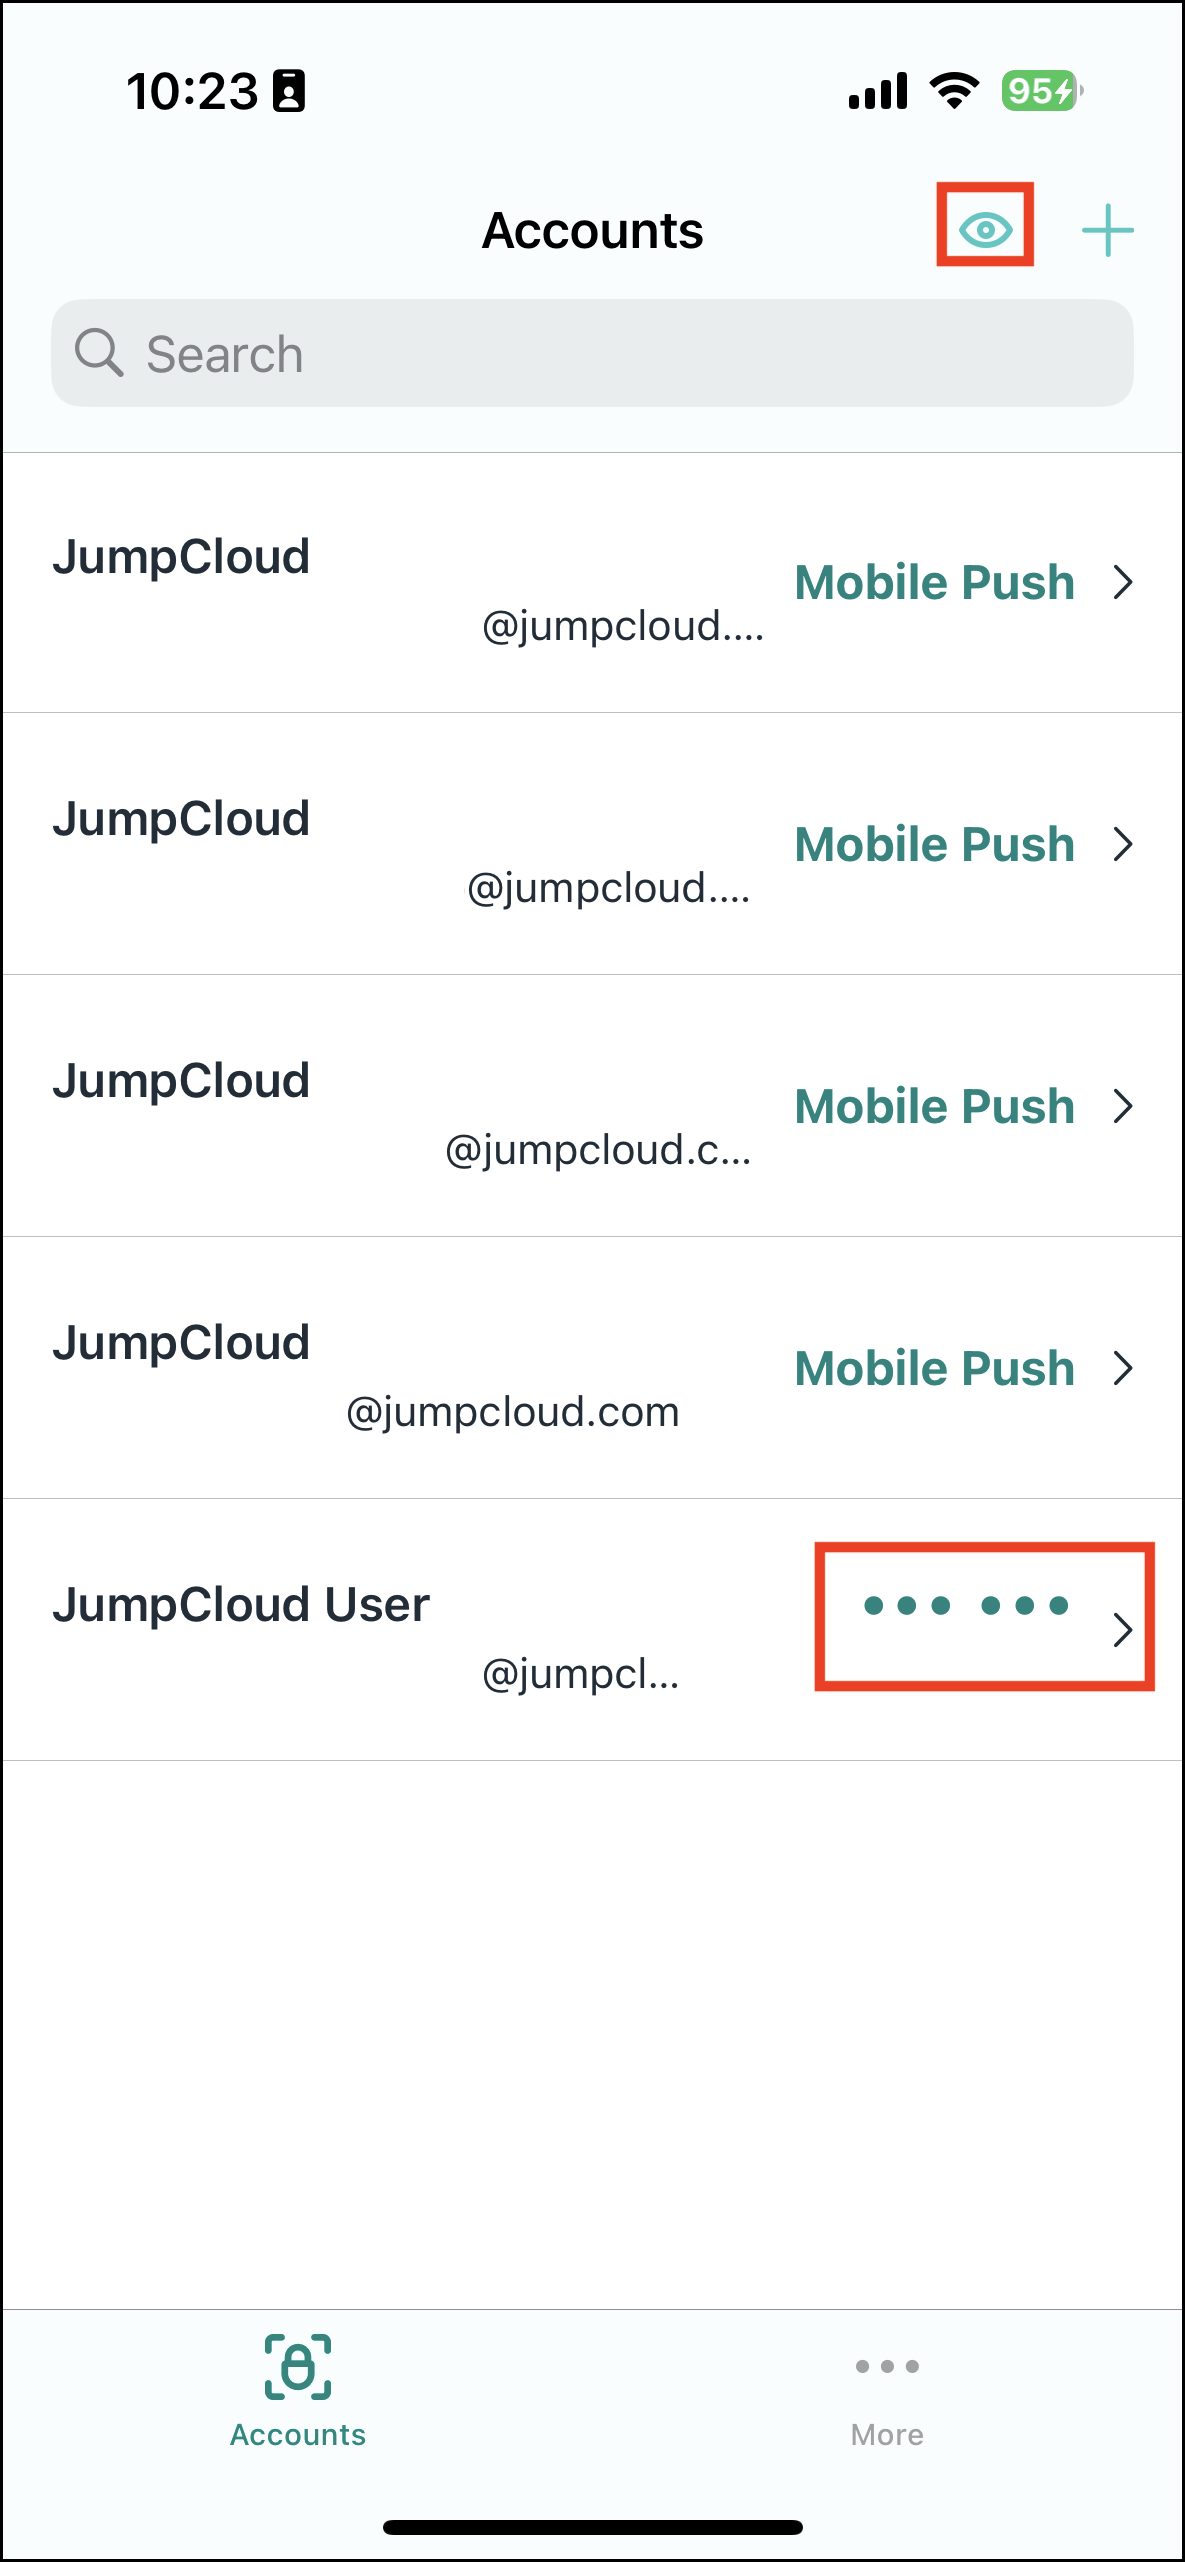
Tapping on the code itself will copy the code to the device’s clipboard. Tapping anywhere else opens the Account Details screen. You can click the eye symbol to show or hide the TOTP codes.
More Screen
At the bottom of the JumpCloud Protect screen, there is a More button. You can do a variety of things from here:
- Tap Settings to access Display and Privacy options.
- The links to How it Works, Troubleshooting Guide, Terms of Service, and the Privacy Policy open external links.
- Tap on the App Version or the Protect ID to copy those values to your clipboard.
Deleting an Account from JumpCloud Protect
If you no longer need one of the accounts you have set up with your JumpCloud Protect mobile app, you can delete it.
To delete an account:
- Open the JumpCloud Protect mobile app on your device.
- Tap the name of the account you want to delete. This opens the Account Details screen.
- Tap Delete Account.
- Tap Delete in the window that appears.
Additional Resources:
Knowledge Base: Troubleshoot: JumpCloud Protect