
A custom API integration can be used to import and update attributes that are not currently available to sync using the JumpCloud app in BambooHR, e.g., manager, alternate email, and employee type, to create more complete user profiles and use those attributes for access and permission control and automation.
The current BambooHR integration is configured in BambooHR using the JumpCloud app. It is a one-way sync. The employee data is sent from BambooHR to JumpCloud in real-time or on a configured schedule.
This integration is configured in JumpCloud can be used as a complement to an existing BambooHR SCIM integration or as a replacement
Prerequisites
- A JumpCloud administrator account
- JumpCloud SSO Package or higher or SSO à la carte option
- A BambooHR user account with full administrator permissions
Important Considerations
- The /custom-report endpoint generates a custom report and can manage the user lifecycle
- Configuring JumpCloud SSO for BambooHR is recommended, but not required:
- If you are using both SSO and provisioning, you can use the existing BambooHR connector
- If you are only using provisioning, you can create a new JumpCloud application connector
- On a user's last day, the status returned to JumpCloud in the custom report will be inactive at the start of the day. In BambooHR, the user will remain active until the end of the day
Configuring the BambooHR API Authentication
![]()
Per the Authentication section of the BambooHR Getting Started with the API, "the API key is sent over HTTP Basic Authentication. Use the secret key as the username and any random string for the password".
To generate the BambooHR API token
- Sign in to your BambooHR instance with administrator permissions.
- Click your user icon in the left bar navigation menu
- Click API Keys
- Click + Add New Key
- Enter a name for the API key in the API Key Name field and click Generate Key.
- Click COPY KEY to copy the key to your clipboard.
- Click Done.
![]()
Copy the API Key to a secure location, like the JumpCloud Password Manager, for future reference.
To encode the BambooHR credentials
- Access the API Key.
- You will need to encode a string that consists of <BambooHR API key>:<random string with 1 or more characters>
- Example: 1208934bba29wa123492879873:x
- Use a tool or commands to base64 encode the credentials:
- Command in a mac terminal:
base64 <<< 1208934bba29wa123492879873:x
- Command in a mac terminal:
- Securely store the encoded credentials, like in the JumpCloud Password Manager.
Configuring the Integration
To create a custom report in BambooHR
Create a custom report in BambooHR with the attributes you want for the integration, including status and supervisor email. You will need the report id found in the URL shown when viewing the report in BambooHR.
- Log in to BambooHR.
- Click the Reports tab from the top navigation bar.
- Click New Custom Reports.
![]()
If you skip this step, a legacy report will be created.
- Click the +New Report and then the pencil icon to enter a name.
- Add the attributes you want to sync to JumpCloud:
- Work email is required. Not including it will result in the user import failing.
- Include status to manage the user lifecyle in JumpCloud.
- Include supervisor email to assign the manager in JumpCloud.
- Include EEID or the accounts cannot be mapped.
- Under Filters, for status select all to include both active and inactive records.
- Click Save.
- Note the id from the URL once the report loads.
To configure the Custom API integration in JumpCloud
To learn more about the JumpCloud Custom API integration connector, see Import Users with a Custom API Integration.
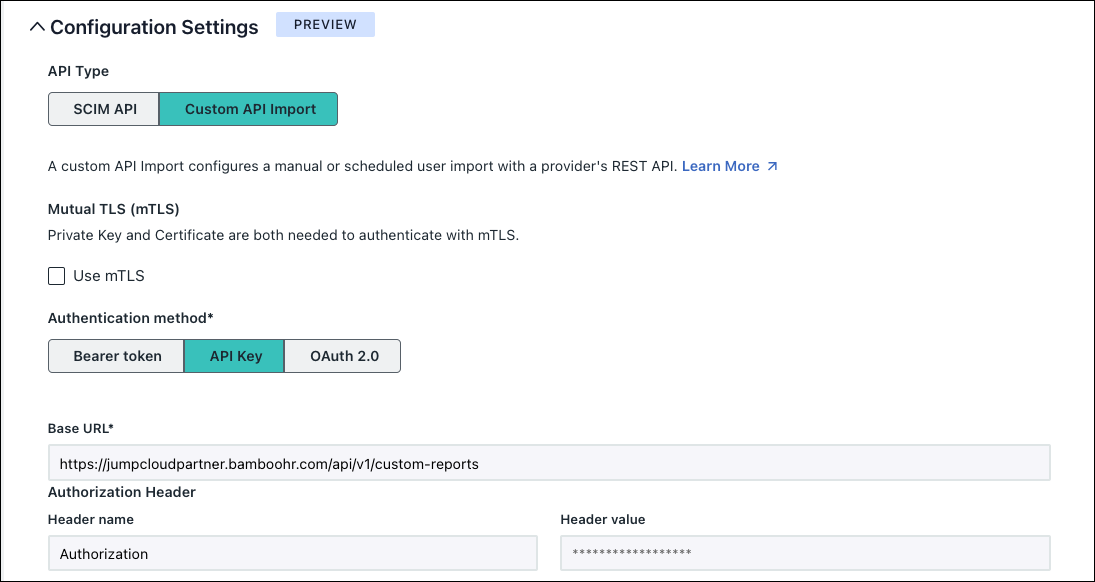
- From the Identity Management tab of your BambooHR application connector (either prebuilt or custom), select or enter the following under Service Provider Configuration:
- API Type - Custom API Import
- Authentication method - API key
- Base URL - https://{companyDomain}.bamboohr.com/api/v1/custom-reports
- Header name - Authorization
- Header value - Basic <base64 encoded credentials>
- Example: Basic Ym2aWILcluwej4xou28==
![]()
To configure the pagination option in the next step, a feature flag needs to be enabled. Contact support to have this feature activated for your account.
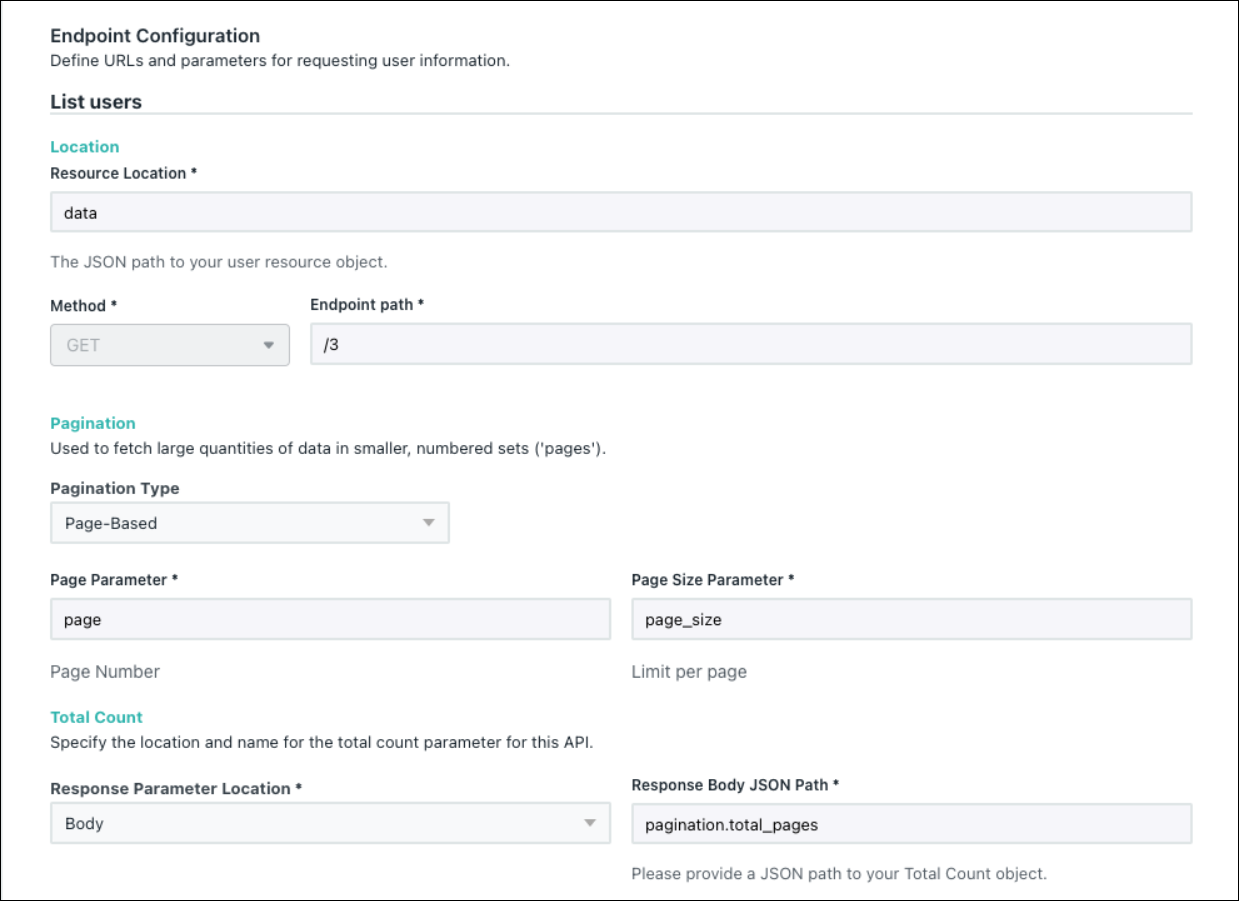
- Select or enter the following in the Endpoint Configuration section:
- Resource Location - data
- Endpoint path - /<report id from URL in BambooHR>
- Pagination:
- Pagination Type - Page-Based
- Page parameter - page
- Page size parameter - page_size
- Pagination Type - Page-Based
- Total Count
- Response Parameter Location - Body
- Response Body JSON Path - pagination.total_pages
- Click Test Connection to verify the credentials and configuration.
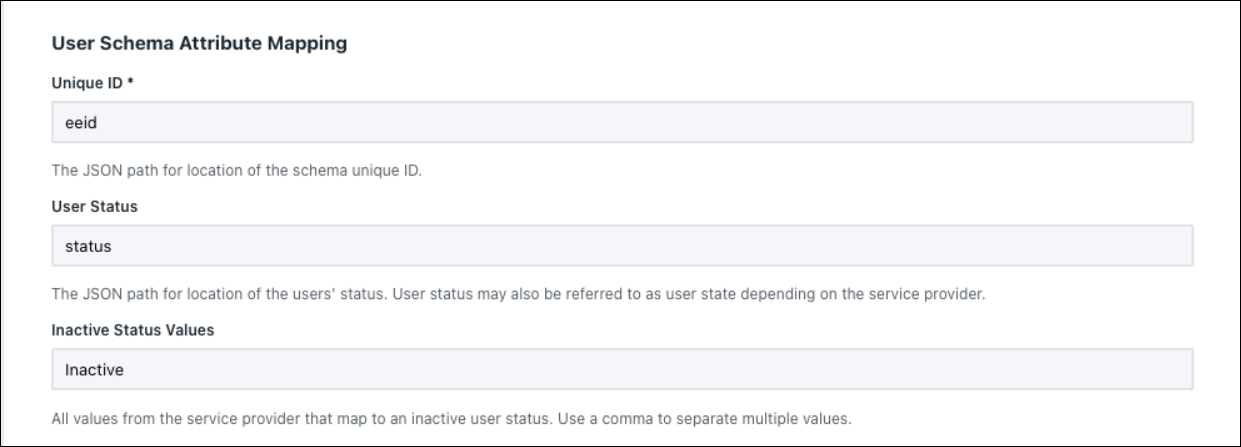
- If successful, enter the following in the User Schema Attribute Mapping section:
- Unique ID - eeid
- User Status - status
![]()
You must include this value in your report if you want to manage the lifecycle and avoid creating inactive users.
- Inactive Status Values - Inactive
![]()
This value is case sensitive, so the “I” must be capitalized.
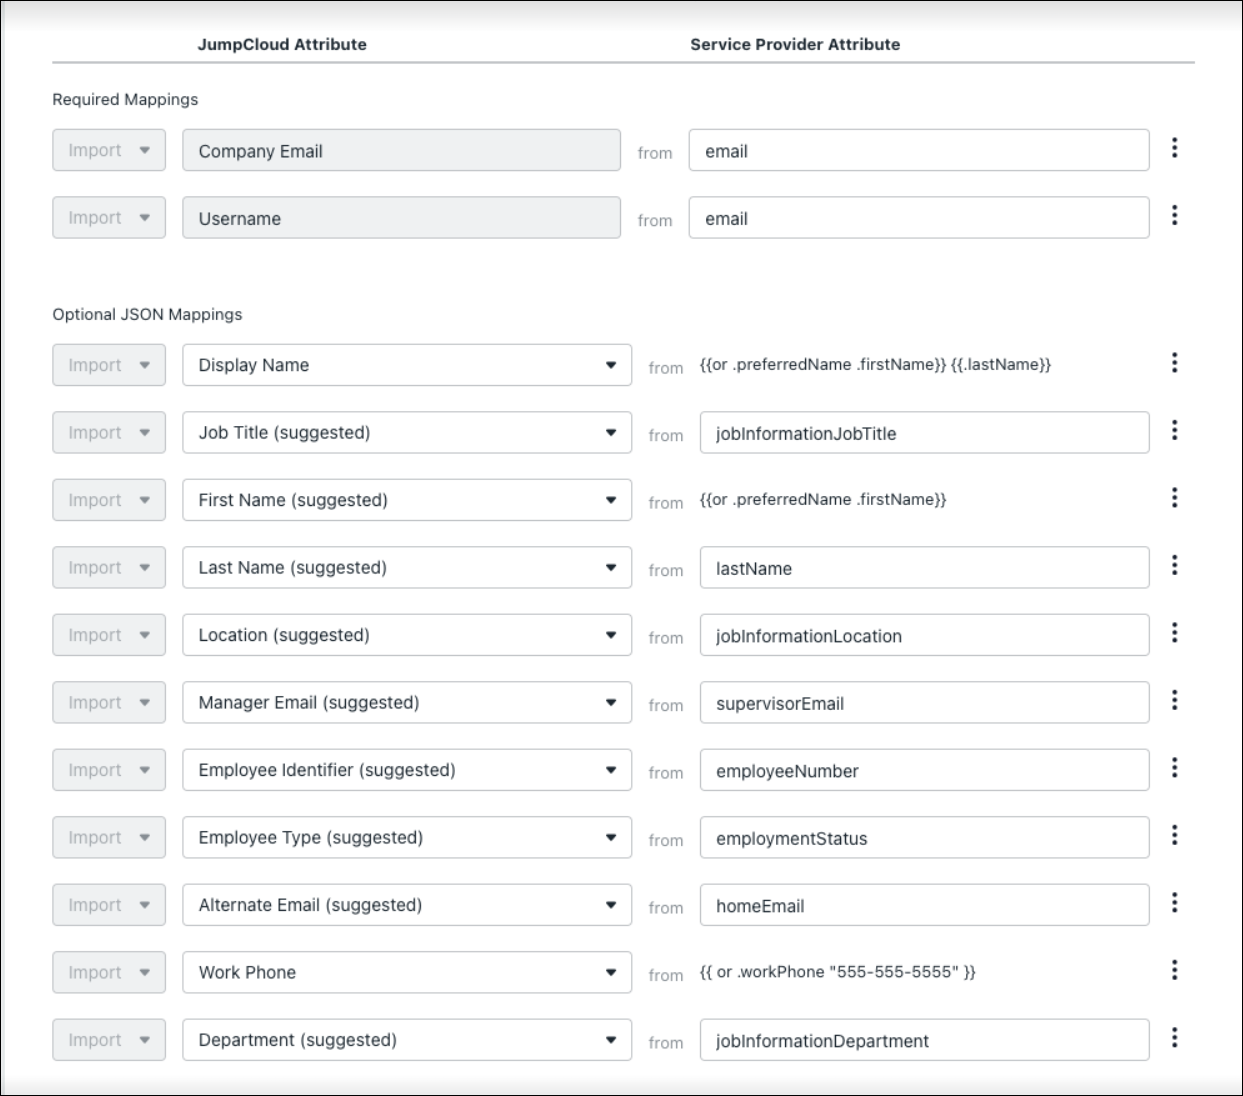
- Complete all required and desired optional mappings.
![]()
If this integration is specifically for populating manager, the only Optional JSON Mappings that should be included is Manager Email. All others can be deleted.
- Click Preview Mappings.
![]()
Do not click Save before clicking Activate in the next step. You will lose all of your configuration settings.
- If the attributes are mapping correctly, click Activate.
- If successful, you will receive a message saying the Identity Management has been successfully verified.
- Perform your initial manual import.
- If the initial import is correct, enable a scheduled sync.
Using Expressions
Some expressions that may be useful are:
Preferred Name
Syncs preferred name if it is populated in BambooHR. If it isn’t populated, it syncs the user’s legal first name.
{{or .preferredName .firstName}}
Display Name
Creates a display name that uses the user’s preferred name, if it is populated, as the first name and the last name. If preferred name is not populated, the display name will be the user’s legal first and last name.
{{or .preferredName .firstName}} {{.lastName}}
See Use Expressions with Identity Management for more information.