
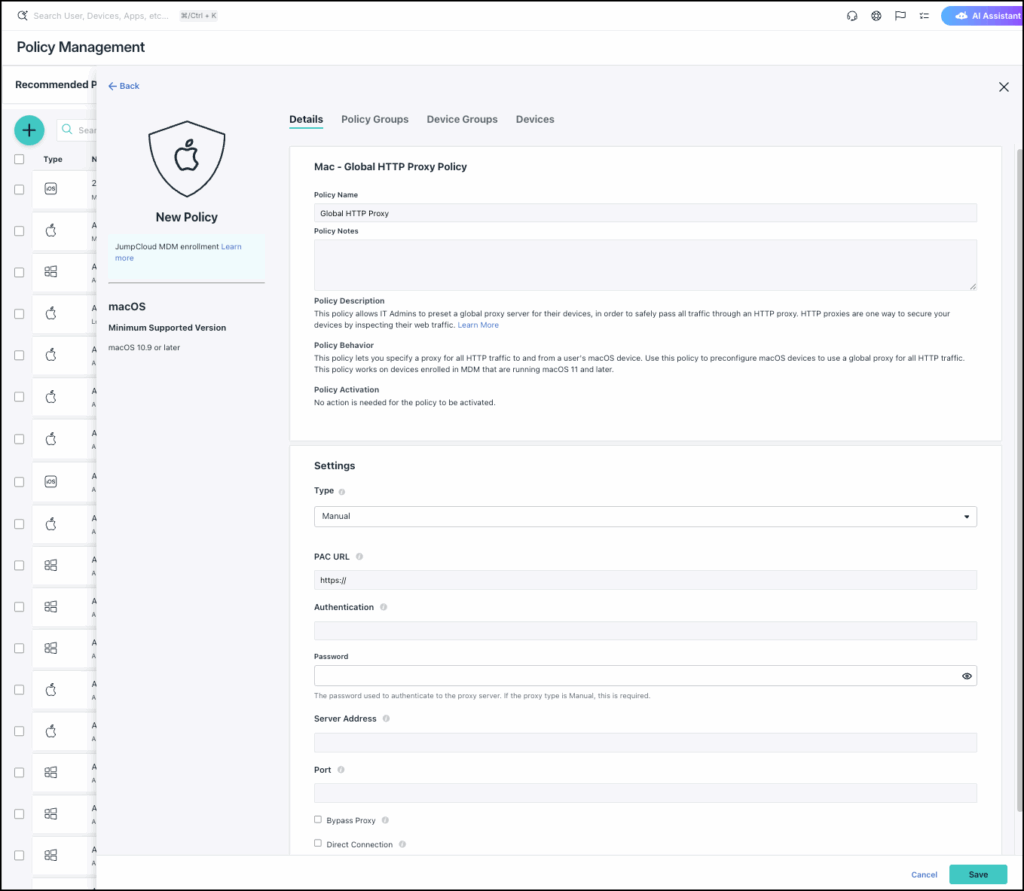
This policy lets IT Admins preconfigure a global proxy server for macOS and iOS devices, in order to safely pass all traffic through an HTTP proxy set by this policy. HTTP proxies are used to secure users’ devices by inspecting their web traffic.
JumpCloud provides these policies to specify a proxy for all HTTP traffic to and from a user’s device:
- Mac Global HTTP Proxy - For macOS devices enrolled in MDM running macOS 11 and later.
- iOS Global HTTP Proxy - For iOS devices enrolled in MDM running iOS 13 and later.
To create a Global HTTP Proxy policy for Mac or iOS:
- Log in to the Admin Portal: https://console.jumpcloud.com/login.
![]()
If your data is stored outside of the US, check which login URL you should be using depending on your region. If your organization uses LDAP, RADIUS, or requires firewall allow list configuration, the Fully Qualified Domain Names (FQDNs) will also be region specific. See JumpCloud Data Centers for the URLs, FQDNs, and IP addresses.
- Go to Device Management > Policy Management.
- In the All tab, click (+).
- On the New Policy panel, select the Mac or iOS tab.
- Select Global HTTP Proxy from the list, then click configure.
- (Optional) In the Policy Name field, enter a new name for the policy or keep the default. Policy names must be unique.
- (Optional) In the Policy Notes field, enter details like when you created the policy, where you tested it, and where you deployed it.
- Under Type, choose one of these types:
- Manual - If a proxy requires manual configuration, including server name, server port, or authentication, choose Manual. A manual proxy’s profile contains the proxy server address, server port, and optionally a user name and password. Manual is the default.
- Auto - Connect automatically to the destination through a proxy auto configuration (PAC) file. The PAC file is a JavaScript file that determines how web browser requests are handled.
- If you chose Automatic in Step 6, complete these fields:
- For PAC URL, enter the URL for the PAC file that defines the proxy configuration. Only URLs that begin with http:// or https:// are allowed. For example, https://CentralProxy.com. This is not required for a Manual Proxy type.
- For Port, enter the proxy server’s port number. For example, 80. This is not required for a Manual Proxy type.
- If you chose Manual in Step 6, complete these fields:
- For Authentication, enter the user name to authenticate to the proxy server. For example, CentralProxy. This is not required for an Automatic HTTP Proxy type, unless access to your PAC file is protected by HTTP-Basic Authentication.
- For Password, enter the password to authenticate to the proxy server. This is not required for an Automatic HTTP Proxy type.
- For Server Address, enter the proxy server’s network address.
- Select Bypass Proxy to bypass the proxy server so that users can display the login page for captive networks.
- Select Direct Connection to connect directly to the captive network if the proxy PAC file is unreachable.
- (Optional) Select the Device Groups tab. Select one or more device groups where you'll apply this policy. For device groups with multiple OS member types, the policy is applied only to the supported OS.
- (Optional) Select the Devices tab. Select one or more devices where you'll apply this policy.
![]()
For this policy to take effect, you must specify a device or a device group in Step 12 or Step 13.
- Click save.
- If prompted, click save again.