
JumpCloud provides two iOS policies to manage the software apps that appear on supervised iOS and iPadOS devices.
These policies let you block Apple apps and third-party apps, which removes the app shortcuts from the device’s home screen:
- Blocked Apple Apps Policy - Hide apps that are included by Apple by default on supervised iOS and iPadOS devices.
- Blocked Custom Apps Policy - Hide custom or third-party apps on supervised iOS and iPadOS devices.
These iOS policies work on all JumpCloud iOS and iPadOS supported operating systems on devices that are enrolled in MDM.
To create an iOS Blocked Apple Apps or Blocked Custom Apps Policy:
- Log in to the JumpCloud Admin Portal.
![]()
If your data is stored outside of the US, check which login URL you should be using depending on your region. If your organization uses LDAP, RADIUS, or requires firewall allow list configuration, the Fully Qualified Domain Names (FQDNs) will also be region specific. See JumpCloud Data Centers for the URLs, FQDNs, and IP addresses.
- Go to Device Management > Policy Management.
- In the All tab, click (+).
- On the New Policy panel, select the iOS tab.
- Select the Blocked Apple Apps policy or the Blocked Custom Apps policy from the list, then click configure.
- (Optional) Enter a new name for the policy or keep the default. Policy names must be unique.
- For Policy Notes, enter details like when you created the policy, where you tested it, and where you deployed it.
- To configure the Blocked Apple Apps Policy, select the specific Apple apps you want to block on your supervised iOS devices. Any selected app from the list will be hidden from the user’s home screens, and will not be launchable, even if they are searched for in the App Store. These apps are not removed from the device, as they are part of the operating system.
- To configure the Blocked Custom Apps Policy, click Add App Bundle ID and enter the app's unique identifier on your iOS device to block that app on your supervised iOS devices. For example, to block the Contacts app, enter com.apple.MobileAddressBook. See this list of Bundle IDs for native iPhone and iPadOS apps. For non-native apps, jump to Locating the Bundle ID.
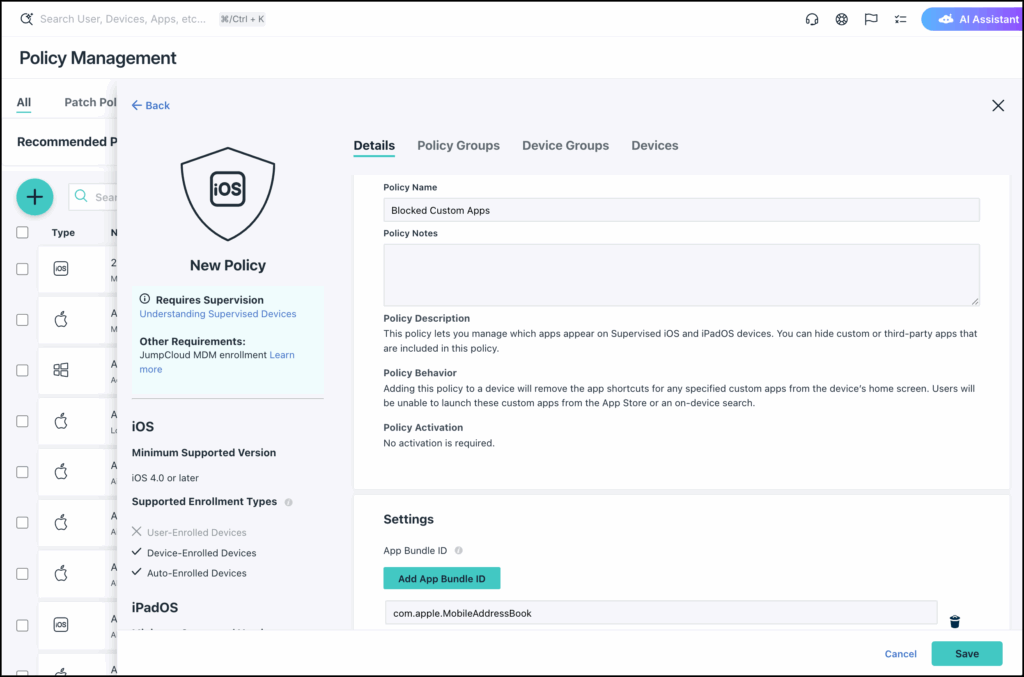
- (Optional) Select the Device Groups tab. Select one or more device groups where you'll apply this policy. For device groups with multiple OS member types, the policy is applied only to the supported OS.
- (Optional) Select the Devices tab. Select one or more devices where you'll apply this policy.
![]()
For this policy to take effect, you must specify a device or a device group.
- Click save.
Locating the Bundle ID
To use the Blocked Custom Apps Policy, you'll need the Bundle ID for any non-native iOS and iPadOS apps you wish to add.
![]()
This process is applicable only to iOS and iPadOS applications. For macOS apps, see Create a Mac Application Privacy Preferences Policy.
To locate the app Bundle ID:
- In your browser, go to the Apple App Store.
- In the top right, click the search icon and search for the app. In the list of results, locate the app and select it.
- The App Store Preview page displays. Copy the id number at the end of the page URL.
- For example, the URL for the JumpCloud Protect app is: https://apps.apple.com/us/app/jumpcloud-protect/id1566884733. The ID is
1566884733.
- For example, the URL for the JumpCloud Protect app is: https://apps.apple.com/us/app/jumpcloud-protect/id1566884733. The ID is
- Perform a lookup using the following URL. Replace PUT_ID_HERE with the app ID collected in step 3: https://itunes.apple.com/lookup?id=PUT_ID_HERE.
- For example, the lookup URL for JumpCloud Protect is: https://itunes.apple.com/lookup?id=1566884733.
- Enter the generated URL in your browser to download a .txt file to your device.
- Open the downloaded .txt file and search for the
bundleId. - Copy the value without the quotes and paste it into the App Bundle ID field of the policy settings in the Admin Portal.